Overview
Before moving into each topic we would like to give our new users a taste of How to model a process with Bizagi Modeler.
To do so, we will take you through a step by step guide to diagram a common process: the Purchase Request.
Before you start
It is necessary to have Bizagi Modeler installed before starting this guide.
What you need to do
This is a guide on how to use the tool to model and document your processes. We encourage you to review in detail each step and to click the links in each section for more information.
•Understand your process: Purchase Request.
Understand your process: Purchase Request
When modeling a process it is important to understand the steps it goes through, the routing, the inputs and outputs.
The Purchase Request process formalizes the acquisition of goods and services. Although the process can change substantially from one company to another, it is a good place to start modeling the company processes.

|
|
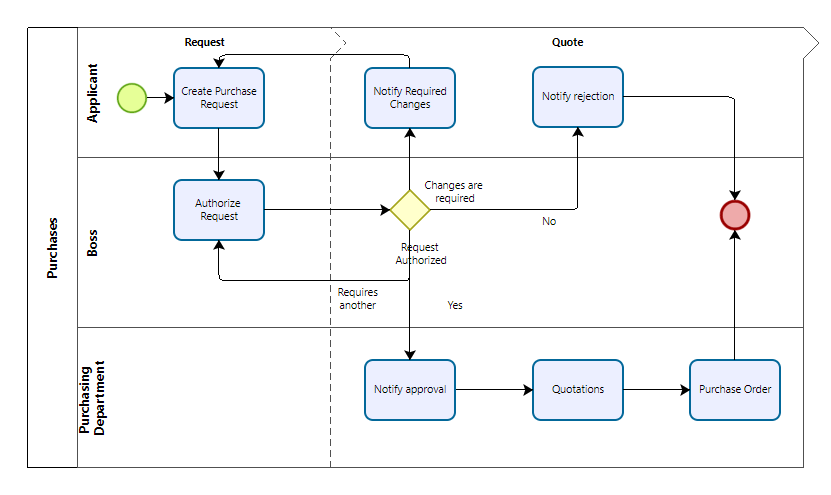
The Purchase request process begins with the identification of products or services needed by the applicant. According to the price of the request, it needs approval from their boss. The boss may approve the request, request changes, or reject it.
If the request is approved, the process evaluates if the boss has the level of authority to approve the amount. If the boss does not, the request is escalated to his/her boss, and so on.
Once the request has been approved, quotations are requested by the Purchasing department, to have the appropriate number of potential suppliers. Quotations are selected according to the delivery date, price, and quality.
The Purchasing department selects a supplier and generates a Purchase Order that is sent to the selected supplier and saved in the company´s ERP.
Process Modeling
To model the Purchase Request process, open Bizagi Modeler desktop application. The first thing you see in a new model is a diagram with an empty pool:
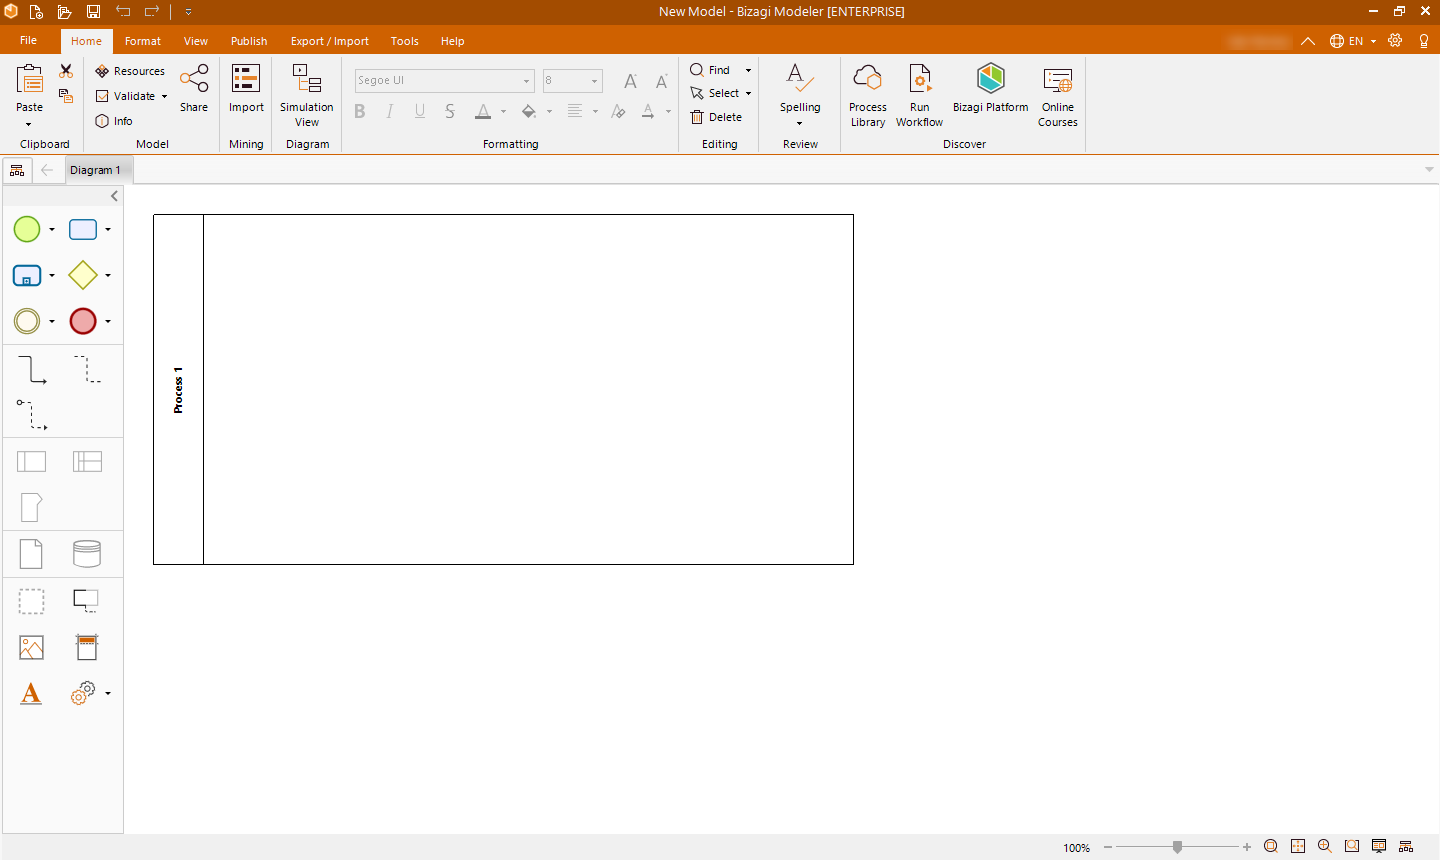
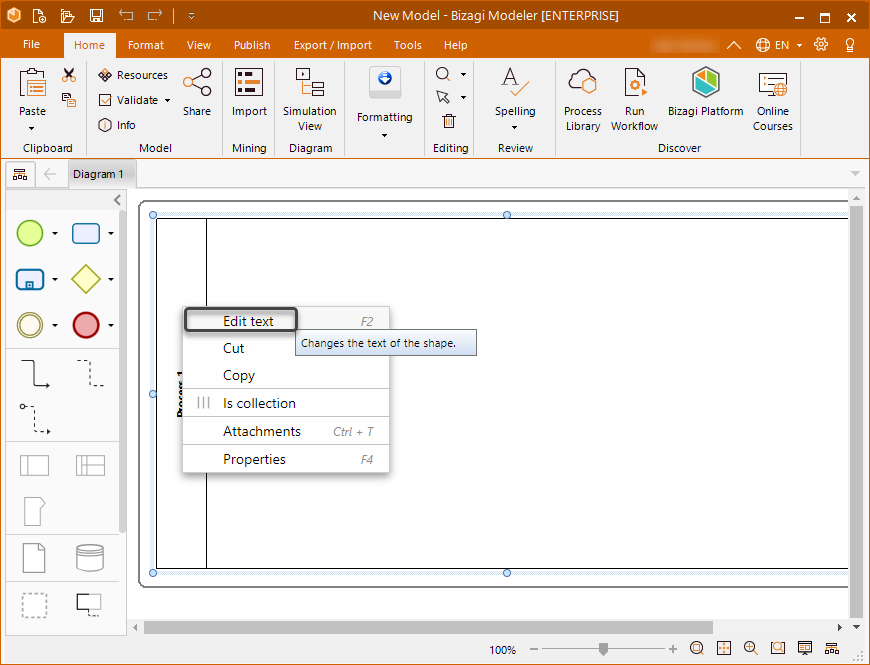
As a good practice, the pool has the same name as the process, to change the name of any element double-click it, press F2, or right-click it and select Edit text from the display menu.
Now before adding shapes to the diagram, identify the main roles (or resources) related to the process.
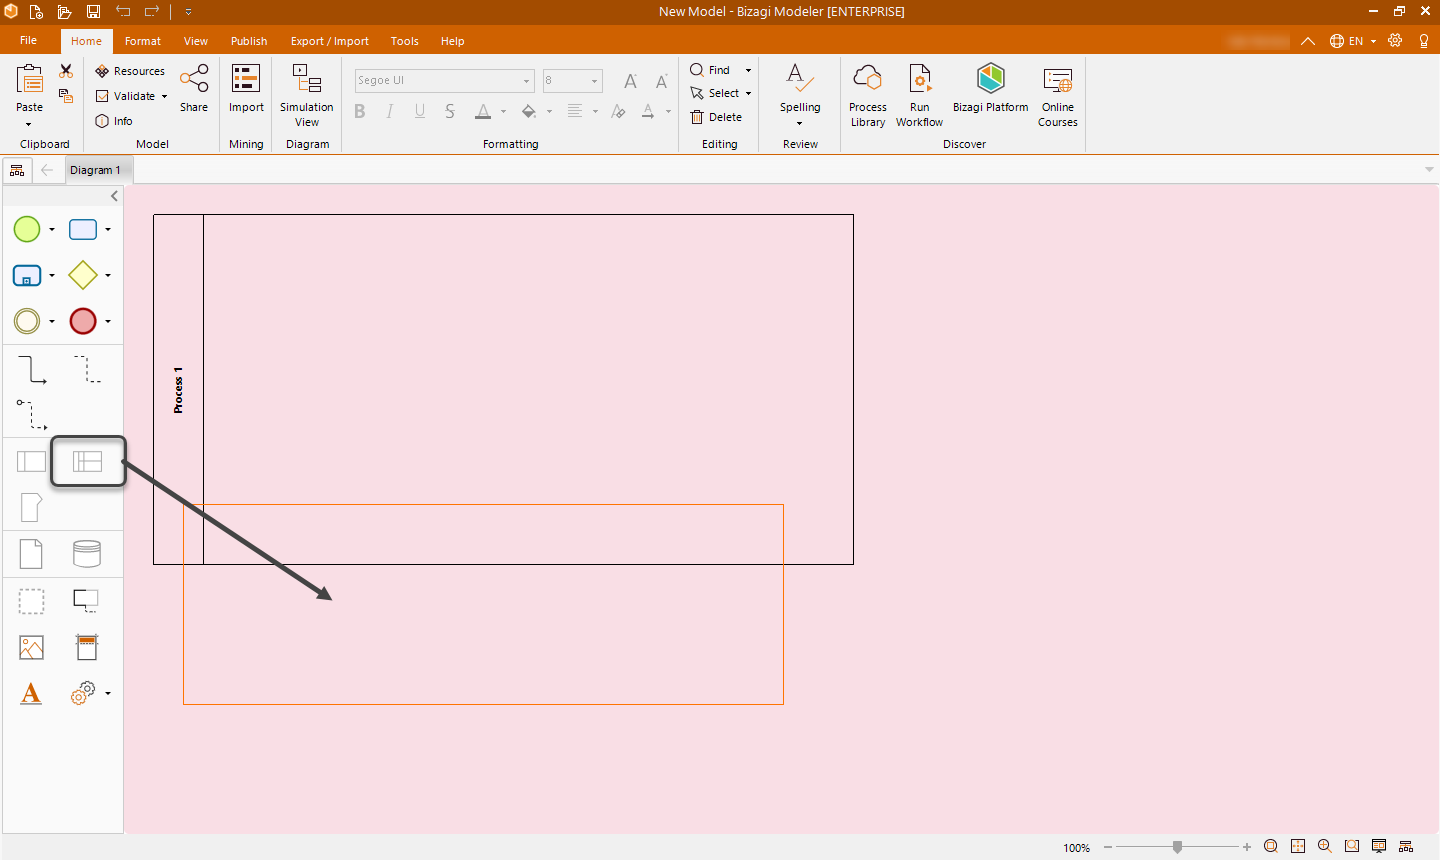
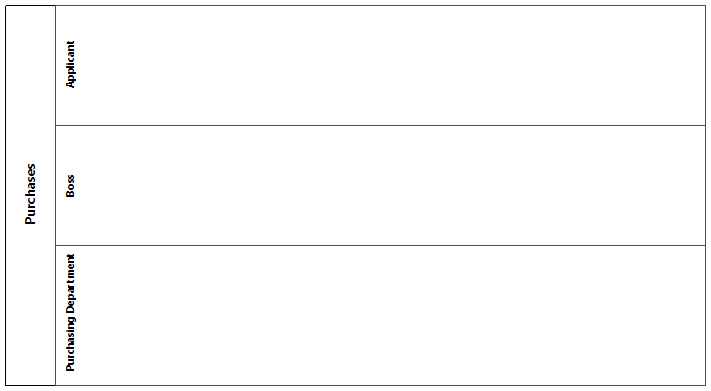
In this case, there are 3 participants: the applicant, the boss, and the purchasing department. Each participant is represented by a lane. Therefore, you should add 3 lanes in the pool with their respective names.
To add any element to the diagram you can drag a drop them from the Palette on the left. Drag and drop the lanes in the pool and name them as explained before.
Then, add the shapes to the diagram.
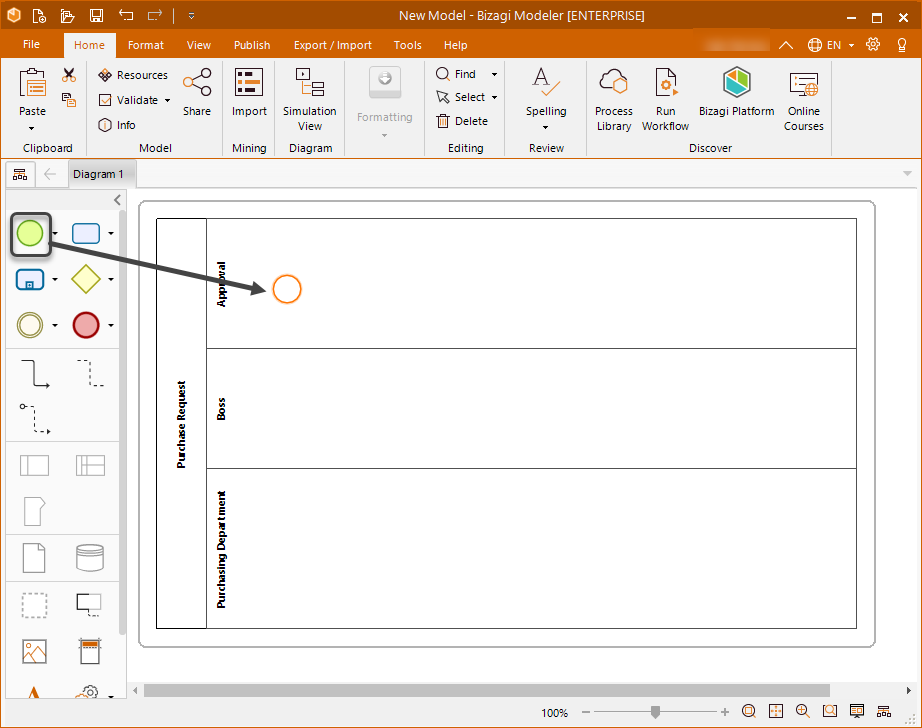
All processes must have a Start event from which the process begins. Drag and drop the Start event into the lane of the participant that starts the process, in this case, the Applicant:
The next step is the first task: Create Purchase Request. To create the task you have two options:
•Drag and drop the task shape and connect the start event to it.
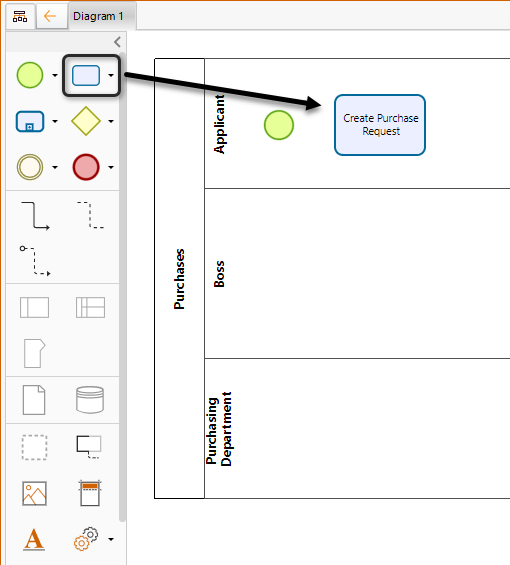

•Use the Pie Menu displayed from the start event, with this option the task is automatically connected to the start event:

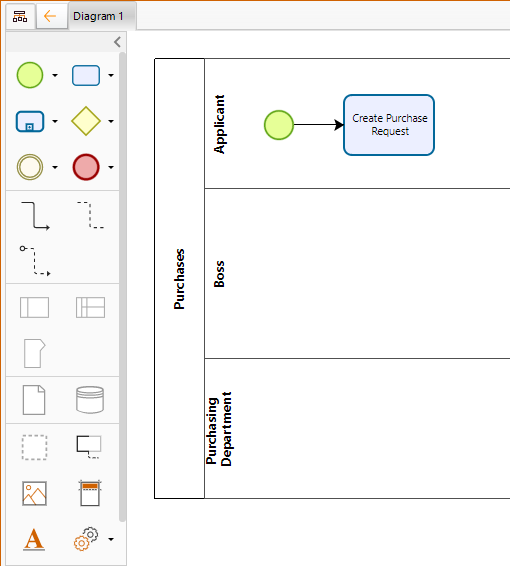
Repeat this to create the Authorize Request task.
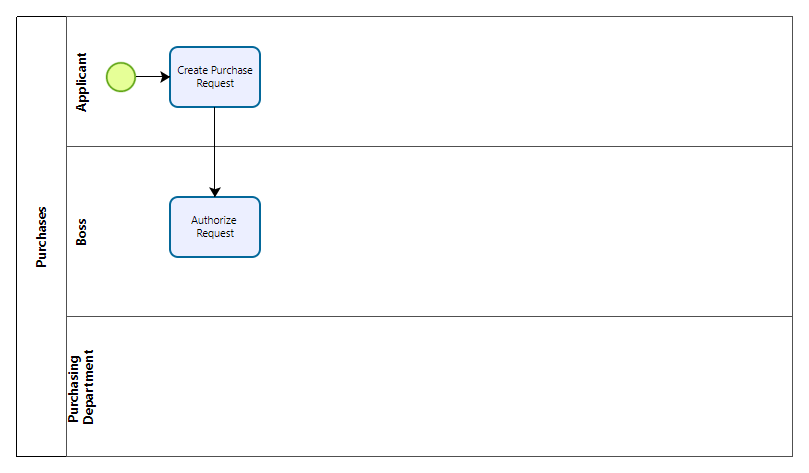
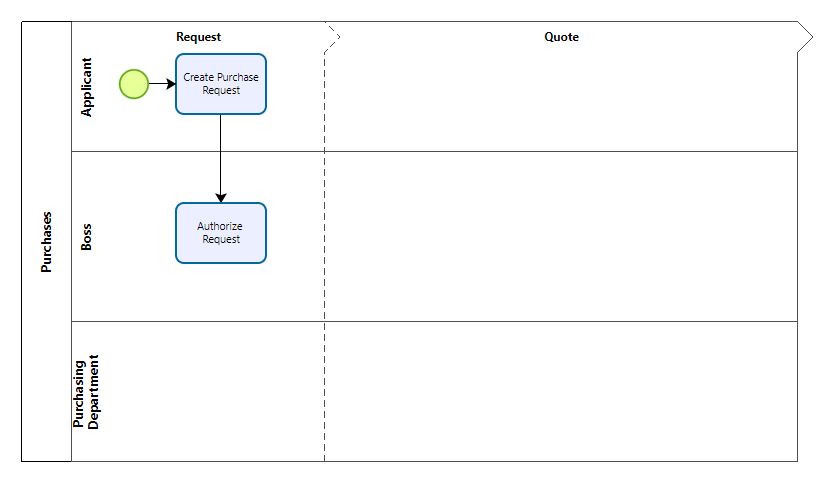
At this point, the Request phase of the process is finished and it is necessary to include its milestone. To do so drag and drop the milestone shape and rename it.
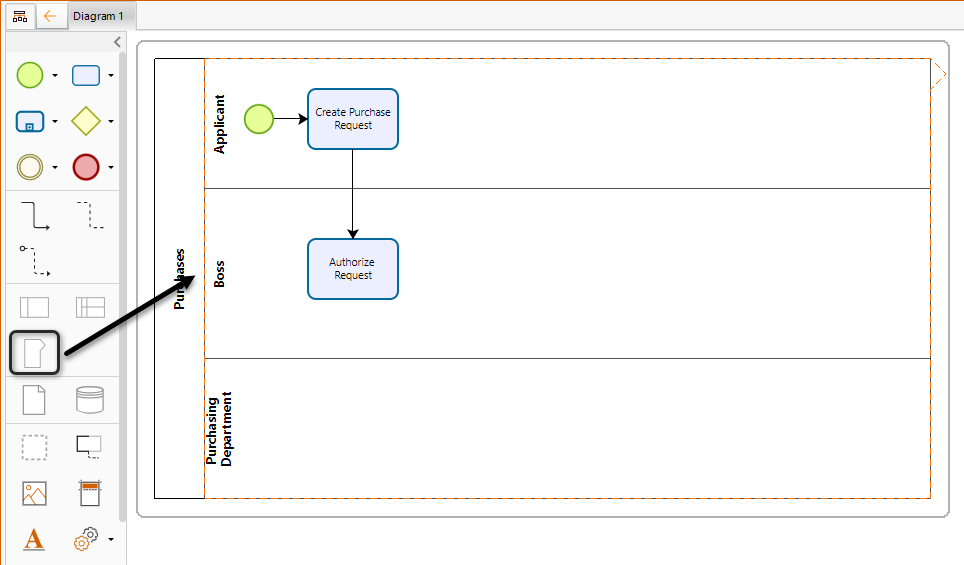
To start diagramming the Quote phase create its milestone just like the Request phase.
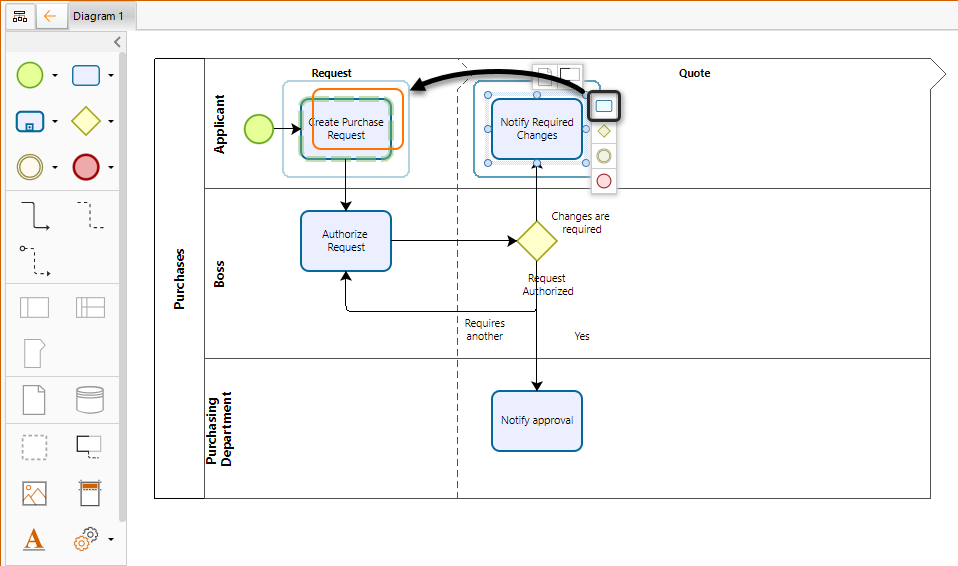
Continue adding the required shapes until your diagram is complete.
To connect two elements in a sequence flow, using the Pie Menu, drag the corresponding shape to the second element. They will be automatically connected.
The following image displays the basic diagram of the Purchase Request process.
Transform elements
Once you have diagrammed the basics of the Purchase Request process, some adjustments are needed to reflect the reality of the process.
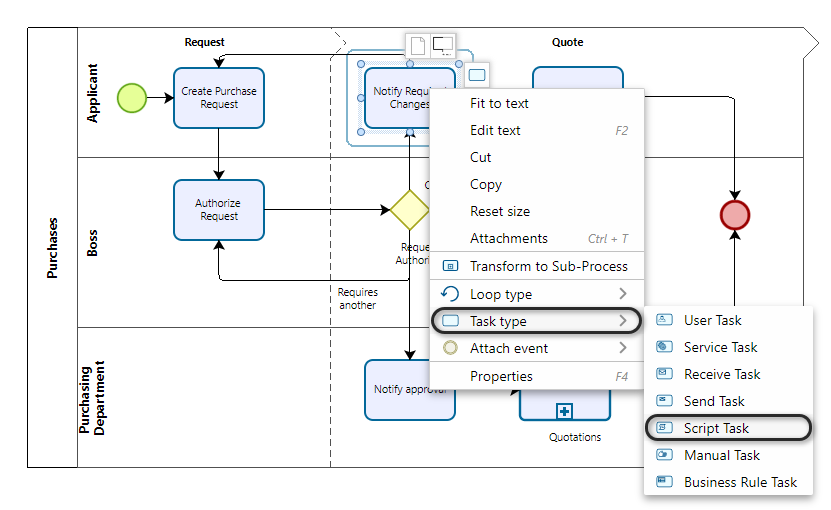
•The Notification Tasks consist of emails automatically sent based on a decision by the Immediate Supervisor (Boss). Therefore these tasks must be changed to Script tasks.
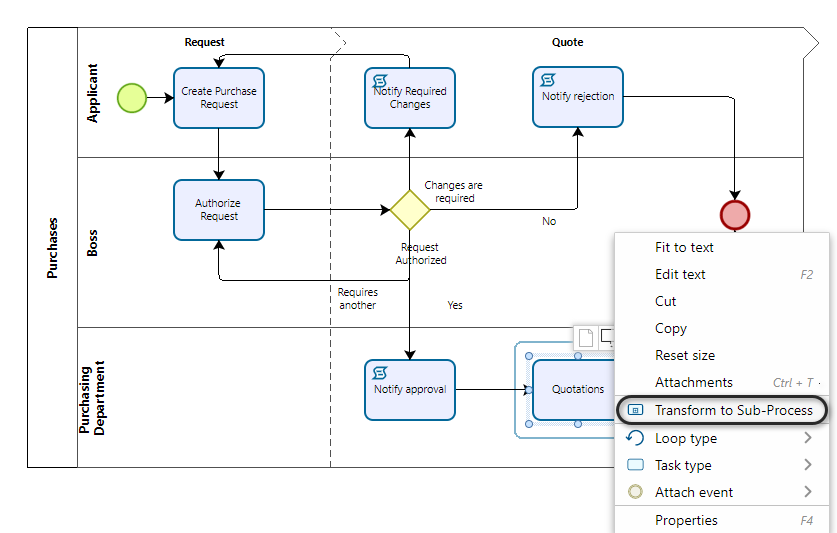
•The Quotation Task must be transformed to a Sub-process where several activities take place to select a supplier.
•The Purchase Order Task is also a Sub-process where the purchase order is sent to the Supplier and created in the ERP system.
To do these adjustments it is not necessary to introduce another element to the process, but to change the existing elements. For example to change the Notify Required Changes task, right-click it. In the display menu go to task type and select Script task. Repeat this for the other two Notification tasks.
|
If you have already used extended attributes, when you change the task type the information may be lost |
For the Quotation and Purchase Order tasks follow the same procedure, right-click the tasks and select transform to Sub-Process.
Sub-process
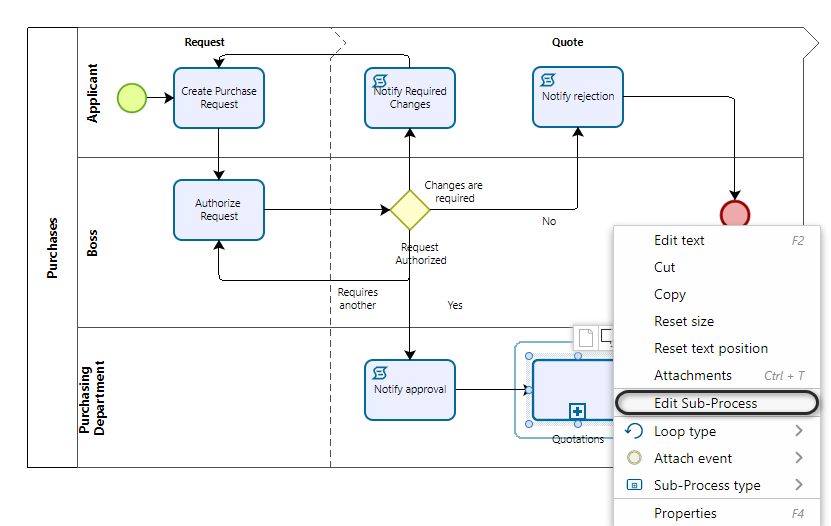
Now is necessary to define the tasks that take place within each sub-process. To do so right-click the sub-process and select Edit Sub-Process.
Bizagi asks if you want to create a new process for the sub-process or if you want to assign one to it. As we haven't created any other process, a new process is needed, hence choose this option.

With this, a new diagram is created for you to model the sub-process. Repeat this for the Purchase Order sub-process.
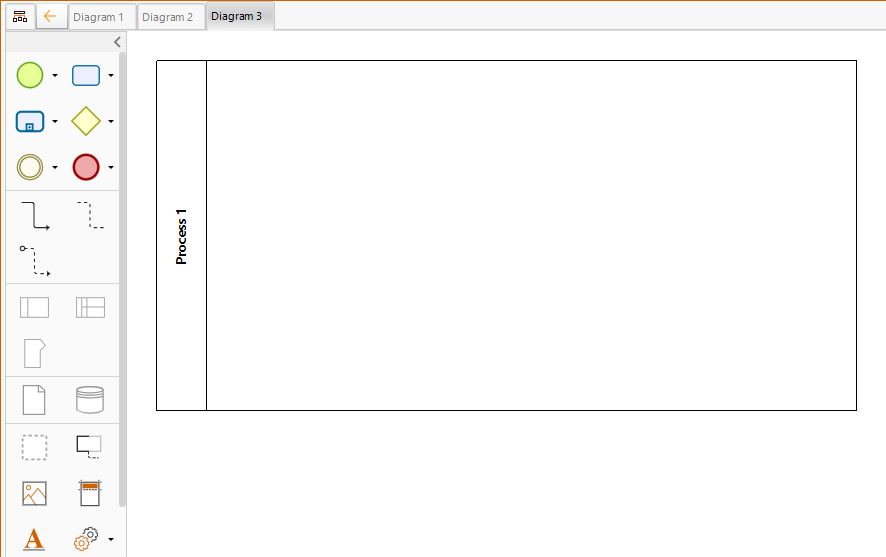
In these two new diagrams, model the two sub-processes the same way we did with the Purchase Request process. Then rename the diagrams the same way an element is renamed.
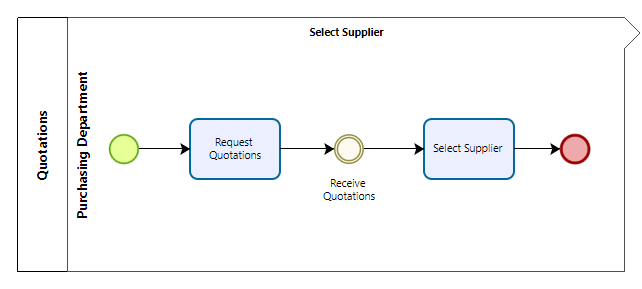
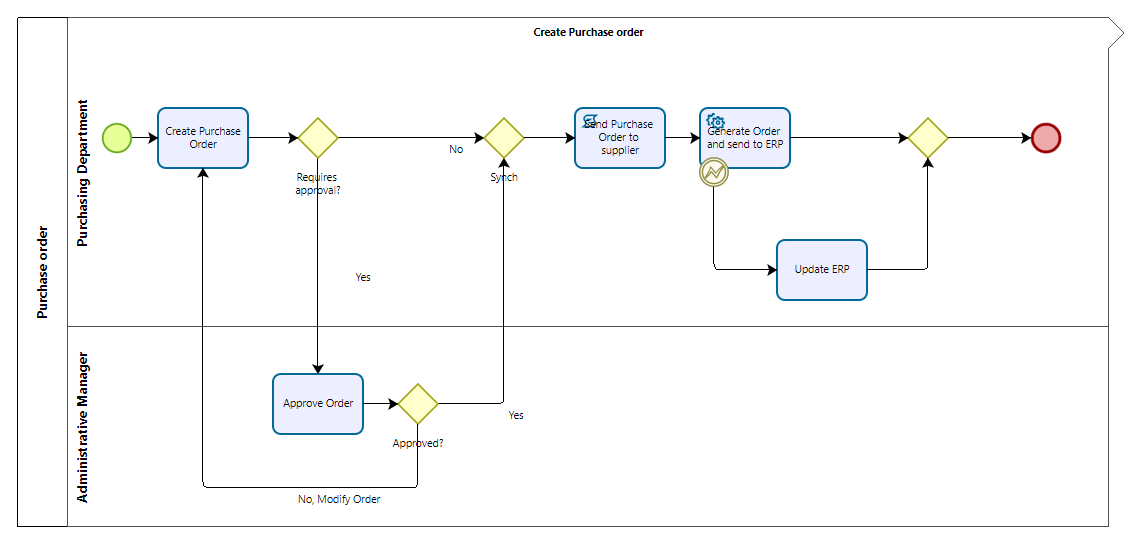
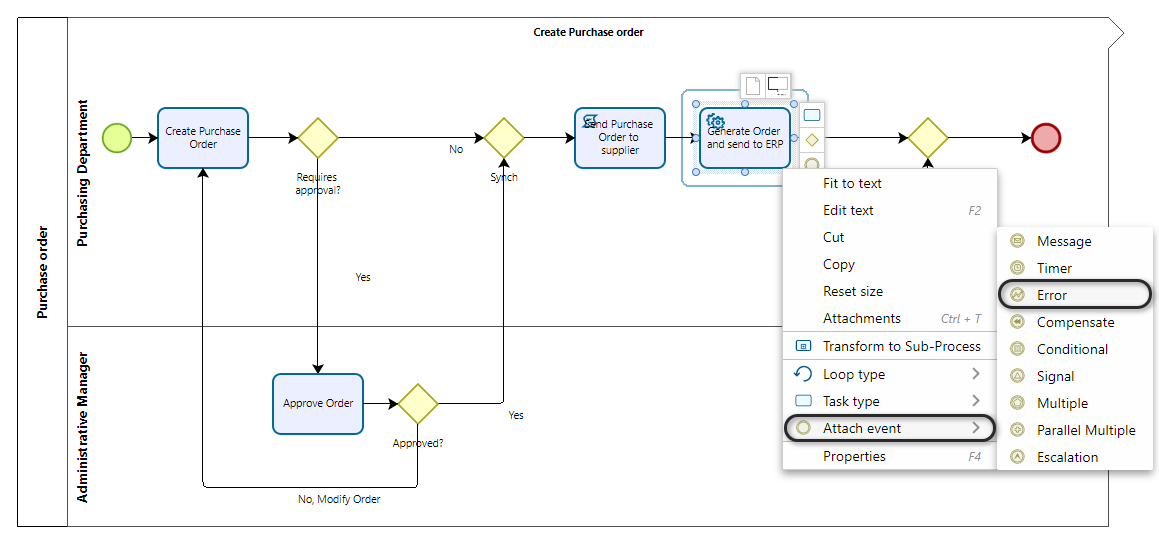
In the Purchase Order sub-process, the Generate Order and send to ERP services task might fail, because of this it is necessary to create an attached event to manage this error.
To do so right-click the task, go to Attach event and select Error. Then connect it to the following task.
Once you have modeled these two sub-processes you have finished modeling your first process.
The next step is to document it.
Process Documentation
Documenting a process is one of the most important steps when creating a model in Bizagi Modeler. This is where all relevant information for the process is included in the model so any user can understand it. You can include information at process level as well as detailed information at an element level in your diagram.
To add information at the process level right-click outside of the boundaries of the pool and select Diagram Properties.
This enables the Diagram properties window at the right of the screen, where you can include: name, description, version, and author of the process.
You can also open this window by pressing the F4 key.
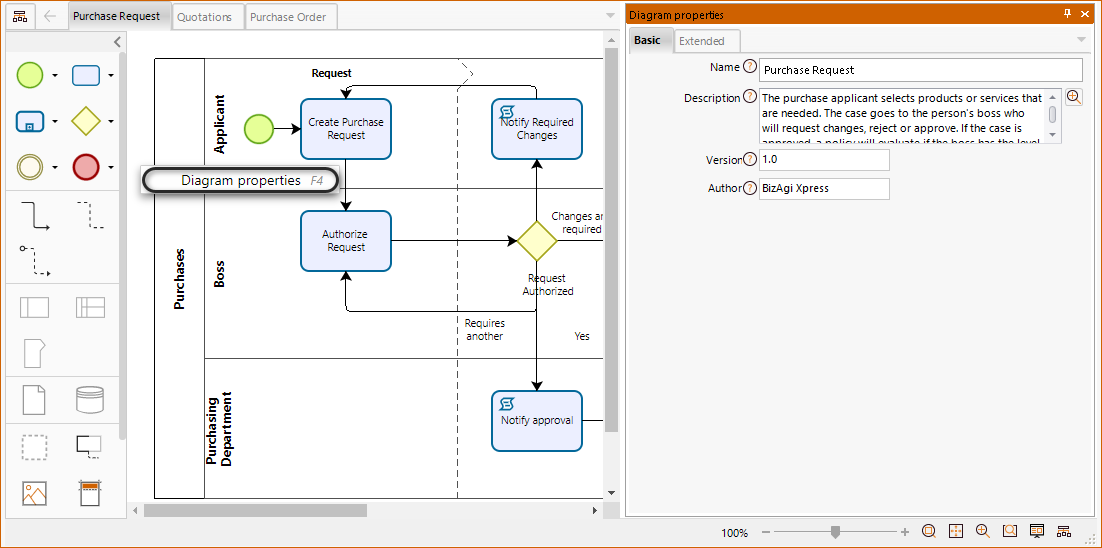
With the Properties window displayed, select any element, and their respective properties will be shown.
Thereby, you can enter detailed information about each step of your flow (each element).
Task Documentation
In tasks documentation, you can also include Resources that are related to each role of the RACI Model.

A resource is a Business Entity or Role that controls or is responsible for a task. To define the resources of the model click the Resources option in the Home tab.
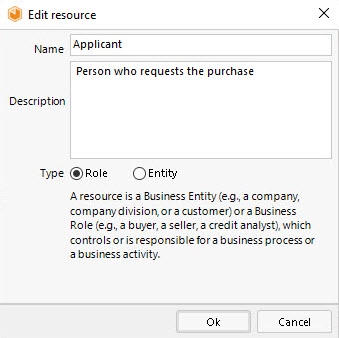
Add, edit or delete any resource. In the Purchase Request model create the resources of the 3 main participants of the process: Applicant, Boss and Purchasing department.

Select add and enter the name, description, and type (role or entity) of the resource.
Once the resource is created you can associate it to any task role.
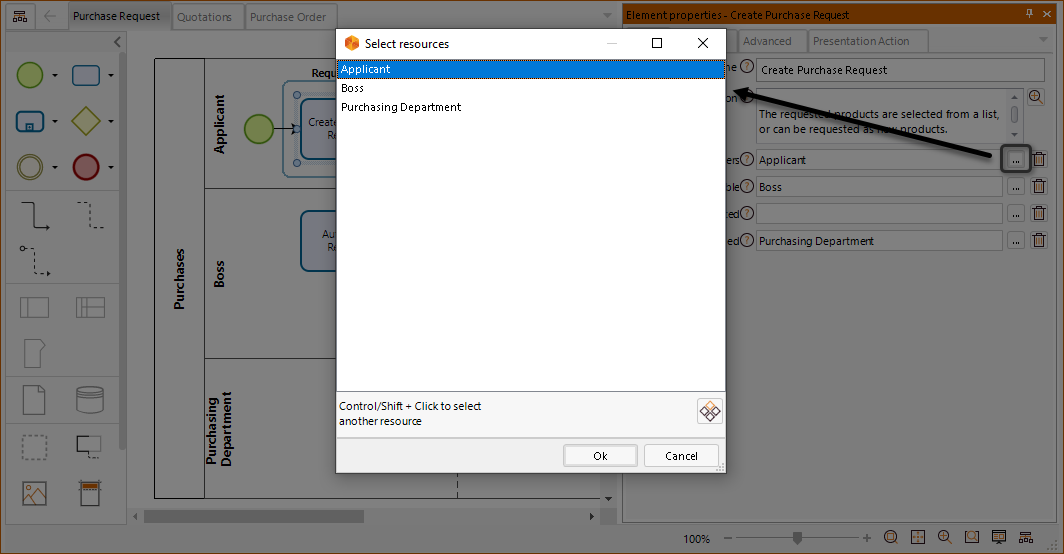
Now document all the tasks of the model.
Create as many resources as necessary, however, it is not necessary to have resources in all roles of a task. For example, in a script task, as it is an automatic task, there may be no roles or just a performer.
Gateway Documentation
In the gateway's properties, when alternative paths are available, documentation is included as conditional expressions for each decision branch representing a path.
You may define the condition for each path either in the Gateway itself, or in each of its decision branches.
To define the conditions of the gateway, on its properties window, go to the advanced tab. In the Gates table, for each of the outbound paths there is a corresponding row identified by the branch name. In the Purchase Request model the Request Authorized gateway has 4 outbound paths: No, Changes are required, Requires another approval and Yes.
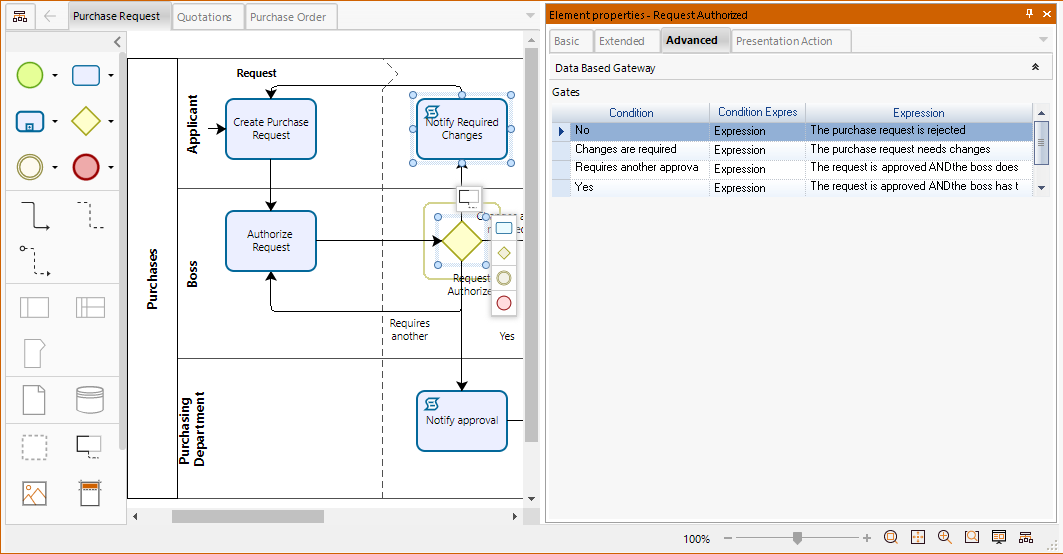
You may either define a conditional expression for the selected path or designate it as the Default path (the path that is chosen if no other conditions are met in other out coming flows). Note the visual representation of a default path is a small oblique line crossing the decision branch.

Once you have documented the basic properties of all the elements of the model. You can extend your documentation to include any type of information that you find relevant for your processes, through extended attributes.
Next steps
The Enterprise plan journey for the Bizagi Modeler services is to: create a model, which has been explained in this guide, save the model to the cloud, collaborate with your pairs or others to improve your model and finally publish the process to the end users.

There are also additional features that are useful for you:
•Compare your model with our Purchase Request model template. It can be downloaded from the Bizagi Xchange web page.
•Publish your complete documentation. You can choose between multiple formats.
•Exchange your model. You can exchange your model in multiple formats.
•Simulate the process flow with Bizagi Modeler simulation tool.
Remember that Bizagi Modeler offers advance features exclusive for certain paid plans. In the following article, you can overview the most relevant features available in each plan and choose the appropriate one for you.
Last Updated 8/29/2023 11:16:49 AM