Overview
A User is defined as someone who interacts with Bizagi's Work Portal carrying out activities in processes, or managing business information.
Each user has an account through which he or she is identified in Bizagi. All the properties defined in the account allow or restrict the interaction with the application.
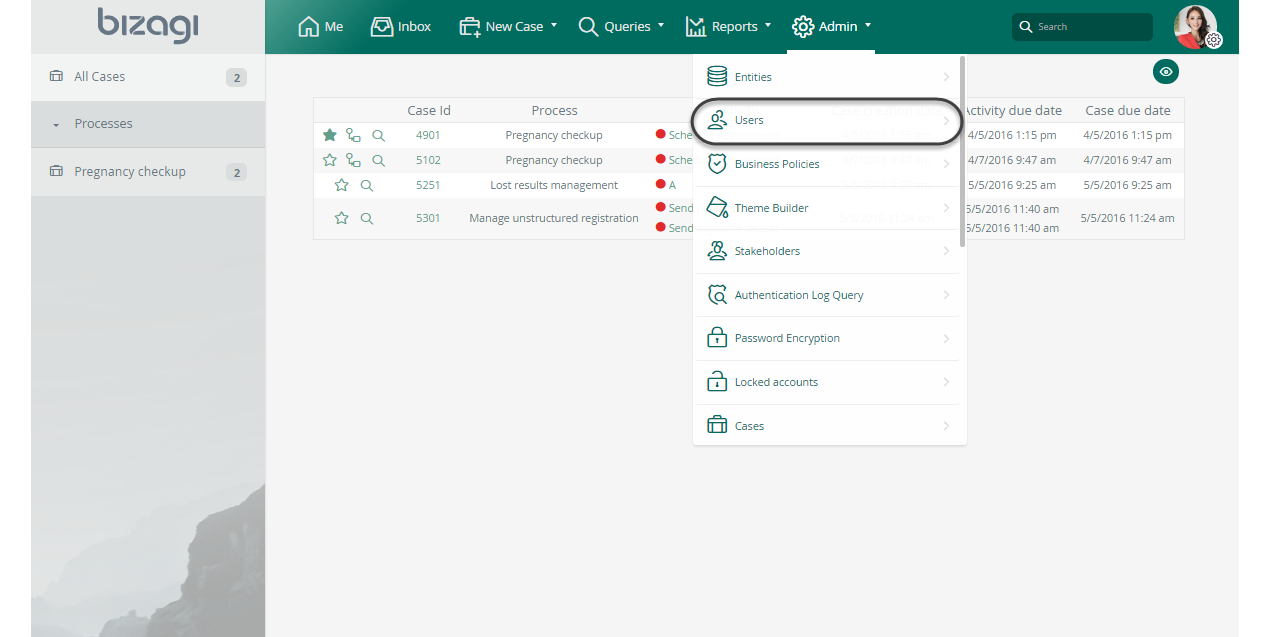
In the Admin options of the Work Portal you will find the Users option under the User Management category. This option allows the administration of users, either updating existing or creating new ones.
Keep in mind that users cannot be deleted once they are created. However, they can be disabled if they are no longer needed.
How to create a User in Bizagi
|
To use this procedure in LDAP Authentication, turn the synchronization off. |
1. In the Admin section of the Work Portal select the Users option. On the new screen click New User.
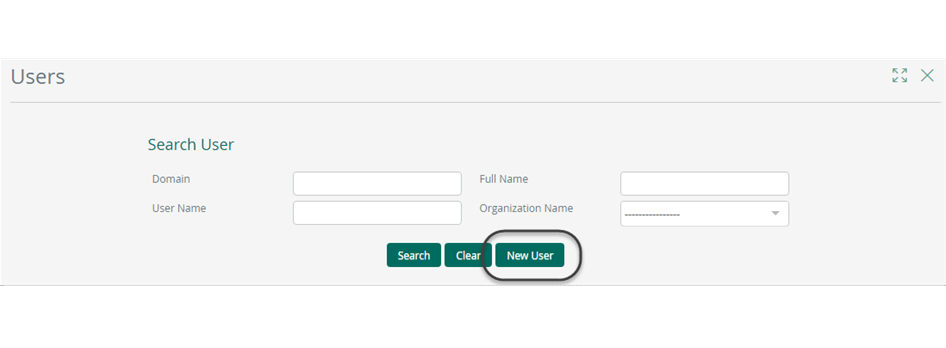
2. The User Administration window appears. Include the required information in the four tabs:
•Basic Information
•Organizations
•Configuration User
•Additional Information.

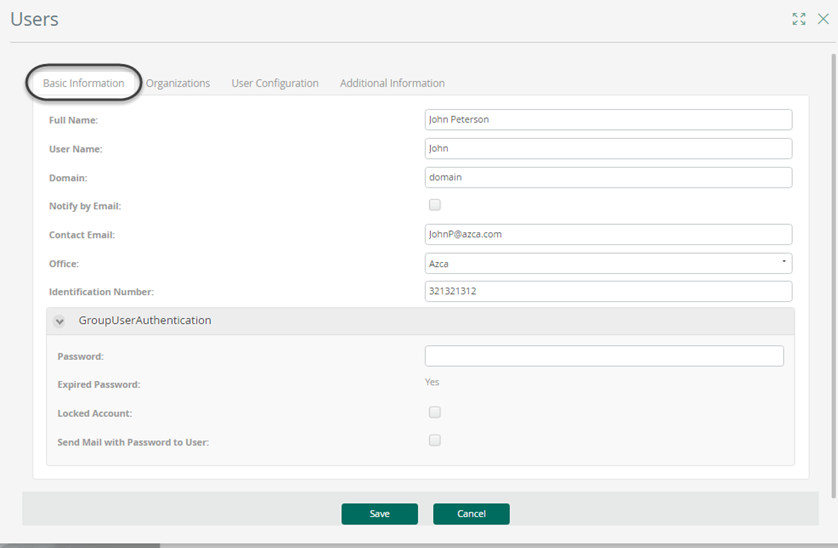
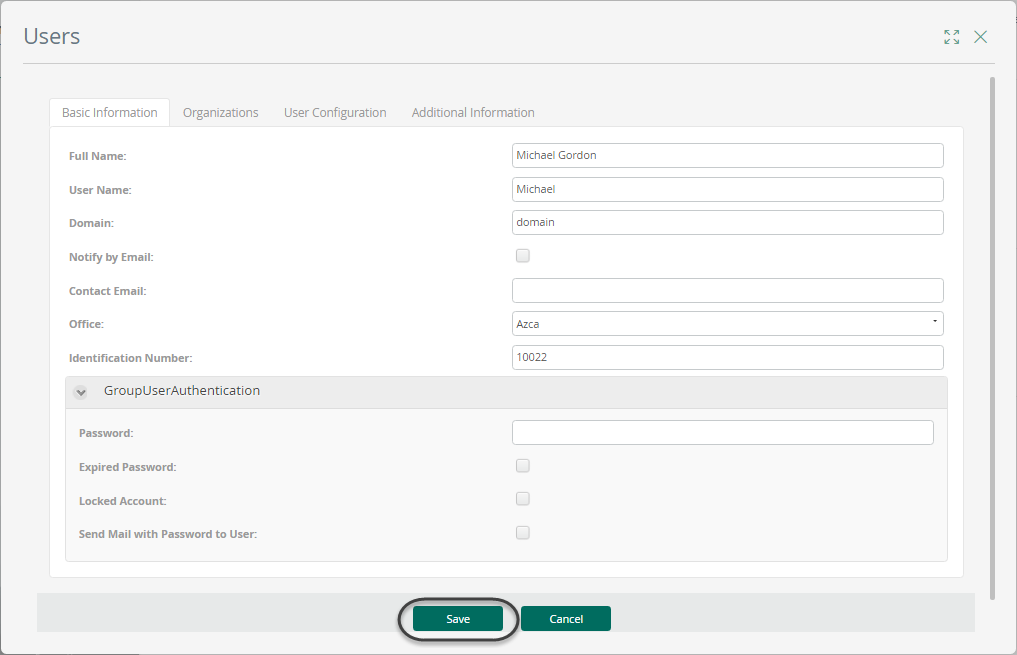
In the Basic Information tab include:
•Name: Name of the user to be created.
•User name: User name of the user to be created. This field cannot contain special character nor spaces. This field has the following characteristics:
-Must have at least 1 character and maximum 100
-Must have printable characters from the RFC-20 from from a-z, A-Z or 0-9 and only the following special characters are allowed: ! $ * + . = _ ~ - #
-Can contain only one @ character
-Cannot start or end in the @ character
|
If your user name contains the @ character, when you log in to the Work Portal, you must add the corresponding domain (defined in the work portal) and a " \ " before your user name. For example: if your user name is Jhon@company.com you must put domain\Jhon@company.com in the user box. |
•Domain: Domain of the network to which the application belongs to. A domain must fulfill the following characteristics:
-Minimum 1 character maximum 25.
-Must have printable characters from the RFC-20 from a-z, A-Z or 0-9.
-The following special characters are allowed : ! $ * + . = _ ~ -
•Notify by Mail: This checkbox defines whether the user will be notified by mail. In order to receive this notifications, enable Automatic Notifications in the process model. For more information, refer to Automatic Notifications.
•Contact Email: Email address where the notifications generated from the application will be sent. Email must meet the following characteristics:
-Must have the following format [Address]@[domain]
-[Address] field can have any US-ASCII character from RFC-20 except the following characters: ( ) < > [ ] : ; @ \ ,
-[Address] field cannot start or end with dot (.)
-[domain] field must start with a character from a-z, A-Z or 0-9
-[domain] field can have a-z, A-Z or 0-9, dash (-) or dot (.) after the initial characters
-[domain] field must end in any character from a-z, A-Z or 0-9
•Contact cellphone: Cellphone number for multifactor authentication for Bizagi Authentication.
•Password: Defines the password to be used to configure the type of Bizagi Authentication in the Bizagi Studio Security component. If the filed is left blank an encrypted random password will be generated.
•Expired Password: Option to expires / unexpires the account. This box is checked if the property Enforce password change after first login is selected in Bizagi Studio Authentication menu (Security module). This will force users to change the password in their first login.
•Locked Account: Option blocks / unblocks the user to access the Work Portal.
•Send Mail With Password to User: Option to send an e-mail to the new user to inform his/her password.
•User Properties Required: When User Properties have been defined from Bizagi Studio and they are required, they will be displayed in this tab in order to include the information related.
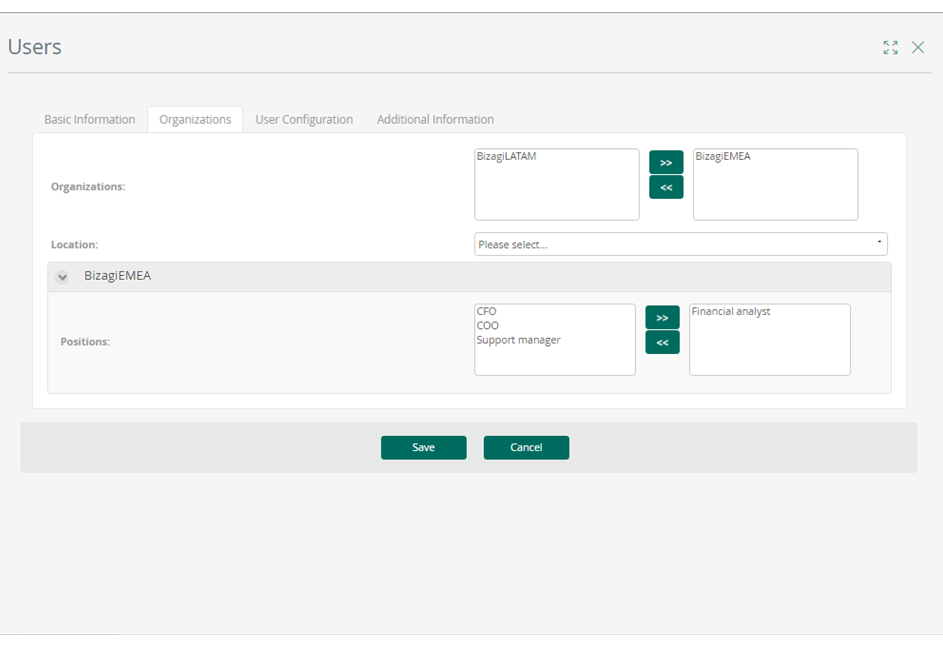
In the Organization tab you can include:
•Organization: Organizations to which the User belongs to. A user may belong to one or more organizations.
•Location: User’s geographic location. A user belongs to a single Location.
•Positions: Positions of the user. A user can have one or more positions, according to the Organization. When an Organization is chosen, the Position menu is displayed.
You can either scroll or use the search control to find the organization(s) you look for.
To add or remove Organizations and positions, select an item and click an arrow: ![]()
In the User Configuration tab you can include:
•Active: Indicates whether the user is active or not to enter the Work Portal.
•Skip assignment rules on cases created by this user: Defines if the cases created by the user will evaluate assignation rules. If checked, every activity of a case created by the user will be assigned to the logged user.
•Area: Department or area that the user belongs to in the organization.
•Boss: Defines the immediate superior person of the user.
•Roles: Role performed by the user in the organization. In Bizagi, a user can have one or more roles. Once you have created the user, select the role and click Add.
Bizagi has the following default roles: •Admon viewer: The user can only view Users and Entities options in the Admin menu. They don't have permission to edit, create or delete information. This role overrides any other role configured for the user. •BA Business Administrator: This is a super user role where the user can bypass security validations on cases. They can view cases and the case folder from those that do not belong to them even if those cases have Case Security. •Apps Editor: This user can access the Apps Designer and has permission to create and edit applications. Refer to Accessing the Apps Editor. |
•Skills: Skill or ability to carry out an action. Special skills that allow a person to carry out an activity. In Bizagi, a user can have one or more skills. Once you have created the user, select the Skill and click the add button.
•Working Time Schema: The administrator can define if the new user is going to work with the Default Working Time Schema, or with a different one
•Delegated User: The user who is delegated the functions of the main user.
•Delegate Enabled: This option allows delegation of user's tasks to a delegated user. The user’s current pending activities can therefore be visualized and carried out by the delegated person.
oThe delegated user can see the information on who delegated the task on the tools menu, in the preferences option.
oThe delegated user can also see the delegated cases on the upper part of the activities screen.
•Enabled for Assignation: When a user is enabled for assignment, he/she can be assigned activities within a process if he/she fills a specific profile.
•Time Zone: The 24 main regions that allow a user to identify the Local Time according to the position of the city or country in the World. If your project requires multiple users to be in different time zones, this parameter is a must, along with the project's Business option: server time zone.
oTo review the hierarchy that Bizagi uses to set the Timezone refer to Timezone Hierarchy.
•Language: Defines the language in which the Work Portal will be displayed to the user.
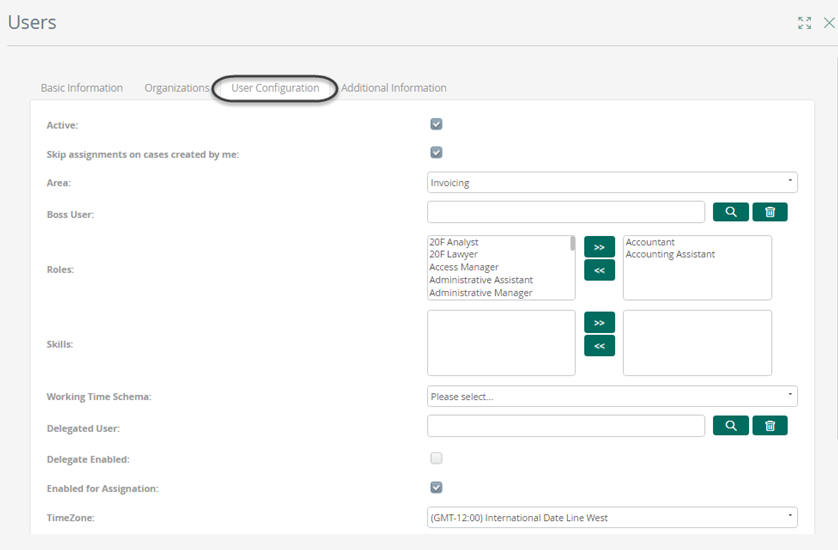
You can either scroll or use the search control to find the role(s) and/or skill(s) you look for.
The Additional Information tab is displayed only when User Properties, that are not required, have been defined in Bizagi Studio. In this you can include all the information related to them.
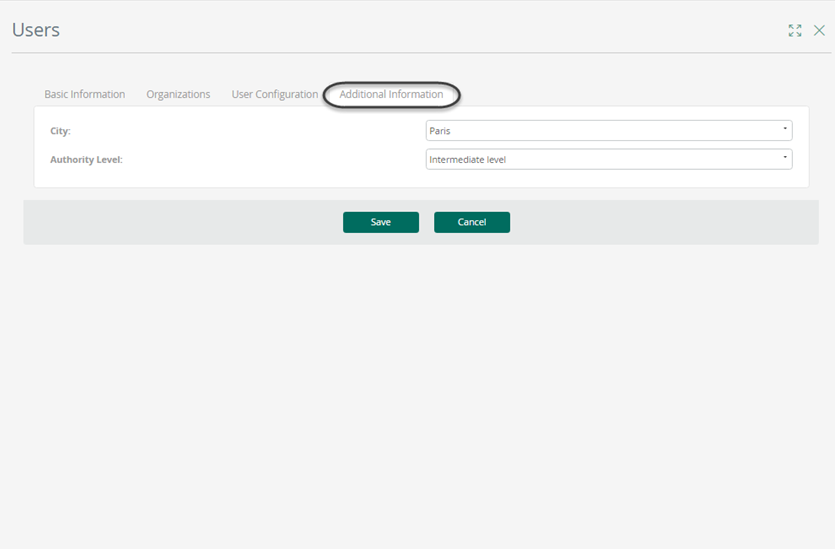
3. When you have finished filling in the information, click Add to save the new user’s information.
|
User's information will be taken to production in the first deployment. Henceforth user's administration must be performed directly in the production environment. |
How to Edit a User
1. In the Admin section of the Work Portal select the Users option and look for the User that will be edited by entering the Domain, User Name or Full Name as search criteria. If these fields are left blank, and Search is clicked all the users will be displayed.

2. Click Search. A list of users that fill the search criteria will be shown, including some user information to help the identification (Id, user, domain, name and e-mail).
Two links are enabled for each user record:
•Edit: Displays the user administration screen to modify the user's information.
•Log: Presents information on modifications made to the user attributes, who made them, the value given them, and the date. The type of change indicates if the property was added, modified, or eliminated.
Click on the Edit link of the user whose information will be modified.

4. The User administration window will be displayed to make the necessary changes. When you are done, click Save.
Data Obfuscation
Data obfuscation is a form of masking data so that it is scrambled and rendered unintelligible on purpose. This is a helpful measure that results in encrypting sensitive data and mitigate unwanted access to it. For the purpose of obfuscating data, Bizagi offers diverse options, among which there is an option for admins in the Work portal, and new functions in the rules API. All of them you will need to consider according to your processes and individuals' requests. Refer to how to obfuscate the different data and scenarios as described below.
Considerations before continuing
•To obfuscate a user must be the admin user or a user with the role BA_Administrator.
•Users cannot obfuscate themselves.
1. Obfuscating personal data of end users There is an option at the Work portal which allows an authorized admin to manually obfuscate information of a given end user. Notice that this is applicable only to end users which work on processes (those recorded at the WFUser entity).
To use it, an admin relies on the user management menu options and searches for a given user:
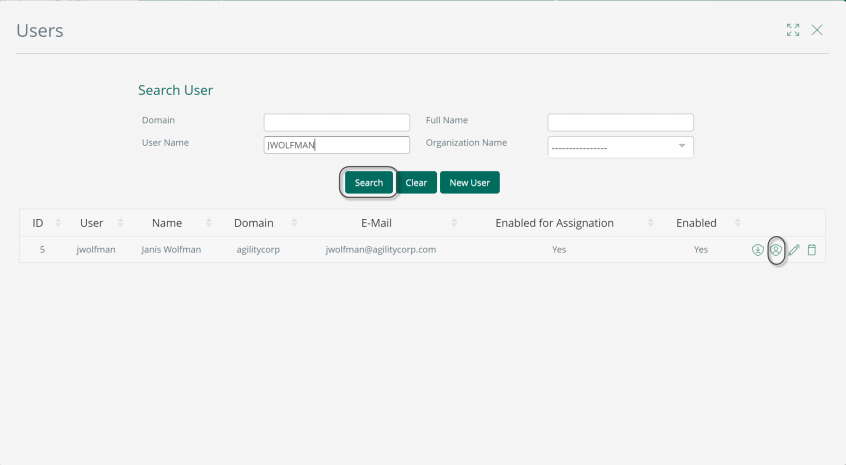
Then by clicking on the "Anonymize" icon, the admin proceeds to confirm if he/she wishes to obfuscate personal data related to this specific user:
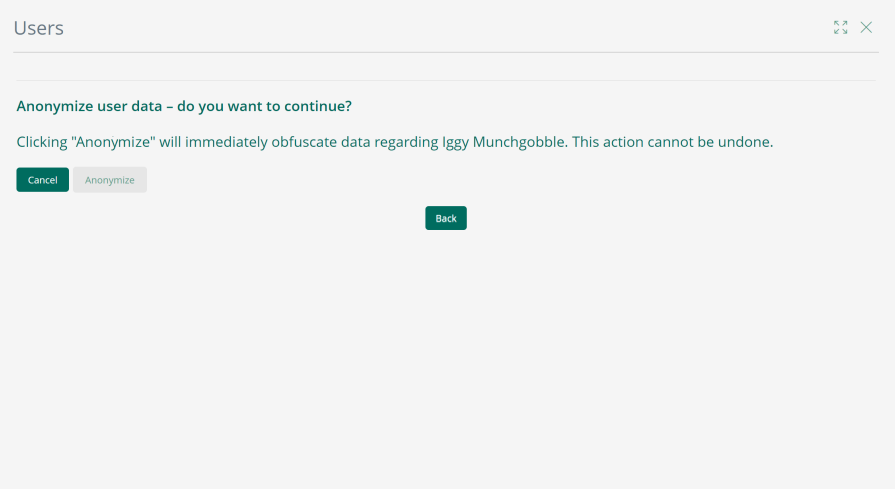
Consider that once you confirm, such data will be rendered unintelligible without the possibility of undoing it. Even though the end user's picture will be set to null, the file remains in the Bizagi cloud storage If you need to delete the file, raise a support ticket. For additional guidelines on this, refer to the Obfuscating files and attachments section of the How is personal data disposed? article.
Last Updated 11/6/2024 4:43:43 PM