Overview
The Themes feature in App Designer Home and in the Appearance menu of App Designer editor helps you create visually appealing apps with minimal effort. Choose from a set of professionally designed themes for your app—Light, Dark, Classic, Modern, Minimalist, and Forest—each crafted to deliver a clean, consistent look that enhances usability and aligns with modern design standards.
In addition to these ready-to-use options, the Themes feature offers practical customization tools:
•Custom Theme Creation: Save your current Appearance settings as a reusable Theme using the + Convert to theme button in App Designer's Appearance menu.
•Custom Theme Management: Export, import, duplicate, edit, and delete custom Themes to streamline your design workflow. These capabilities make it easier to maintain a consistent visual identity across apps, facilitate Theme migration between projects, and simplify sharing and reusing Theme configurations across teams.
•Instant Theme Application: Preview how each Theme applies to your app’s appearance before committing changes and apply Themes with a single click.
Accessing the Themes configuration
There are two ways to access the Themes configuration in App Designer, from the App Designer home page and from the App Designer editor:
Accessing the Themes configuration from the App Designer home page
1.In the App Designer Home page, click the three-dot menu.
2.Select Themes from the drop-down menu.
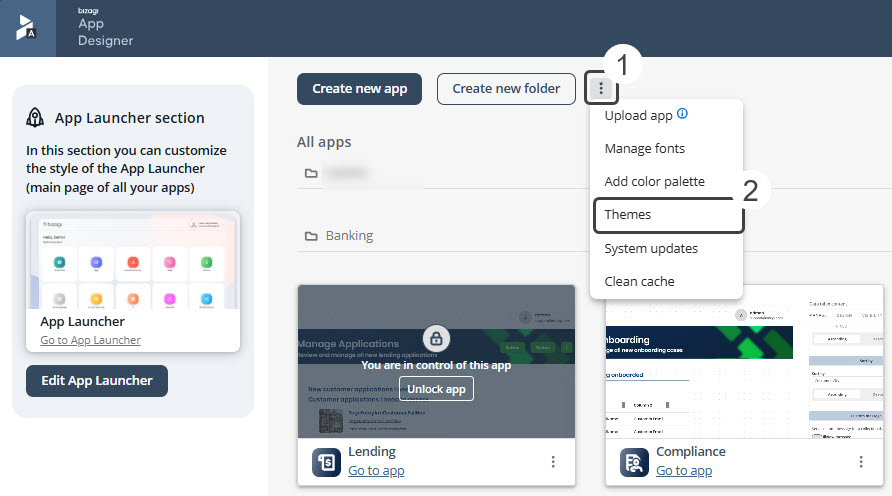
Note: This view allows you to browse available default and uploaded Themes. You can also manage your custom or uploaded Themes — import, duplicate, edit, download, or delete them as needed. Default Themes are view-only and cannot be deleted or downloaded.
Accessing the Themes configuration from the App Designer editor
1.Open or create an app and click it to open the App Designer editor.
2.Go to Settings from the top menu and choose Appearance.
3.Click the Manage themes button.
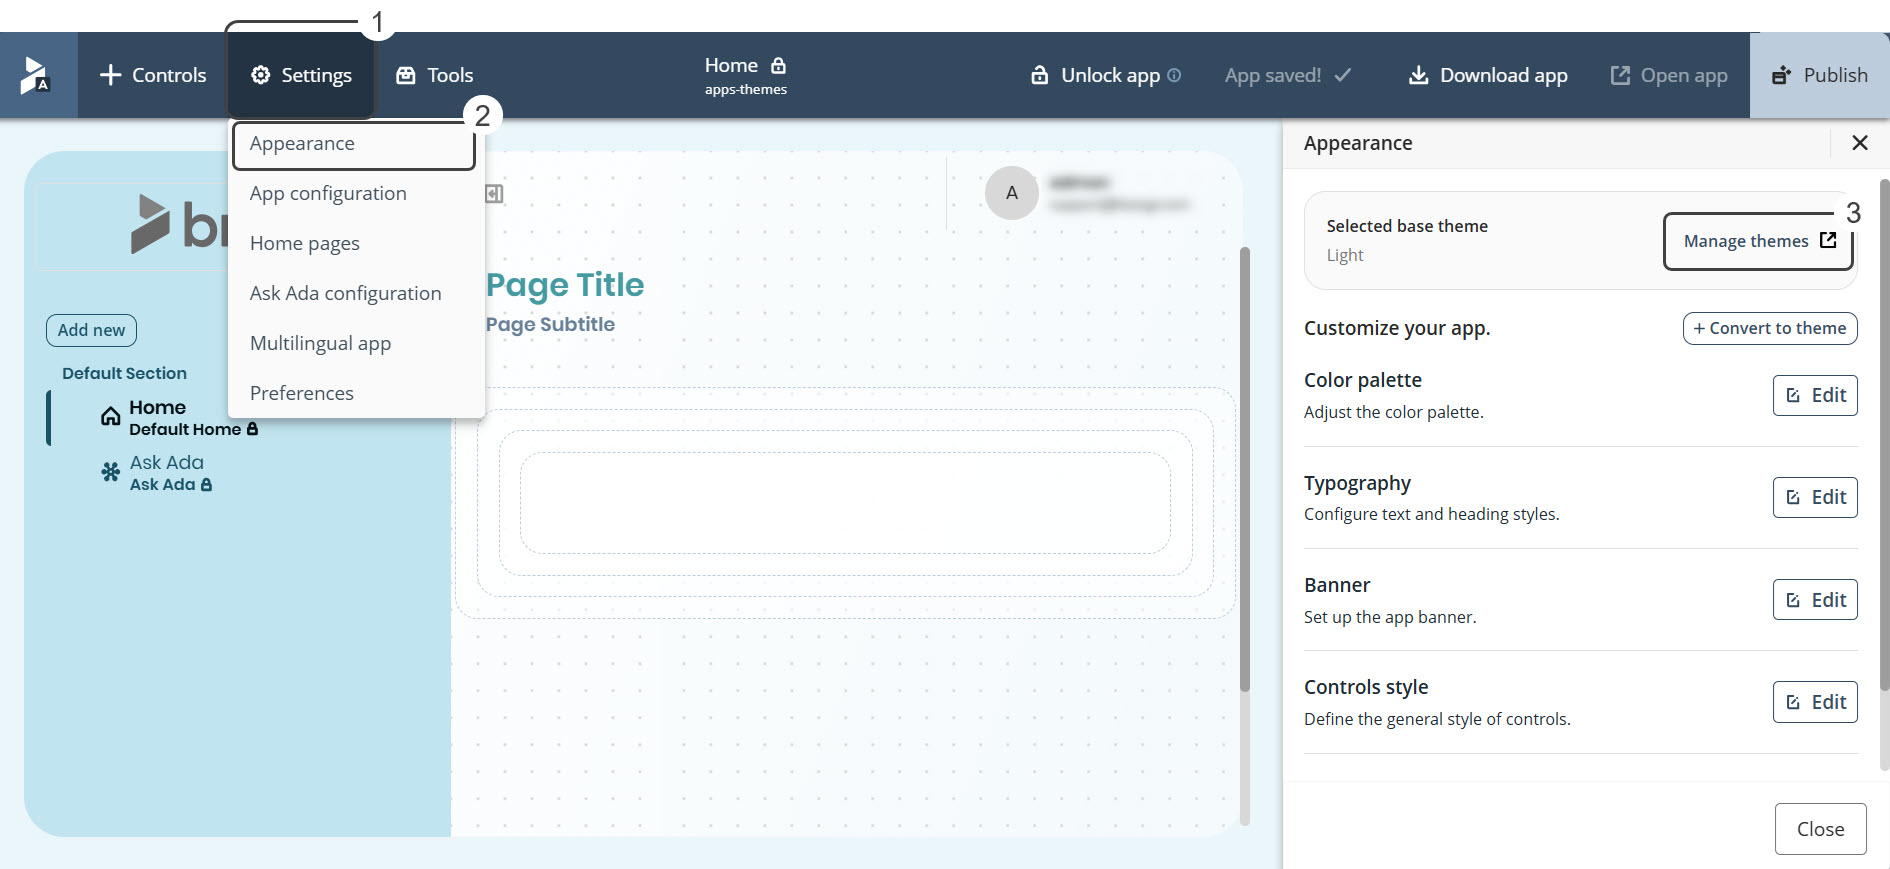
Note: You can apply a Theme directly to the current app from this view, and the changes will take effect immediately.
Use case scenarios
Selecting and applying Themes
Once you are in the desired app and have opened the Manage themes pop-up window, you can view and apply any of the available Themes—both default and custom. You can import themes in .BTF (Bizagi Theme File) format.
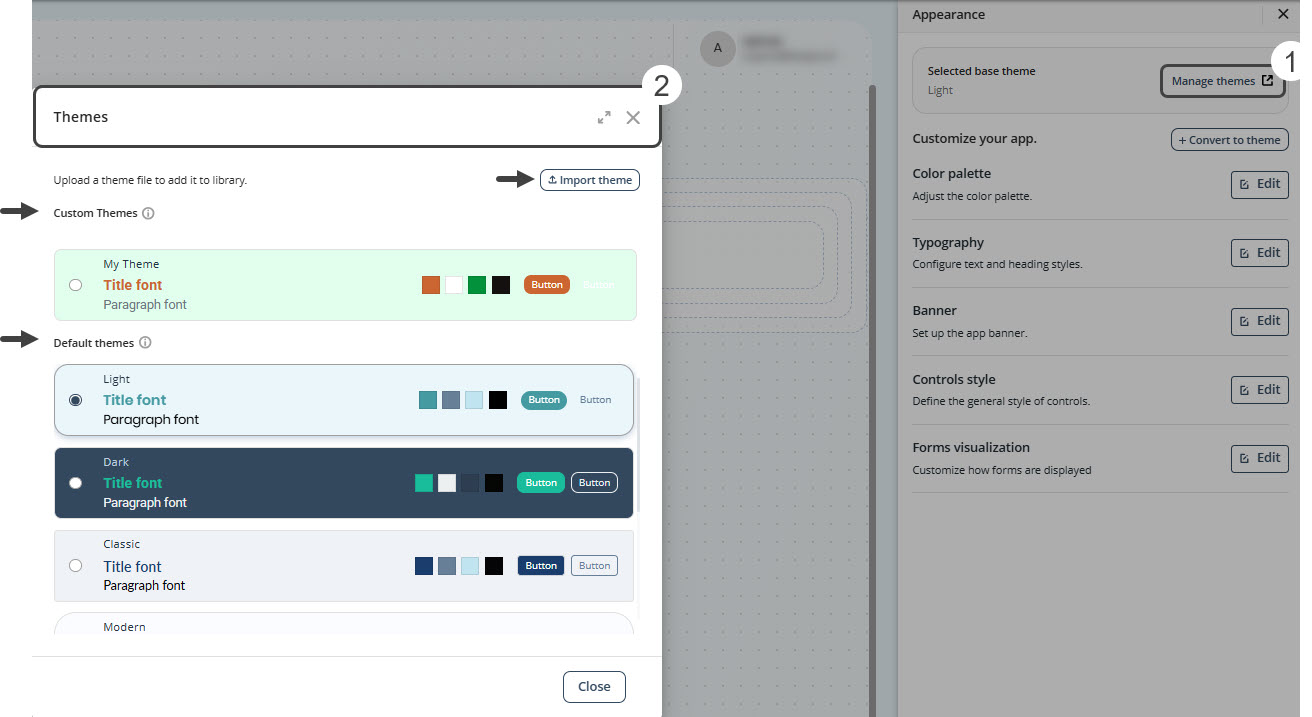
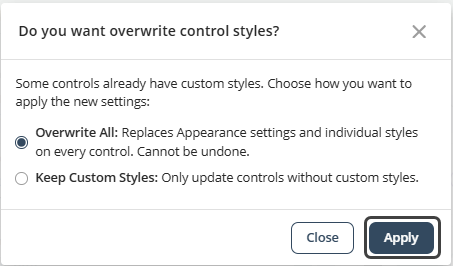
To apply a Theme, simply click it. A pop-up will appear prompting you to choose between Overwrite All or Keep Custom Styles. After making your selection, click Apply. The changes will be reflected in your app immediately.
The available default themes are:
•Light: Clear theme with soft colors and a white background.
•Dark: Dark theme with a black background and green accents.
•Classic: Traditional Theme with standard color combinations.
•Modern: Contemporary theme with vibrant colors (purple/violet).
•Minimalist: Minimalist Theme with subtle colors (aqua green/turquoise).
•Forest: Nature-inspired Theme evoking freshness and contrast with a balance of brightness and depth.
Customizing Theme Color Palette
Each Theme — even default ones — allows you to personalize its Color palette to better match your app's style and branding. You can edit:
•Primary Colors: Adjust the base colors that define the overall look of the Theme.
•Accent Colors: Fine-tune secondary and highlight colors for emphasis and contrast.
To customize your Theme's Color palette:
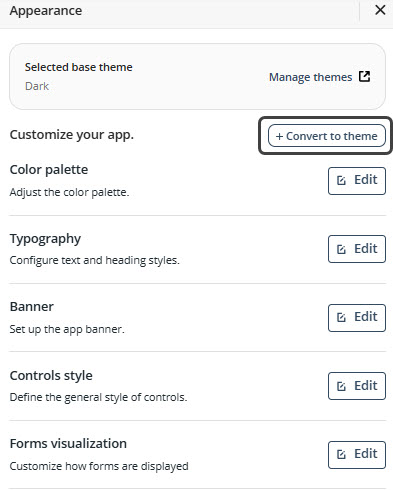
1.In the App Designer editor, click Settings in the top ribbon and select Appearance.
2.Next to the Color palette section, click Edit.
3.Choose from default Color palettes, select a custom one, or create a new palette by clicking Add new.
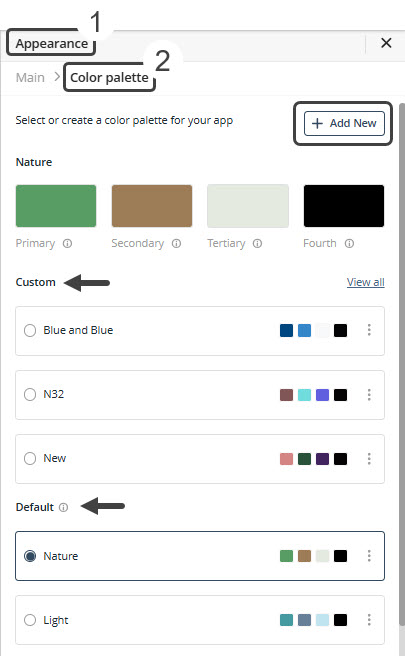
Changes are reflected instantly, allowing you to preview updates in real time as you customize your Theme.
Creating a Custom Theme from current Appearance settings
You can create a reusable Custom theme based on the current visual configuration of your app using the Convert to theme button. This allows you to standardize design across multiple apps, save Appearance settings for future use, and share consistent styles within your project. You can do so by:
1.Customize your app’s appearance through the Appearance menu in App Designer editor. This includes configuring the Color palette, Typography, Banner, Controls Style, and Forms Visualization. Once your design is complete, click the +Convert to Theme button.
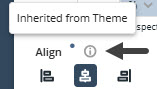
Tip: When editing Appearance settings of app elements, a blue dot icon next to a configuration name indicates that the value is inherited from the selected Theme. Hovering over the icon will display a tooltip with the message "Inherited from Theme", helping you identify which settings are controlled by the selected Theme.
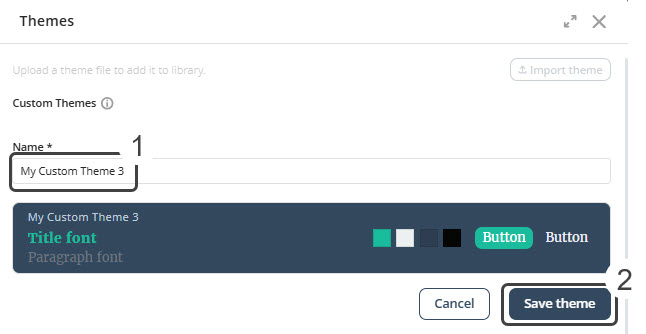
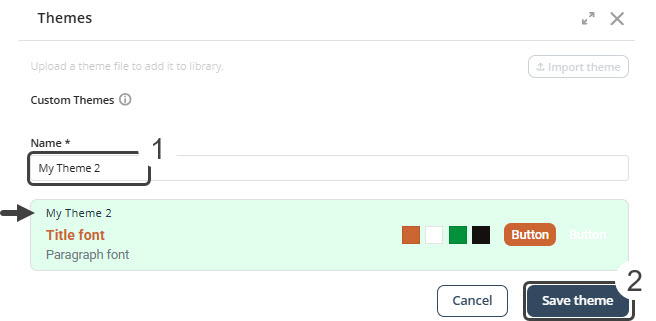
2. A pop-up window appears with a preview of the Theme with your custom settings. Assign a name to your Custom theme.
Note: Assign a unique name for your Theme. The system will validate the name to prevent duplicates (case-insensitive). If the name already exists, a warning prompting you to change the name appears.

3. After entering a valid name, click Save theme to confirm.
The Theme will be generated using all current appearance settings and saved as a Custom theme. The newly created Theme will appear at the top of the Theme list, sorted by creation date, and will be immediately available for use in other apps.
You can import themes in .BTF (Bizagi Theme File) format from either the App Designer home page or App Designer editor. To import a Theme:
1.Click the Import theme button within the Themes menu.
2.In the pop-up window, either drag the .BTF file into the designated area or click the box to open your file explorer and select the file.
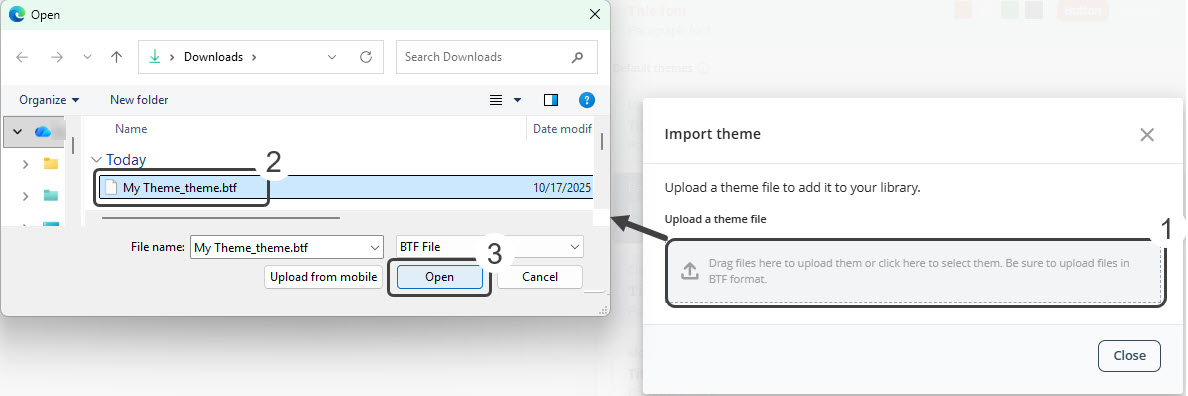
3. Once uploaded, a preview of the Theme will appear. Assign a unique name to it.
4. Click Save theme to complete the import.
Newly imported Themes appear at the top of the Custom Themes list, ordered by import date.
|
Considerations on Importing Themes •Only files in .BTF (Bizagi Theme File) format can be imported, and the recommended maximum file size is 50MB. •Theme names must be unique. •Validation is case-insensitive—for example, “Light”, “light”, and “LIGHT” are considered the same name. •If a duplicate name is detected, a warning message will prompt you to rename the theme before proceeding. •If the imported Theme includes custom elements (such as color palettes or fonts), they will be created automatically. •A new unique ID is generated to prevent conflicts. |
Themes can only be exported from the App Designer home page — not from individual apps (App Designer editor). To export a Theme:
1.Click the Themes menu on the App Designer home page.
2.In the pop-up window, locate the Theme you want to export.
3.Click the three-dot menu next to the Theme and select the Download option.
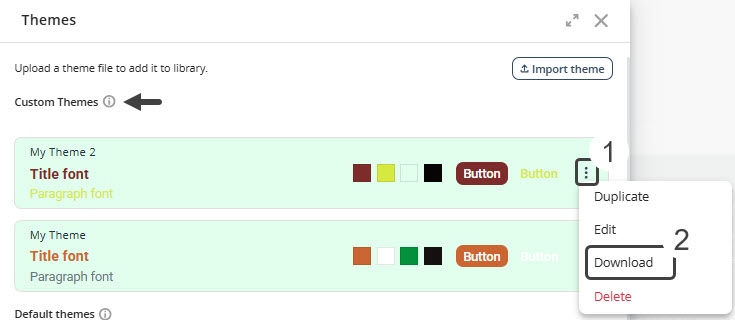
A file in .BTF (Bizagi Theme File) format is generated and automatically downloads to your device.
Note: Export files have size limits (recommended maximum: 50MB).
You can remove custom Themes that are no longer needed from the App Designer home page.
1.Open the Themes menu from the App Designer home page.
2.Locate the Theme you want to delete.
3.Click the three-dot menu next to the Theme.
4.Select Delete from the dropdown list.
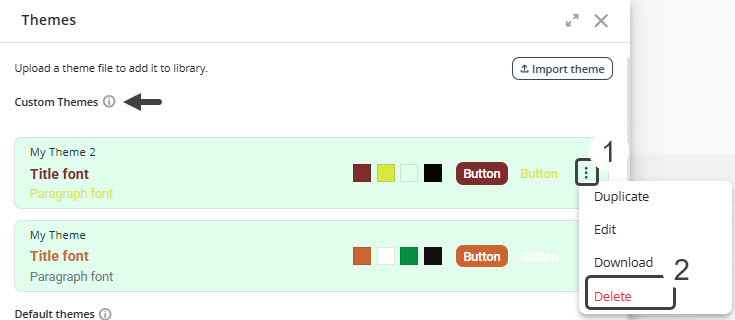
5. If the Theme is not in use, a confirmation pop-up window will appear asking: “Are you sure you want to delete this theme?”
6. Click Delete to confirm. The Theme will be permanently removed.
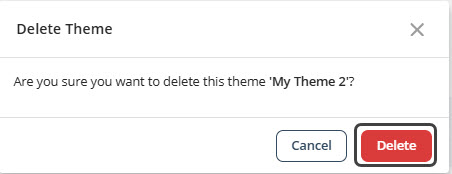
Note: Deletion is permanent and cannot be undone.
|
Considerations on Theme Deletion: •Only one Theme can be deleted at a time (no bulk deletion). •Only Custom themes can be deleted.
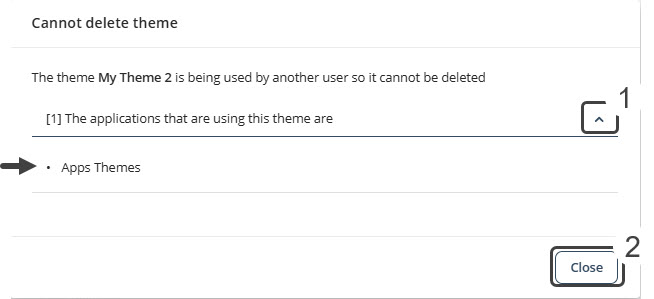
If the Theme is in use: •A message will appear indicating the Theme cannot be deleted. •A list of apps currently using the Theme will be shown.
•You must unassign the Theme from all apps in which it is being used before deleting. |
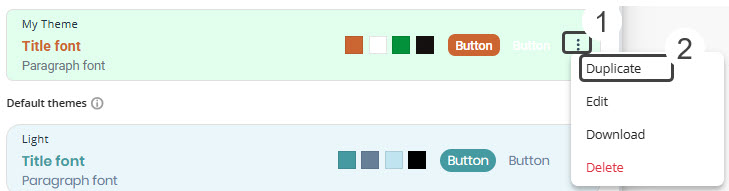
You can duplicate both custom and default Themes to create a new version that can be customized without affecting the original. This action is available only from the App Designer home page. To duplicate a theme:
1.Open the Themes settings from the App Designer home page.
2.Locate the Theme you want to duplicate.
3.Click the three-dot menu next to the Theme you want to duplicate and select Duplicate.
4. In the pop-up window, assign a unique name to the new Theme and click Save theme.
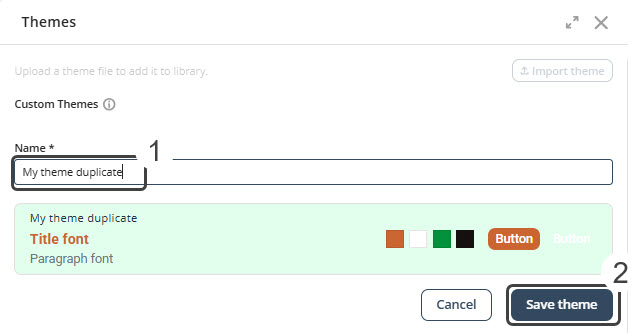
The duplicated Theme will appear at the top of the Custom themes section. From there, you can edit it, if you wish.
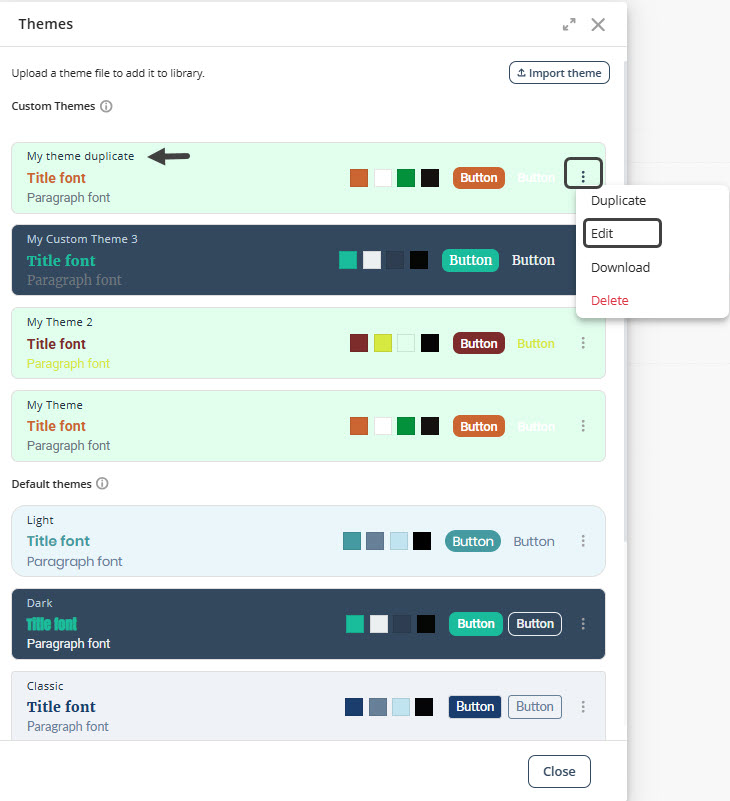
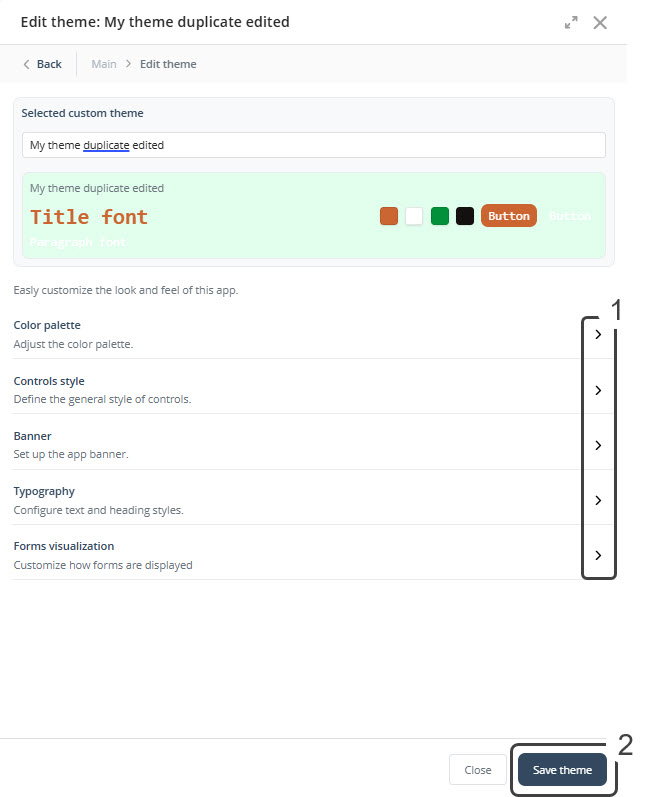
You can edit Custom themes from the App Designer home page. To edit Custom themes:
1.Click the three-dot menu of a Custom theme and select Edit.
2.This will take you to the Themes Edit home in which you can choose from Color palette, Typography, Banner, Controls Style, and Forms Visualization to apply changes. Click on the arrow besides each Appearance configuration to access it.
Tip: To return to the Edit Theme home, click its name in the top ribbon, located within the navigational path.

3. Once you have applied the desired changes, click Save theme.
•If the Theme you're editing hasn't been applied to any app yet, your changes will be saved and reflected immediately. This Theme will now be listed at the top of the Custom themes list.
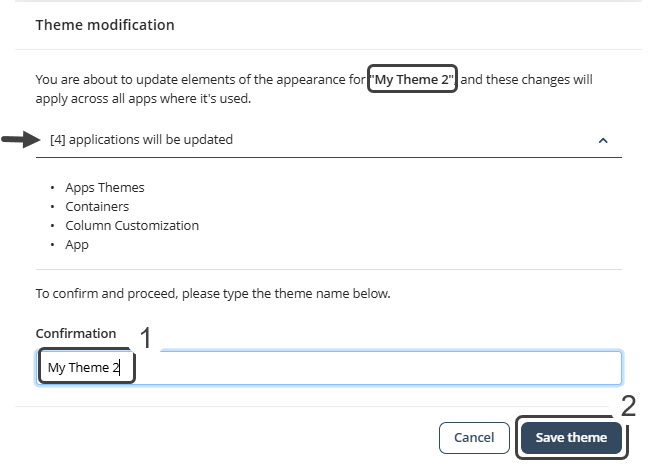
•However, if the Theme is already in use by one or more apps, a confirmation pop-up will appear. This window lists all the apps currently using this Theme and prompts you to type the Theme’s name to confirm the changes. This step ensures you understand that any modifications will affect all apps where the edited Theme is applied.
|
Important Considerations •Only users with edit permissions can manage Themes. Users with limited permissions can only apply Themes. •Only Custom themes can be deleted, not default themes. •The currently selected Theme or the Theme currently in use by other apps cannot be deleted. •An app can have only one Theme at a time. •Only Custom themes can be edited. To modify a default theme, first duplicate it — this creates a copy that you can customize without affecting the original. •If the imported Theme includes custom elements (such as styles or settings not currently present in the app), App Designer will automatically create them to ensure the Theme is correctly applied. |
Last Updated 11/20/2025 9:20:30 AM