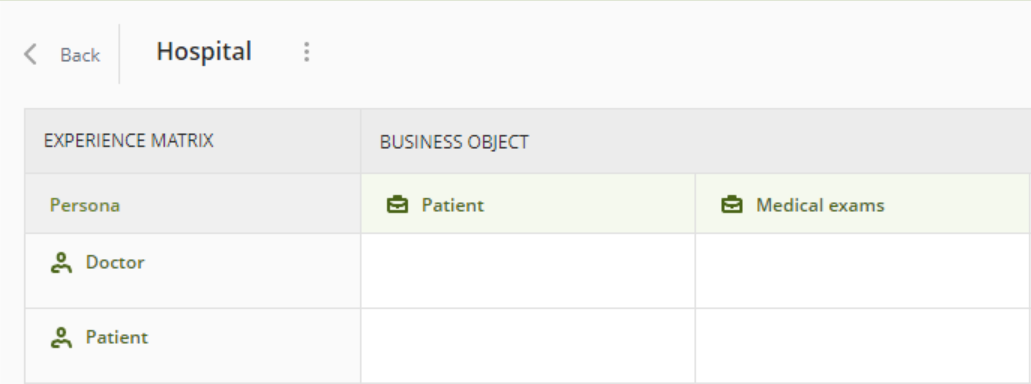
Business Objects are part of the building blocks of your Experience Matrix. After identifying the Personas, define the Business Objects (i.e., Master or Persona entities) that each Persona interacts with. This ensures they have access to the necessary data, allowing them to view information, create records, make updates, and initiate new processes. This article explains how to manage Business Objects, including how to add them, configure their Actions—such as Record Actions and Business Actions—configure their Views, remove or edit them, and work with exposed attributes.
Manage Business Objects
Add a Business Object
To add a Business Object to your Experience Matrix:
1. Click the Add button located in the first row. Like adding Personas, this opens a menu with two options:
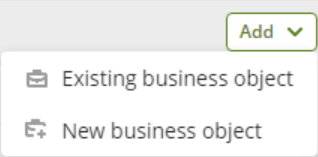
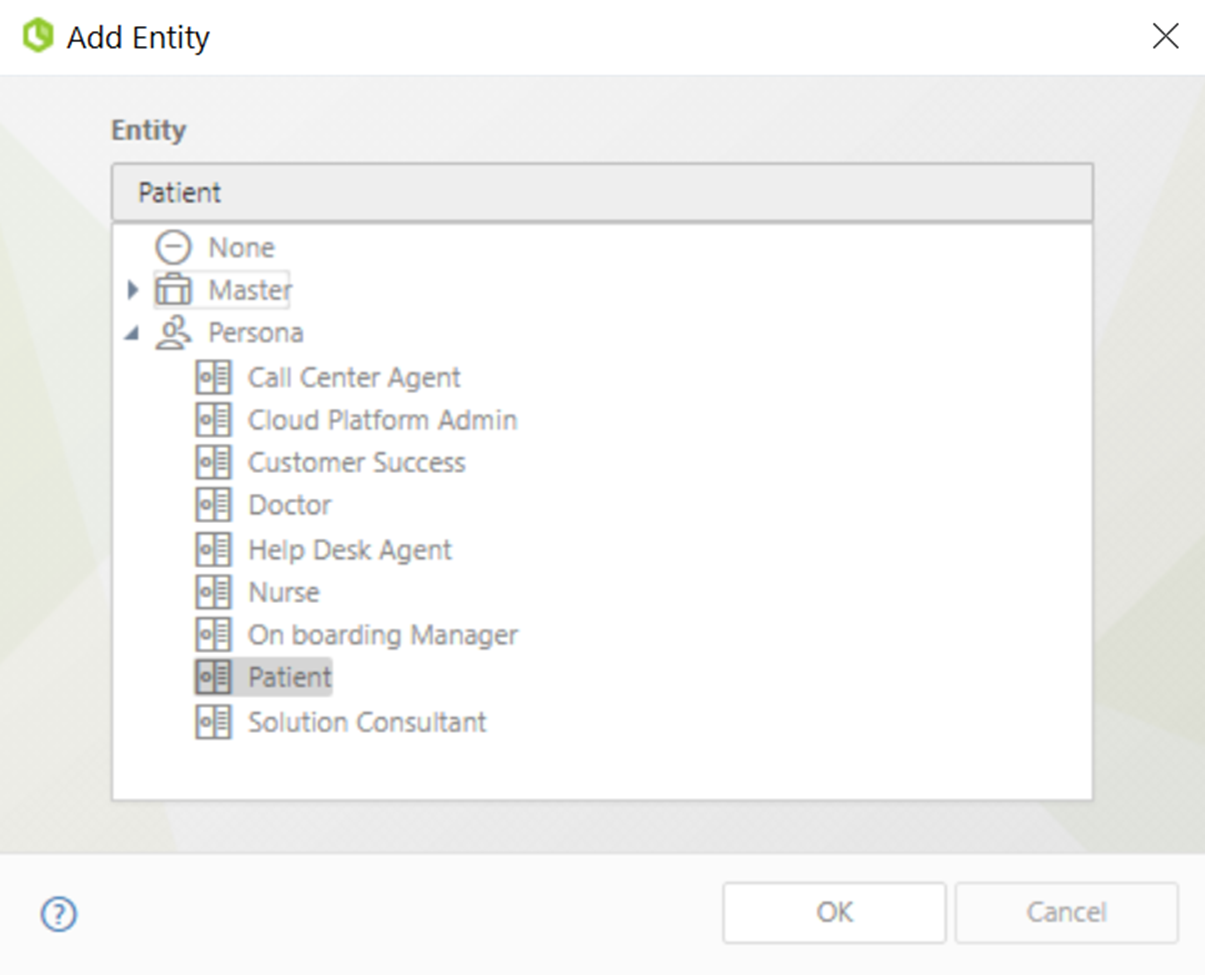
•Existing business object: When clicked, this option allows you to add an existing Business Object to the Matrix using the Add Entity wizard. To do so, select the Business Object you want to add by clicking its name on the list, and then click the OK button.
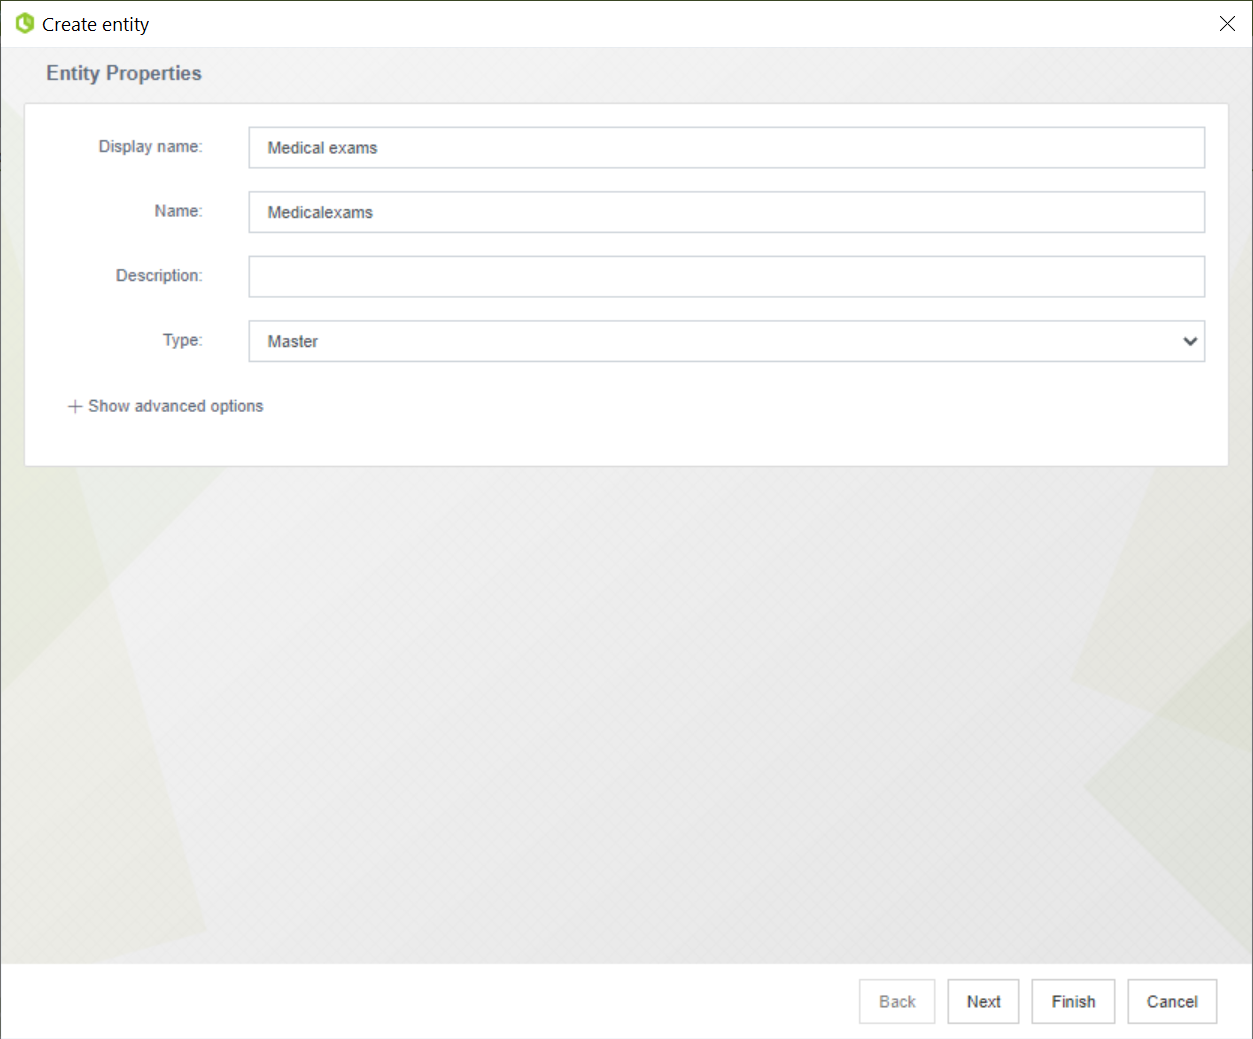
•New business object: When clicked, this option opens the Create Entity wizard for you to define a new Master or Persona entity.
|
When you create a new Business Object, the default entity type is Master. |
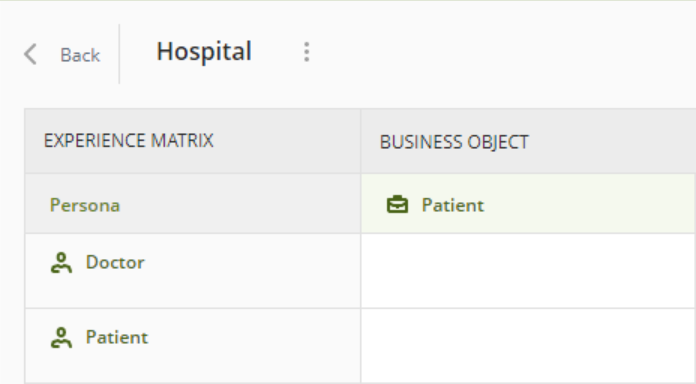
2. Once you finish, the new Business Object is added to your Experience Matrix. All Business Objects you add appear as shaded rows in the second section of the matrix.
Manage Actions of a Business Object
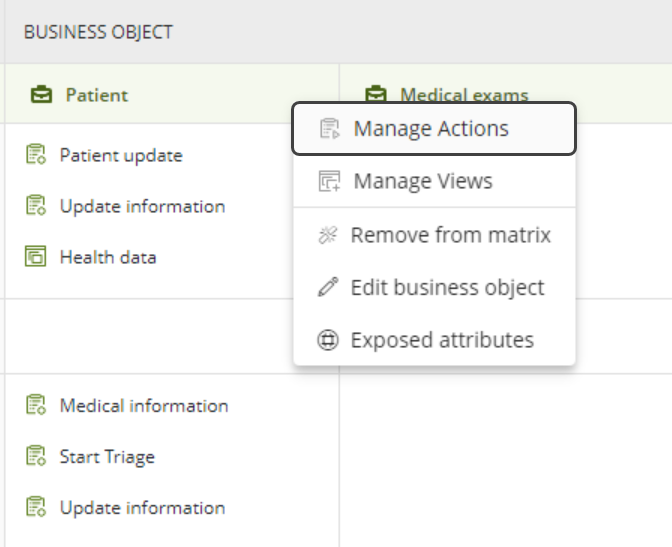
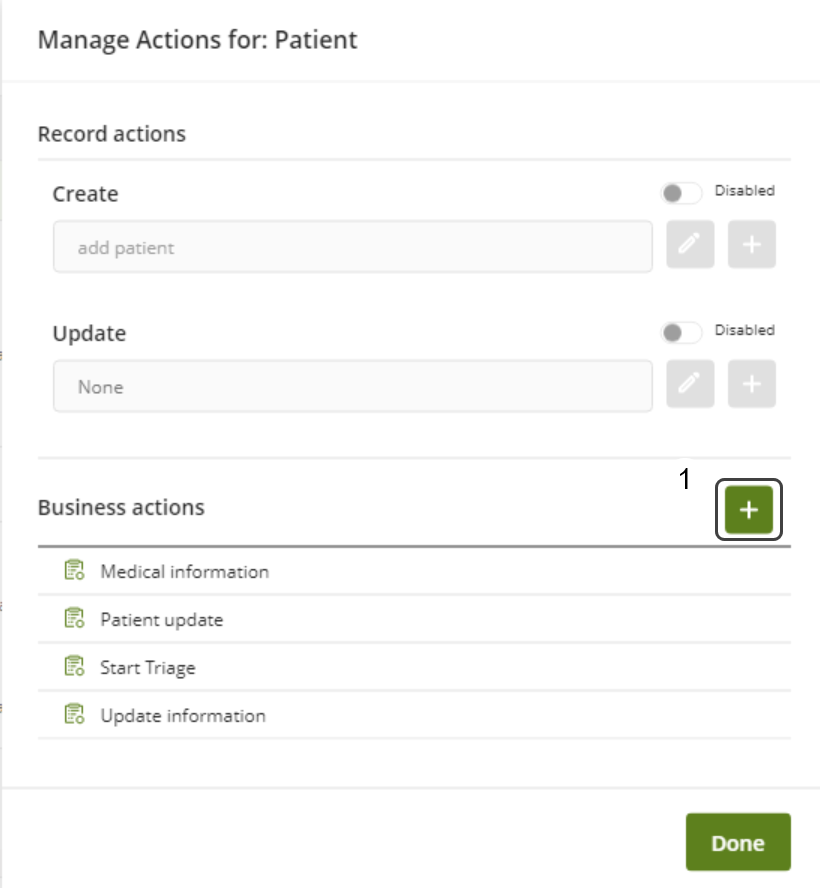
To configure Record Actions or Business Actions, click the three-dot menu next to the name of the Business Object you wish to work on, and then select the Manage Actions option.
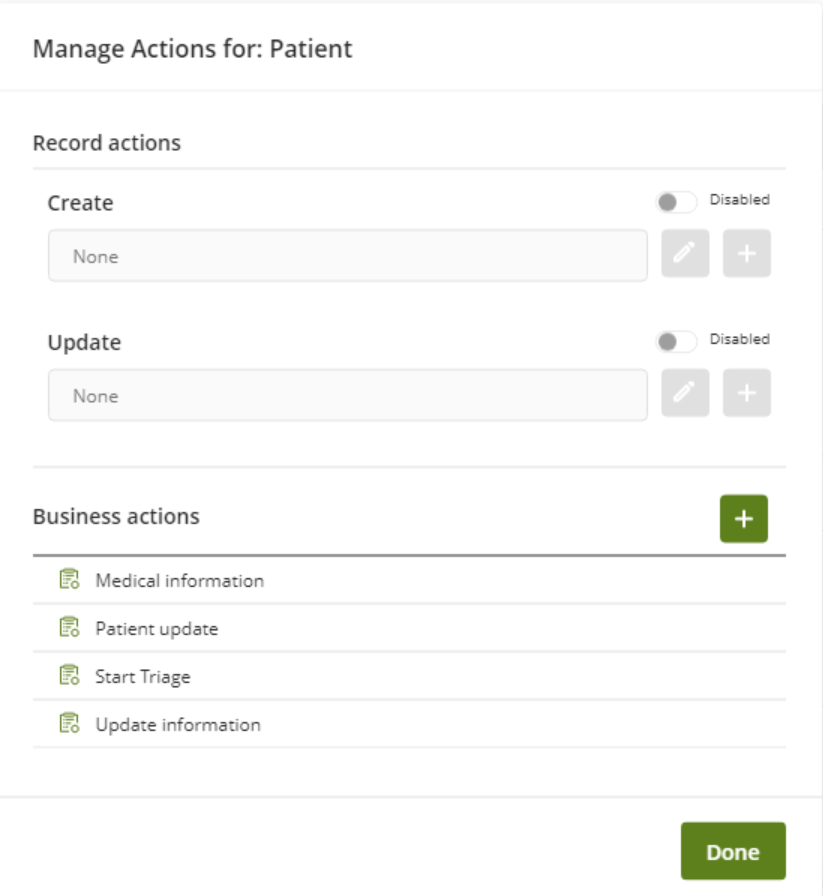
Record Actions
A Record Action is a configurable operation that allows a process to create or update data in an entity without custom scripting. Create Record Actions add new records to an entity or collection, while Update Record Actions modify the values of existing records based on defined conditions. These actions streamline data management within a process and ensure consistent, rule-driven updates to business information.
To configure a Create Record Action, follow these steps:
1.Enable the Create toggle switch button by clicking it.
2.Click the ![]() button.
button.
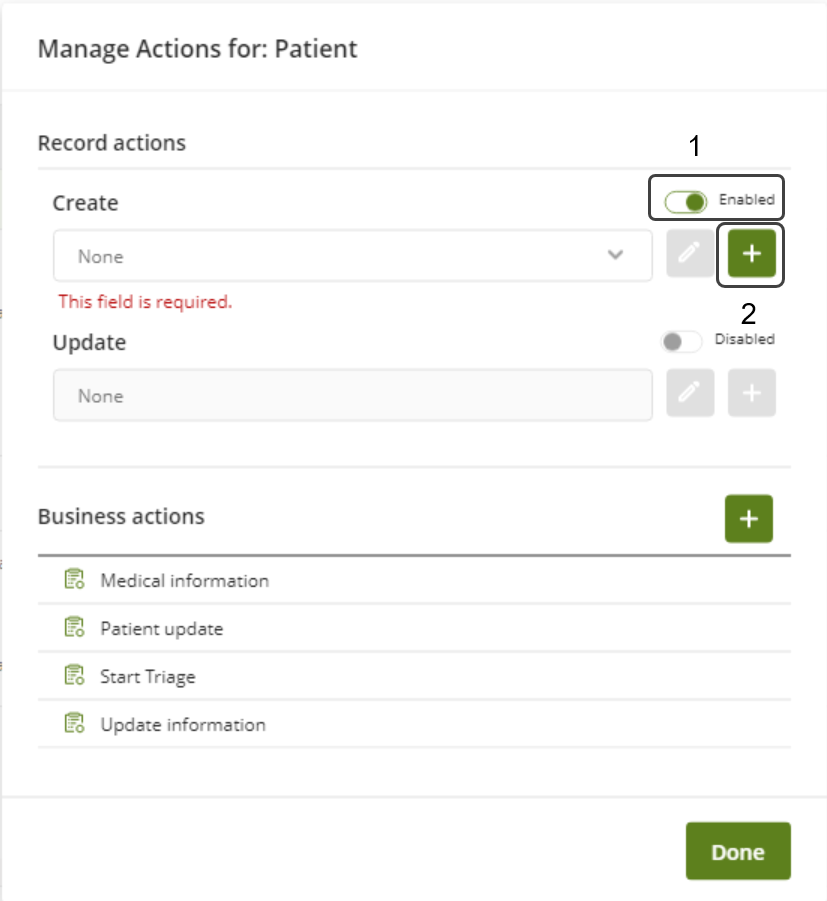
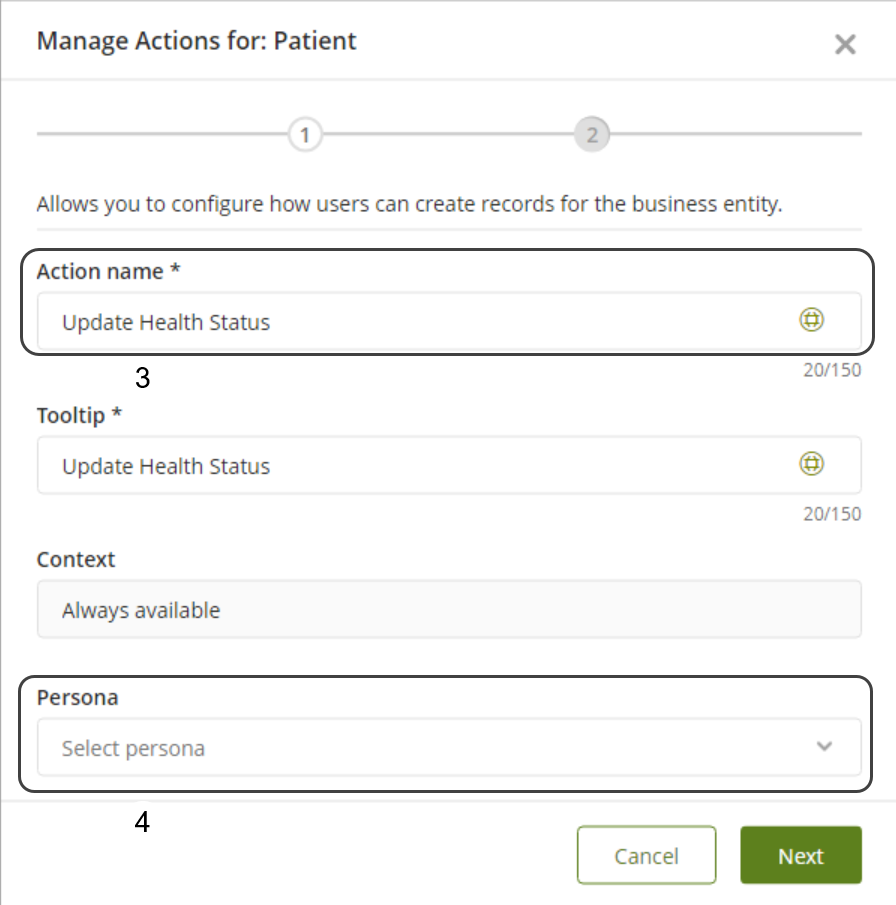
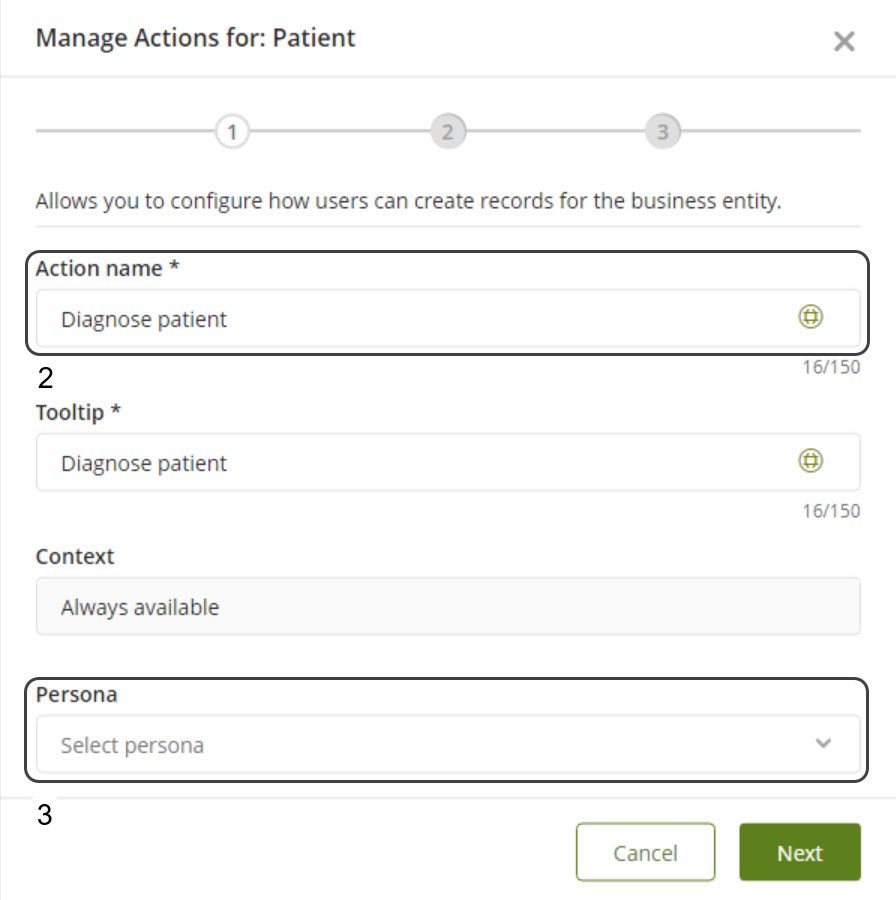
3.In the Action name field, write the name of the Create Record Action. In the Tooltip field, add a short description that explains the purpose of the Action.
4.Select the Personas you want to allow to perform this Record Action. You can also assign Personas after creating the Action.
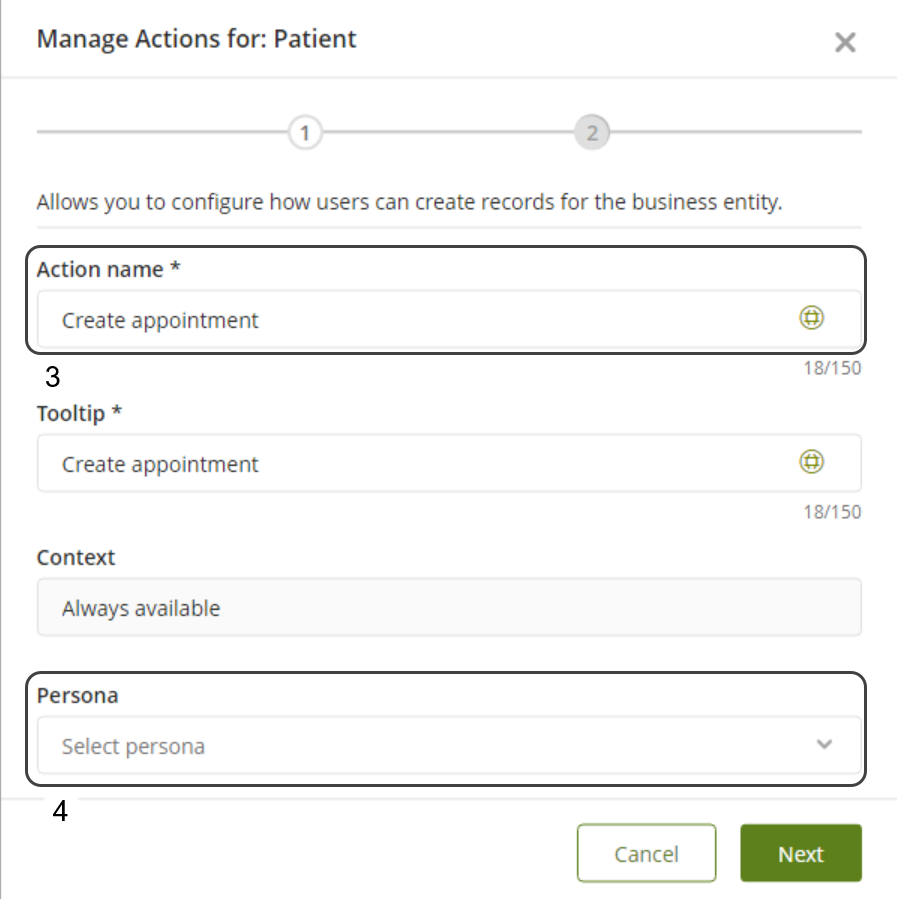
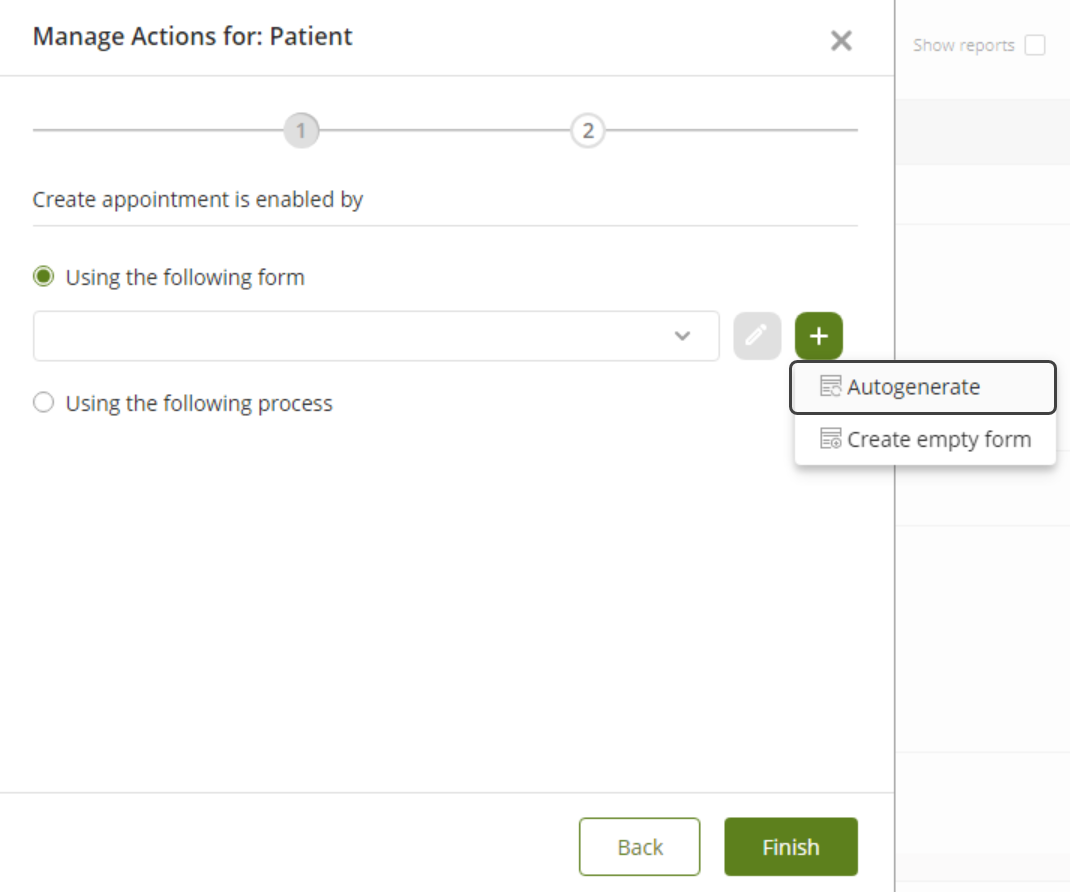
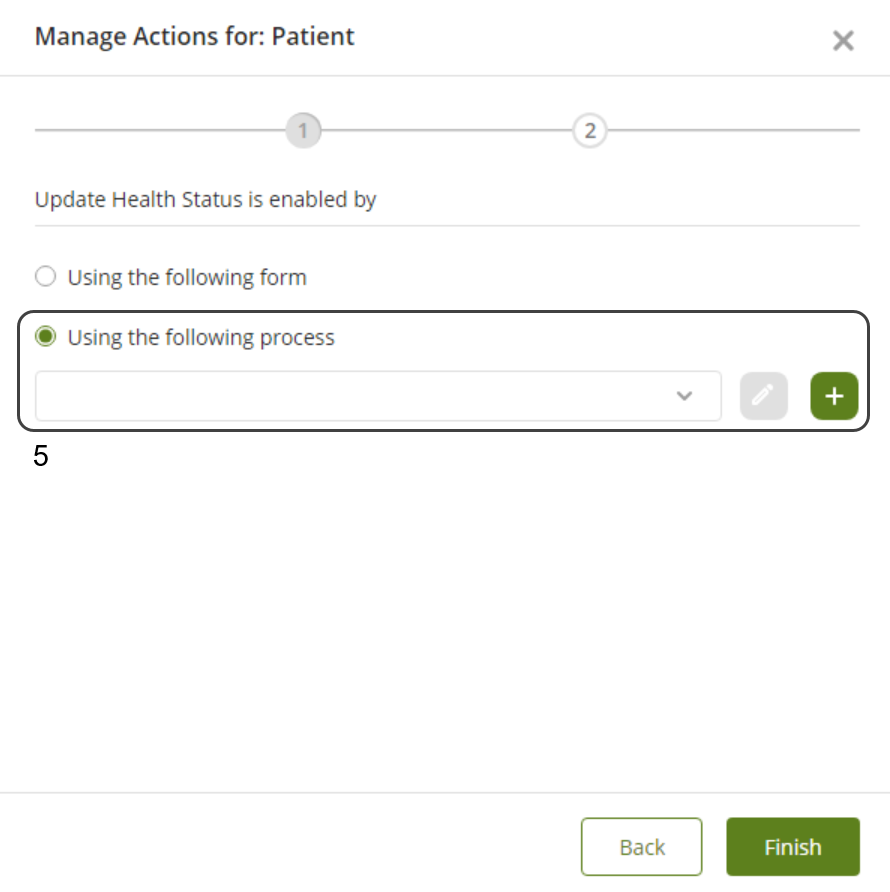
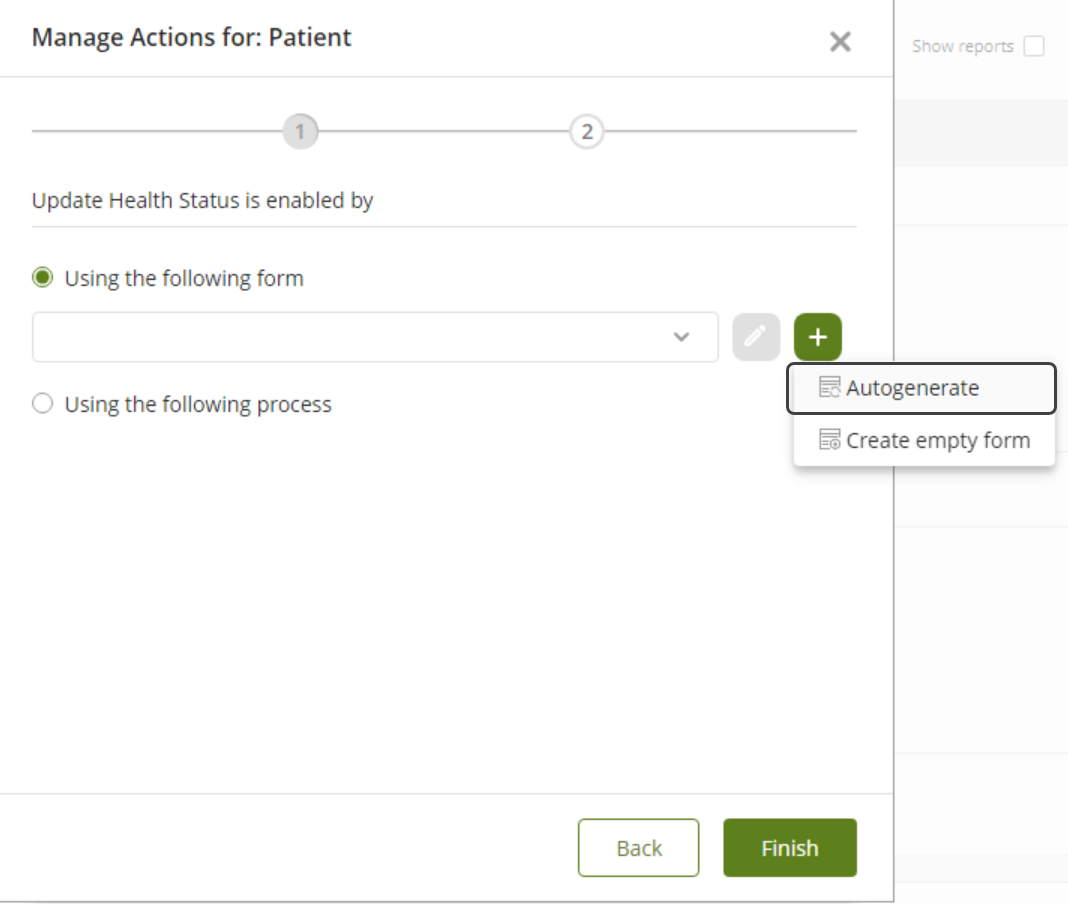
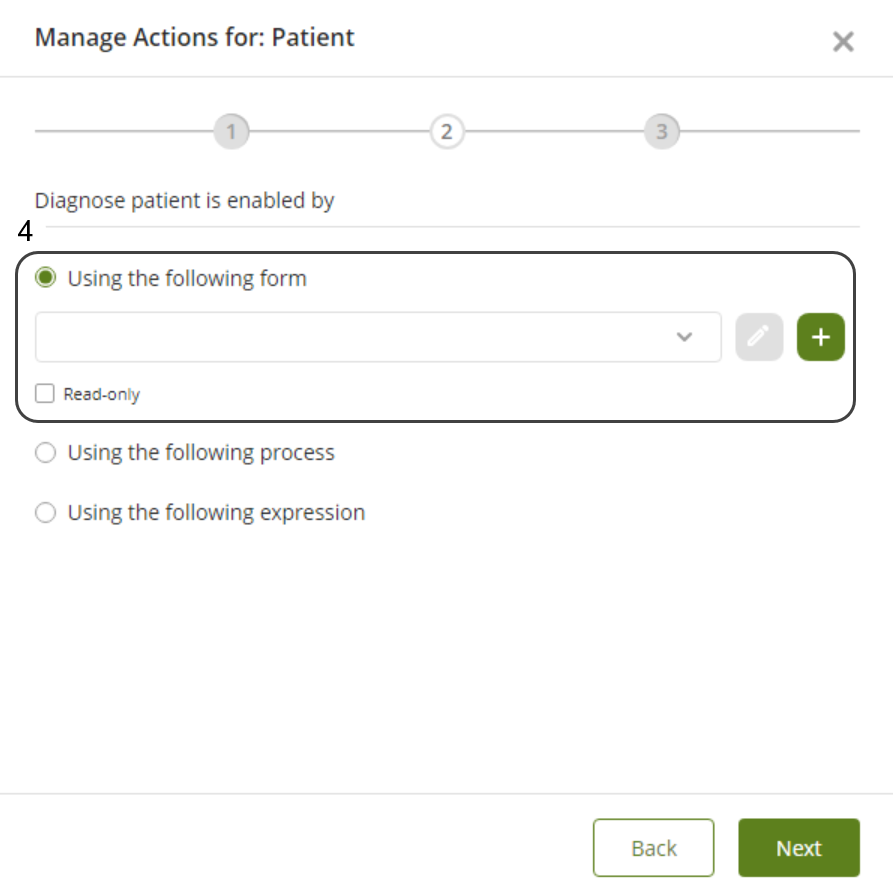
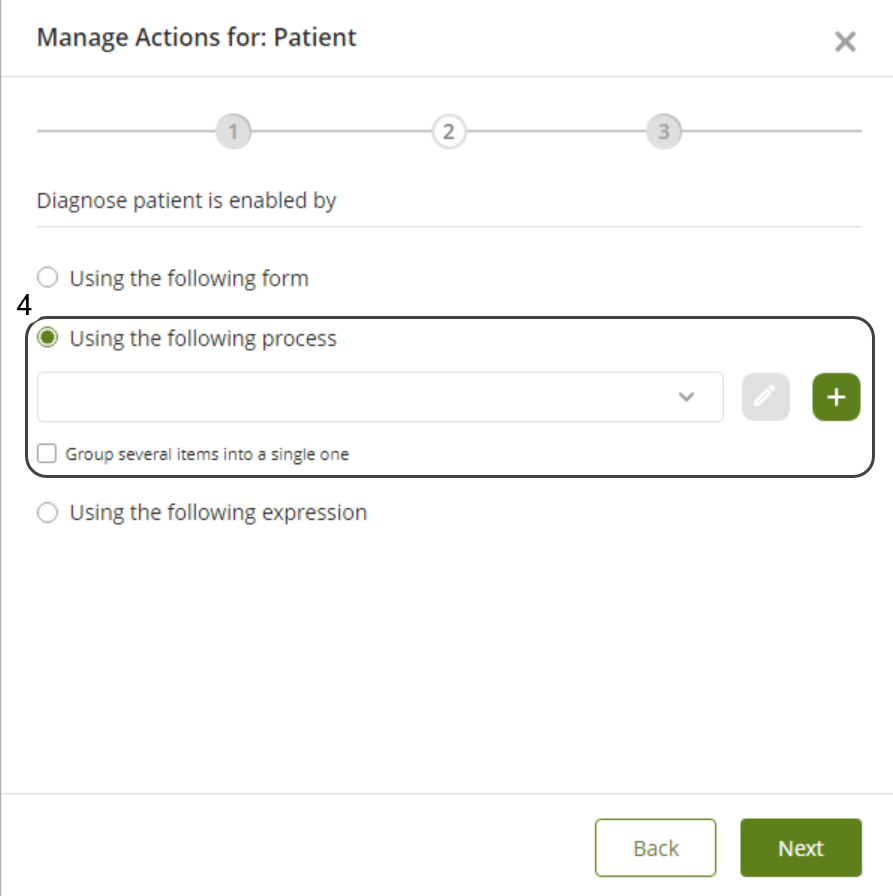
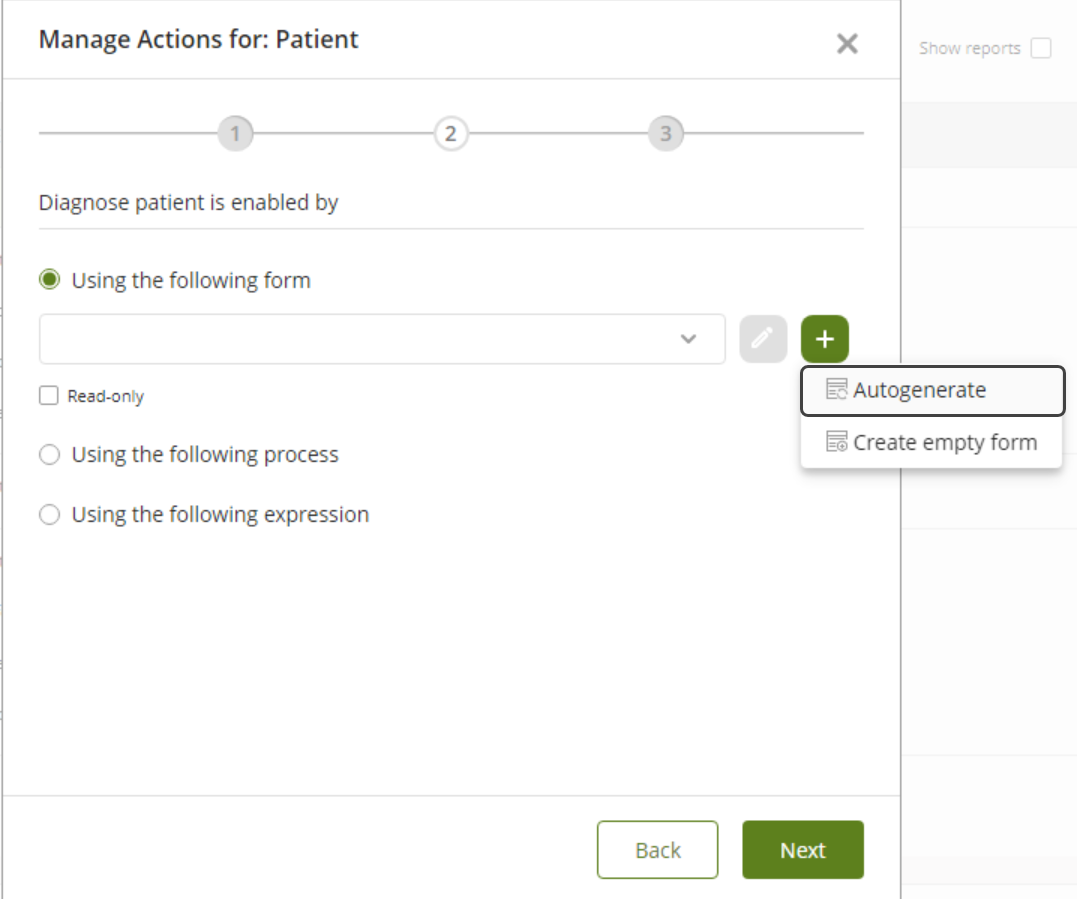
5.Finally, choose how you want the Action to be enabled: either by using a Form or a Process.
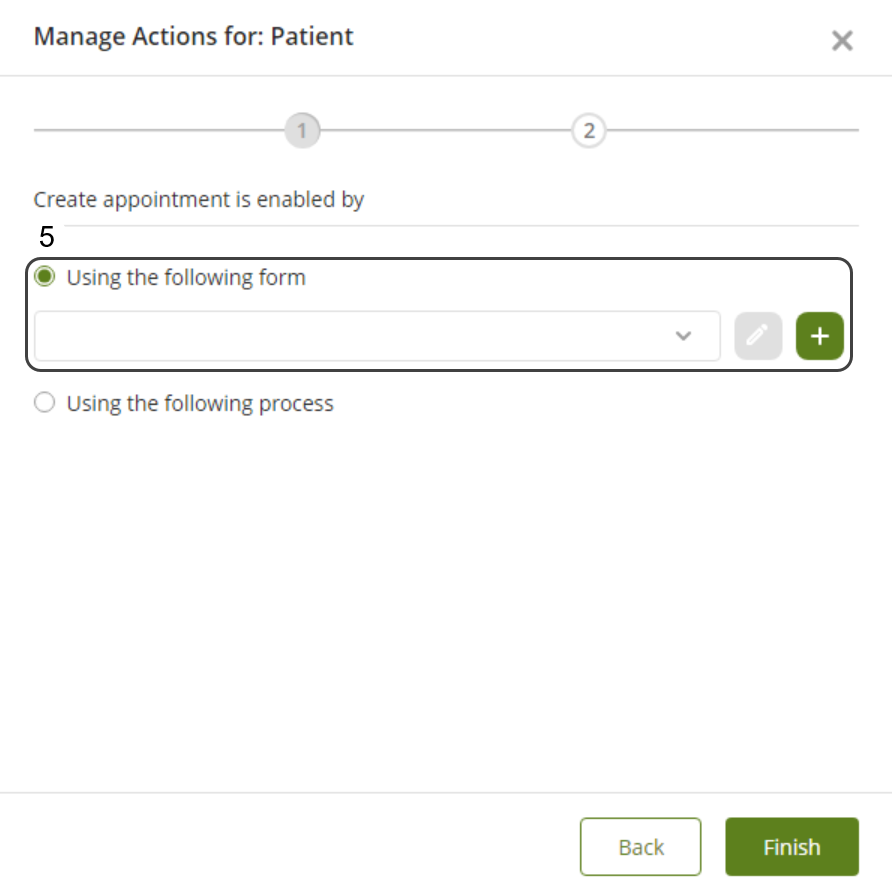

|
If you choose to enable the Action via a Form, you can opt to Autogenerate the Form, which creates a Form with all the attributes already defined in the Entity.
|
Refer to the Visualization of a Creation Record Action documentation to see how a Creation Record Action is reflected in a published app.
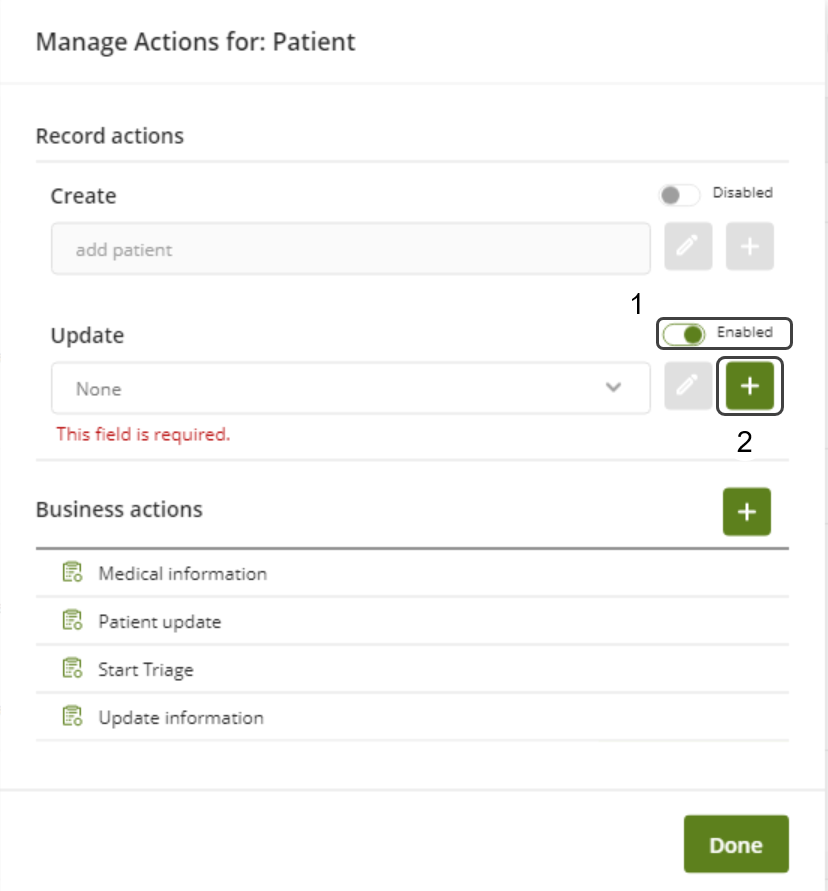
To configure an Update Record Action, follow these steps:
1.Enable the Update toggle switch button by clicking it.
2.Click the ![]() button.
button.
3. In the Action name field, write the name of the Update Record Action. In the Tooltip field, add a short description that explains the purpose of the action.
4. Select the Personas you want to allow to perform this Update Record Action. You can also assign Personas after creating the Action.
5. Finally, choose how you want the Action to be enabled, either by using a Form or a Process.
Note: Always use distinct entities for Business Objects and Update Record Actions enabled by Process to maintain proper relationships in the data model. Check the Considerations When Enabling Actions via Process section for more information.

|
If you choose to enable the Action via a Form, you can opt to Autogenerate the Form, which creates a Form with all the attributes already defined in the Entity.
|
Refer to the Visualization of an Update Record Action documentation to see how an Update Record Action is reflected in a published app.
Business Actions are reusable, predefined operations that automate tasks such as creating, updating, or validating data within a process. They centralize common logic in one place, allowing multiple activities or processes to execute the same action consistently and without custom code. To create a Business Action, follow these steps:
1.Click the ![]() button in the Business actions section located at the bottom of the Manage Actions for: [Business Object] pop-up window.
button in the Business actions section located at the bottom of the Manage Actions for: [Business Object] pop-up window.
2. In the Action name field, write the name of the Business Action. In the Tooltip field, add a short description that explains the purpose of the action.
3. Select the Personas you want to allow to perform this Business Action. You can also assign Personas after creating the Action.
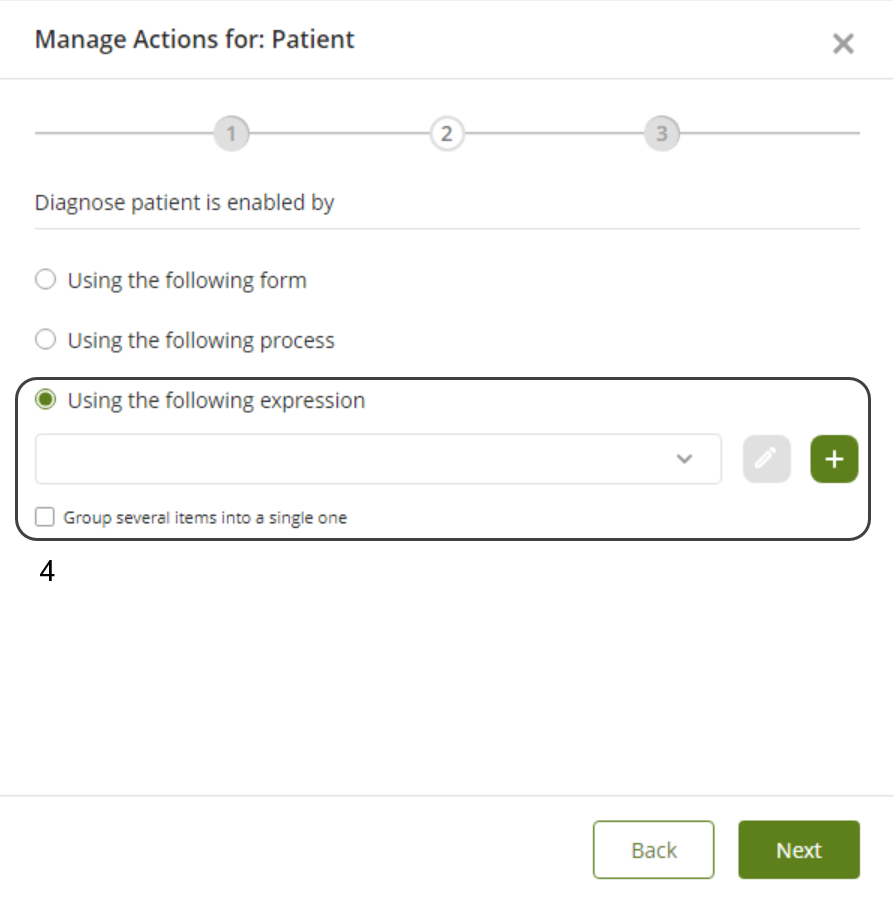
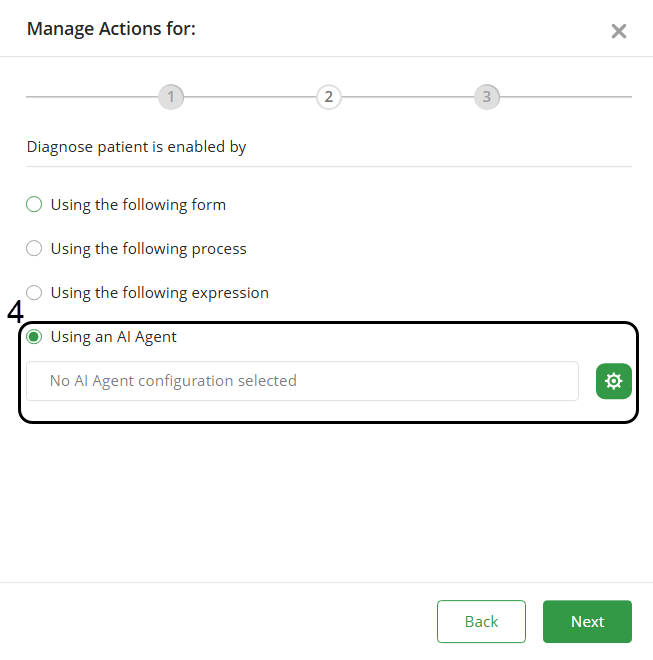
4. Finally, choose how you want the Action to be enabled, selecting between using a Form, a Process, a rule or an AI Agent.
Note: Always use distinct entities for Business Objects and Business Actions enabled by Process to maintain proper relationships in the data model. Check the Considerations When Enabling Actions via Process section for more information.
|
If you choose to enable the Action via a Form, you can opt to Autogenerate the Form, which creates a Form with all the attributes already defined in the Entity.
|
Refer to the Visualization of a Business Action documentation to see how a Business Action is reflected in a published app.
Considerations When Enabling Actions via Process
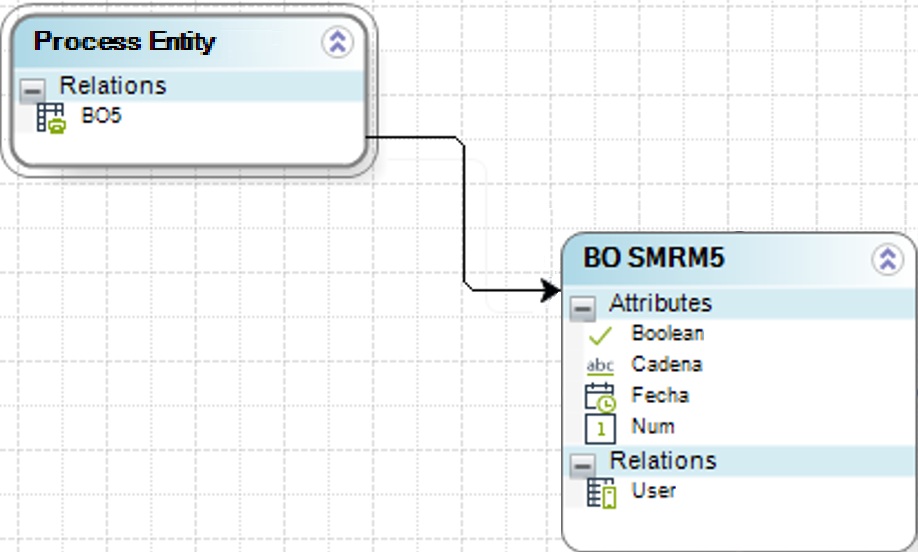
When configuring an Update Record Action or a Business Action using a Process, avoid selecting the same entity as the Business Object for the process entity. Doing so will cause the action to create a new empty record instead of mapping the existing record’s data when executed in Bizagi Apps.
To ensure correct behavior, you must configure a process entity different from the Business Object entity and link it to the Business Object in the data model. This guarantees that the information from the record where the Action is executed is properly mapped.
There are two ways to set up this configuration:
Option 1: Use an Existing Entity
1.Make sure the data model already includes an entity different from the Business Object.
2.In the Manage Actions menu, at the last step (after choosing Process as the method to enable the Action), click the ![]() button to create a new process.
button to create a new process.
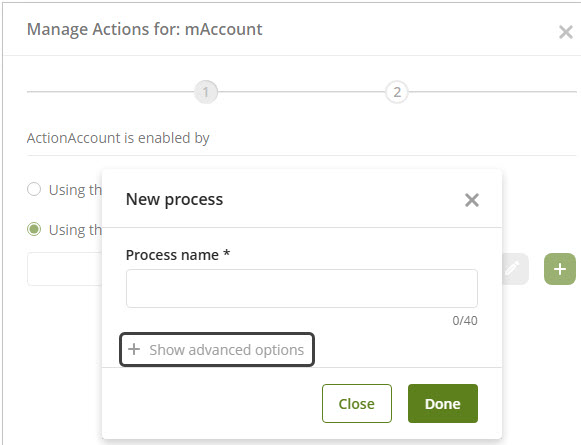
3.Assign a name to the process and click Show advanced options.
4.Select the process entity from the existing data model (different from the Business Object entity).
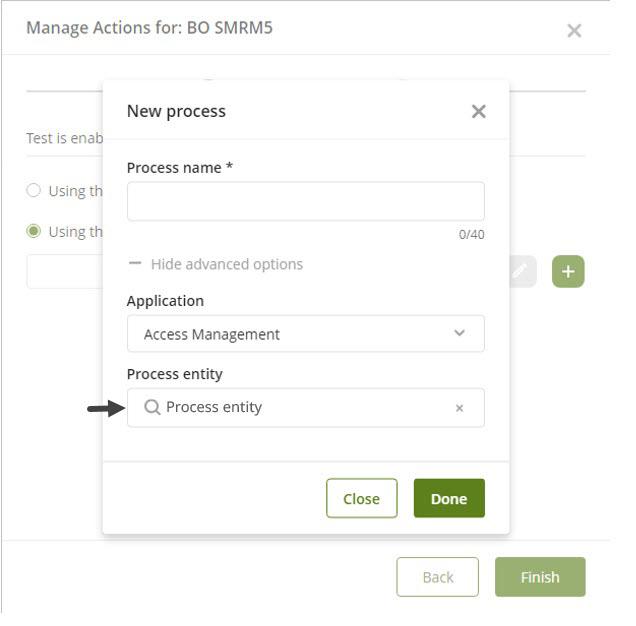
Option 2: Create a New Entity
1.In the Manage Actions menu, at the last step (after choosing Process), click the ![]() button to create a new process.
button to create a new process.
2.Assign a name to the process and click Show advanced options.
3.Type the name of the new process entity in the Process Entity field. A warning message will appear indicating that this entity will be created in the data model when the process is confirmed.
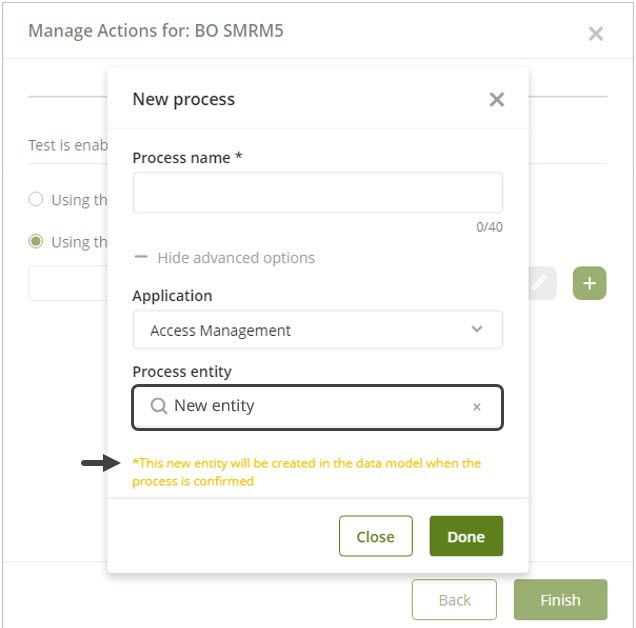
4.In the data model, relate the Business Object entity to the new process entity to ensure proper data mapping.
|
Always use different entities for Actions enabled via Processes and for the Business Object. Ensure proper relationships between the process entity and the Business Object in the data model to guarantee correct data mapping. |
Manage Views of a Business Object
To configure the View of an Entity from the Experience Matrix, follow these steps:
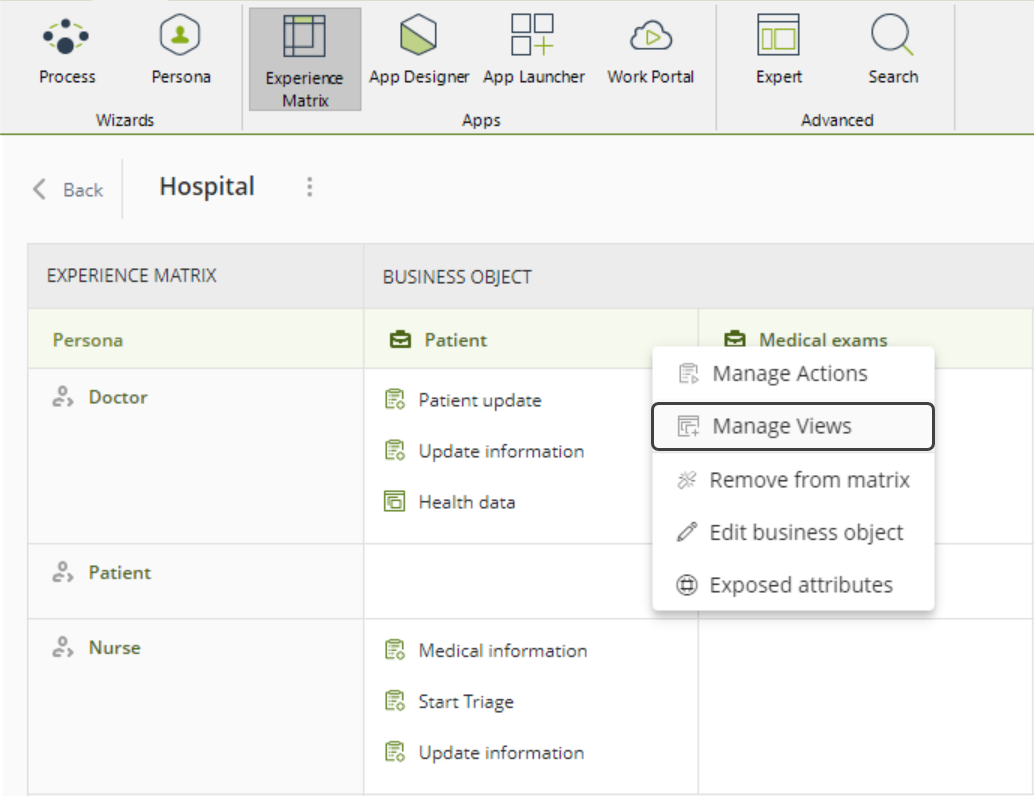
1.In the Experience Matrix, click the three-dot menu next to the name of the Business Object you wish to work on, and then select the Manage Views option.
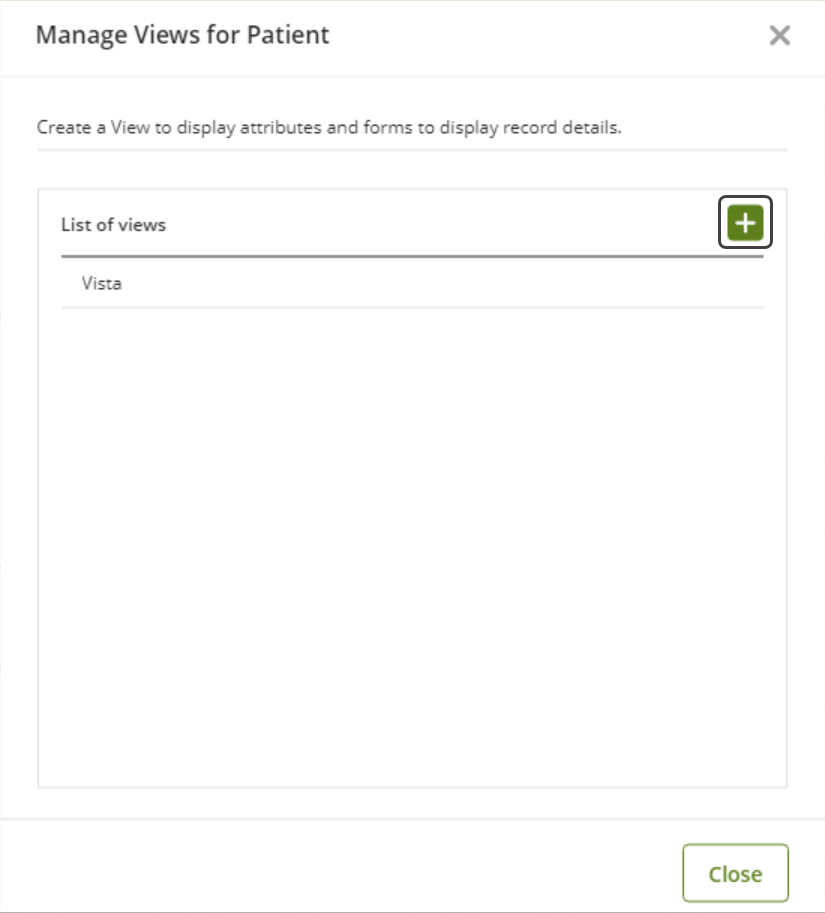
2.In the Manage Views window for your Business Object, the list of existing Views appears. To create a new view, click the ![]() icon on the right side of the list.
icon on the right side of the list.
3.Set the name of the View. Click Next.
The Name property of Views incorporates the following validations:
•The View cannot have the same Name as another View in the project.
•The Name cannot contain reserved words.
•The Name cannot have invalid characters.
•The Name must be within the character limit.
If the Name does not fulfill any of these requirements, an error message appears at the bottom of the window for you to adjust the property.

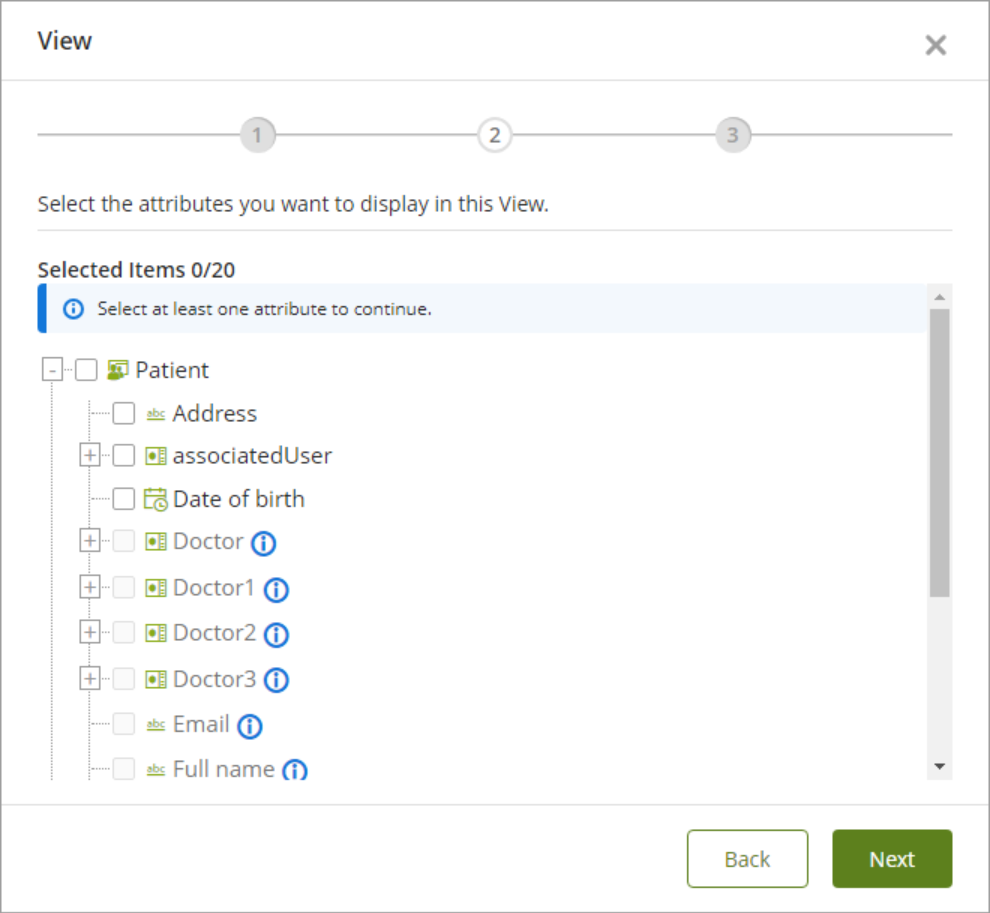
4. Select the attributes to display in this View by clicking the checkboxes. Click Next.
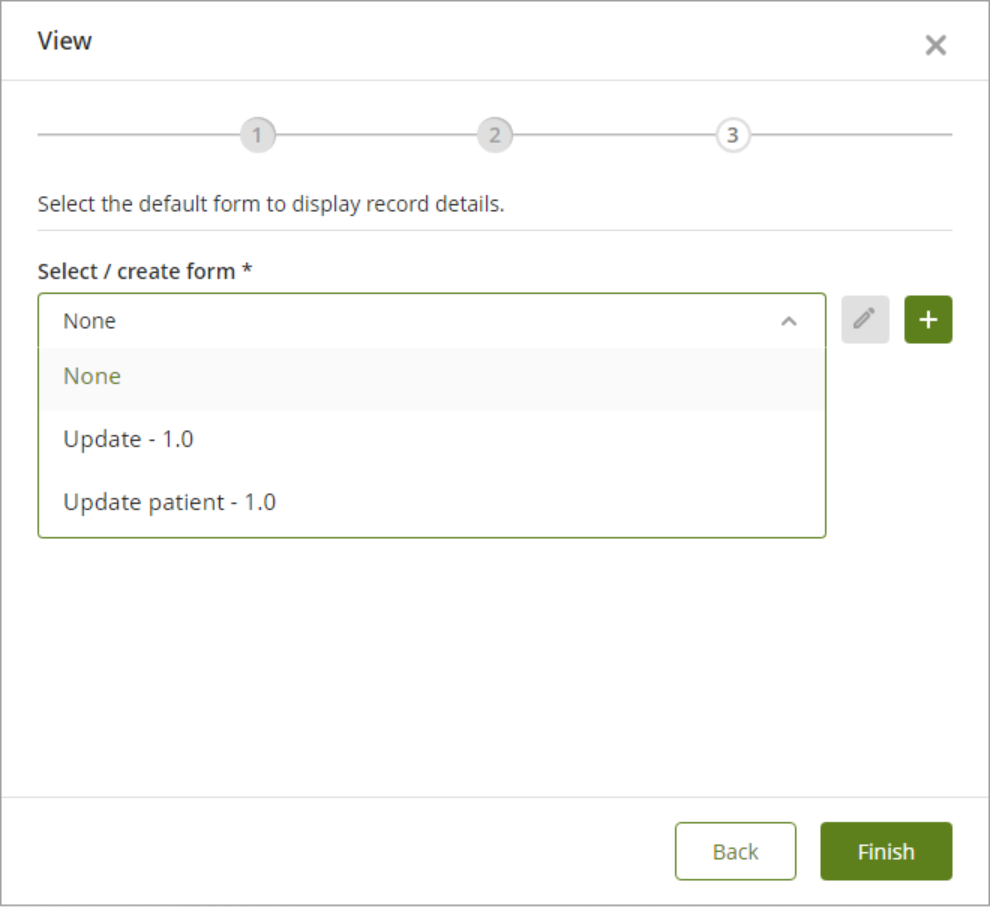
5. In the final step, select the default Form to display record details. Choose an existing Form, create a new one, or set no Form (None) as the default option. Click Finish once you have made your selection.
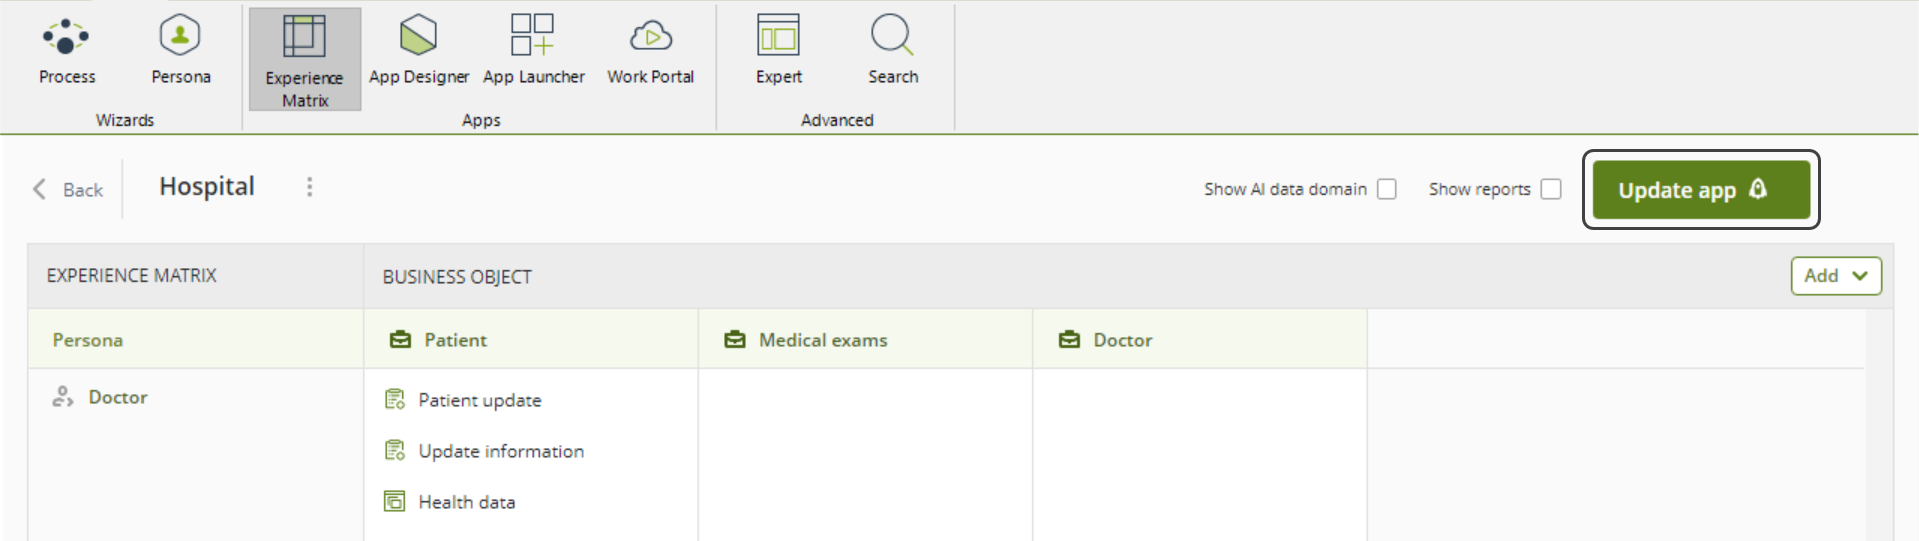
6. To generate the app containing the View configuration, click the Generate app button located on the upper right side of the matrix. This opens the generated app in the App Designer editor.
Note: If the app already exists, click the Update app button instead. This updates the existing app's View configuration and opens it in the App Designer editor.
Remove a Business Object
To remove a Business Object from your Matrix:
1. Click the three-dot menu next to its name. Then, select Remove from matrix.
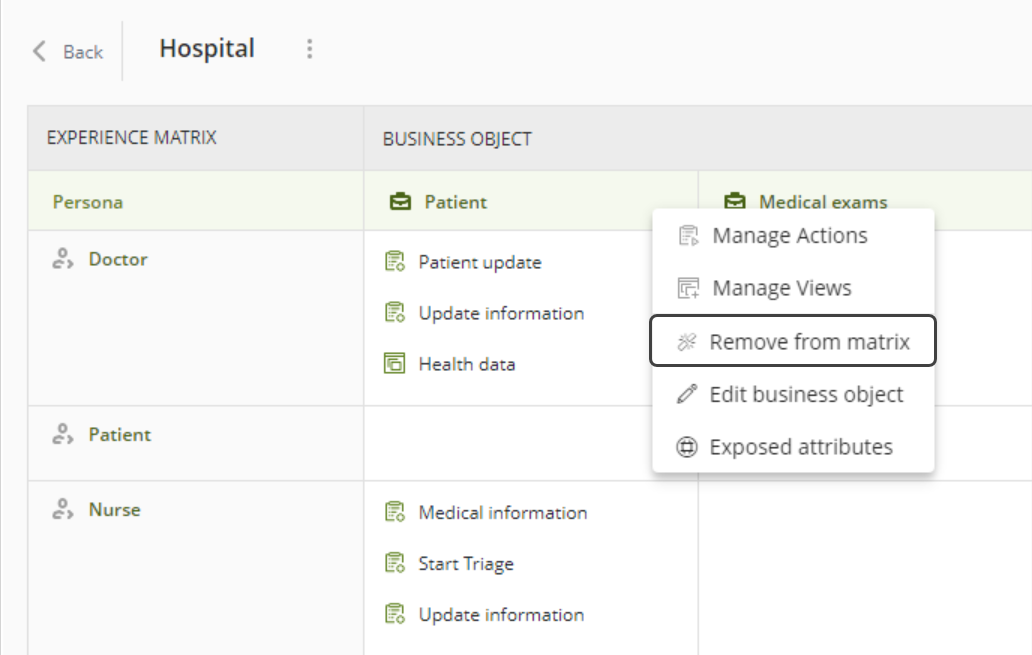
2. A confirmation message appears, indicating that the Business Object will be unlinked from the Matrix. Click OK to remove the Business Object from the Matrix.

|
Removing Business Objects from the Experience Matrix does not delete them from the project. |
Edit a Business Object
To edit a Business Object included in your Matrix, click the three-dot menu next to its name. Then, click the Edit business object option. This opens the Edit wizard for you to modify the selected Business Object's properties and attributes.
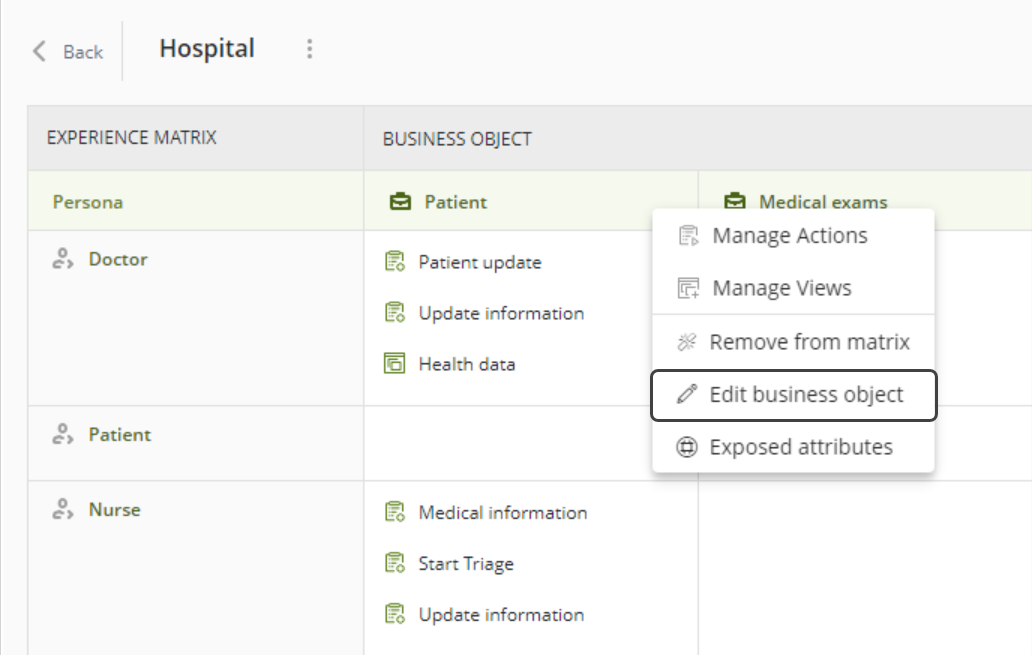
Business Objects have a third option called Exposed Attributes. This option allows you to review, filter and define which attributes can be accessed by end users when using the OData services. Moreover, these are the attributes that Bizagi Apps can see and are used by Views.
To consult the exposed attributes of a Business Object, click the three-dot menu next to its name. Then, click the Exposed attributes option.

This opens the OData exposed attributes window for you to review which attributes of the selected Business Object are currently exposed.
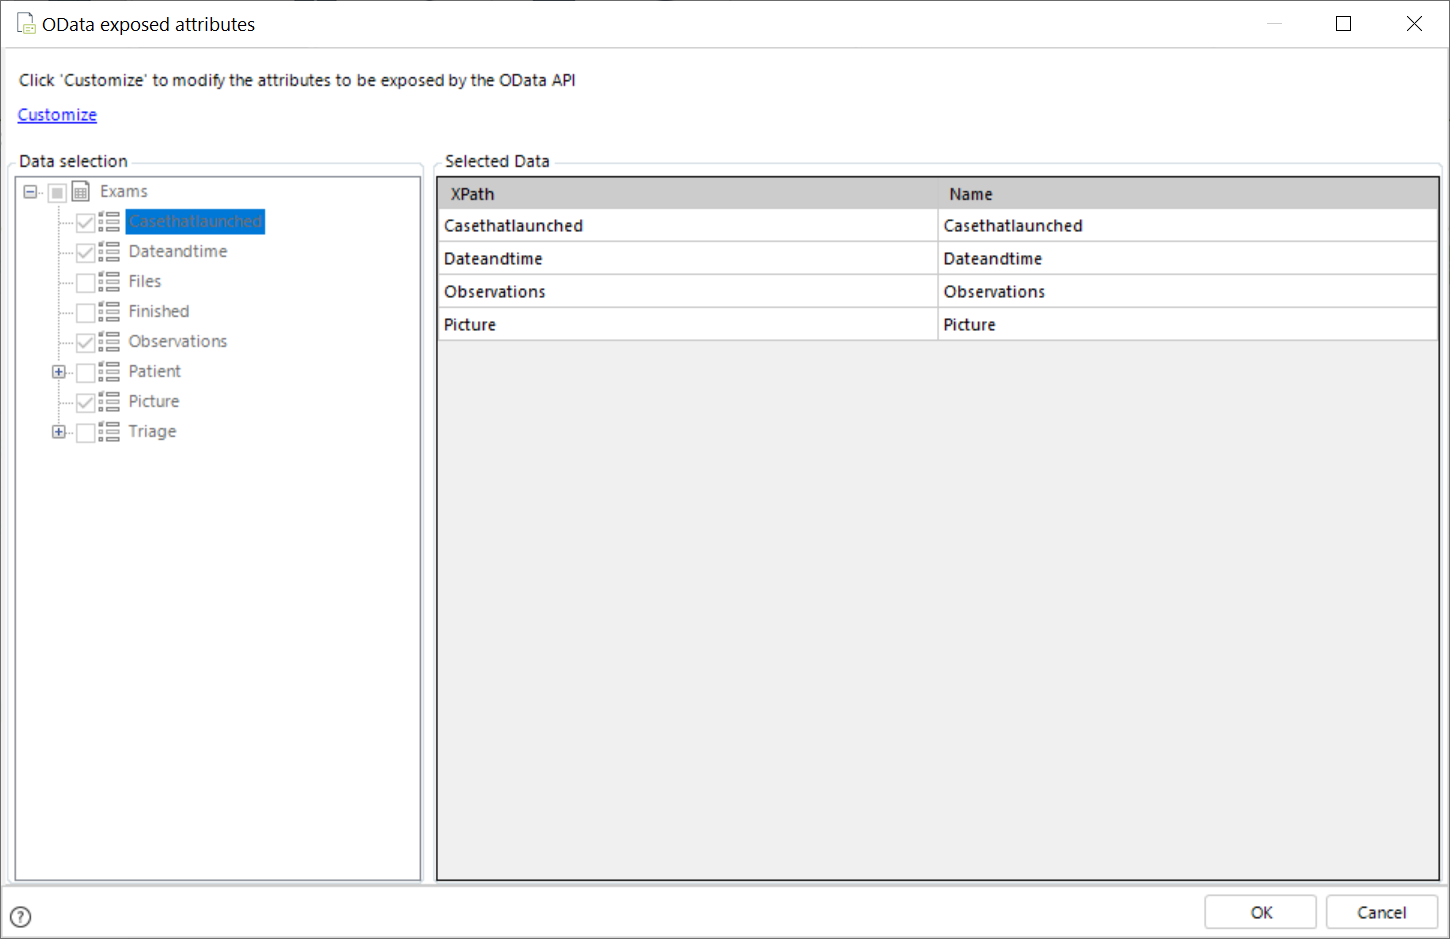
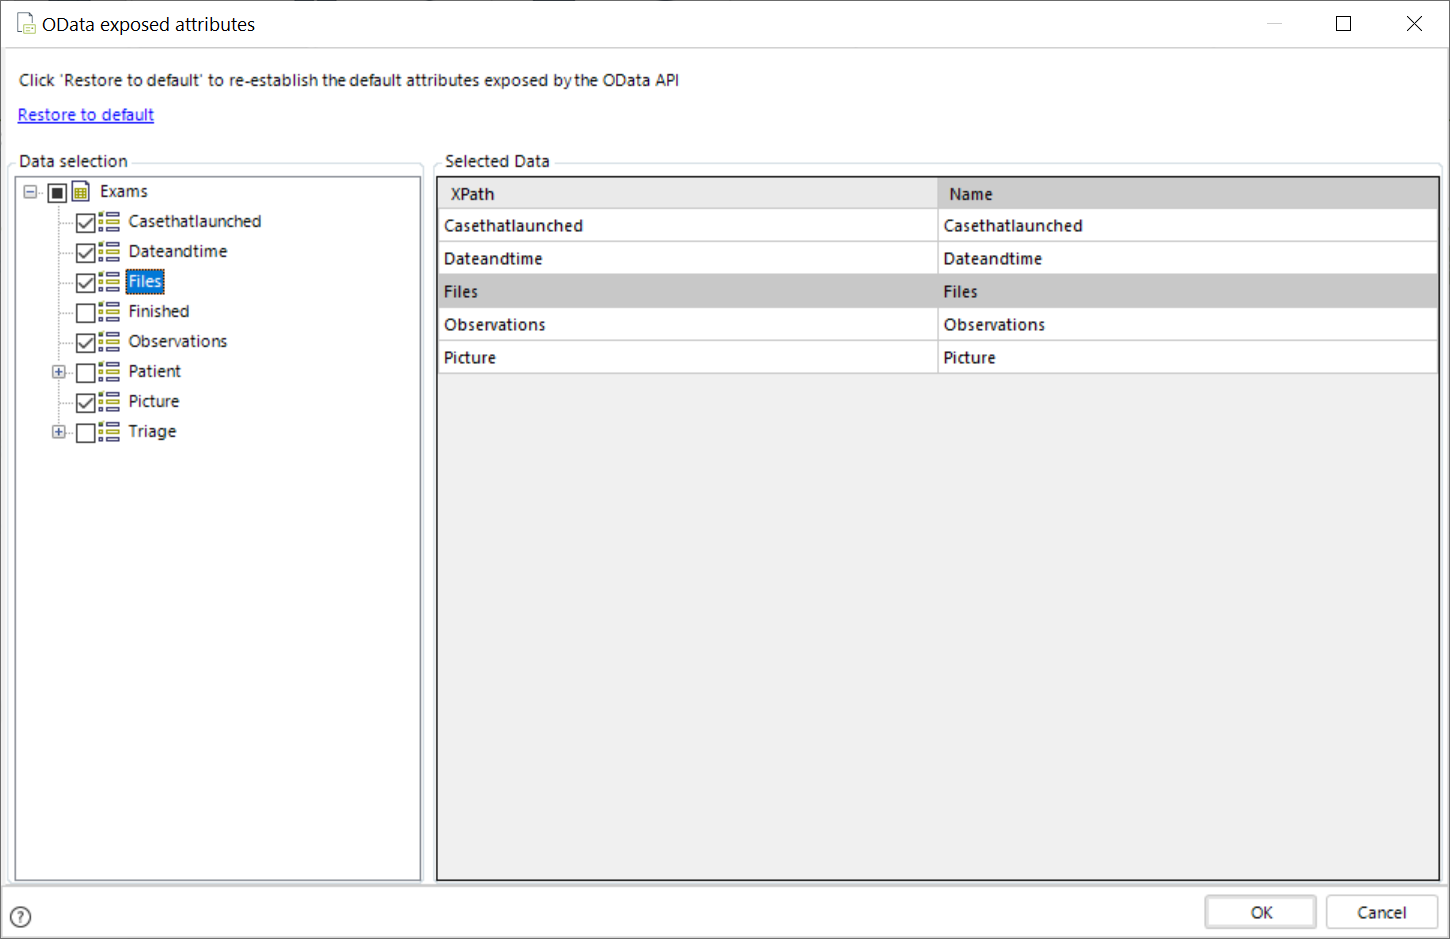
To manage exposed attributes, click the Customize link located in the top left corner of the window. This enables the Data selection and the Selected Data panels for you to navigate the Business Object's attributes and examine the list of exposed attributes, respectively. To add an attribute to the list, check its checkbox in the Data selection panel. Conversely, to remove an attribute from the list, uncheck its checkbox.
Once you have finished selecting the exposed attributes of the Business Object, click the OK button to close the window and keep your changes.
|
When selecting exposed attributes, you can also reestablish the default list by clicking the Restore to default link located in the top left corner of the window. |
Last Updated 7/18/2026 6:10:06 PM