Overview
Bizagi Work portal is shipped with more than 10 languages as an out-of-the box feature, but it also supports any other language as well, as described at Multi-language support.
When enabling a language for Bizagi Work portal which is not shipped in with the product, you will need to include translations for those menus, options, and labels in general.
Or similarly, modify and customize the built-in translations for an out-of-the-box language if desired.
To include or modify such translations, there are 2 options:
1. Use the language settings options at the Work portal to massively load all translations.
This option is especially helpful for a live production environment, since it allows you to manage directly these translations at anytime.
The following content will illustrate how to use this option at the Work portal.
2. Use Bizagi Studio (from the development environment) to include translations.
This latter option is especially useful when modifying or customizing only a few specific translations.
To learn about the latter option, refer to Translate default interface labels from Bizagi Studio.
|
The Theme builder is available in the languages supported by default. However, its default menus are not currently available for other languages or customized translations. |
Prerequisites
•Recall that at this point, you should have already enabled the language or set of languages you want to support.
•This step is done as described at Enabling languages.
•To Localize entities, users must have the corresponding granted access rights.
Work portal menu, options and labels in general (default interface labels) are classified and presented by Bizagi as Internal Objects.
Recall that these are the ones used in every single Bizagi project, such as: menus in the upper ribbon, labels for the Inbox and different panels, and messages that are displayed upon validations.
What you need to do
The outline to include or modify existing translations from the Work Portal options is:
1. Select the base language.
Choose a language in which you already have definitions or the one currently used by your project. To help you identify those objects while viewing default labels as a guided reference, for you to define an accurate translation).
2. Enter the given translations.
Download an Excel file containing the list of all the objects and fill in those translation blanks.
3. Load translations.
Upload the Excel file containing the translations while selecting the target language that such inputs apply to (either to populate initially or to modify and overwrite).
Procedure
Log in to the Work Portal with an account having admin rights.
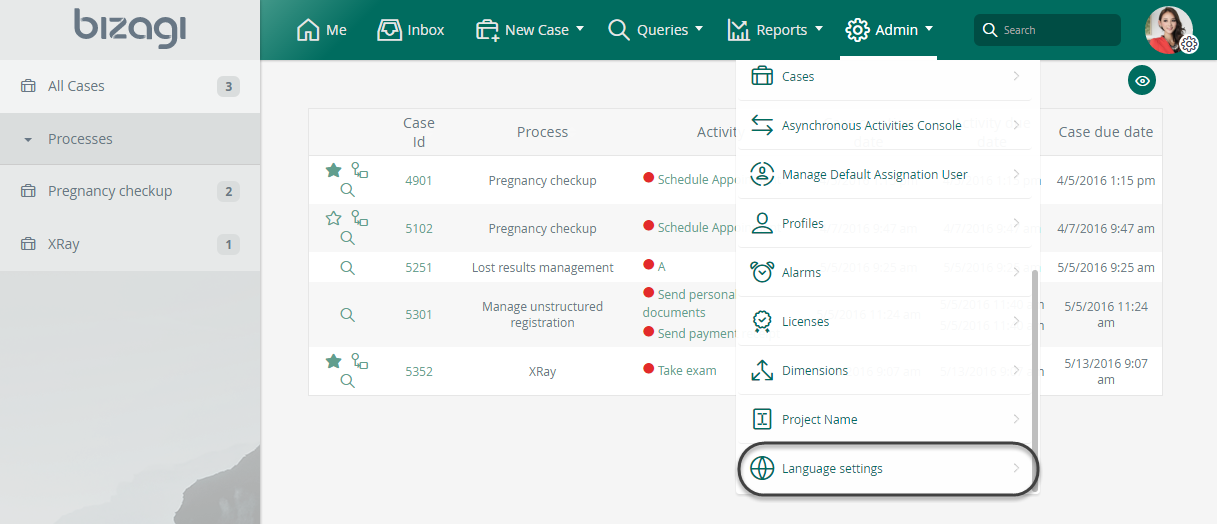
Then go to the Admin menu and open the Language settings options.

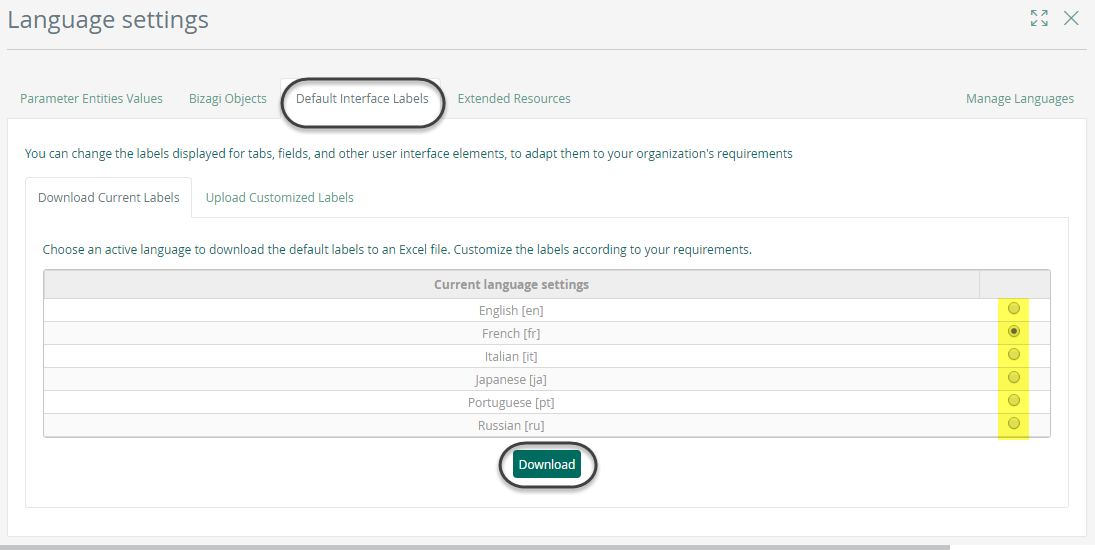
Move to the Default interface labels tab and choose the base language (which serves as reference for the translation) from the list of active languages.
Click Download to download the Excel template.

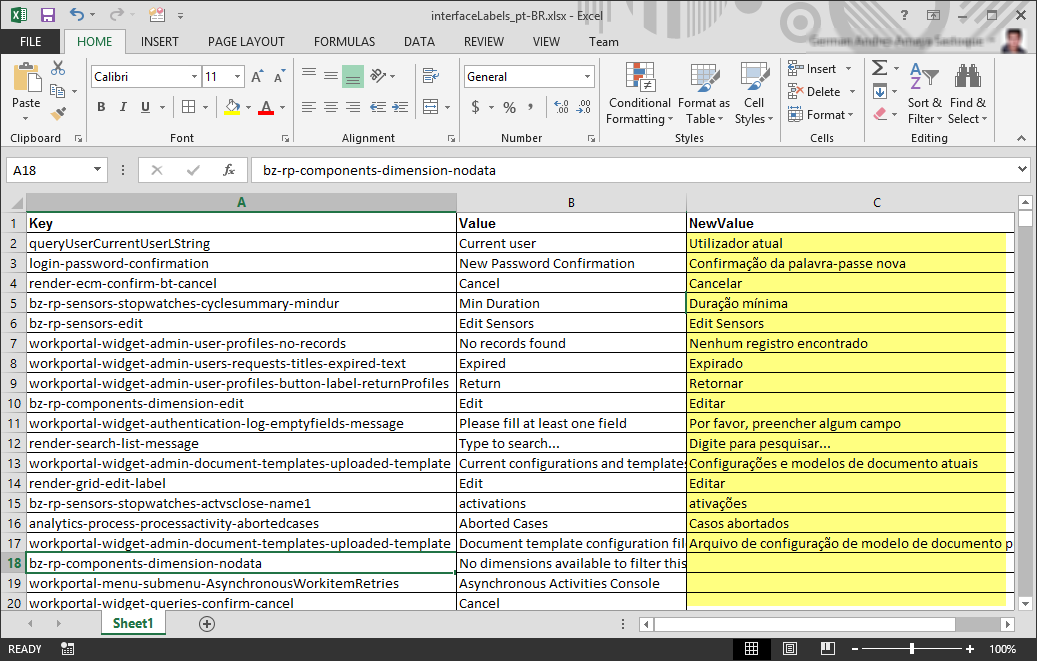
Open the Excel template.
You will find one sheet with three columns:
•The first column refers to the internal name of the menu.
•The second column is the default value that is given in Bizagi for the base language selected.
•The third column is blank and is the only column enabled to enter values. That is where you should enter the desired translation. Make sure that everything you enter in this column corresponds to a single language.

Once the translation for every object has been entered, save and close the file.
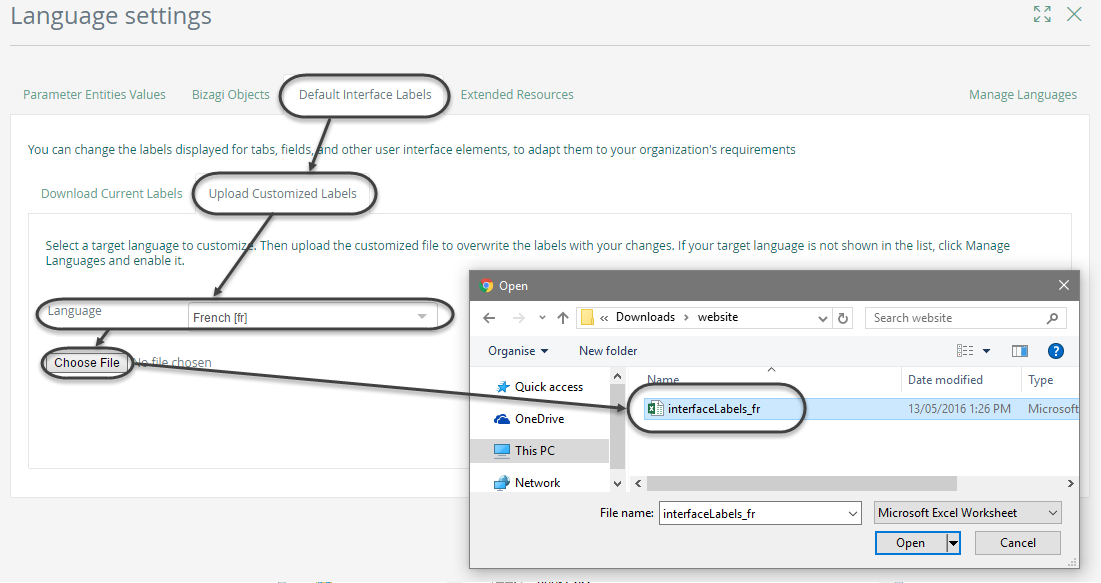
Back in Bizagi Work portal and while in the same Language settings window, move to the Update customized labels tab.
Select the target language whose objects will be updated with the content entered in the New Value column, and browse for the Excel file that contains the translations.
|
The size of the Excel file must be lower than the limit established in the Upload Max File Size parameter that you configure in the Advanced tab of the Environment settings. See Environment configuration. |

Finally click Upload to update the resources.
Important recommendations
•Take into account important notes regarding the supported standard (ISO 639-1), and others notes, as described at Multi-language support.
•When inputting or modifying translations directly in the production environment, it is strongly recommended to repeat such procedure with these same translations in your other environments (i.e development environment).
•Feel free to take any backups necessary of the initial Excel files in case you are modifying translations.
Recall that once new translations are uploaded, these will overwrite any previous ones for that same language.
•Leaving blank spaces in the Excel is a possibility.
If you leave empty values in the New Value column of the Excel file the first time, the objects will take the default value.. For example, if you are localizing to Spanish and you leave a blank cell, then Bizagi will show its Spanish default value for the control. If the target language is not supported by default, any undefined value will be displayed in English. On the other hand, if the objects already have location and leave blank values, they will continue with the existing value.
Last Updated 1/6/2022 5:27:44 PM