Overview
In addition to having menus, options and labels in general at the Work Portal, shown in a particular language of your choice, multi-language support in Bizagi consider also the possibility of having separate language profiles for users.
This applies when enabling more than one language for your project. For example when having users in the different geographical regions, spread all around the globe while using a same set of processes.
In these scenarios, though each user views the Work portal in a given language. For them to actually read labels regarding processes, business, or organizational definitions in that given language, it would be up to your implementation to input the translations for the names of specific objects of your project. For example, defining the name of your processes, name of user interface fields, values or parameter entity values, for each enabled language.
|
If the Work Portal is to be displayed in a single language, then Process and its objects are expected to be designed in said language right from the start, and localizing processes is not necessary. It is when enabling more than one language that localization capabilities will allow your entire user interface to be displayed homogeneously for each of the multiple languages. |
To localize your processes and their objects, there are two options:
1. Use the language settings options at the Work portal to massively load all translations.
This option is especially helpful for a live production environment, since it allows you to manage directly these translations at anytime.
The major advantage when using this option is that you would implement completely the processes first, without having to include translations at that point.
And then, once the implementation is finished, you define translations for all processes and their objects (massively).
The following content will illustrate how to use this option at the Work portal.
2. Use Bizagi Studio (from the development environment) to include translations.
This latter option is especially useful when modifying or customizing only a few specific translations.
The expected procedure when using this option, is including translations as you go along implementing your processes or to perform some adjustments.
To view how to do this from Bizagi Studio options, refer to Localize processes and their objects.
Prerequisites
Recall that at this point, you should have already enabled the language or set of languages you want to support.
This step is done as described at Enabling languages.
To Localize entities, users must have the corresponding granted access rights.
Localization for all process objects
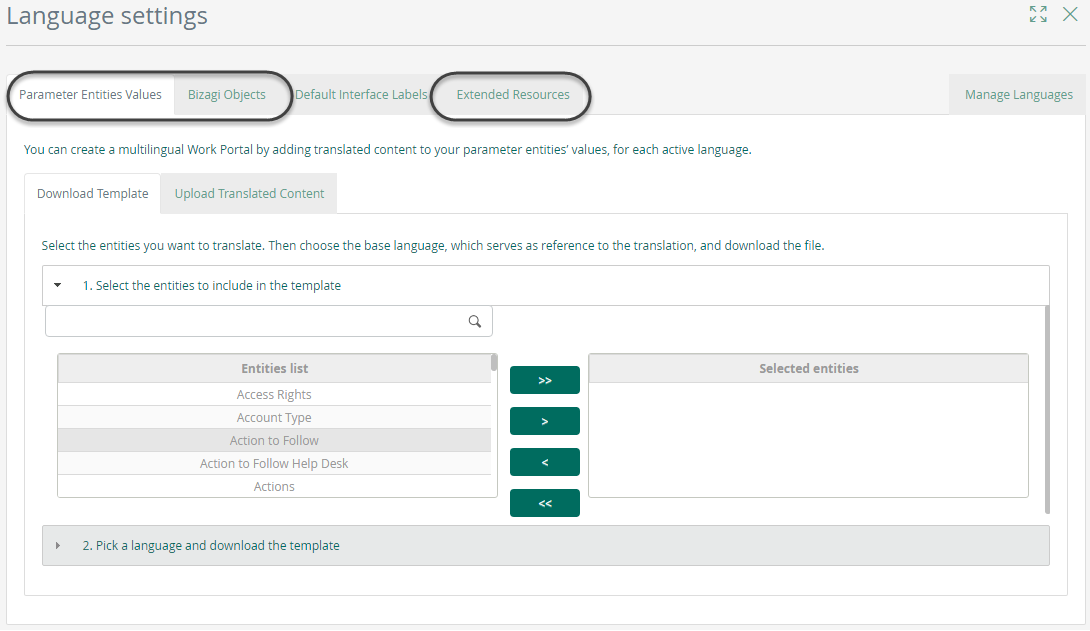
Specific definitions of your project regarding processes and their objects are presented by Bizagi as 3 categories: Bizagi Objects, Parameter entities and Extended Resources.
It is recommended to include translations for the 3 categories, though some projects may not necessarily use definitions in all of them:
•Bizagi Objects: Refers to those objects which are specific to your implementation, such as names of processes, roles and further definitions in your organization, user interfaces for activities and their fields.
•Parameter Entities: Refers to the values of parameter entities, which are those that Bizagi uses as previously populated lists to select from (e.g names of cities).
•Extended resources: Refers to further customizations your project may have to address specific and extended behaviors (such as validation messages).
|
•The parameter entities are listed only when having at least one attribute marked as Localizable from the data model. •Note that Default interface labels refers to those objects which are presented for every Work portal, regardless of your proprietary implementations. •Inputting new translations or overwriting existing ones for these type of objects is done only for languages other than the ones shipped in as an out-of-the-box feature or to customize them, as described at Including or modifying translations for the Work portal. |
What you need to do
The outline to define localization for your processes and their objects is doing the following for each of Bizagi Objects, Parameter entities and Extended Resources when applicable:
1. Select the base language.
Choose a language in which you already have definitions in, or the one currently used by your project (in order to help you identify those objects while viewing default labels as a guided reference, for you to define an accurate translation).
2. Enter the given translations.
Download an Excel file containing the list of all the objects and fill in those translation blanks.
3. Load translations.
Upload the Excel file containing the translations while selecting the target language that such inputs apply to (either to populate initially or to modify and overwrite).
Project content is presented by Bizagi as Bizagi Objects, and it refers to all the items that you create for your processes such as: entities, attributes, skills and positions.
In order to localize them from the Work Portal options, log in to the Work Portal with an account having admin rights.
Then go to the Admin menu and open the Language settings options.
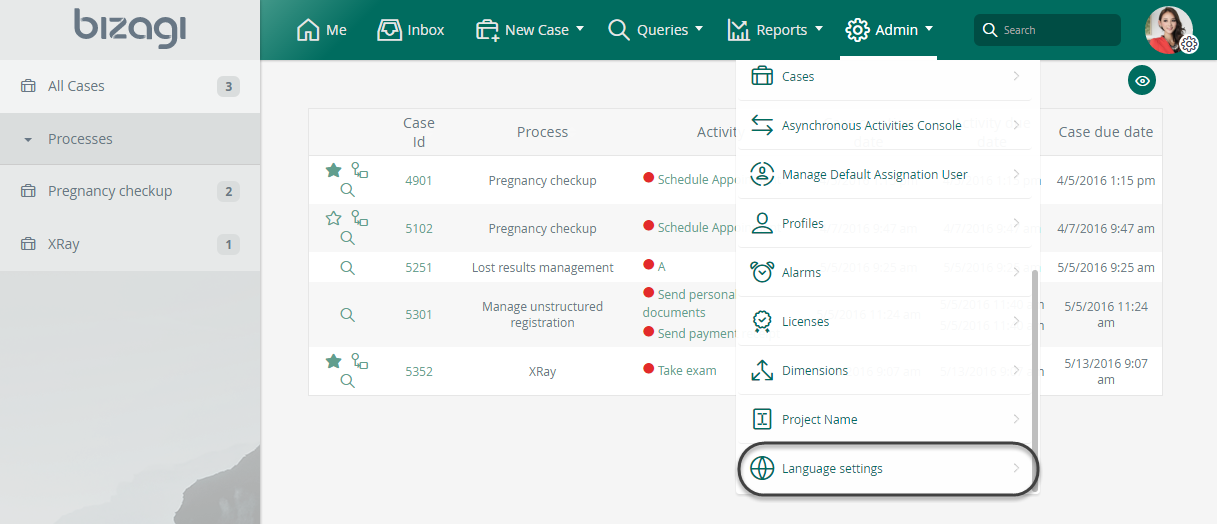
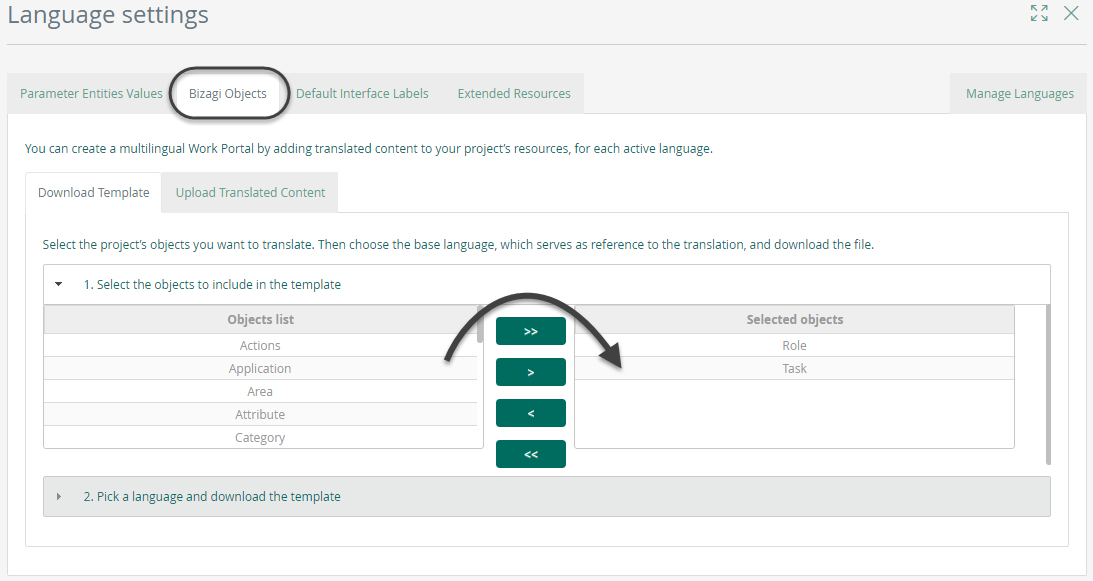
Move to the Bizagi objects tab. Select the objects you want to translate.
Use the arrows to move the objects from one list to another. The ones on the right will be the ones included in the Excel file for translation.
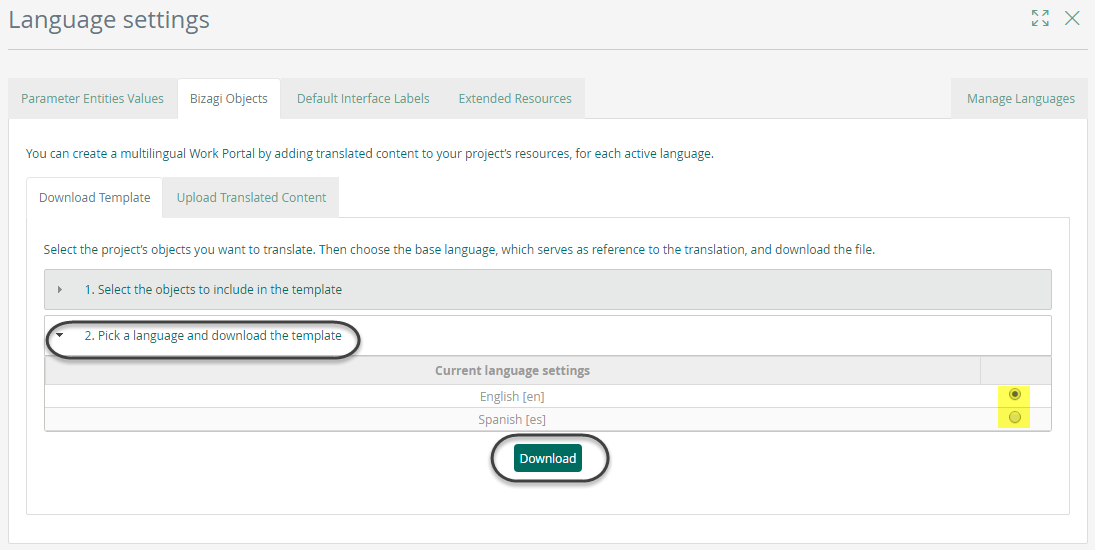
Expand the second menu and choose the base language (which serves as reference to the translation) from the list of active languages.
Click Download to download the excel template.
Open the excel template. Note that this templates contains several sheets, one for each object selected.
In each sheet you will find three columns:
•The first column identifies the property of the object.
•The second column is the value given by you to the property for the base language selected.
•The third column is blank and is the only column enabled to enter values. That is where you should enter the desired translation. Make sure that everything you enter in this column corresponds to a single language.

Once the translation for every object has been entered, save and close the file.
Back in Bizagi Work portal and while in the same Language settings window, move to the Update translated content tab.
Select the language whose objects will be updated and browse for the excel file that contains the translations.
|
The size of the Excel file must be lower than the limit established in the Upload Max File Size parameter that you configure in the Advanced tab of the Environment settings. See Environment configuration. |
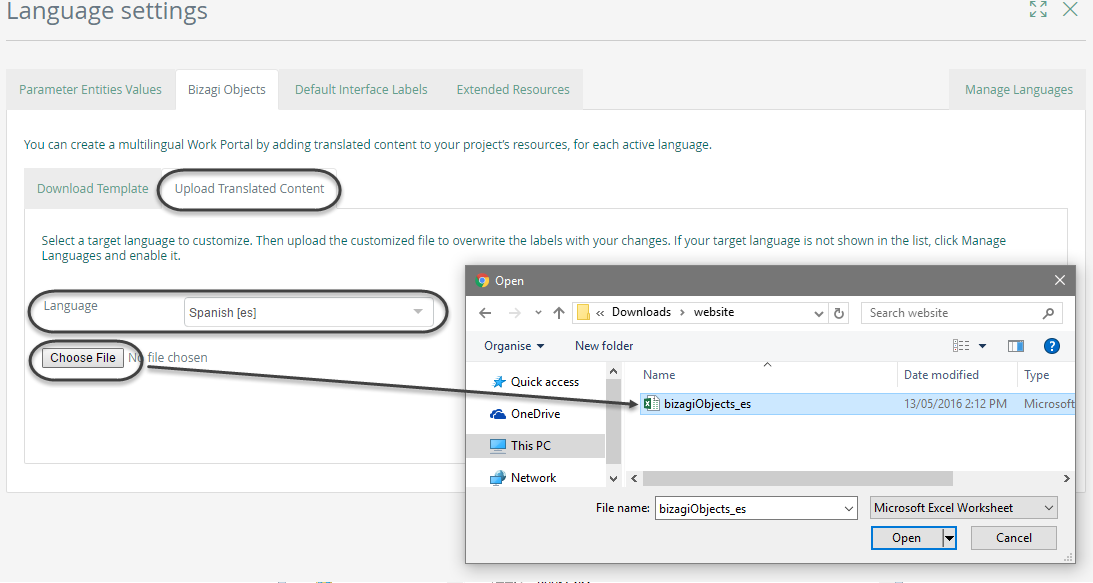
Finally click Upload to update the resources.
Parameter entities hold those records which are preset by an admin in the system, usually holding lists of possible values for users to choose from.
To localize them from the Work Portal, go to the Admin menu and open the Language settings options.

Move to the Parameter entities values tab. Select the entities that contains the attributes whose values will be translated. Use the arrows to move the entities from one list to another.
The one on the right will be the ones downloaded for translation.
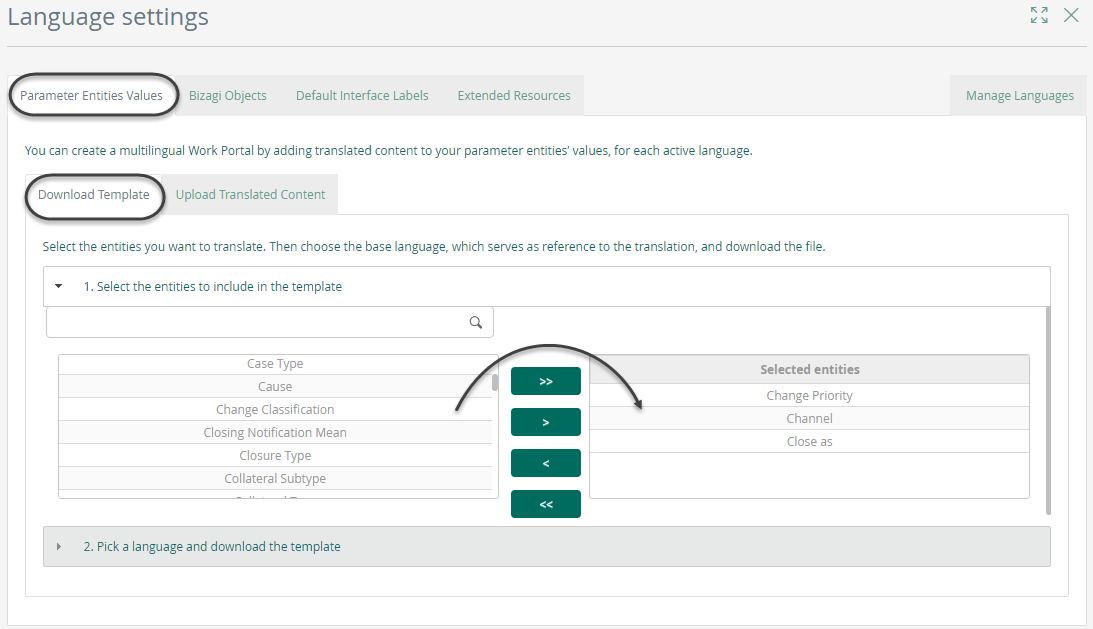
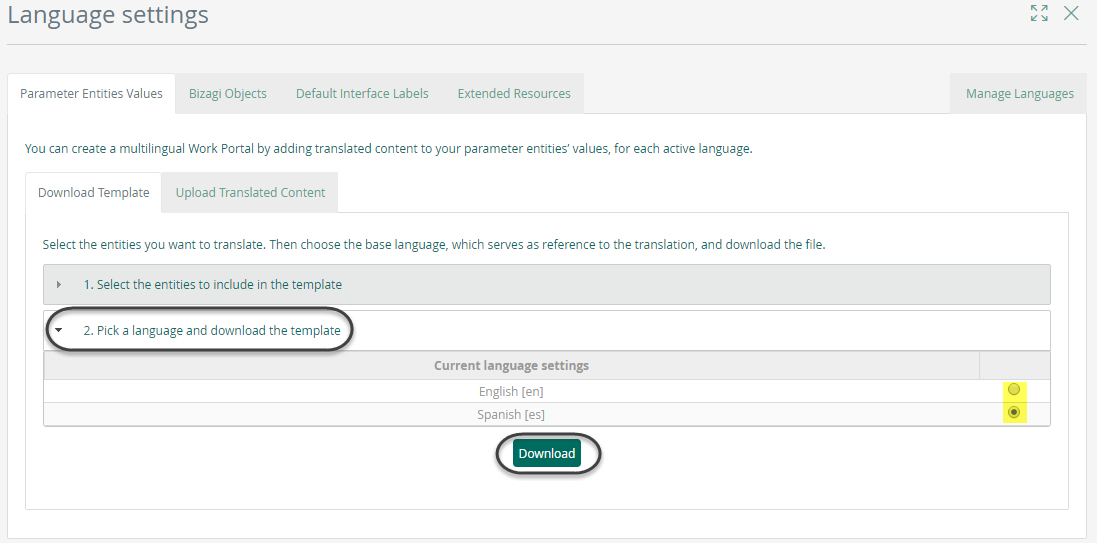
Expand the second menu and choose the base language (which serves as reference to the translation) from the list of active languages. Click Download to download the excel template.
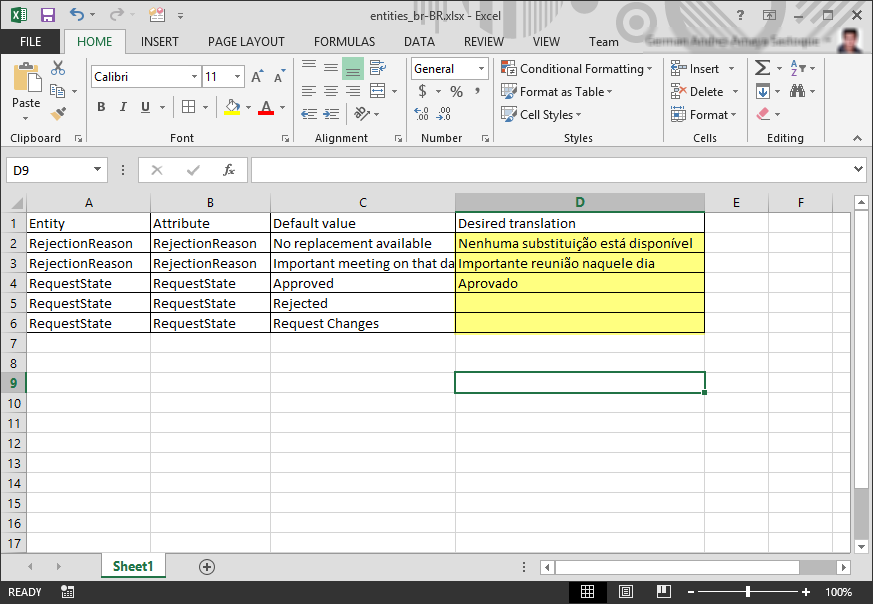
Open the excel template.
You will find four columns:
•The first column identifies the name of the Entity that contains the attribute.
•The second column is the name of the attribute given by you when automating the process.
•The third column identifies the attribute value in the default language.
•The fourth column is blank and is the only column enabled to enter values. That is where you should enter the desired translation. Make sure that everything you enter in this column corresponds to a single language.
Once the translation for every object has been entered, save and close the file.
Back in Bizagi Work portal and while in the same Language settings window, move to the Update translated content tab.
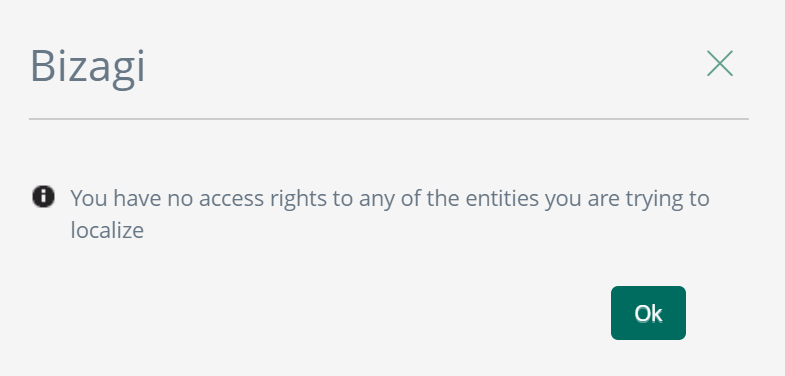
At least one of the selected entities must be authorized for the user, otherwise a notification appears to notify that the end user has no access rights.
Select the language whose objects will be updated and browse for the excel file that contains the translations.
|
The size of the Excel file must be lower than the limit established in the Upload Max File Size parameter that you configure in the Advanced tab of the Environment settings. See Environment configuration. |
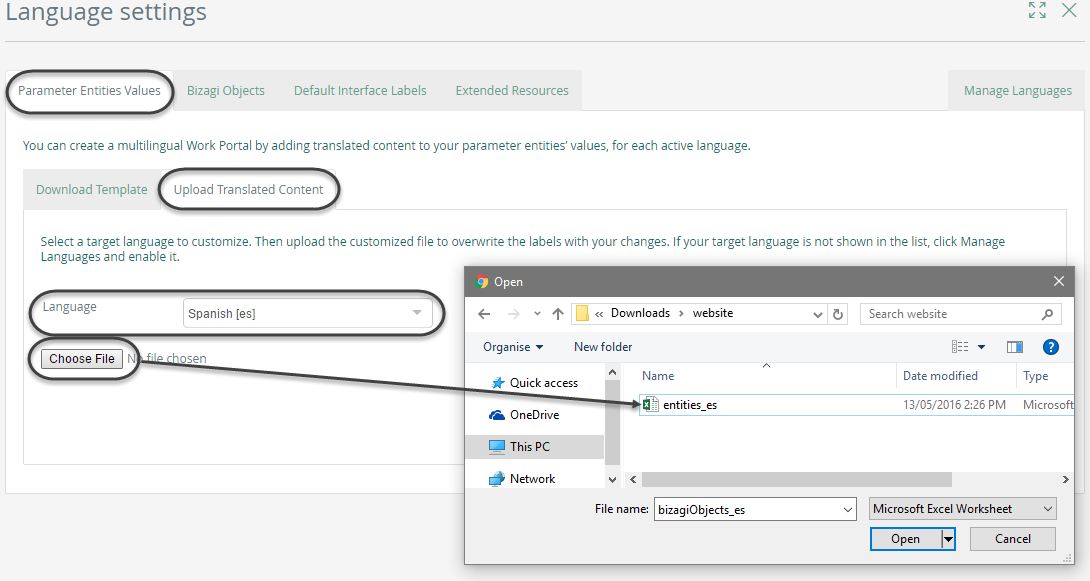
Finally click Upload to update the resources.
Prerequisites for localizing Parameter entities
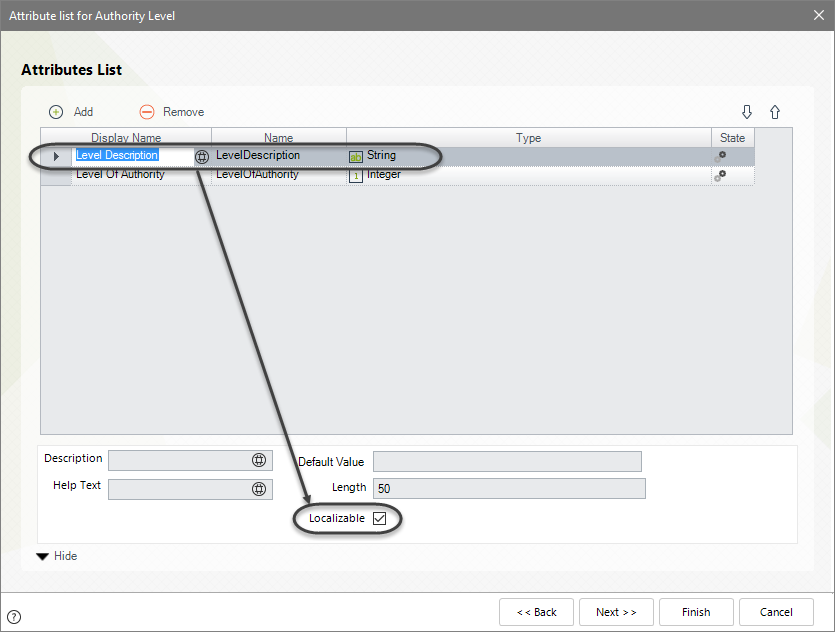
To enable Parameter entities to be localizable from the Work portal make sure that:
•Localization for the entities is enabled:
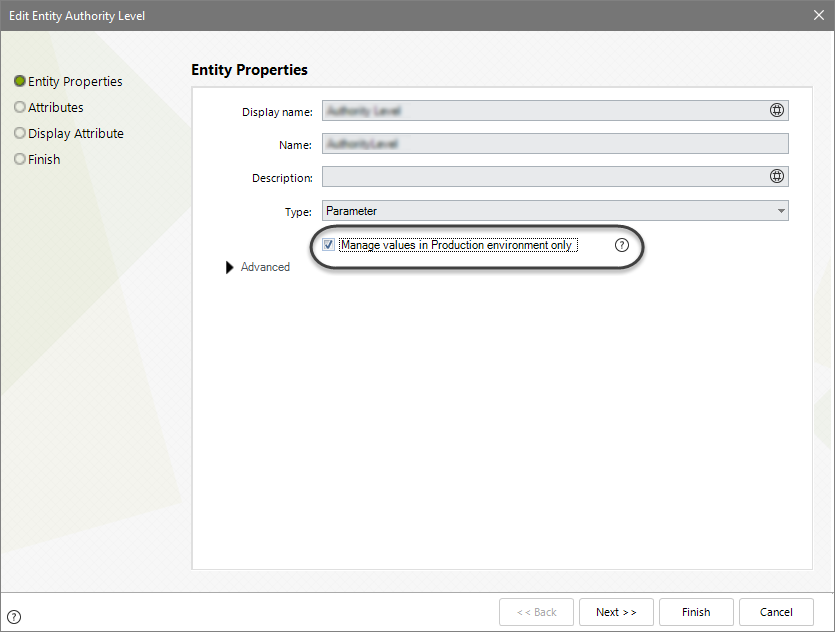
•Entities are manageable in production:
•Users have the corresponding access rights.
To be able to localize entities, users must have explicit permissions over them. Thus, depending on the configuration set in Bizagi Studio's security permissions, for the Multilanguage and Entities options, menus are displayed or not for end user on the different tabs and menus, as follows:
Multilanguage permission enabled |
Entities administrator permission enabled |
End user's Work Portal screen |
|---|---|---|
Yes |
No |
The localization menu appears. The entity list is empty. |
No |
Yes |
The localization menu appears. Only the entities tab for the enabled entities appears. |
Yes |
Yes |
The localization menu appears complete |
No |
No |
The option to manage localization does not appear. |
For instance, suppose that you have an end user named Alisa who has Multilanguage permissions but she has no permission to manage Entities. On the Work Portal, Alisa visualizes all the tabs of the ribbon but the entities list on the Parameter Entities values tab is empty.
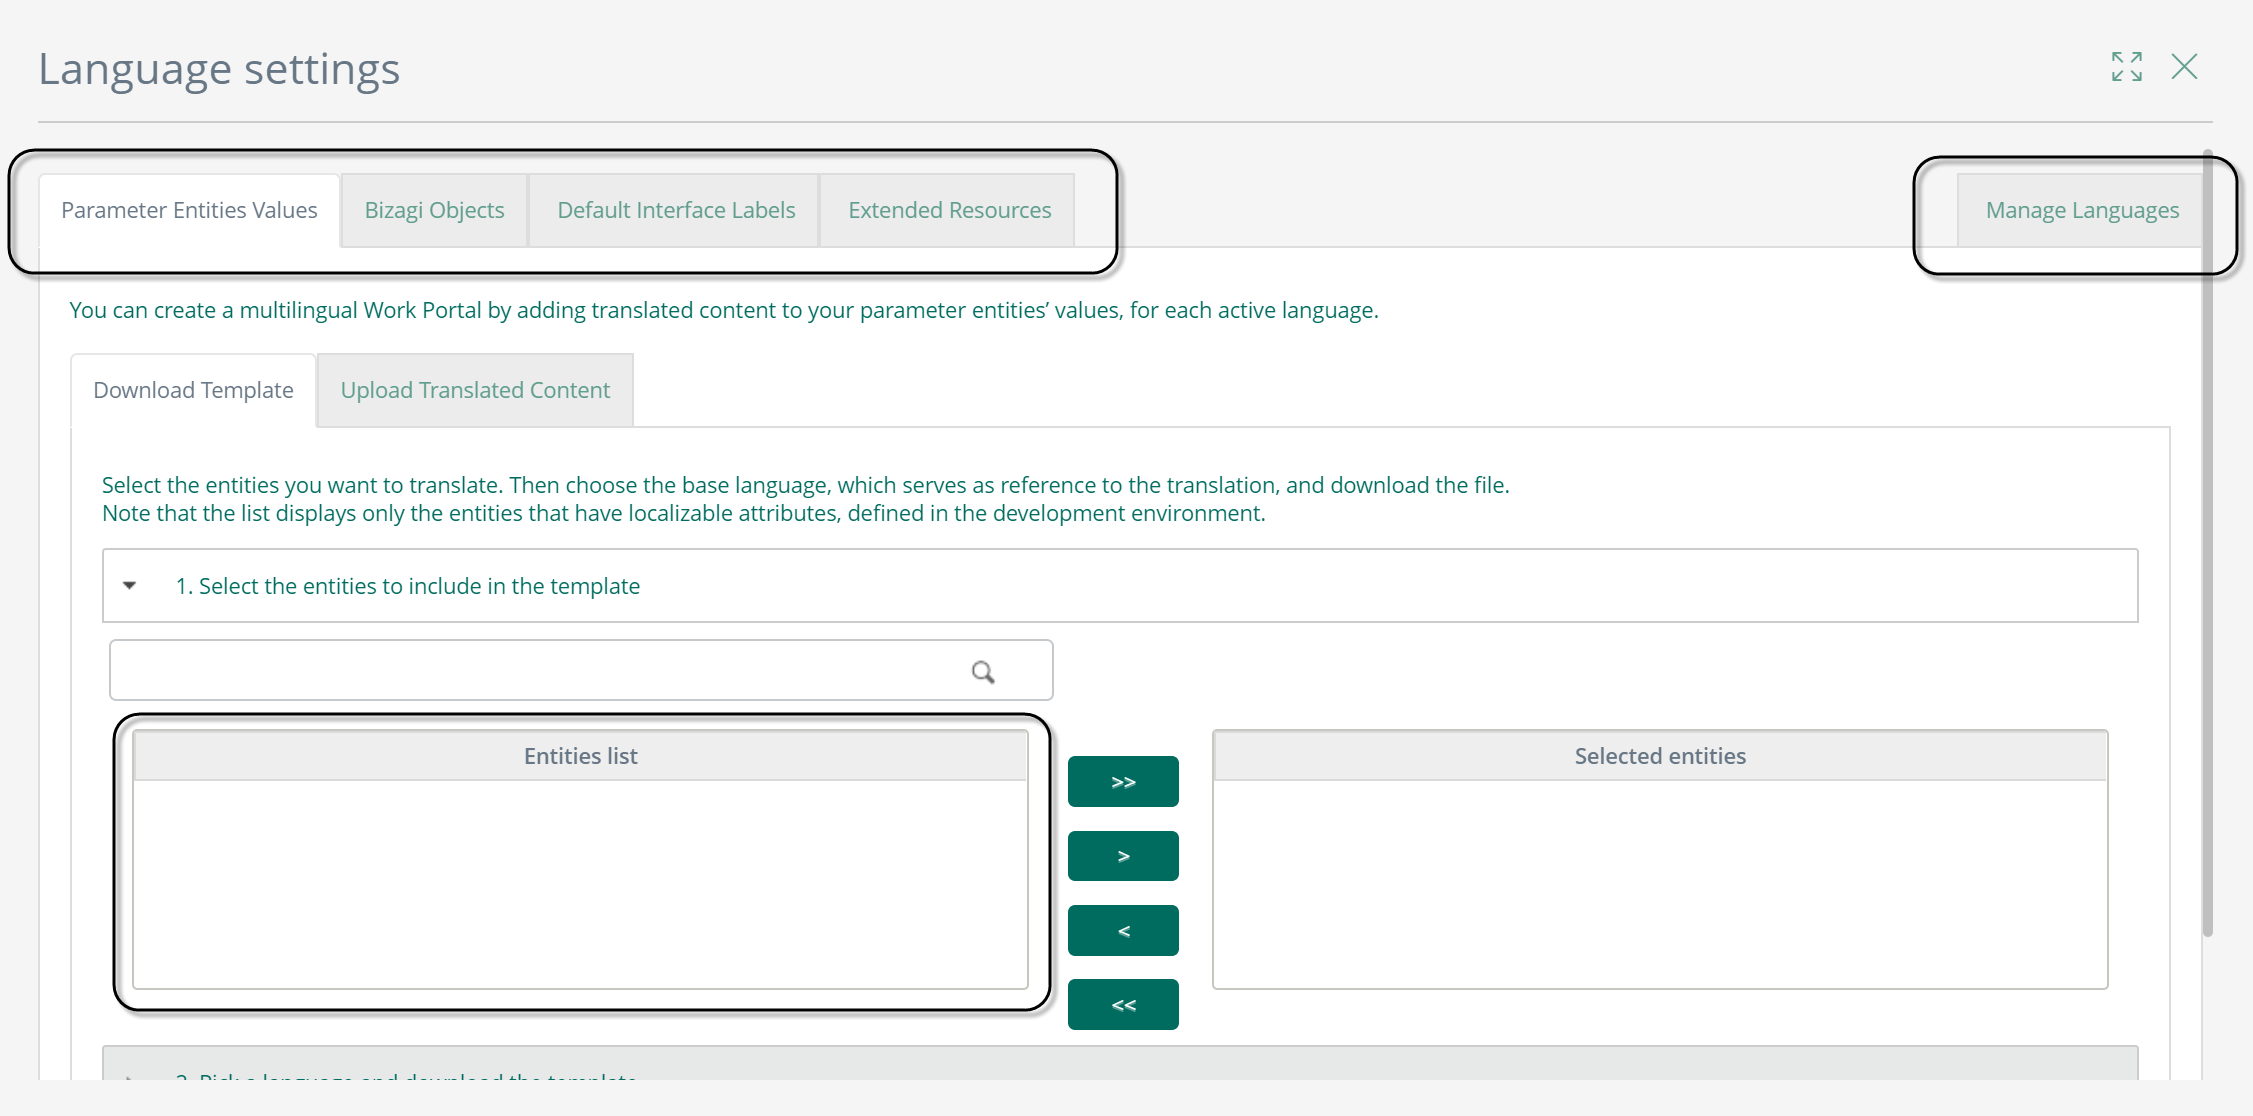
Now suppose another user named William has Entities permissions but doesn't have Multilanguage permissions.
William visualizes the Work Portal's language settings for the Parameter Entity with the list of entities he is enabled to manage, and that are set as localizable. He does not visualize the other Language settings tab:
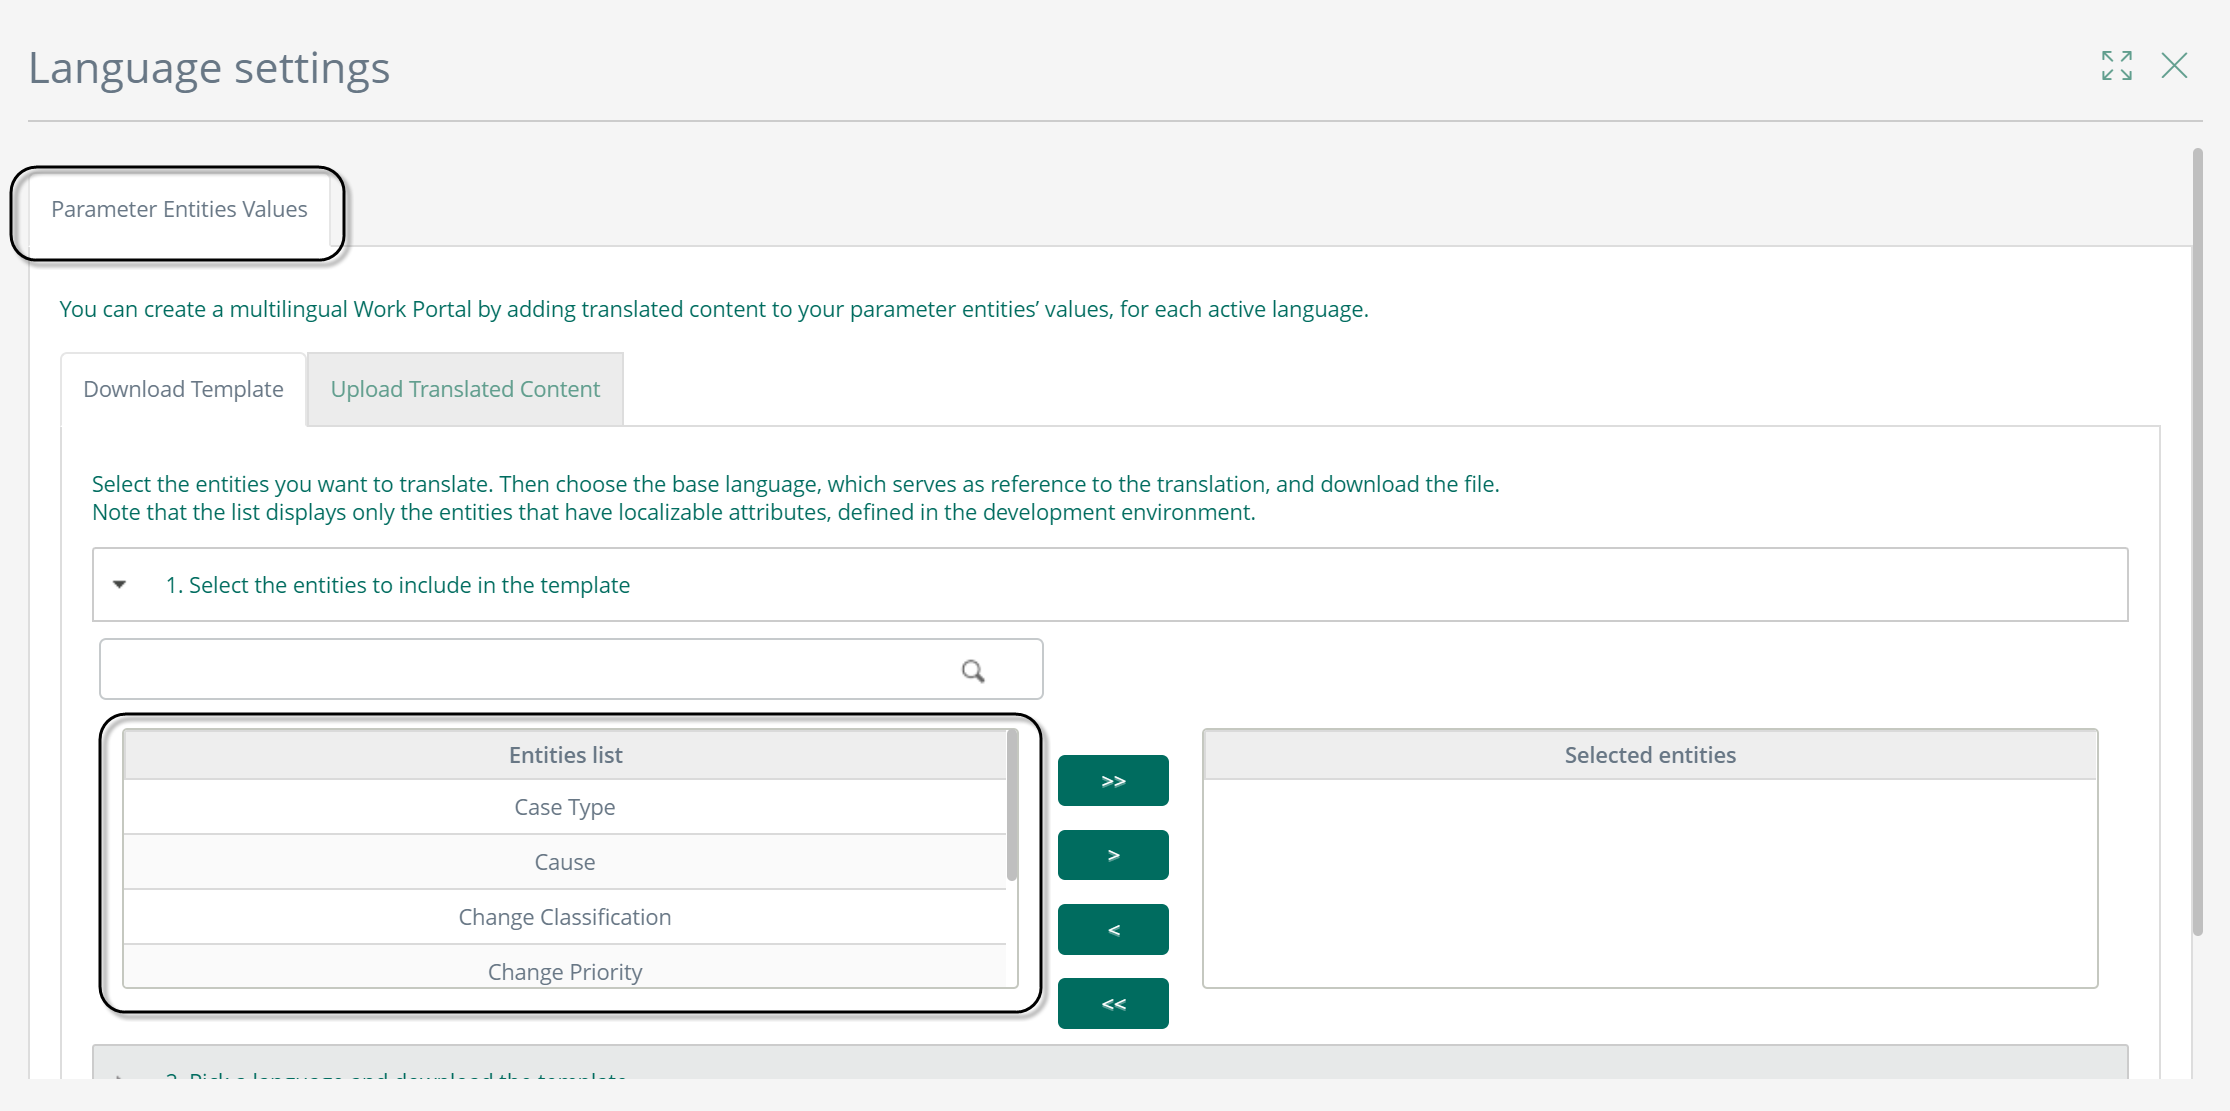
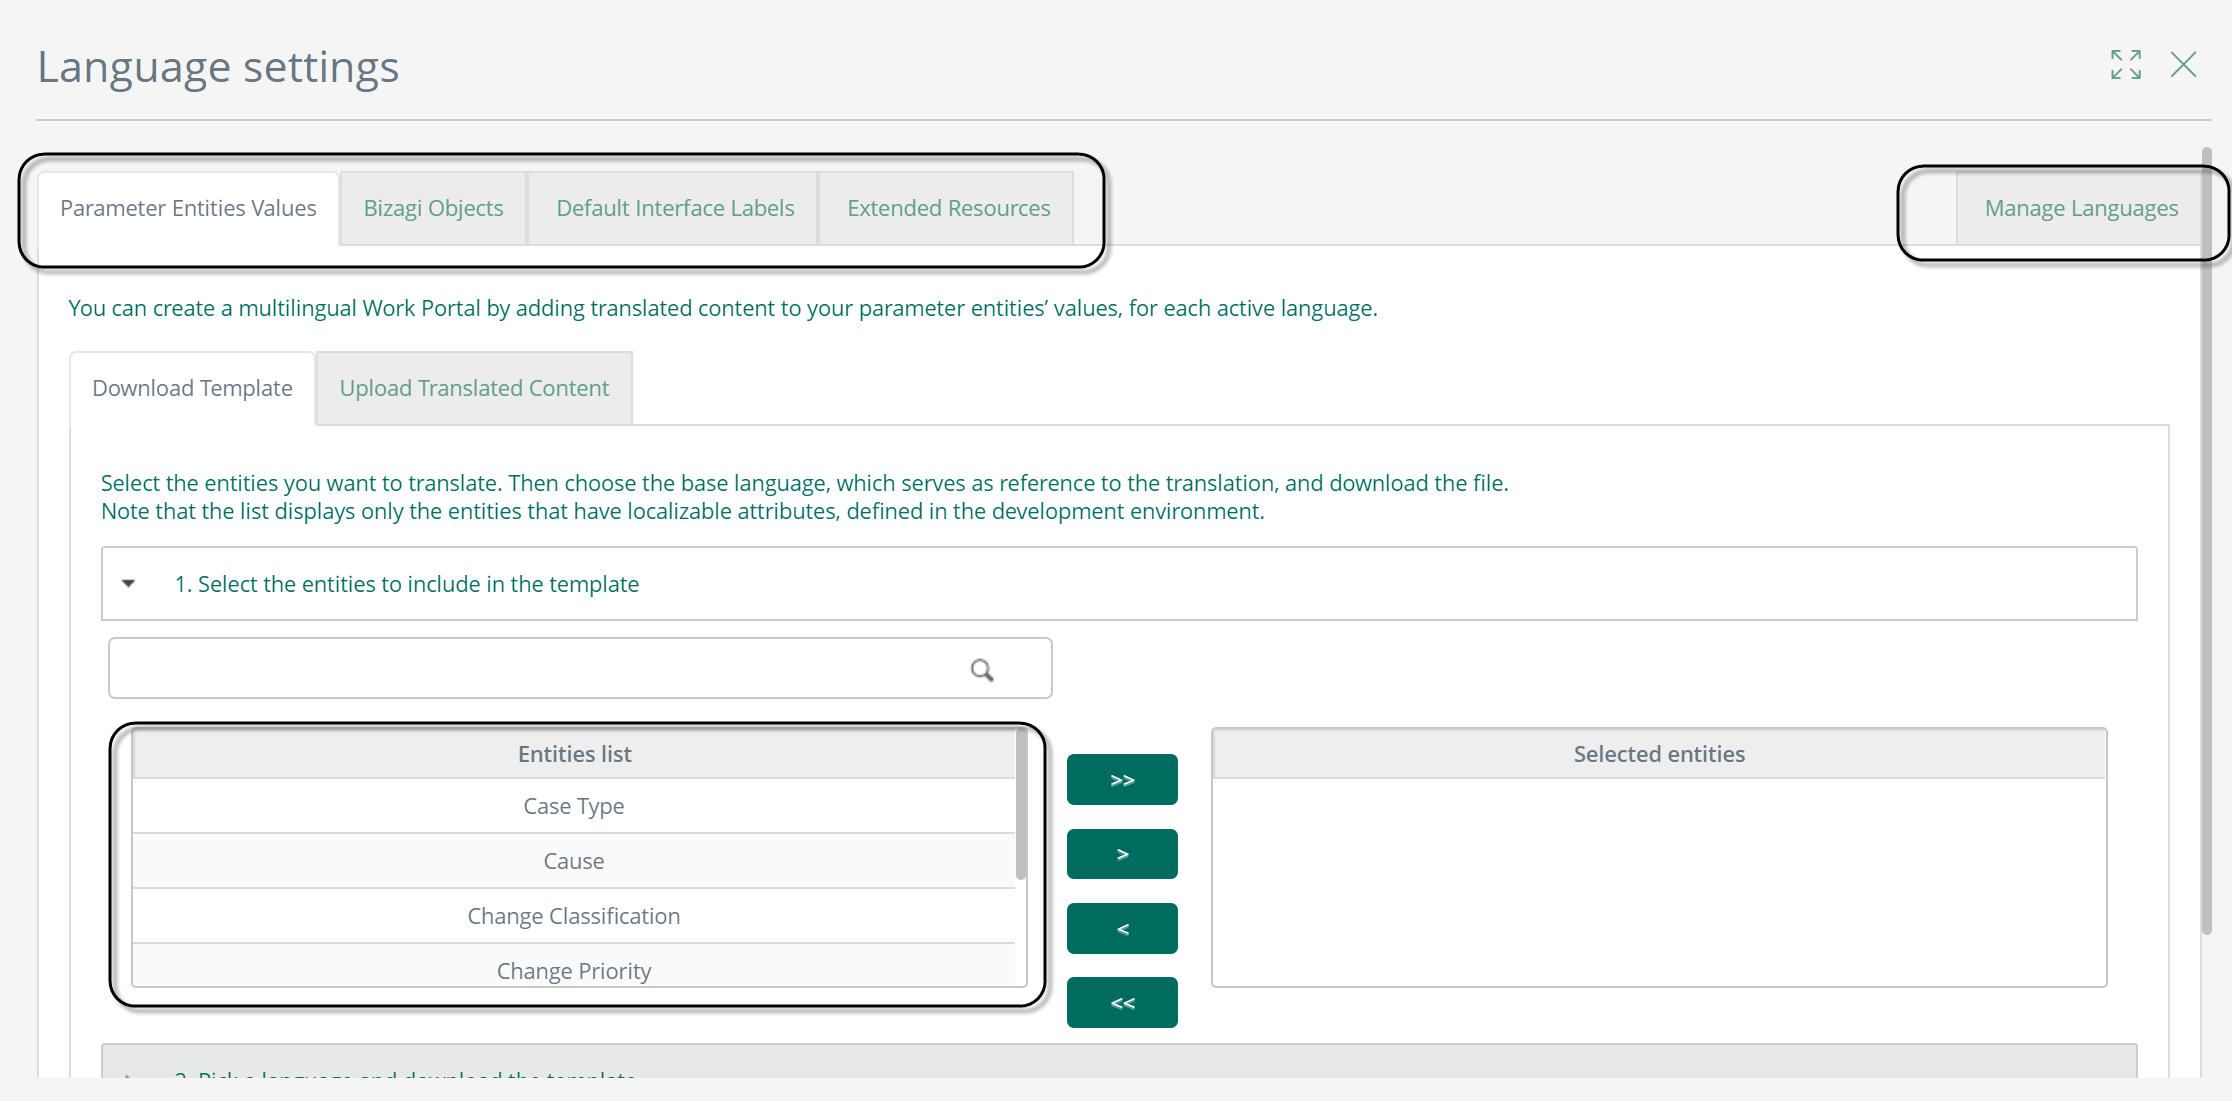
Suppose that you have a user named Charles who has both Entities Administrator and Multilanguage permissions. Charles visualizes in the Work Portal's language settings all the tabs and the list of entities that were set as localizable in Bizagi Studio:
When an end user with Multilanguage permissions has no access rights to any of the entities and tries to upload a file with Entities information, the following message appears:
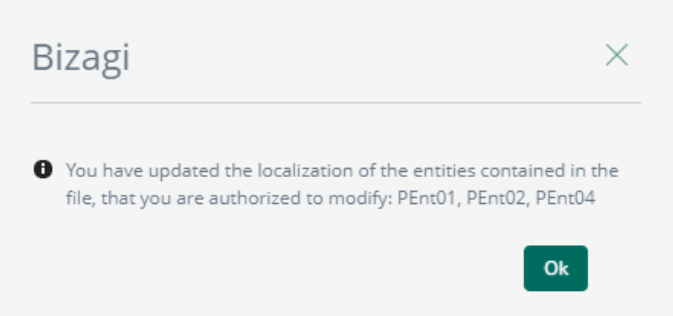
If a user uploads a file and has permissions over certain entities but not all of them, the following message appears:
Recall that Extended resources are the ones you can create mainly to show validations to end users in different languages. Once an extended resource is created or additional languages are enabled, each resource should be translated.
In order to localize them from the Work Portal options, log in to the Work Portal with an account having admin rights.
Then go to the Admin menu and open the Language settings options.

Move to the Extended resources tab and choose the base language (which serves as reference for the translation) from the list of active languages.
Click Download to download the Excel template.
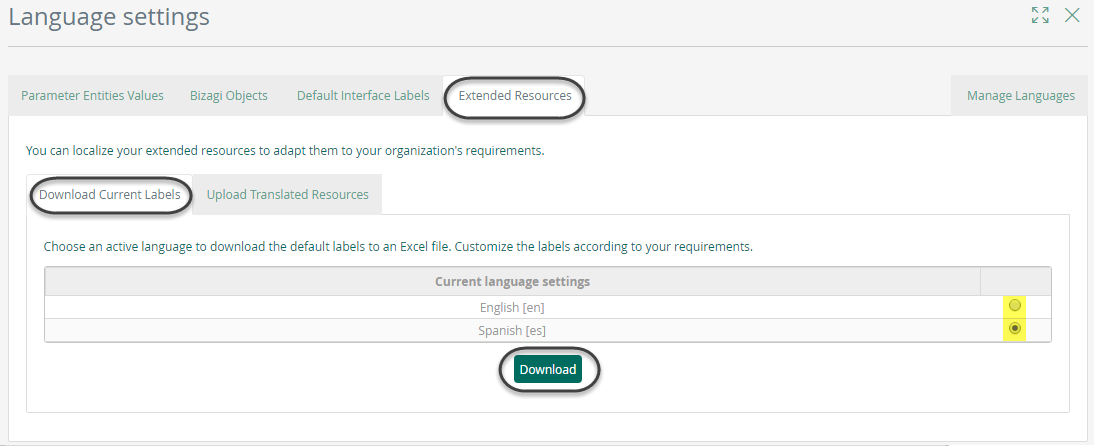
Open the Excel template.
You will find one sheet with three columns:
•The first column refers to the internal name of the Extended resource.
•The second column is the default value given by you in the definition of the Extended object, for the base language selected.
•The third column is blank and is the only column enabled to enter values. That is where you should enter the desired translation. Make sure that everything you enter in this column corresponds to a single language.
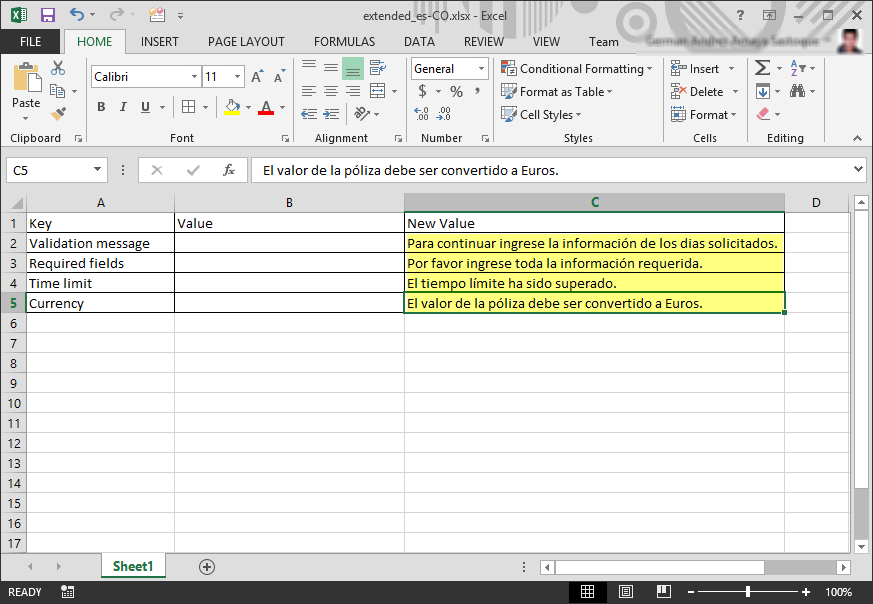
Once the translation for every object has been entered, save and close the file.
Back in Bizagi Work portal and while in the same Language settings window, move to the Update customized labels tab.
Select the target language whose objects will be updated with the content entered in the New Value column, and browse for the Excel file that contains the translations.
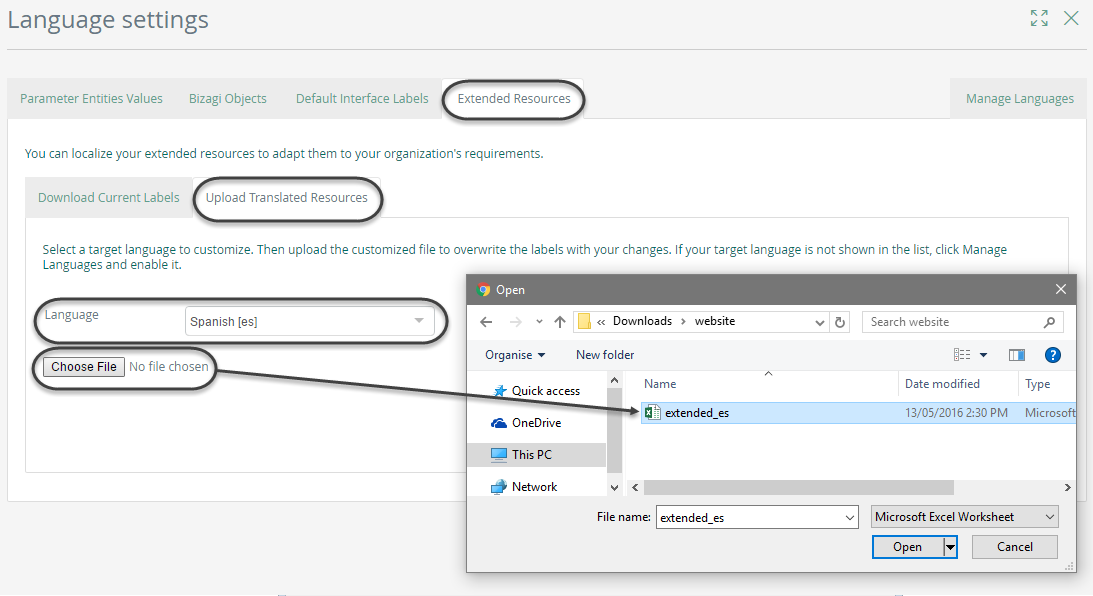
Finally click Upload to update the resources.
Important recommendations
•When inputting or modifying translations directly in the production environment, it is strongly recommended to repeat such procedure with these same translations in your other environments (i.e development environment).
•Feel free to take any backups necessary of the initial Excel files in case you are modifying translations.
Recall that once new translations are uploaded, these will overwrite any previous ones for that same language.
•Leaving blank spaces in the Excel is a possibility.
Though it is possibly not the best approach, you do not necessarily need to fill in extensively translations for all objects.
If you do not input anything for the NewValue column in the Excel file, Bizagi will take the default value for that object (i.e a parameter entity value).
For example, if you are localizing to Spanish and leave a blank cell, then Bizagi will show its Spanish default for that value.
If the target language is not supported by default, any blank cells will be shown in English.
Last Updated 1/6/2022 5:27:49 PM