Overview
Master entities can be modified in the Expert view using the options mentioned below. Bear in mind that these entities can be created and configured from any data model or from this view as well. To learn more about Master entities follow this link. Some options are shown right-clicking a Master entity, or some others selecting one of the nodes of the Master entity.
Right-click options
When a Master entity is selected, the following options are shown
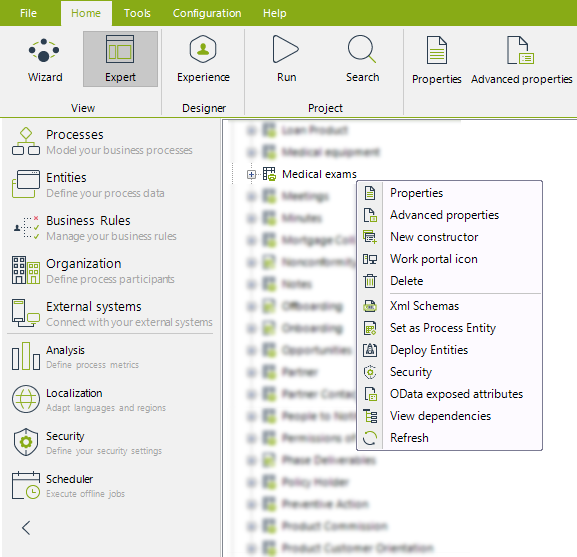
Option |
Detail |
|
|---|---|---|
Properties |
This is the same wizard to create and modify entities as the one used in the second step of the process wizard (Model Data). This allows to edit the display name of the entity and its attributes. The name can be modified but keep in mind that you must also modify its corresponding dependencies. Learn more about creating an entity following this link. |
|
Advanced properties |
Log |
Enables the possibility to register operations to Bizagi log. By default this option is NOT selected. Learn more about Bizagi log following this link. |
Business key |
Allows the addition of Business keys for this entity. Learn more about Business keys following this link. |
|
Inheritance |
Allows you to select the parent of the selected entity. Learn more about Inheritance following this link. |
|
Mapping |
This list allows the automatic injection of data from the current entity, in other words, allows the values of this entity to be automatically used in actions and forms. This list has every foreign key stored as an attribute in this entity, that is to say, every entity which has a collection of items of this entity. To enable the injection of data from this entity based on a relationship, check the Automapped option. When the Automapping box is NOT ticked, there will be NO automatic mapping. Each item of this list has the current XPath (or name of the attribute) and the entity that relates with the current entity. Learn more about adding custom Hints following this link. |
|
New constructor |
The way to create new registries in the entity directly from the Work Portal is configured during this wizard. Learn more about entity constructors following this link. |
|
Work portal icon |
By default, every Entity Action displays a briefcase icon, you can change this icon using this option selecting one of the Bizagi Icons. The icon is shown in every Action shown in the Me Menu > My Stuff. Learn more about Entity Actions following this link. Learn more about the Me Menu following this link. |
|
Delete |
Deletes the entity. This can only be done if the entity is not related in any way with other elements within the project. |
|
Xml schemas |
This option is used to generate the schema used by third party services to manipulate Bizagi Web Services endpoints. Learn more about XML schema in Bizagi following this link. |
|
Set as Process Entity |
This option allows the selection of a process, which will use this entity as its process entity from now on. The previous process entity will become a Master Entity. |
|
View Related Processes. |
This option displays a Pop-up window to view all the related processes to the selected master entity. |
|
Deploy entities |
Marks the selected entity to include it in the deployment. |
|
Security |
This option is used to configure the security of the element. |
|
OData exposed attributes |
Customize which information is returned whenever invoking Bizagi OData API services. Learn more about OData attributes following this link. |
|
View dependencies |
This option is used to verify if the entity is being used by any other form, rule, entity, or element; this option lists in a hierarchical way all the dependencies of the entity. |
|
Refresh |
Refresh the information of the entity. Useful when working in a collaborative environment. |
|
Nodes
When a Master entity is expanded, the following nodes are shown:
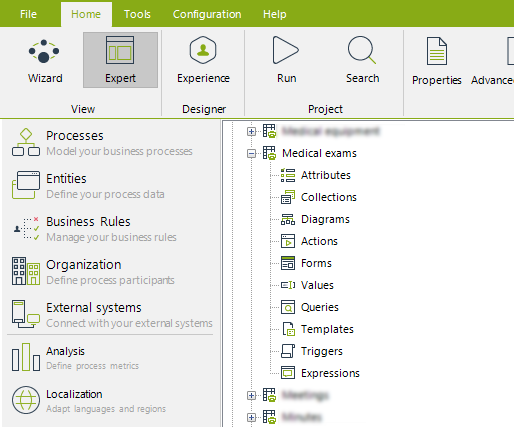
Each node displays the following information:

The Attributes node contains all the attributes of the entity filtered by data type. The data types considered as attributes are the common types (Boolean, currency, date time, file, string...) and one-to-one relationships with other entities. Each attribute has a name, a display name (which is the one used in the Work Portal) and its data type. When the data type is Entity, a Related entity is shown. Lastly, the Dpl column shows if the attribute is considered in deployment.
When the node is selected, the Ribbon will display the following options:

•Edit attributes: This option will display the Entity edition wizard in its second step. Allowing the user to modify, add or even delete attributes and relations, and their advanced properties.
•New relationship: This option will add the specified relationship between the entities selected. The entities does not have to be related with the current entity.
•Refresh: This option will reload the information stored from the database, refreshing the attributes listed.

The Collections node contains all the one-to-multiple relationships of the entity. Each collection has a name, a display name (which is the one used in the Work Portal) and its related entity.
If a collection has been marked with the "Enable Add Button" option, then an option to add registries will be shown at the top of the results of a search or the values in Me Menu > My Stuff.
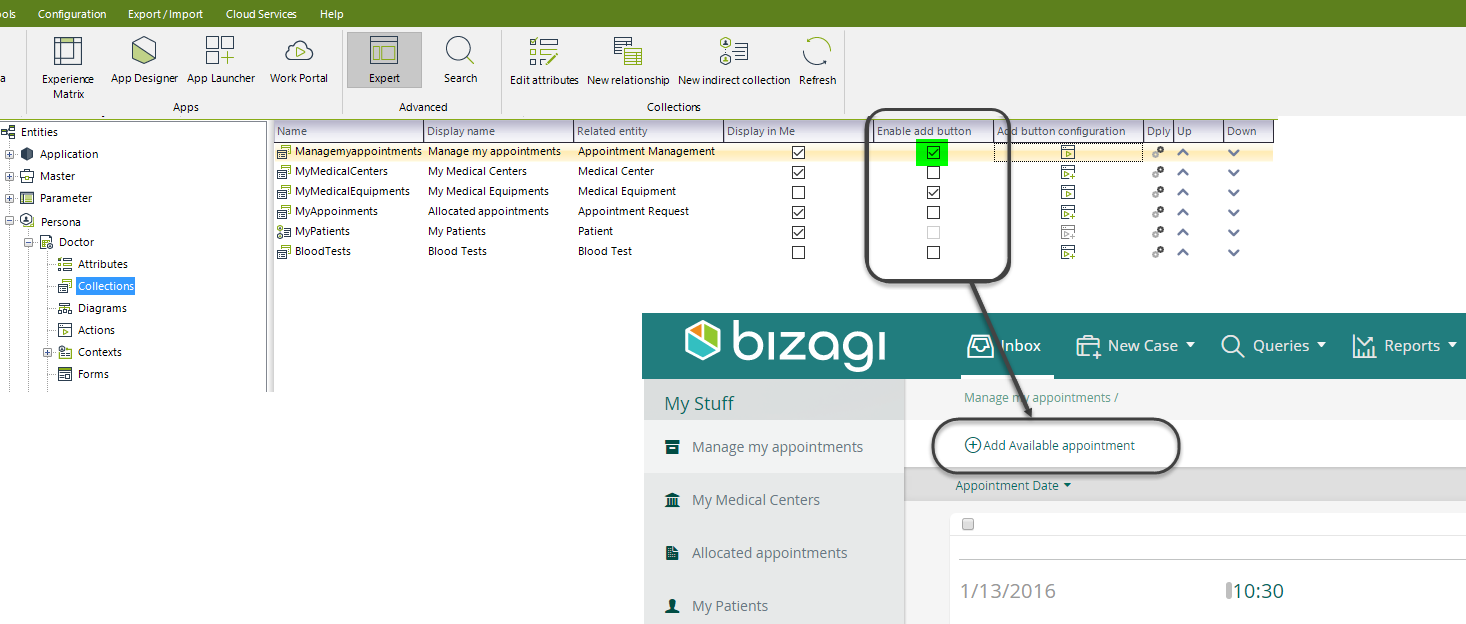
When the node is selected, the Ribbon will display the following options:

•Edit attributes: This option will display the Entity edition wizard in its second step. Allowing the user to modify, add or even delete attributes and relations, and their advanced properties.
•New relationship: This option will add the specified relationship between the entities selected. The entities does not have to be related with the current entity.
•New indirect collection: this option will create an indirect relationship for the current entity. Indirect relationships are Xpaths which are not directly navigable but the entity is somewhat related to the current entity. When selected, a wizard will help to connect the current entity with the target entity. Bear in mind that every collection used through the indirect XPath can be filtered. The relationships shown at the right frame are the available relationships to navigate from the last entity added to the new indirect path.
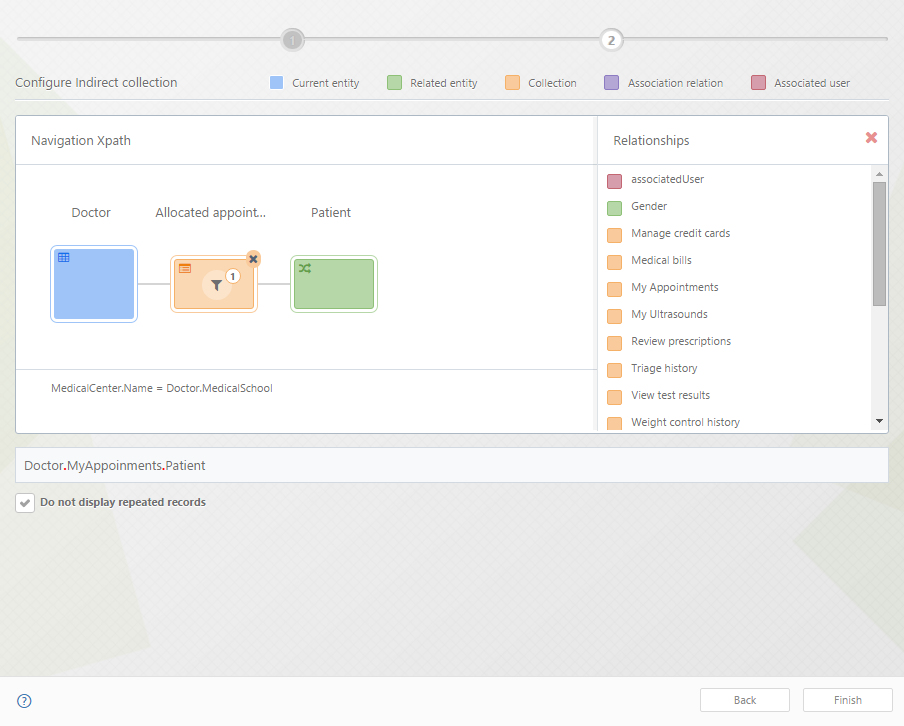
Once the relation has been specified, the new relationship will be shown amongst the other relations. Please note that the icon of the indirect relationship is different to the other relationships.

•Refresh: This option will reload the information stored from the database, refreshing the collections listed.
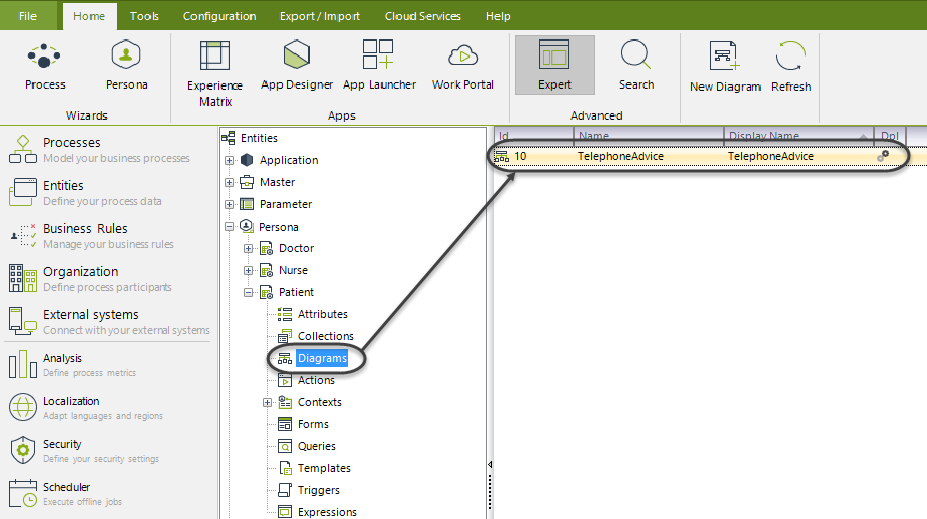
The Diagrams node contains all the diagrams modeled for this entity. There is no limitation on how many diagrams can be created under a node.
The diagram does not have to have the entity from which the node is child of. nonetheless, it is highly advisable to include the entity since will help with the approach of your project.
The intention for these diagrams is to ease the data modeling for each entity and its relationships, since the Experience design needs more focus on each entity than in the process entity. Each diagram
has an Id, a name and a display name.
When the node is selected, the Ribbon will display the following options:

•New Diagram: This option will add a new blank diagram to the entity.
•Refresh: This option will reload the information stored from the database, refreshing the diagrams listed.
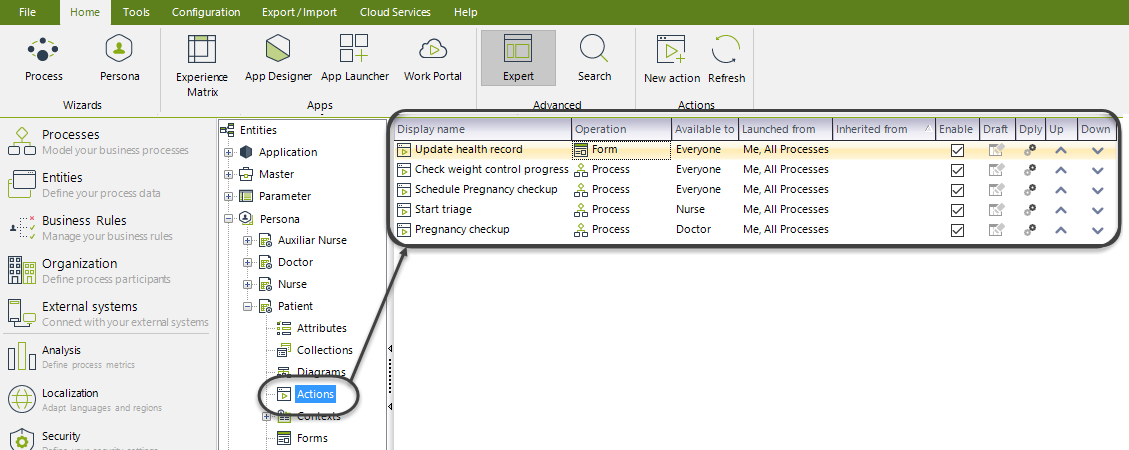
The Actions node contains all the Actions defined for this entity. Hence, these actions can be executed selecting the entity in My Stuff section of the Me Menu, or executed from a Process.
Every Action listed has a Display name, its operation (Form or Process), where can it be launched (whether Me menu or All Processes), the entity from which the current entity inherits from (if any), and if the Action is enabled. In case the Action is unchecked, the action will not be available for any Persona. If the Action had been previously configured, the Draft icon is gray, otherwise is black.
The Dply column shows if the Action has been launched to production (database icon) o if it is still in development (gear icon).
|
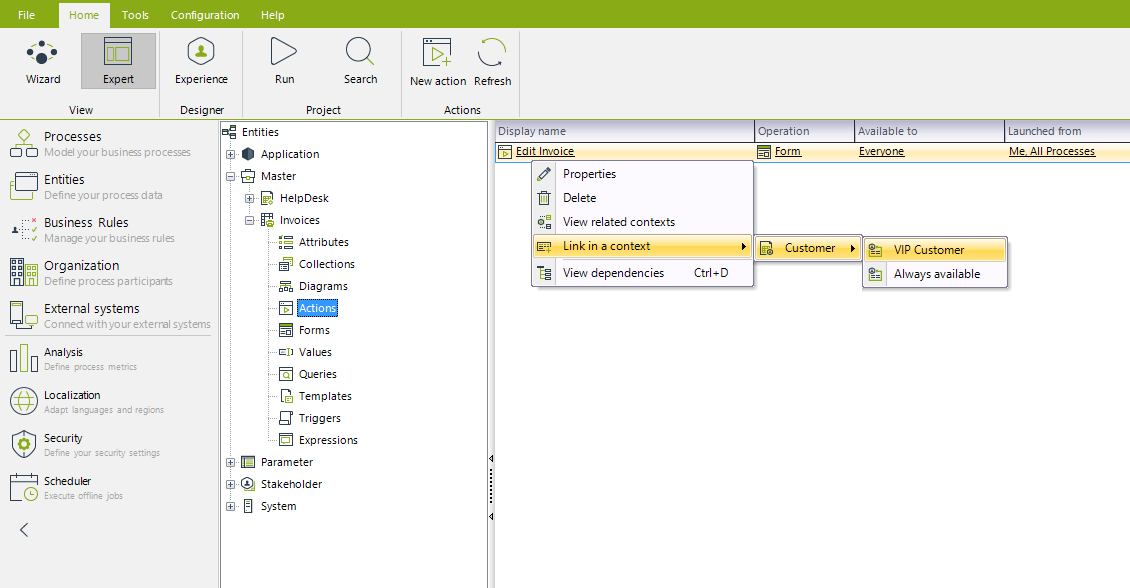
Bear in mind that any action created is by default unlinked to any context. Therefore the action must be manually linked to its correspondent contexts |
Any action can be linked to a context directly from the Master > Entities view, right-clicking the collection to attach:
When the node is selected, the Ribbon will display the following options:

•New Action: This option will start the Actions Advanced Configuration (learn more here) menu to add a new Action for the current entity.
•Refresh: This option will reload the information stored from the database, refreshing the Actions listed.
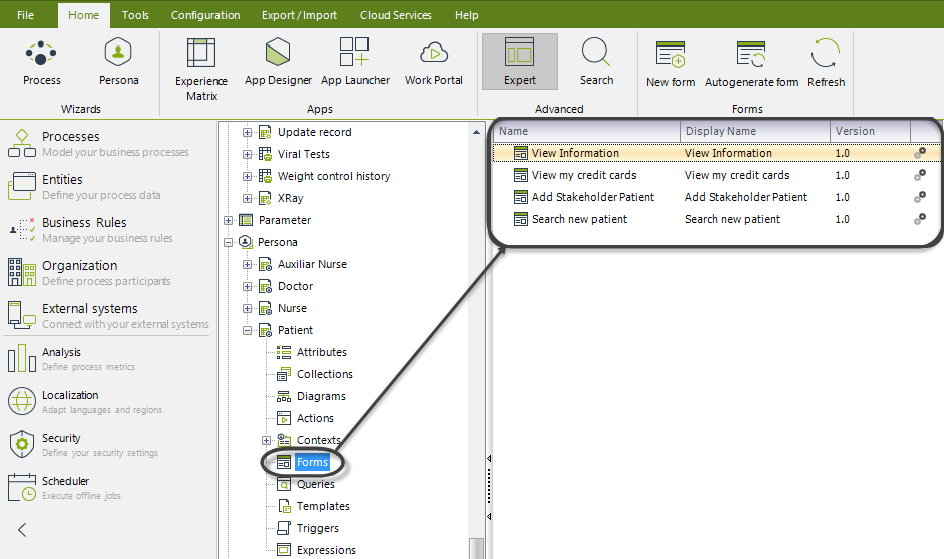
The Forms node contains all the Forms defined for this entity. These forms are used in the Work Portal to interact with the final users.
Every Form listed has a Name, a Display Name and version. The Dply column shows if the Form has been launched to production (database icon) o if it is still in development (gear icon).
When the node is selected, the Ribbon will display the following options:

•New Form: This option will start the Forms Editor (learn more here) where the form is built.
•Autogenerate form: This option will automatically create a Form with all the current entity attributes.
•Refresh: This option will reload the information stored from the database, refreshing the Forms listed.
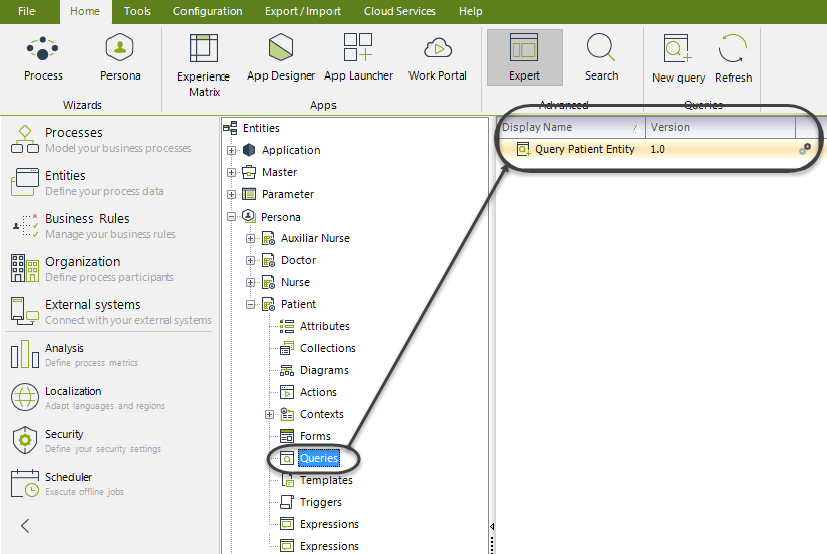
The Queries node contains all the queries defined for this entity. These queries are called Entity Query Forms they are used in the Work Portal to interact with the final users. To learn more, please refer to the Entity Query Forms article.
Every query listed has a Display Name and its version. The Dply column shows if the query has been launched to production (database icon) o if it is still in development (gear icon).
When the node is selected, the Ribbon will display the following options:

•New query: This option will start the Forms Editor (learn more here) window to add a Query Form.
•Refresh: This option will reload the information stored from the database, refreshing the queries listed.
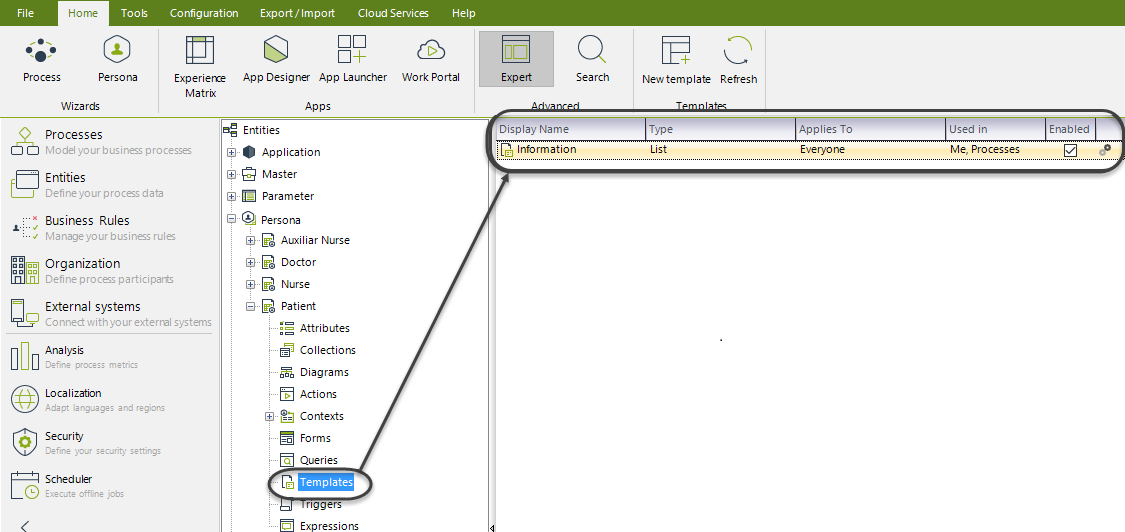
The Templates node contains all the templates defined for this entity. These templates are used in the Work Portal to interact with the final users. To learn more, please refer to Data Templates.
Every template listed has a display name, its defined type, to which Persona does it applies for and where is the template able to be shown. The Enabled check allows the template to be displayed. The Dply column shows if the template has been launched to production (database icon) o if it is still in development (gear icon).
When the node is selected, the Ribbon will display the following options:

•New template: This option will start the Template Configuration window (learn more here) to add a Data Template.
•Refresh: This option will reload the information stored from the database, refreshing the templates listed.
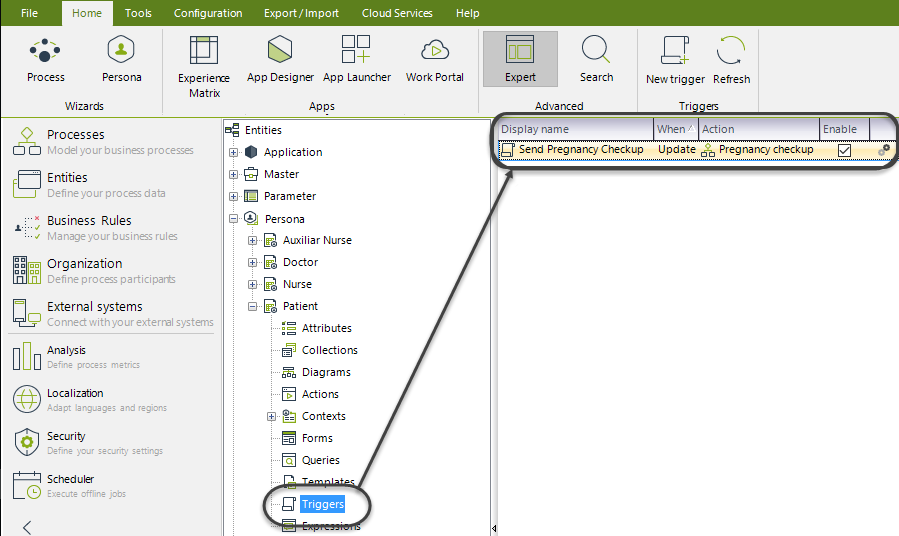
The Triggers node contains all the triggers defined for this entity. These triggers are data based actions. To learn more, please refer to Triggers.
Every trigger listed has a display name, when will the trigger be launched, and the action to execute. The Enabled check allows the trigger to be used. The Dply column shows if the trigger has been launched to production (database icon) o if it is still in development (gear icon).
When the node is selected, the Ribbon will display the following options:

•New trigger: This option will start the Trigger Configuration window (learn more here) to add a Trigger.
•Refresh: This option will reload the information stored from the database, refreshing the triggers listed.
If a trigger is right-clicked, the following options will be displayed:

•Edit trigger: This option starts the Trigger Configuration window, allowing the edition of the trigger.
•Delete trigger: This option deletes the trigger as long as any related dependencies are found.
•View dependencies: This option hierarchically lists all the dependencies of the trigger.
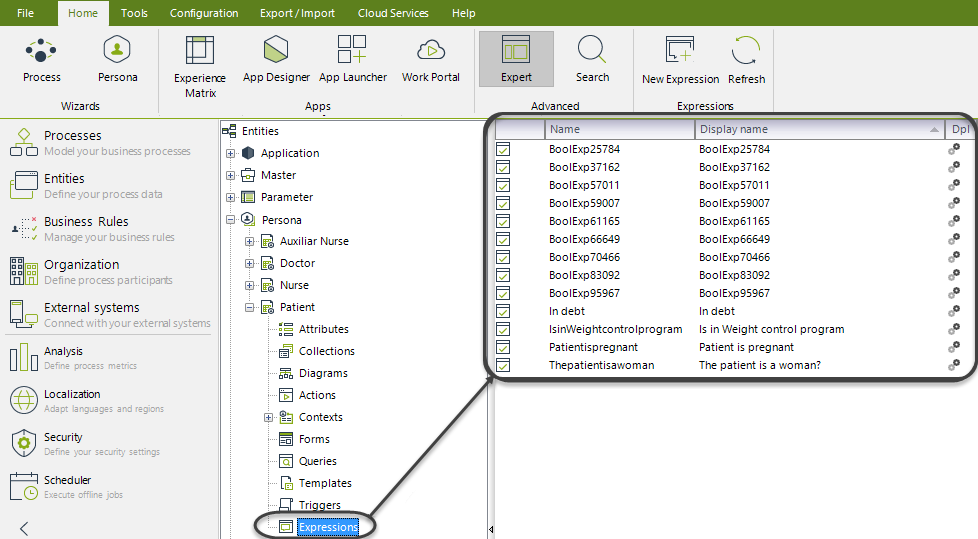
The Expressions node contains all the expressions defined for this entity. To learn more, please refer to Expressions.
Every expression listed has a name, and a display name. The Dply column shows if the expression has been launched to production (database icon) o if it is still in development (gear icon).
When the node is selected, the Ribbon will display the following options:

•New expression: This option will start the Expression Configuration window to add a Expression.
•Refresh: This option will reload the information stored from the database, refreshing the expressions listed.
If a expression is right-clicked, the following options will be displayed:

•Properties: This option starts the Expression Configuration window, allowing the edition of the expression.
•Delete Rule: This option deletes the expression as long as any related dependencies are found.
•View dependencies: This option hierarchically lists all the dependencies of the expression.
Last Updated 12/2/2025 5:24:48 PM