Overview
Excel is trusted by many companies worldwide to build calculating tools or to reflect a certain business logic. It is also used by thousands of employees to perform basic or complex calculations that would otherwise take a lot of time and effort. Bizagi acknowledges this reality and features its the out of the box Excel Connector to support this tool natively.
The Excel Connector is a way to integrate those tools that companies already rely on for their operations with Bizagi. Using this connector, you can upload an Excel file to Bizagi. This file contains all the operations and formulas already preconfigured on it, and the connector provides a set of operations to read and write on the file. That is, with the Excel Connector, you can write information in an Excel file directly from Bizagi, let Excel handle the calculations and then read the results to store them in your Bizagi's data model.
|
The Excel Connector can not be used to load data in files that are uploaded by forms or expressions. To do that, you need to use the CHelper functions to read data from this type of files. To learn more about how to do this, please visit this article. |
Another useful scenario to use the Excel Connector in Bizagi is to replace the usage of large (or very simple) Parameter Entities. You can configure an Excel Connector with a file containing all the possible values of an entity. With this, you no longer have to manage your Parametric Entities from your development or production environment, delegating some of your business logic to Excel and making the Deployment process easier.
In this article, you can find the description of all the operations that the Excel Connector can perform, a step by step guide on how to configure it, all the restrictions and important notes around it.
Creating an Excel Connector
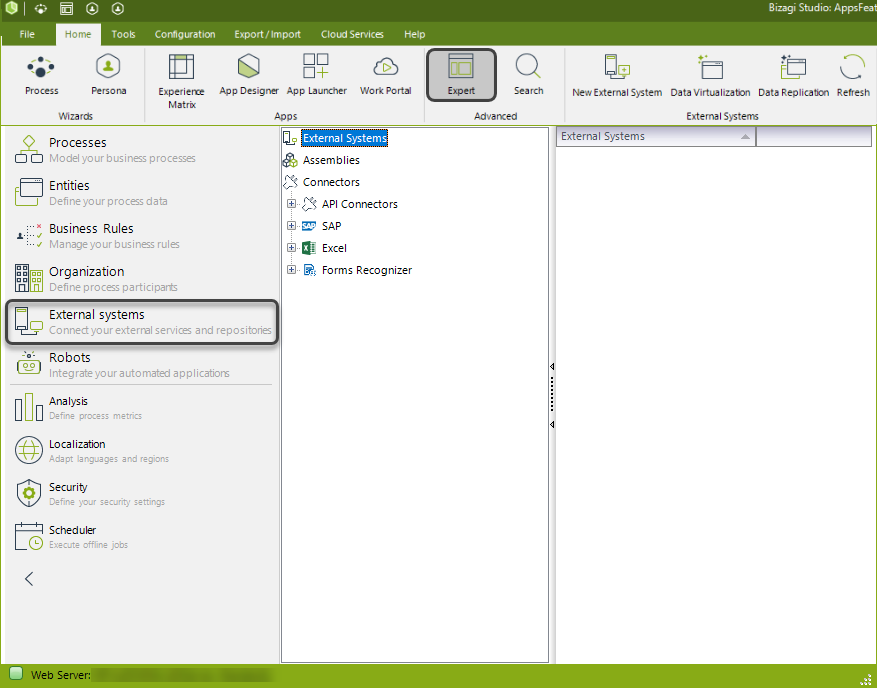
Bizagi Studio supports the Excel Connector natively. To create a specific connector that suits your business case, head to the Expert view and locate the External systems option.
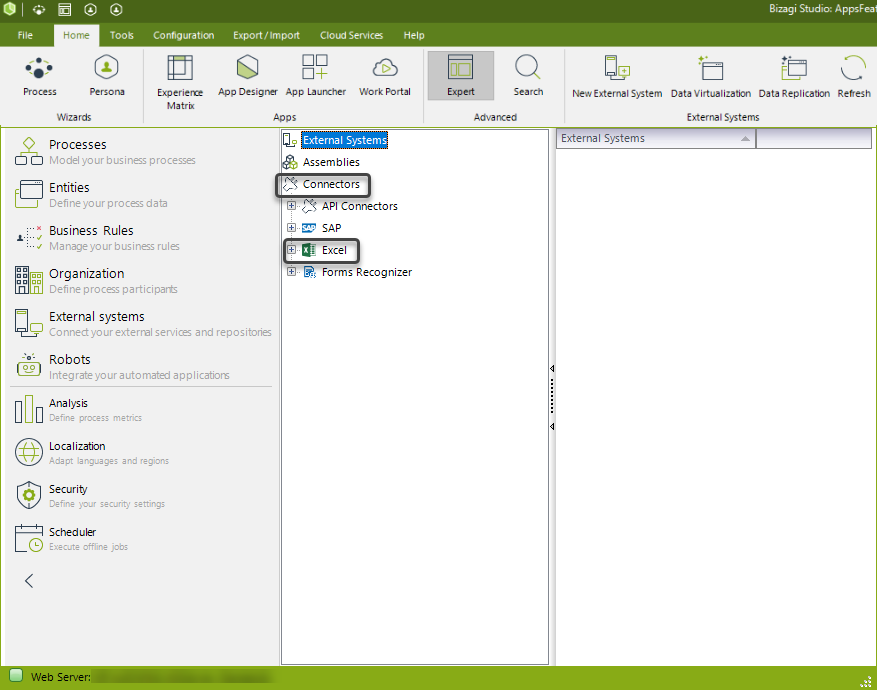
In the options that are shown, locate Excel under the Connectors branch.
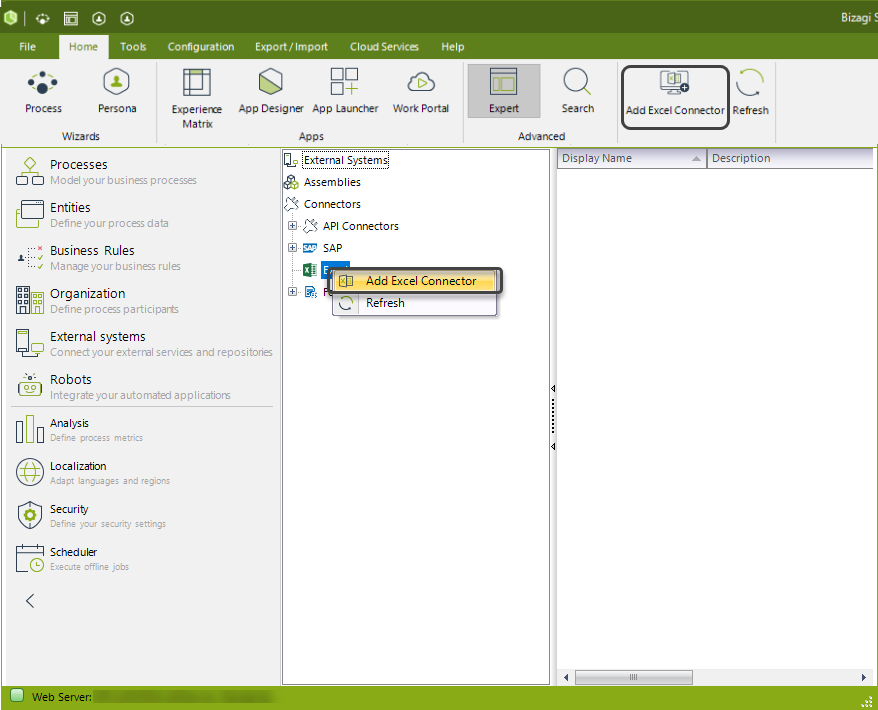
Then, right click Excel and click Add Excel Connector. Alternatively, you can first click Excel and then click Add Excel Connector on the ribbon.
The connector creation wizard appears.
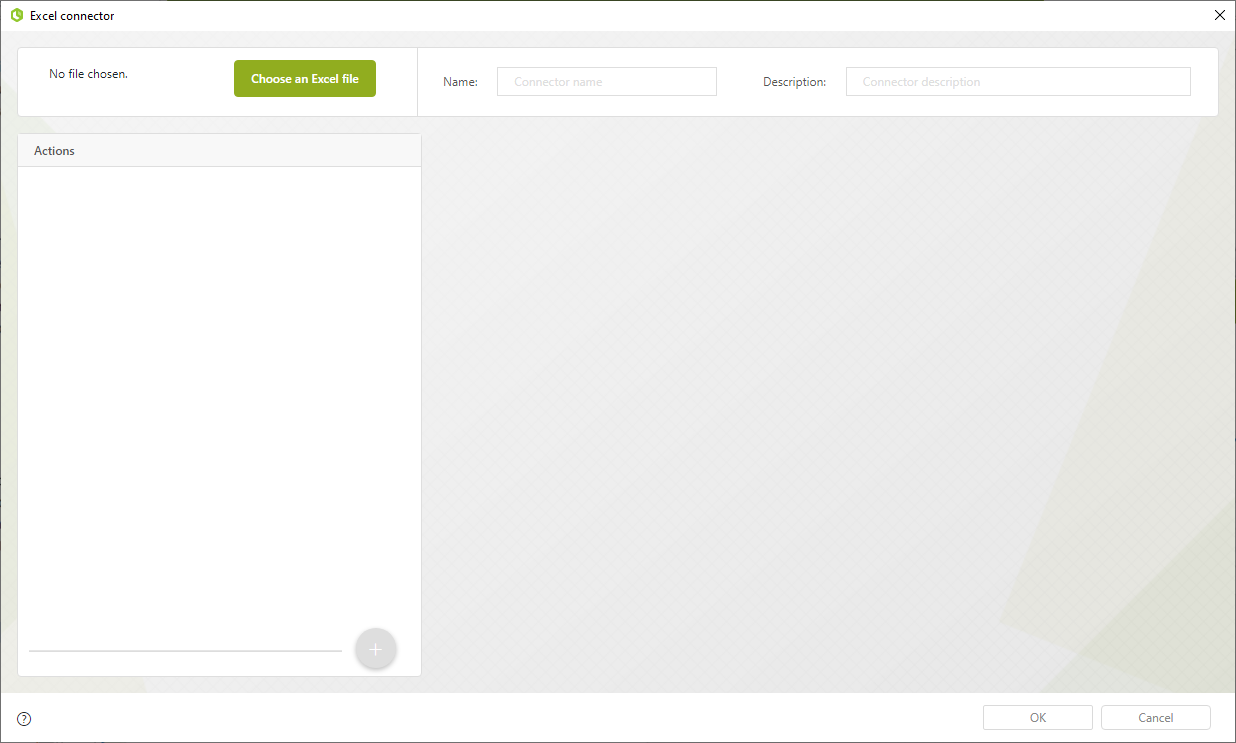
On the image shown above, you can see the four different panels that appear in this wizard:
1.In this panel, you must select the Excel file you want to upload. When you click the Choose an Excel file button, a file explorer appears. Select the file that contains the Business Logic and calculations that you want to automate in Bizagi with this connector.
|
This connector only works with the Excel file that is loaded while configuring the connector. Files uploaded by forms or expressions are not supported. |
2.On the second panel, you are asked to provide a Name and a Description for your connector. This is useful to differentiate between Excel Connectors when you want to use a specific one on a process and you need to identify it from the list of available Excel Connectors.
3.The third panel only gets active when you have already selected an Excel file. In this panel you can start adding the sequence of actions that the Excel Connector will perform over the specified file each time it is called.
4.The fourth panel is where you configure the details of each of the actions of the connector. On this panel you can specify from which cell or range of cells you want to read, or in which cell you want to write. This is the main panel of the wizard.
|
If the first action of the Excel Connector is a Read Action, the second step of mapping the input can be ignored, when the connector is being used in Activity action or in a Form action. This also applies when a file is mapped to the input, since such file is ignored. |
In this example, let's create an Excel Connector that performs a simple calculation based on information it receives from a Bizagi process.
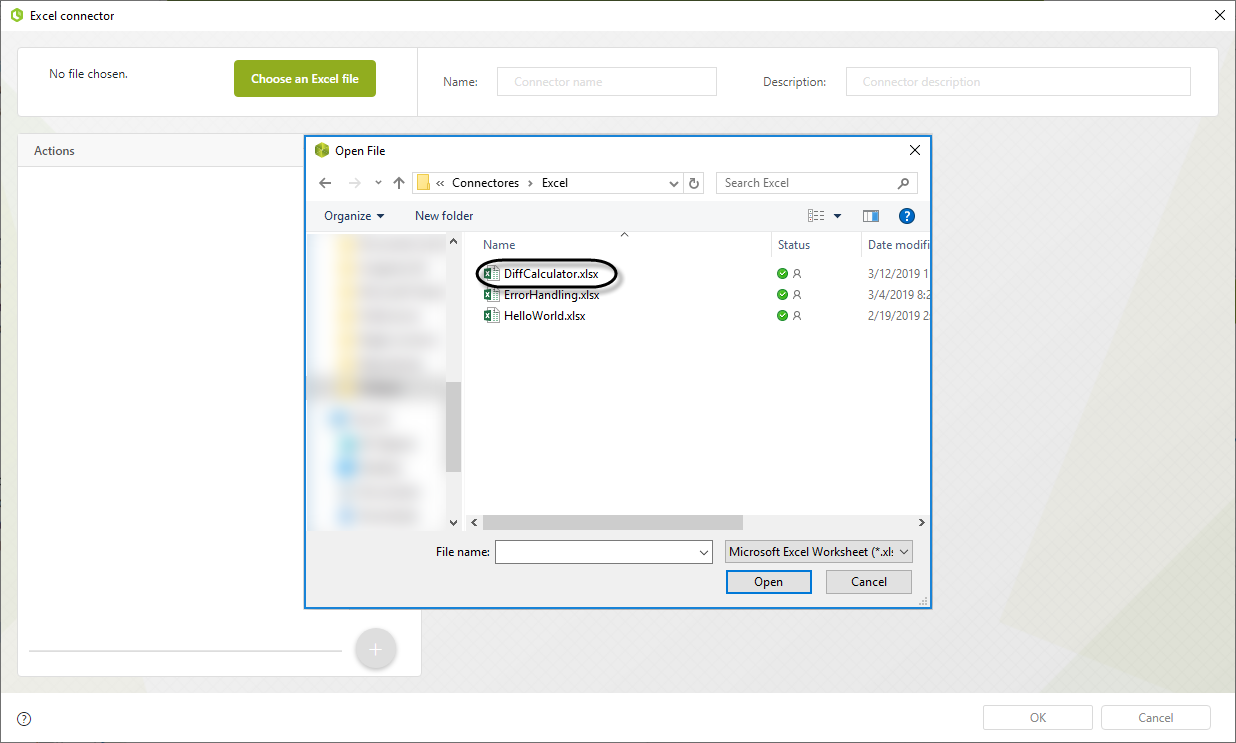
The first step is launching the Wizard an then clicking the Choose an Excel File button. Select the file you want to perform operations on. In this case we are going to use a simple Excel file which takes two values and calculates their relative difference:
Configuring the connector's actions
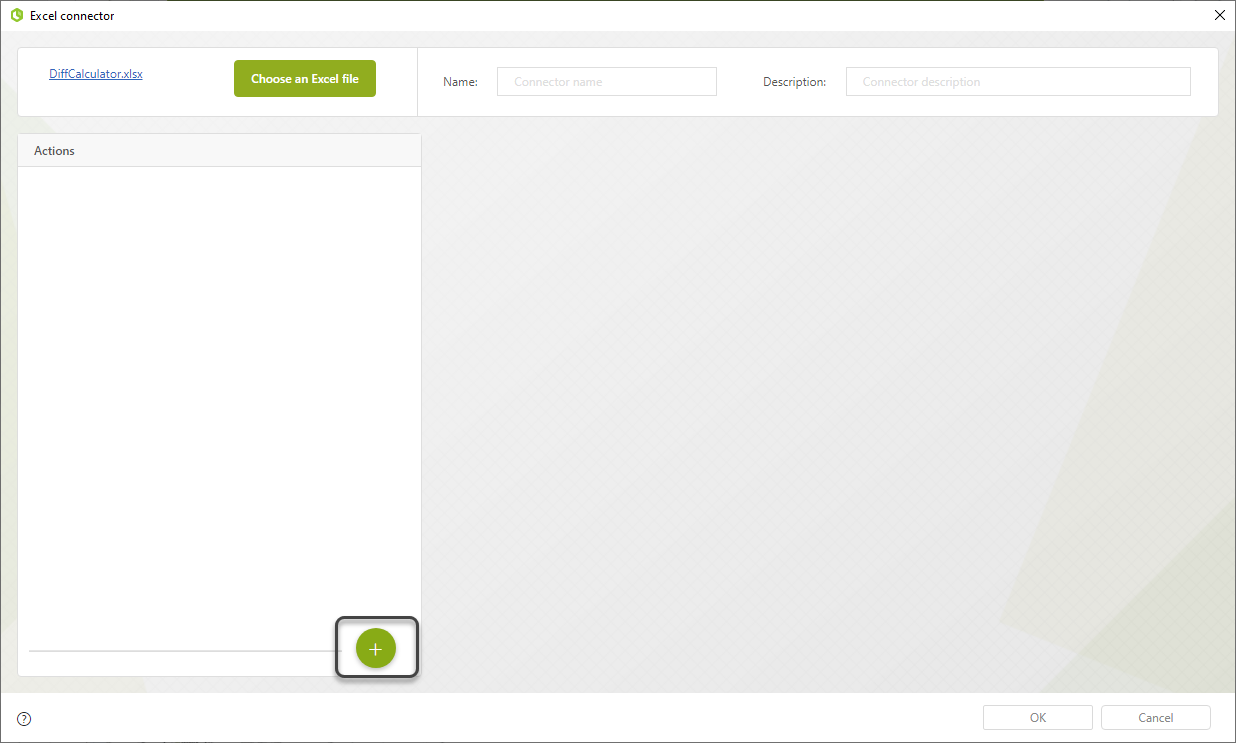
The next step is to define the sequence of actions that the connector will follow each time it is executed. To add a step to the sequence , click the ![]() button on the third panel on the wizard.
button on the third panel on the wizard.
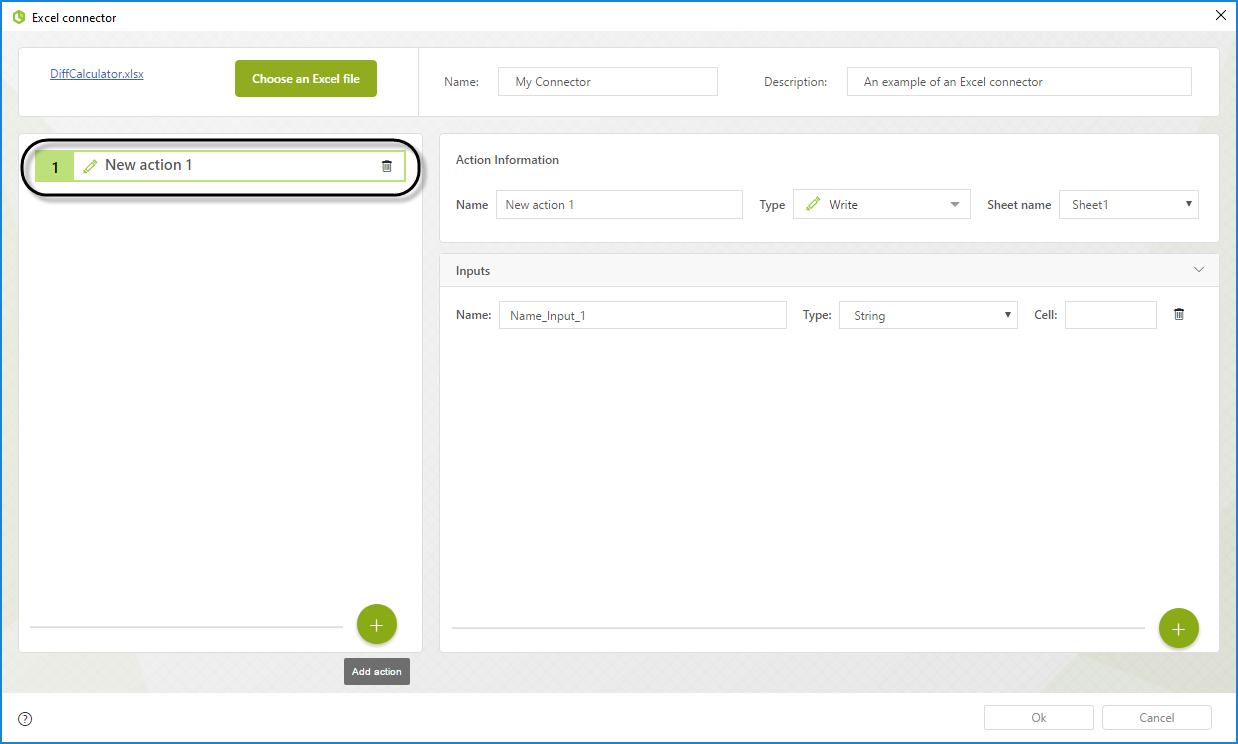
As you can see, a new write action is added. This is the default action and it can be changed from the main panel. On the third panel of the wizard you can see the sequence of actions that have been configured for the connector. On the main panel of the wizard you can see the configuration options for the current action. You can easily identify each action by giving them a name. This actions are executed in the sequence order shown in the third panel of the wizard. If you want to change the order of execution of the connector's actions, just drag and drop an action into its corresponding position.
|
The Excel connector action's names cannot contain any special character. |
Bizagi's Excel Connector can perform different types of actions, and you can select the type of action you want to configure in the Action type control, located at the main panel of the wizard. You can also select the corresponding Sheet of the file in which you want the action to take place.
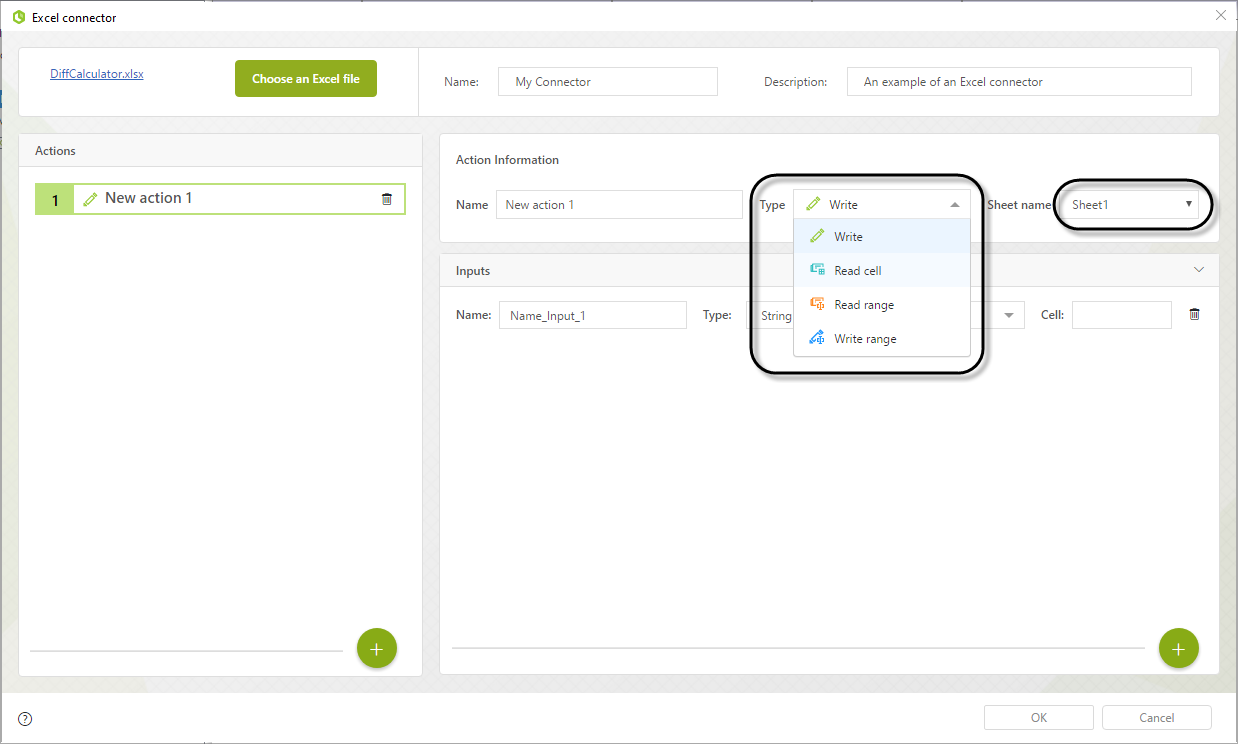
The available action types are:
1.Write action: This action lets you write Bizagi attributes in individual cells of your Excel spreadsheet.
2.Read action: This action lets you read individual cells of your Excel spreadsheet and save them in your Bizagi attributes.
3.Read range action: This action lets you read a range of cells of your Excel spreadsheet and save them on a collection in Bizagi
4.Write range action: This action lets you write the records of a Bizagi collection in a range of cells in your Excel spreadsheet.
5.Filter range action: This action lets you read a range of cells of your Excel spreadsheet, and filter them before saving them on a collection in Bizagi.
Using your configured connector on a process
Up until this point we have defined the actions that our connector will perform whenever it is executed, and the logical order of execution of those actions. However, we haven't used the connector in our project.
There are two different ways to start the execution of a configured connector in a process: as a Form action or as an Activity action.
Configuring the execution of a connector from a form
To configure the execution of an Excel Connector from a form, go to the Actions and validations option, where you can define the set of conditions that have to be meet for your connector to be executed. Define such conditions in the When section of an action, and in the Then section select the option to execute Excel connector.
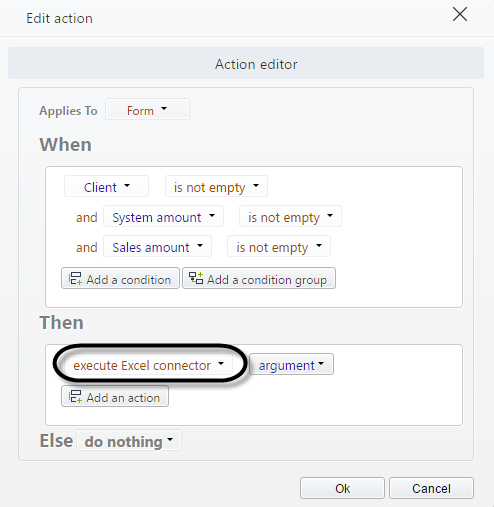
As soon as you click the Argument button, a Wizard to configure the integration with the connector pops up.
Configuring the execution of a connector from an Activity Action
The second option to configure the execution of an Excel Connector on a process is from an Activity Action. Go to the fourth step of the Process Wizard and then select the activity on which you want to trigger the execution of your connector. After you click the activity, the Activity Actions window of the task appears. Click on the plus icon of any of the Activity types (On Enter, On Save or On Exit) and then click Excel connector to launch a Wizard to configure the integration between the connector and your process.
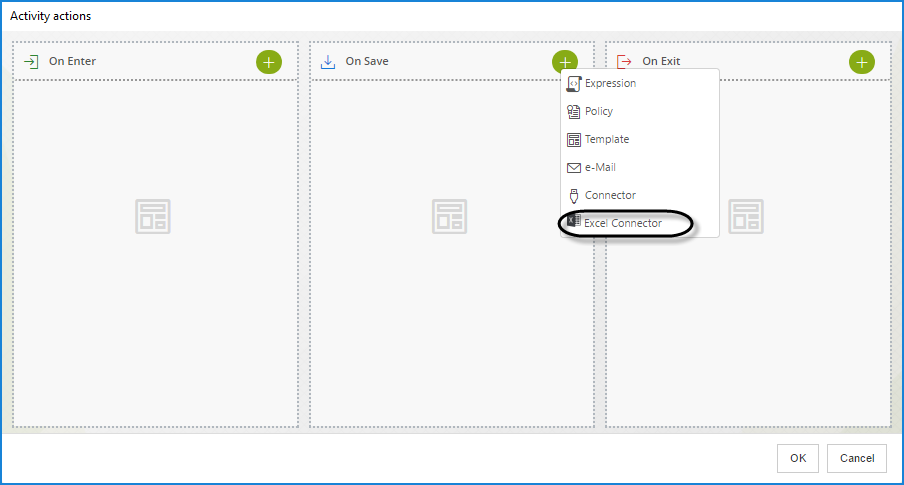
Excel Connector mapping Wizard
To help you configure your connector's execution, a Wizard similar to the one used with Connectors appears.
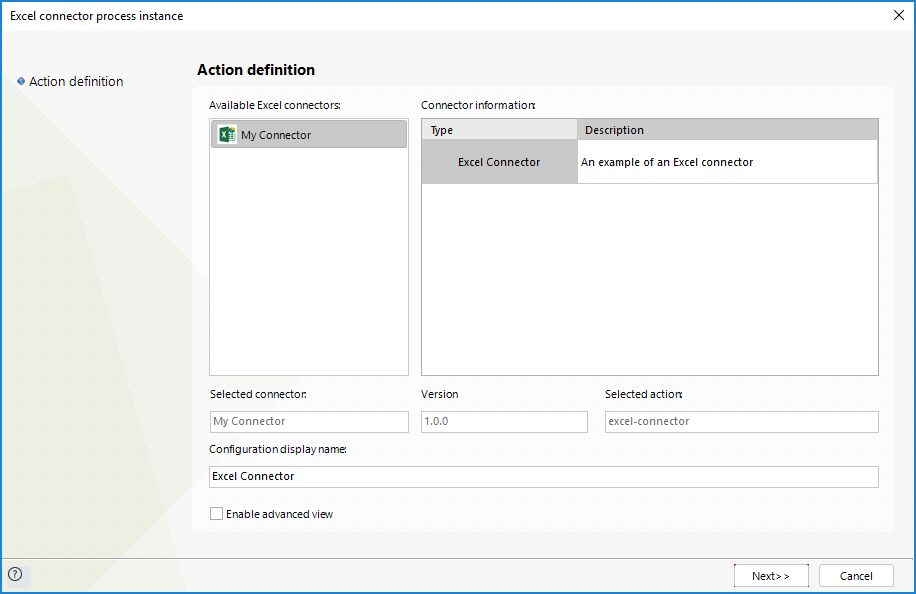
In this window, select the specific connector you wish to use (you can have multiple Excel Connectors configured for a project) and then click Next.
The Action inputs mapping window appears. Map the corresponding attribute from your Data Model to each of the connector's inputs.
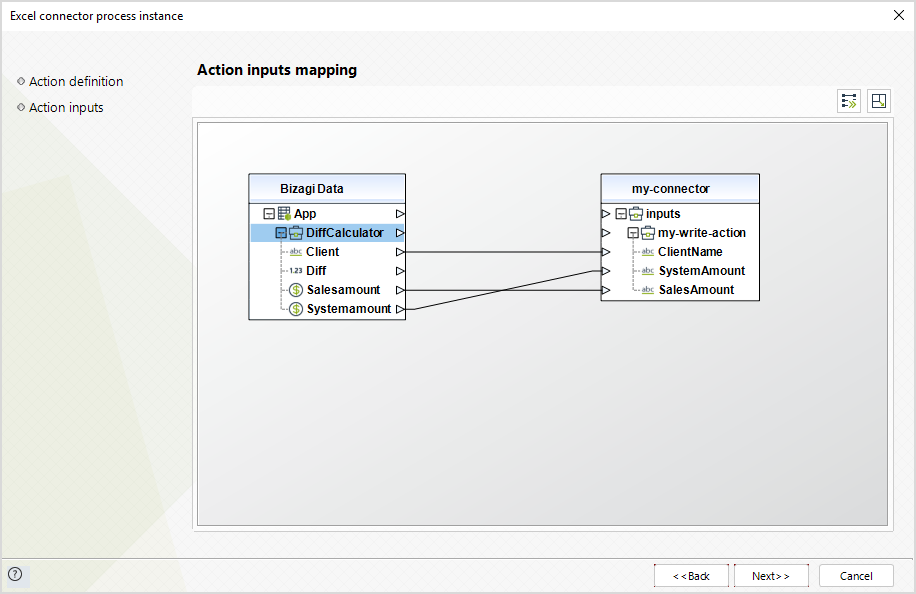
|
If you are working in an environment with localization active, you must be very careful with what you expect to send to your Excel. When this option is active parametric attributes store different values in each language. This connector will always send the value in the default language regardless of the localization configuration. |
When you are done configuring the inputs for the connector's execution, click Next.
A new mapping window appears. This time map the output values of the execution of the Excel Connector to its corresponding attribute on your Data Model.
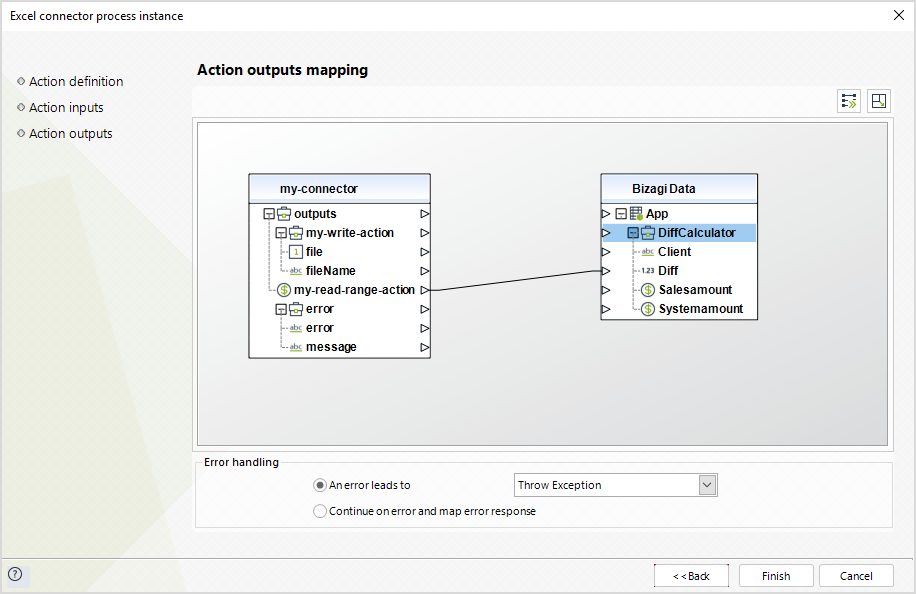
When you are done mapping the outputs of the connector to your Data Model, click Finish.
At this point you have an Excel Connector configured and ready to be executed! Whenever you get to the point you configured the connector to be executed at, it will perform the sequence of tasks you programmed it to do and retrieve the results. This is evidenced in the image below.
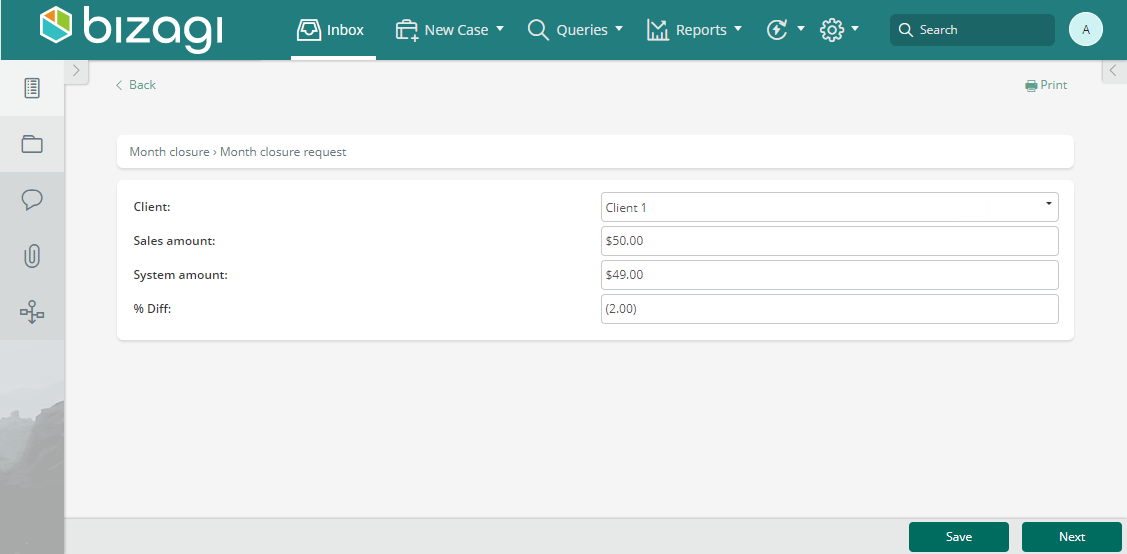
In the Month closure request task, the user inputs the Client, Sales amount and System amount values; upon clicking the Save button, the Excel Connector is invoked and inputs the three fields into the spreadsheet, which calculates the result that is finally read by the connector and saved into the data model in the % Diff attribute.
Advance view
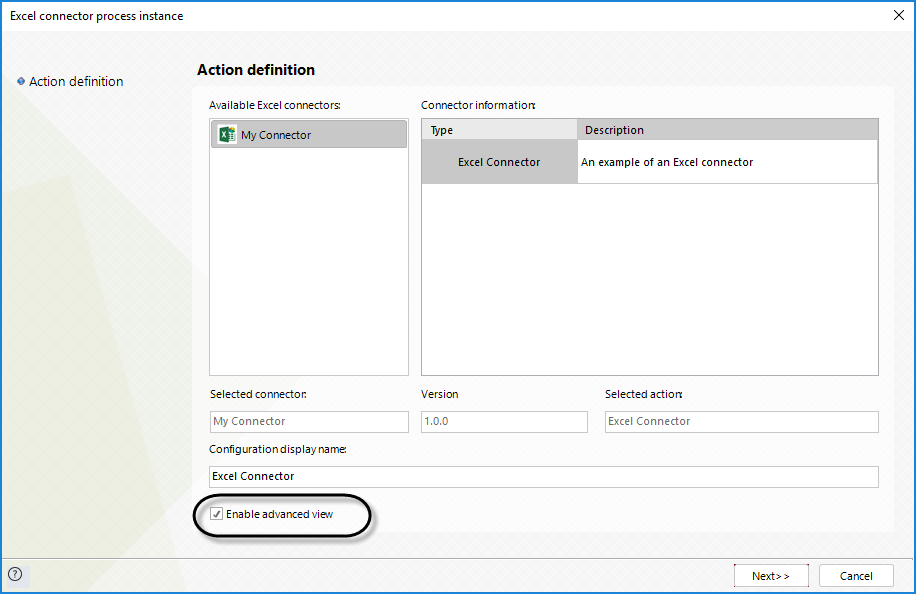
For some business cases the Spreadsheet or cell in which your actions take place may not be static. Bizagi offers you a way to select them by mapping them as attributes of your Excel connector. To do this, select the Enable advanced view option in the first step of the Excel Connector mapping Wizard.
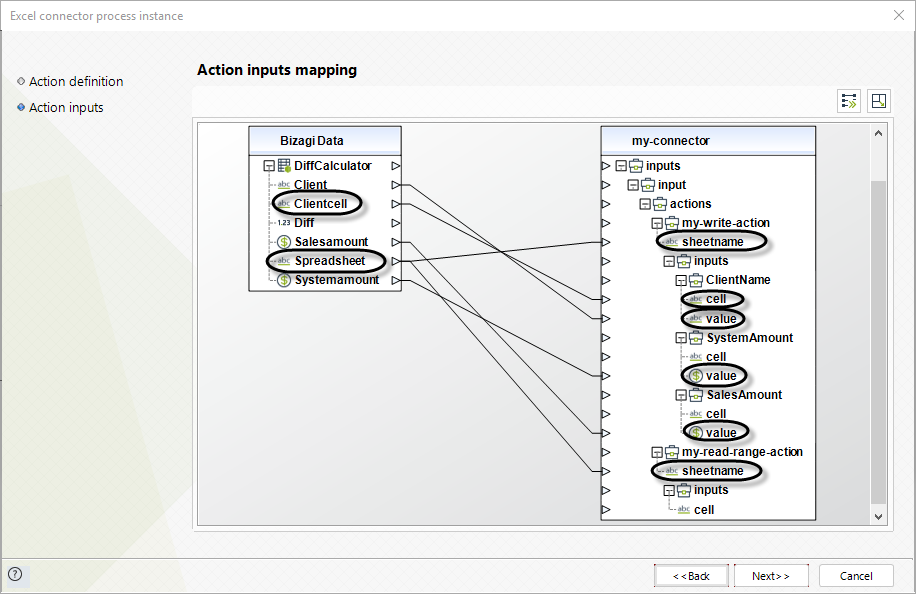
When using the advanced view you will find that more attributes of the Excel Connector are available in the second step of the wizard. For each action, you can select the spreadsheet where the action takes place. In addition to this, you can select a different attribute depending on the method. You can find more information of which properties are available for each action at: Write action, Read action, Read range action and Write Range action.
In this view you must map your attribute in the Data Model to the value field in the Excel Connector.
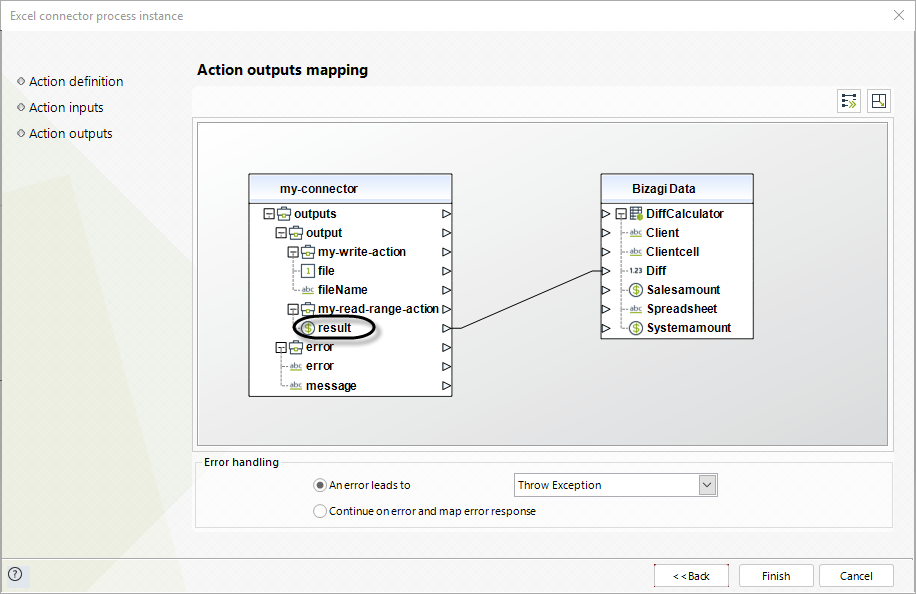
Finally, in the third step of this view the value of the output is explicitly shown in the mapping wizard as the attribute result.
Important considerations
There are some important aspects that need to be taken into account when dealing with Excel Connectors:
•An Excel Connector may have an impact on the performance of a case. This depends on the size of the Excel file that is used and the capacities of the server where Bizagi is running. We recommend using files smaller than 14 MB.
•When writing values to an Excel file, the data type and format configured on the specific cell on Excel prevails over the data type configured in Bizagi.
•The allowed file extensions to be used with this feature are: XLS, XLSX and XLSB.
•Excel Macros cannot be used with the Excel Connector. This means that the Excel Connector does not support reading results calculated by a Macro.
•The Excel Connector is built on top of the Aspose Cells library (version 18.11), this means that all restrictions of the library also apply to the Excel Connector. Take into account that Aspose Cells counts with many features from which a reduced set of them were considered to develop the connector; this means that a feature available in Aspose Cells might not be available to use in the Excel Connector. In this website you can find a list of what Aspose Cells does support.
•We do not recommend using this connector to load large volumes of data.
Last Updated 2/19/2024 11:14:53 AM