Overview
You can upload Excel files to Bizagi and extract their data to perform different business operations through Bizagi.
|
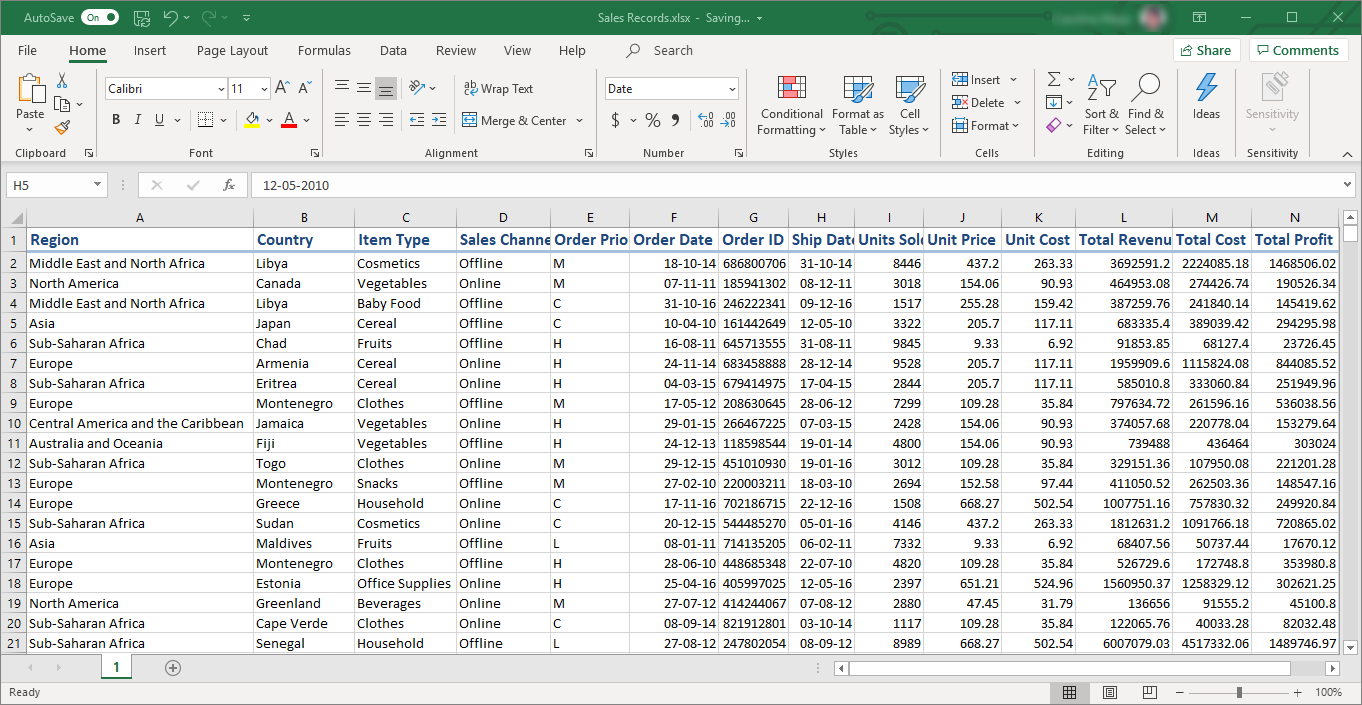
It is essential to ensure that the Excel file being used has only the first row containing titles or headers. If there are multiple rows with titles, the functions will not work correctly. |
To extract data from an excel file, use the following function:
CHelper.GetDataTableFromWorkSheet(oFileData, iSheetId)
The following parameters are needed:
•oFileData: Data of the excel file to read.
•iSheetId: The index of the excel sheet to read. The first sheet is 0.
This function returns all the data from the excel file as a DataTable, ignoring the values from the first row, which usually are title fields. The data types of each record are maintained with this method. To obtain those values as Strings, you can use the function:
CHelper.GetDataTableFromWorkSheetAsString(oFileData, iSheetId)
The following parameters are needed:
•oFileData: Data of the excel file to read.
•iSheetId: The index of the excel sheet to read. The first sheet is 0..
When importing dates as string you can use the following function to convert them to date data types:
FormatedDate = CHelper.FormatDate(dateAsString, "dddd, MMMM dd, yyyy hh:mm tt");
Keep in mind that
•For this function to work correctly the excel file's culture must match the Bizagi culture. If that is not the case you must use Parse conversion.
•All the column names of the Excel file should be different. If there are columns whose name is the same, the function will not work.
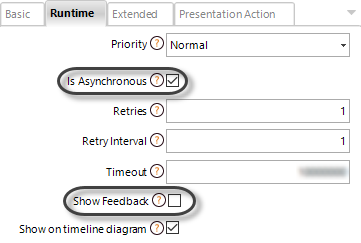
•When the file has more than 10.000 records use the function in an asynchronous task that doesn't show feedback.

Example
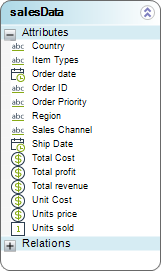
Suppose that there is a process task where users can upload an Excel file with monthly sales reports and you want to store that data in a Bizagi entity. In this case, the information will be uploaded to the Sales Data collection. The entity has the following attributes:

The excel file that is going to be uploaded has the following structure:

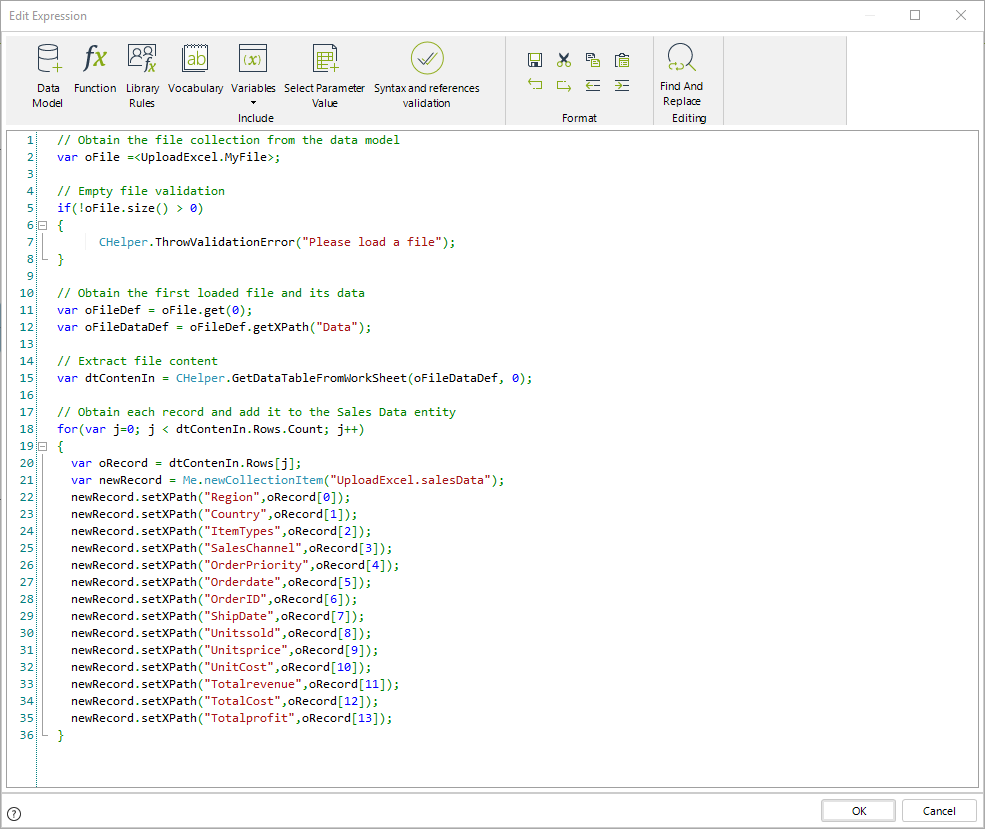
After the user uploads the file during a task, this rule is executed to read and save the data to the collection:

The expression is as follows:
// Obtain the file collection from the data model
var oFile =<UploadExcel.MyFile>;
// Empty file validation
if(!oFile.size() > 0)
{
CHelper.ThrowValidationError("Please load a file");
}
// Obtain the first loaded file and its data
var oFileDef = oFile.get(0);
var oFileDataDef = oFileDef.getXPath("Data");
// Extract file content
var dtContenIn = CHelper.GetDataTableFromWorkSheet(oFileDataDef, 0);
// Obtain each record and add it to the Sales Data entity
for(var j=0; j < dtContenIn.Rows.Count; j++)
{
var oRecord = dtContenIn.Rows[j];
var newRecord = Me.newCollectionItem("UploadExcel.salesData");
newRecord.setXPath("Region",oRecord[0]);
newRecord.setXPath("Country",oRecord[1]);
newRecord.setXPath("ItemTypes",oRecord[2]);
newRecord.setXPath("SalesChannel",oRecord[3]);
newRecord.setXPath("OrderPriority",oRecord[4]);
newRecord.setXPath("Orderdate",oRecord[5]);
newRecord.setXPath("OrderID",oRecord[6]);
newRecord.setXPath("ShipDate",oRecord[7]);
newRecord.setXPath("Unitssold",oRecord[8]);
newRecord.setXPath("Unitsprice",oRecord[9]);
newRecord.setXPath("UnitCost",oRecord[10]);
newRecord.setXPath("Totalrevenue",oRecord[11]);
newRecord.setXPath("TotalCost",oRecord[12]);
newRecord.setXPath("Totalprofit",oRecord[13]);
}
Keep in mind that in this example the data that the user uploads goes directly into a collection, this is why a loop is used to add the records directly into the collection.
When the data from a file must go to a master entity that is not modeled as a collection, you can build an XML string to add the data using the CEntityXmlHelper.fromXmlToEntity(inputXML) function.
The following expression reads the same Excel file from the previous example and saves the data in the Sales entity using the fromXmlToEntity function.
// Obtain the file collection from the data model
var oFile =<UploadExcel.MyFile>;
// Empty file validation
if(!oFile.size() > 0)
{
CHelper.ThrowValidationError("Please load a file");
}
// Obtain the first loaded file and its data
var oFileDef = oFile.get(0);
var oFileDataDef = oFileDef.getXPath("Data");
// Get data as string
var dtContenIn = CHelper.GetDataTableFromWorkSheetAsString(oFileDataDef, 0);
// Start building the request XML
var inputXML = "<BizAgiWSParam>";
inputXML += "<Entities>";
// Obtain each record and add it to inputXML
for(var j=0; j<dtContenIn.Rows.Count; j++)
{
var oRecord = dtContenIn.Rows[j];
inputXML += "<Sales>";
inputXML += "<Region>" + oRecord[0] + "</Region>";
inputXML += "<Country>" + oRecord[1] + "</Country>";
inputXML += "<OrderID>" + oRecord[6] + "</OrderID>";
inputXML += "</Sales>";
}
inputXML += "</Entities>";
inputXML += "</BizAgiWSParam>";
// Save records
var sResult = CEntityXmlHelper.fromXmlToEntity(inputXML);
Last Updated 4/12/2024 12:09:31 PM