Introduction
Organizations are supported by technologies to help them increase the added value of the business and concentrate their efforts and resources on achieving high customer satisfaction and profitability. Businesses are dependent on information technology and there must be defined procedures and policies to efficiently manage it.
Reliability of the technological resources is fundamental. Ensuring total availability, capability, and security according to business demands, can be a real headache for organizations. Information Technology Departments have been created to provide assurance in the availability and reliability of information, and the proper technological infrastructure operation. But the bigger the organization, the more difficult is the technological resources management. Change Management is one of the areas where there is most risk.
Change Management responds to the needs of introducing changes as part of the business continuity, new business requirements and continuous improvement. It also minimizes the impact and disruption by properly evaluating possible effects and planning and controlling the execution of changes.
Bizagi’s Change Management Process template is based on the principles of ITIL V3 Practices to help guarantee Changes by planning, impact and risk evaluation, level of authorization, communication, implementation, and documentation. The definition of a standard process flow, responsibilities, information that must be recorded for each activity and the traceability of each change will allow you to prioritize and respond to change requests, reduce the number of unsuccessful changes, meet external requirements, provide better estimations of time and cost, aid productivity, reduce response times and catch useful data for continuous improvement.
Analyze and implement the changes for your organization in an agile and efficient way.

Bizagi Modeler Process Description (Bpm)
The complete documentation of this process can be found within its Bizagi Modeler file (.bpm). From there, you can generate a Word document with all its information.
Description
The process starts with the creation of an RFC (Request for Change) by a person or group. Once the RFC has been planned and reviewed it is submitted to the Change Management Department. This department establishes an initial assessment and evaluation and decides if the RFC is accepted, rejected, or requires amendment. Changes must be approved according to their classification and impact level.
When the RFC has been authorized, its implementation is planned, communicated, and executed. Then the Change implementation is evaluated by the Requester (person or group) who confirms if the implementation was successful or not. The necessary actions to remedy the unexpected or undesired effects of the implementation are performed if required.
Finally, the Change manager reviews the development of the Change and closes the RFC.

Main Facts in the Process Construction
Data Model
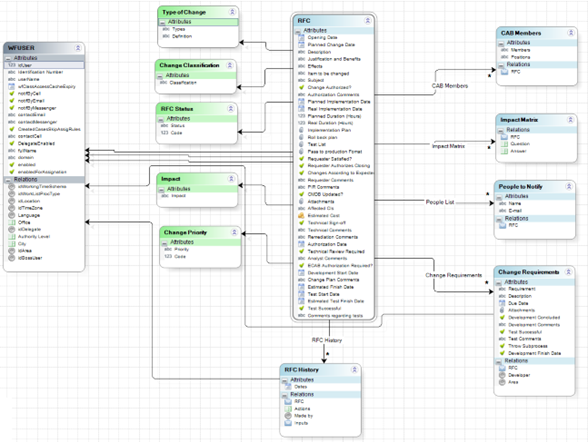
The Process entity is Request for Change (RFC). This entity stores all the attributes and relationships necessary to manage and follow a Change.
Relationships with parameter tables are established to enable the user to select their values to define the information needed to resolve each Request. Some of these tables are as follow: Type of Change, Classification, Status, Impact and Priority among others.
The process has relationships with the system entity WFUSER to allow the process to identify the task performers and their information.
Some master entities as Impact Matrix, Change Requirements and RFC History are related to the Process entity to allow the user to define, store and track the necessary information along with the Request development.
Parameter Entities
Different parameter entities are used to define information that determines the flow that the Process will follow. Some of them are totally customizable according to your needs and policies, as will be shown below:
Questions
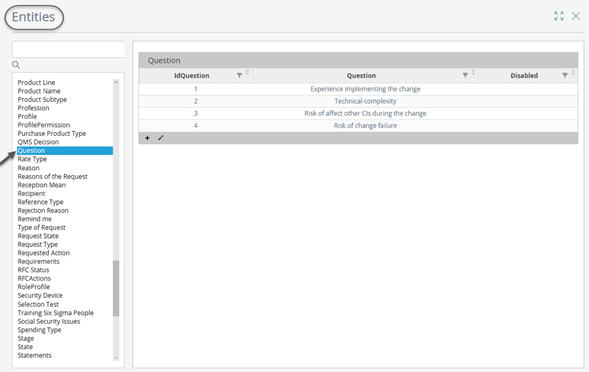
The impact evaluation of an RFC is commonly evaluated by using an impact matrix. This matrix is composed of questions that establish the level of impact the change could have over the business operation.
To define your own questions according to the way you classify and assess your changes, go to Modules and select the entities option. Search the parameter entities and then click on the “Question” entity. Click on “Values” and add or edit questions as required.
Answers
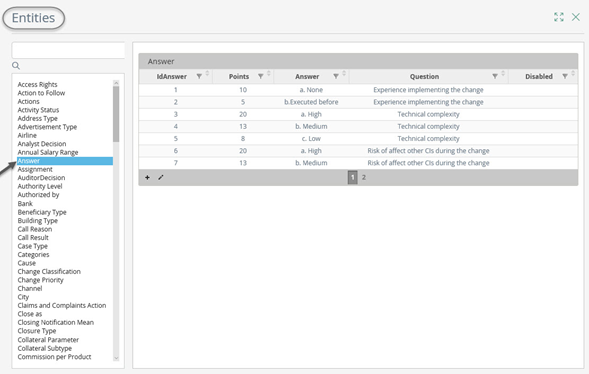
Answers must be defined for each of the established questions and must be scored according to the impact each answer has. The impact level is obtained by totalizing all scores of the selected answers
To define your own answers and their related scores, go to Modules and select the entities option. Search the parameter entities and then click on the “Answer” entity. Click on “Values” and add or edit the answers, their score, and their related questions as required.
Master Entities
Five master entities were defined for this Process template.
•To track an RFC’s development, the master entity “History” stores the main information of the Request in chronological order to allow the user to consult its development at any time.
•The “CAB Member” master entity stores the information related to the people that evaluated and authorized a change.
•“People to Notify” master entity stores the information related to the people that must be notified, via email, about the implementation of a change.
•“Change Requirements” master entity is used to define the requirements that must be developed to complete a change. Basic information, such as the requirement description, due date, and developer in charge, is stored in this entity. The requirements development sub-process is thrown for each requirement defined in this table.
•The “Impact Matrix” master entity is defined to allow the user to easily answer a set of questions to establish the Change impact level.
Impact Matrix
Impact evaluation is one of the most critical tasks in this process. The authorization of a change depends, mainly, on the assessment of the possible effects on business operations, so the change feasibility and its effects must be carefully analyzed.
The impact matrix is a tool that helps the Change management team to evaluate the impact of a change. It consists of a set of questions, whereby each one has an associated set of answers, and each answer has a related score. The total score defines the impact level according to established policies.
The “Impact matrix” master entity is used to enable the user to consult and answer the questions that the Change Management team has established in the “Questions” parameter entity.
Add values to Parameter Tables from the Work Portal.
Bizagi processes should always have an administrator in charge of parameterization to ensure that the data handled by the process is always correct. In the development environment, these tables can be managed from Bizagi Studio, but when projects are in production, they can only be managed through the Work Portal.
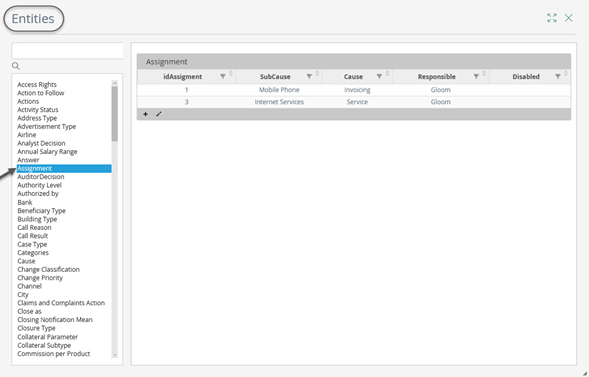
To add or edit values in parameter tables from the Work Portal go to the Admin option and then select the Entities option. A complete list of the entities involved in the process will be displayed; select the table you wish to add or edit. A form will be enabled to enter the required values.
Important Rules
Get Impact Level
As we have seen before, the impact matrix is very useful in this process. To define the impact level according to the selected answers for each question, “Get Impact Level” is used. This rule obtains the value of the impact level according to the scores of the selected answers, as follows:
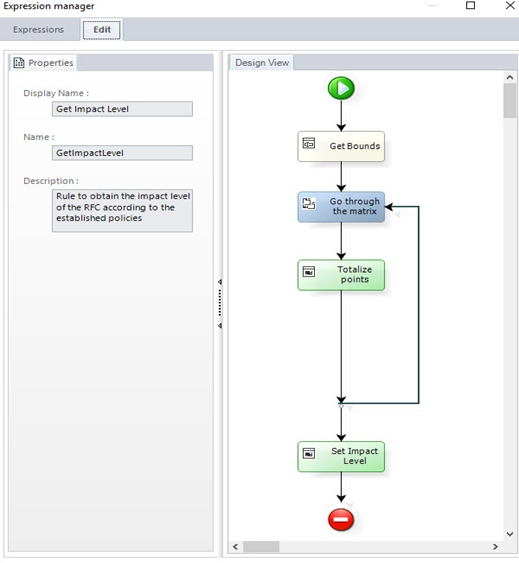
The image above shows the structure of the expression. The first step is “Get bounds” where the values of the bounds that define the impact level ranking are obtained from vocabularies. The second step is to iterate over the “Impact matrix” master entity, then obtain the score related to the selected answers and accumulate it. Finally, the RFC level is established by comparing the total score with the defined rankings of impact level. How can I define the impact level rankings?
The impact matrix is shown in the different forms as follows:

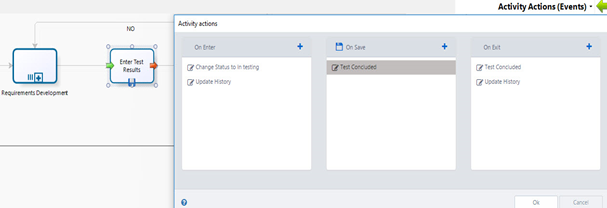
Test Concluded
The “Requirements Development” multiple sub-process is thrown by each defined requirement to allow the person in charge of its development to report the results of his assignment. When a requirement does not meet tests in a satisfactory way, the sub-process is thrown again.
This rule is used to identify what processes must be thrown out to review a specific requirement.
Vocabularies
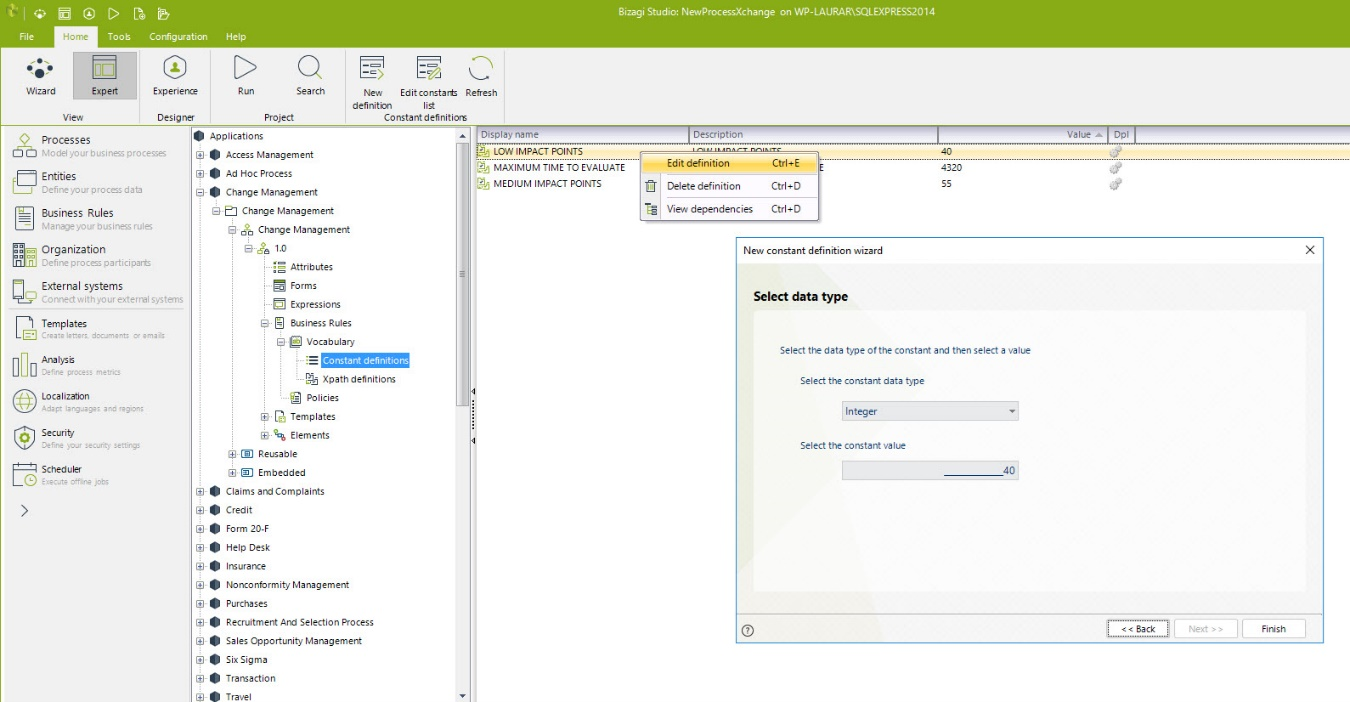
The impact level is defined according to the total score of the selected answers to each question. You can define the limits or bounds of each impact level rank. LOWERBOUND and UPPERBOUND constant definitions were created to allow you to modify their values and customize these bounds which define the impact ranking as follow:

To modify the vocabularies, enter the Modules view, go to the Processes option, and search the Vocabularies Constant definitions. Select the constant definition “LOWERBOUND” or “UPPERBOUND” and set their values according to your guidelines.
Set Timers Configuration
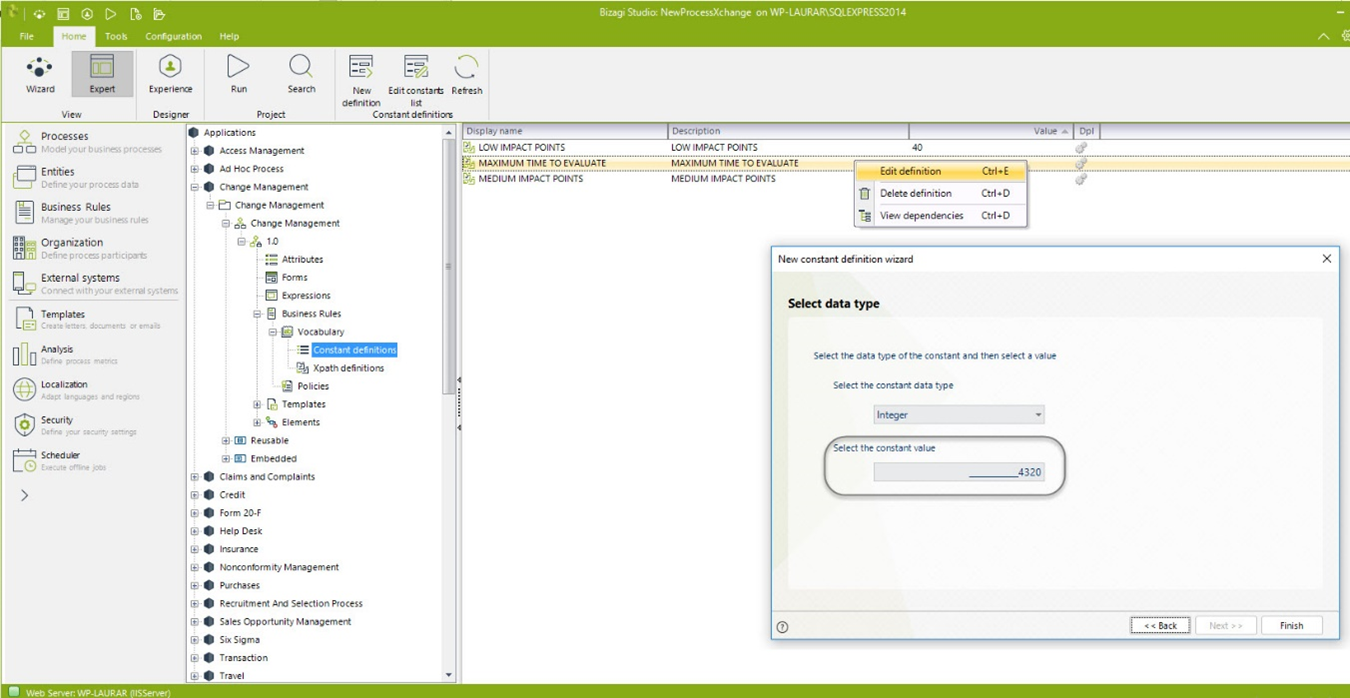
In this Process, a timer is used to control the response time the Requester has to evaluate the Change implementation. RFC´s can stay open waiting for the requester to evaluate the results, but sometimes, the requester is satisfied with the Change and does not evaluate it. This RFC must be closed to improve the RFC´s attention rate and should not affect the process performance metrics.
You can set the duration given through vocabulary definitions. Enter the Modules view, go to the Processes option and search the Vocabularies Constant definitions. Select the constant definition “MAXIMUM TIME TO EVALUATE” and set this value according to your guidelines.
Indicators
This process template will help you to control your management via case queries according to criteria that will give you data useful for calculating Key Performance Indicators (KPI´s). Queries are executed through the “Queries” option in the main menu of the Work Portal.
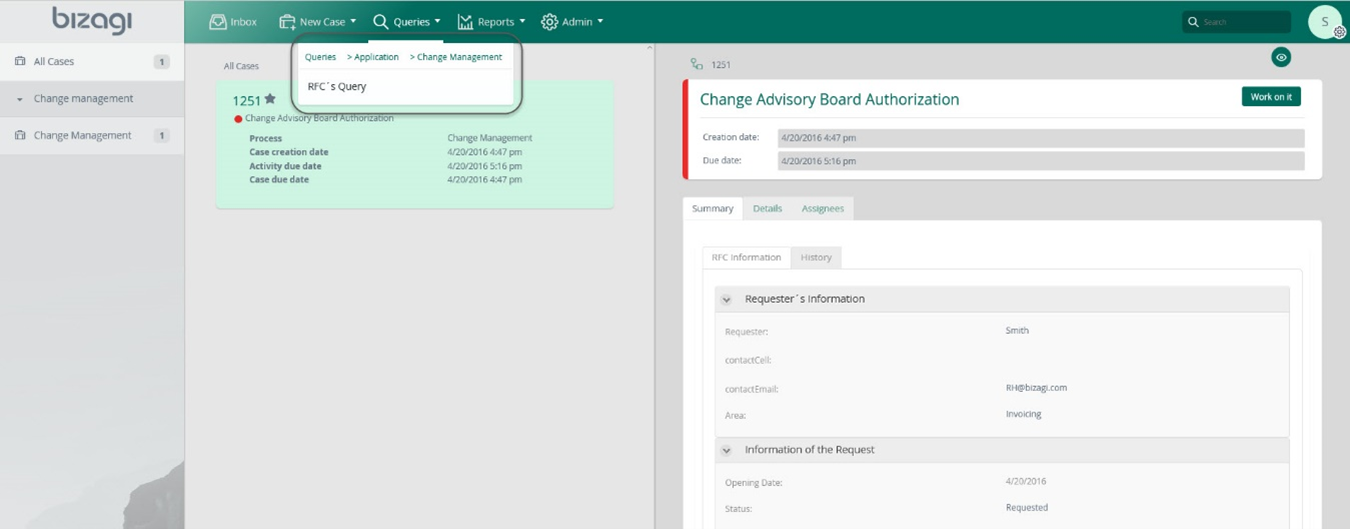
By default, the process template includes some attributes useful to calculate several indicators.
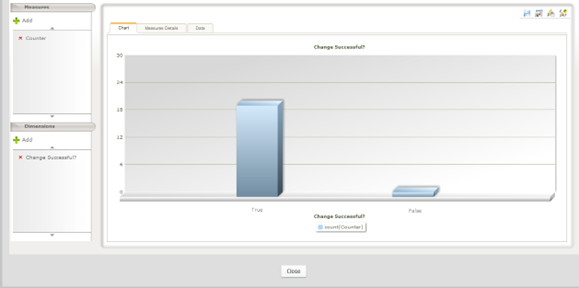
For example, if you wish to evaluate the rate of successful changes in a period, you can use the query form on the web application in the “Queries” option, choose the option yes in the “Change Successful” field and the start and final date of the period you wish to evaluate in the “Closing Date” fields.
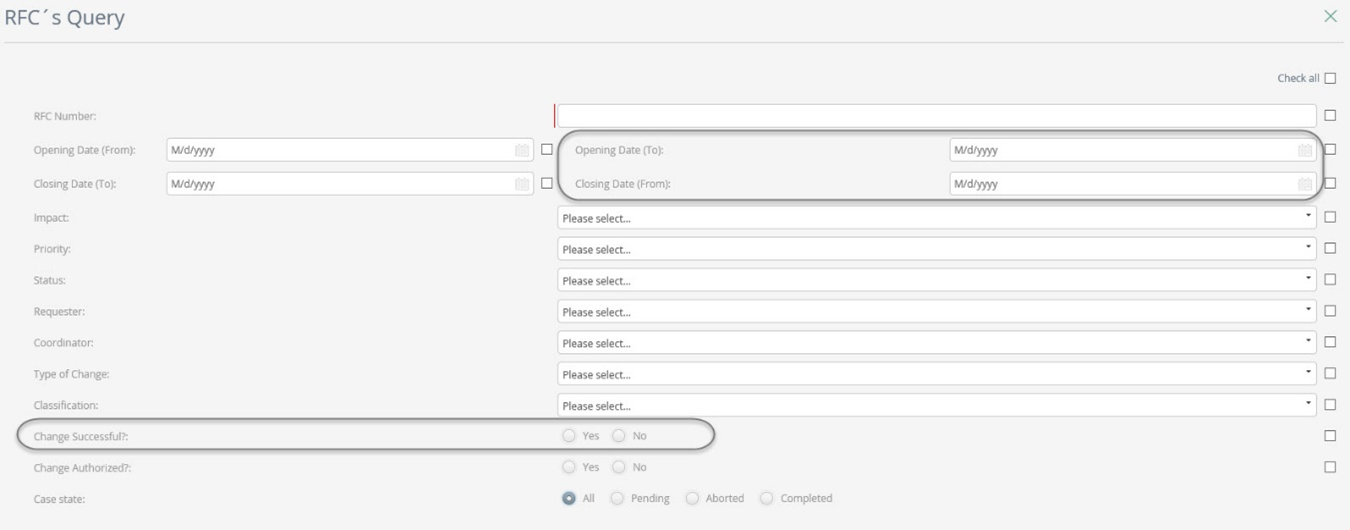
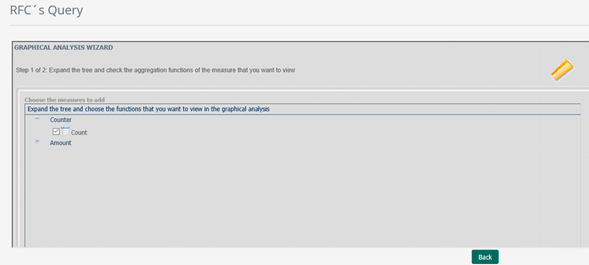
The RFC’s that meet the criteria will be displayed. Click on Graphical Analysis option.

In the Measures definition window of the Graphical analysis wizard check the “Counter” Option.
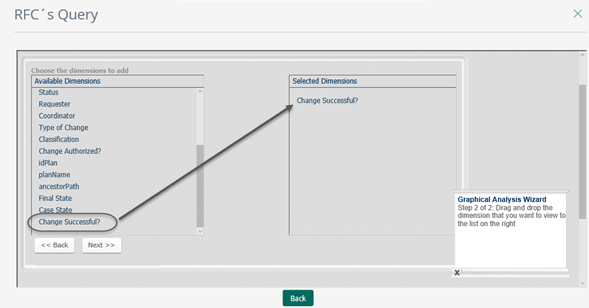
In the Dimensions definition window of the Graphical analysis wizard drag and drop the “Change Successful?” dimension to the selected dimensions on the right-hand side square.
The number of successful and unsuccessful RFCs in the selected period is shown in a column chart:
Do the same for the total RFCs in the period, for this, only select the start and final date of the period in the “Closing Date” fields.
Once you have obtained this data you can easily calculate the rate of successful changes, defined as:

Bizagi offers the function to export the data to Excel to manipulate it.
You can define your own indicators using the attributes already created in the template or adding another to obtain the information you need. If you wish to obtain information about how to set up queries you can go to http://help.bizagi.com/platform/en/index.html?queries.htm
Last Updated 8/23/2022 9:21:00 PM