Overview
An excellent Market positioning is achieved through competitive advantages that influences the consumer´s purchase decision and makes the difference between a company and its competition.
Nowadays it is not a competitive advantage to constantly improve the customer attention. Instead, it is an inescapable need if a company wants to stay in business and grow into the globalized markets.
Consumption and brand preferences are too sensitive and easily guide the consumer to the competition if they feel indifference from the company about their needs and requests.
On the other hand, when your company gives its customers a special treatment that overcome their expectations it will lead to customer loyalty, company’s brand improvement and sells and market participation increase.
Therefore, you need to concentrate your efforts on searching for your customer’s high satisfaction levels through faster and betters answers to their manifestations. You could achieve this focusing your resources in finding responses for them and not spending too much managing their attention.
Bizagi's Petitions, Claims and Complaint Management process template will help you to administrate Petitions, Claims, Complaints and Suggestions through the definition of a clear information flow, the responsibilities of each activity required to solve them and the process control through their traceability. The combination of the template’s characteristics will allow you to make the correct decisions and easily identify what should be improved in order to keep and improve the image that your customers have about your company.
Bizagi Modeler Process Description (Bpm)
The complete documentation of this process can be found within its Bizagi Modeler file (.bpm). From there, you can generate a Word document with all its information.
Process Description
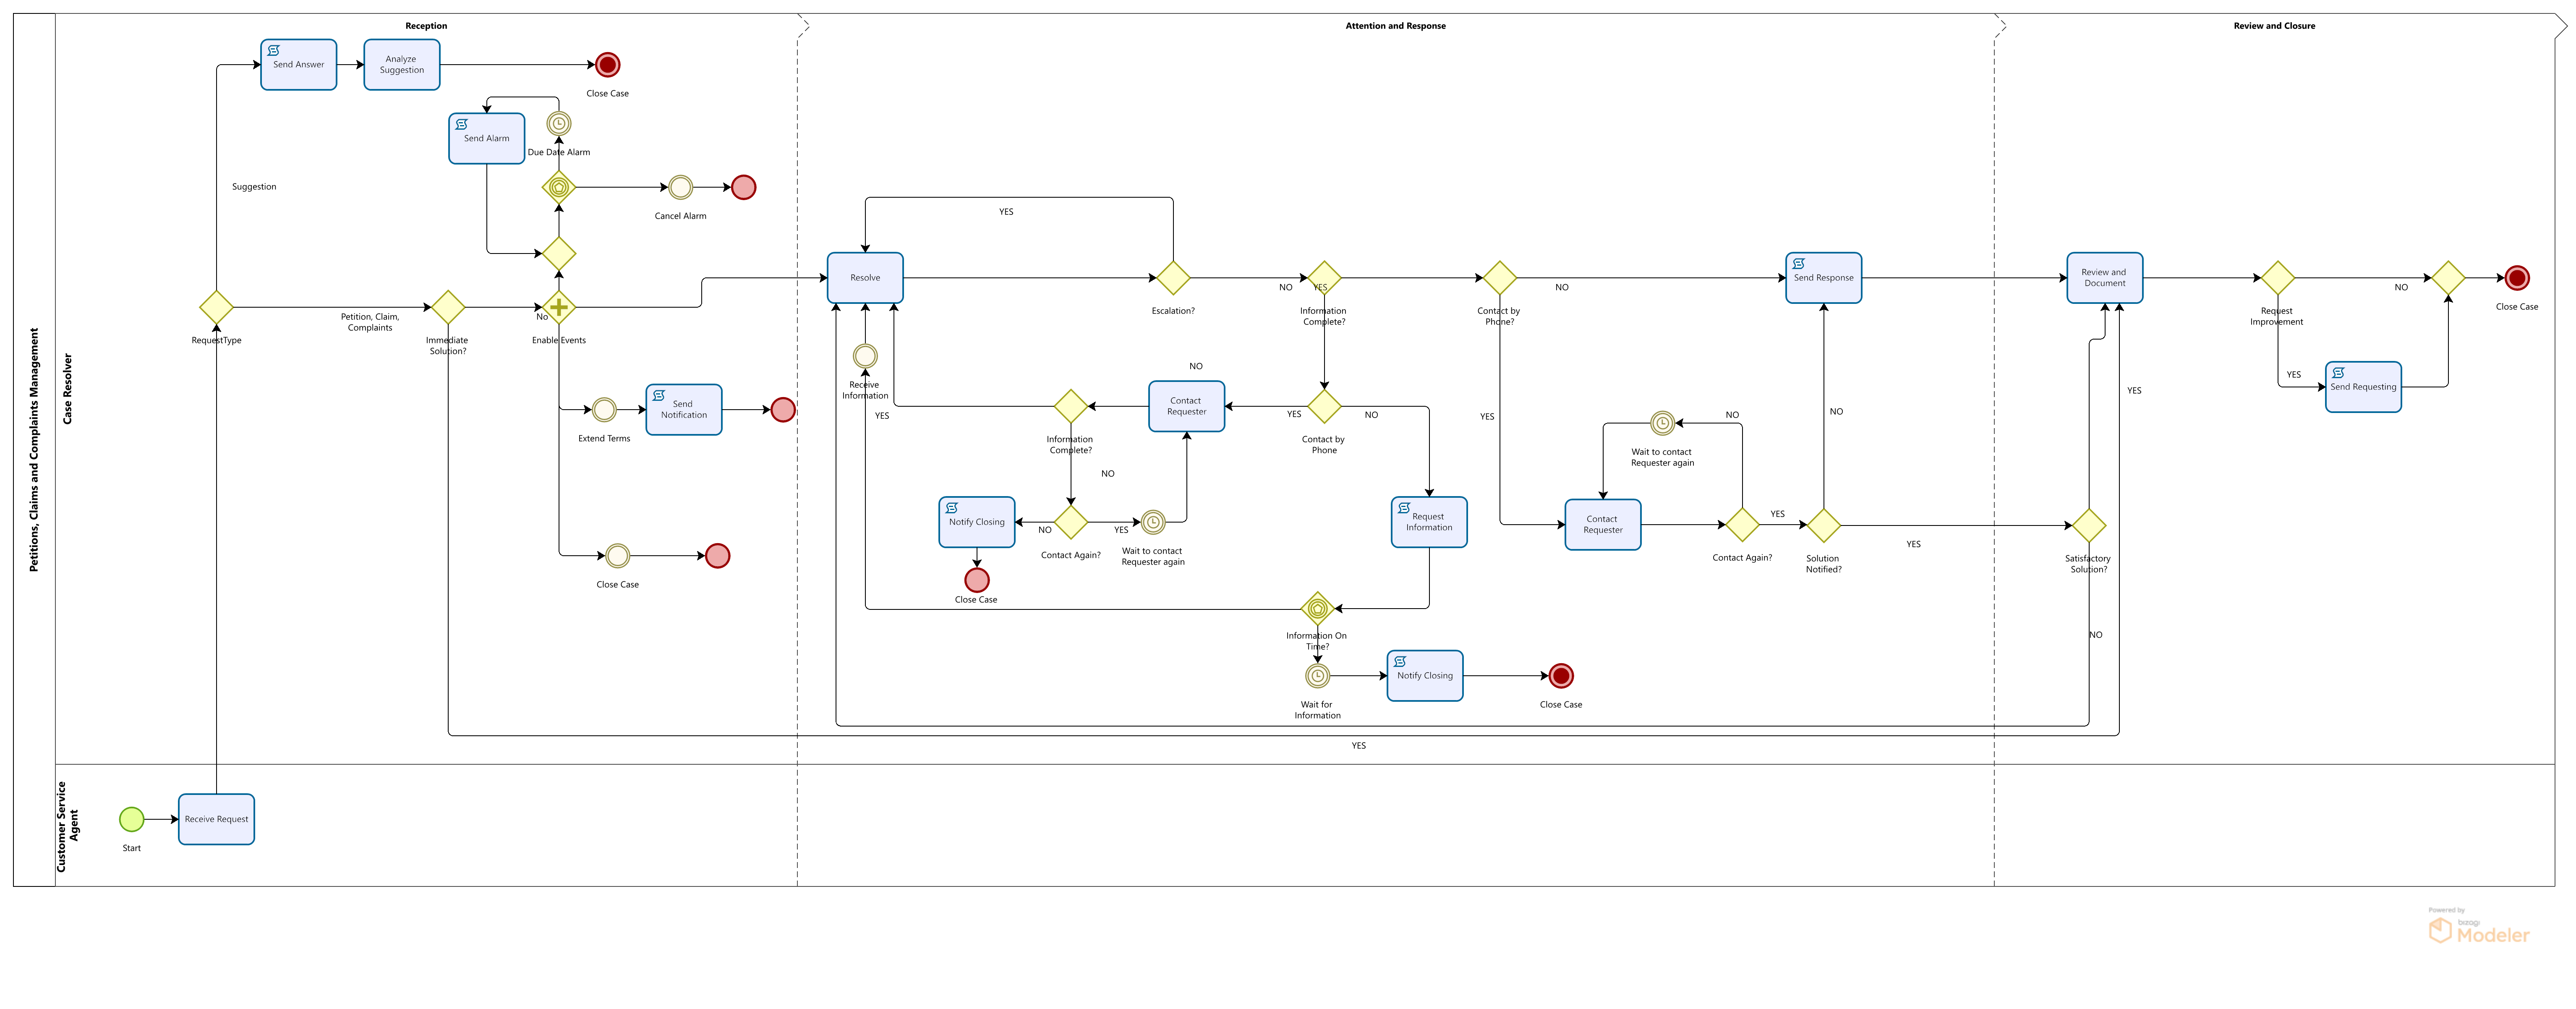
The process starts when a Request is made; a Customer Service Agent receives, and sorts it in Petition, Claim, Complaint or Suggestion.
If the Request is a Suggestion, it is entered into the system and a response is given immediately. If the Request is a Petition, Claim or Complaint, it is registered and an immediate response is given if possible. If not, the Agent identifies if more information must be requested or if the case must be escalated to another area or person.
When a solution is found, it is notified by phone (If it requires a special treatment or monitoring), mail or letter. Then the case is reviewed to evaluate the service and to identify issues or inefficiencies that should be improved. Improvement actions can be requested through an e-mail sent to the people who are able to evaluate and implement it.
If the case solution should be documented in the Knowledge Base, the documentation details are recorded. Finally, the case is closed.
This document will guide you through the main steps in the Petitions, Claims and Complaints Management process construction. The main facts of this process are exposed below.
Main Facts in the Process Construction
Data Model
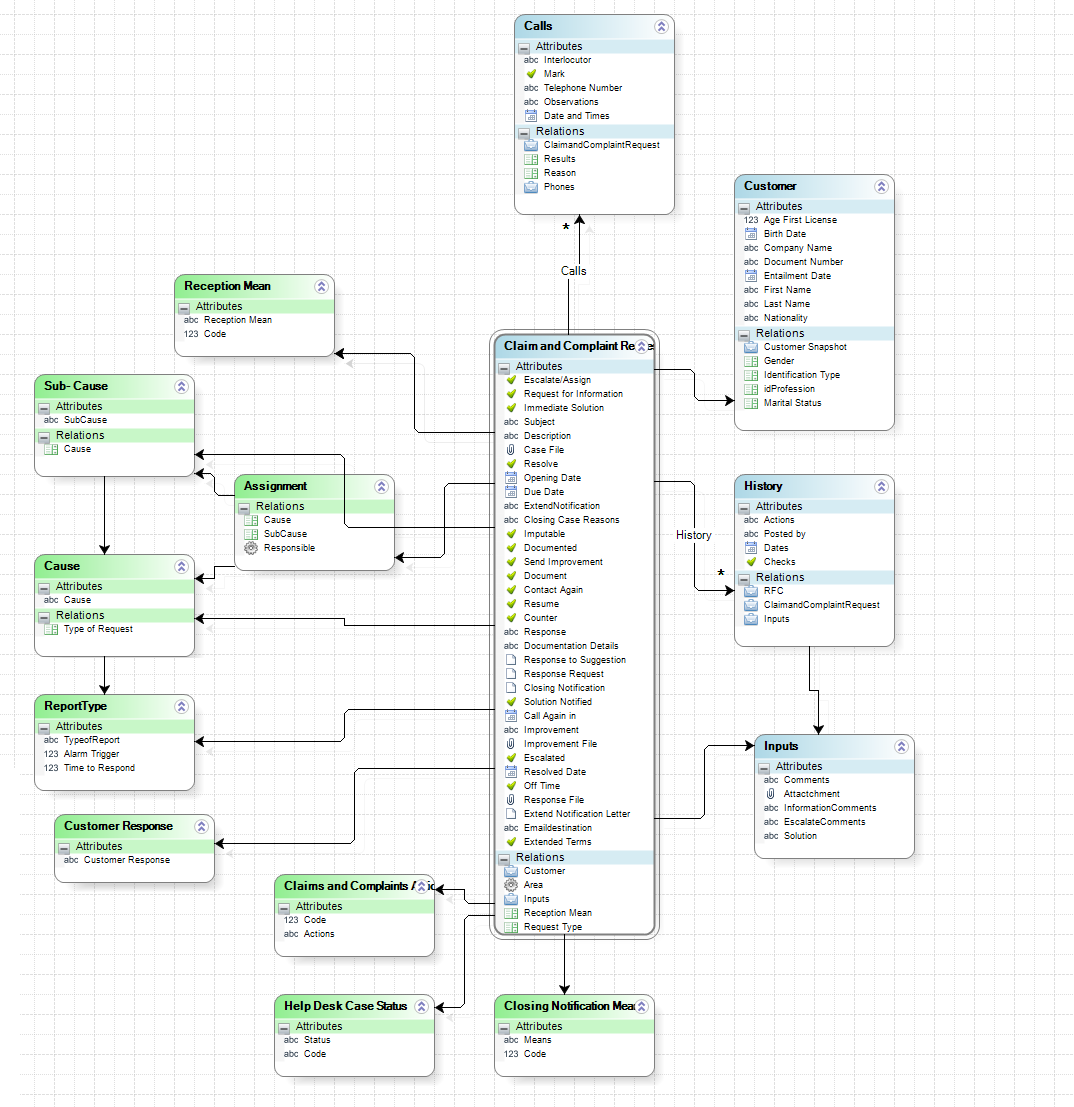
The process entity is the Request which has all the attributes and relations necessary to save cases information.
The first relationship found is with the entity WFUSER; this allows the process to identify the task performers and their attributes.
Also, relationships with parameter tables are established to enable the user to select their values to define the information needed to resolve each case. Some of these tables are Request Type, Priority, Cause and Sub-Cause among others.
In order to track the case development, there is a master entity called History. This entity saves the main information of the case in a chronological order to allow the user to consult the case development in all the activities and in the summary form. A similar behavior is performed by the master entity Calls which stores all contact information that has been established with the Requester to ask information or notify a response to the Request.
Parameter Entities
Response Times
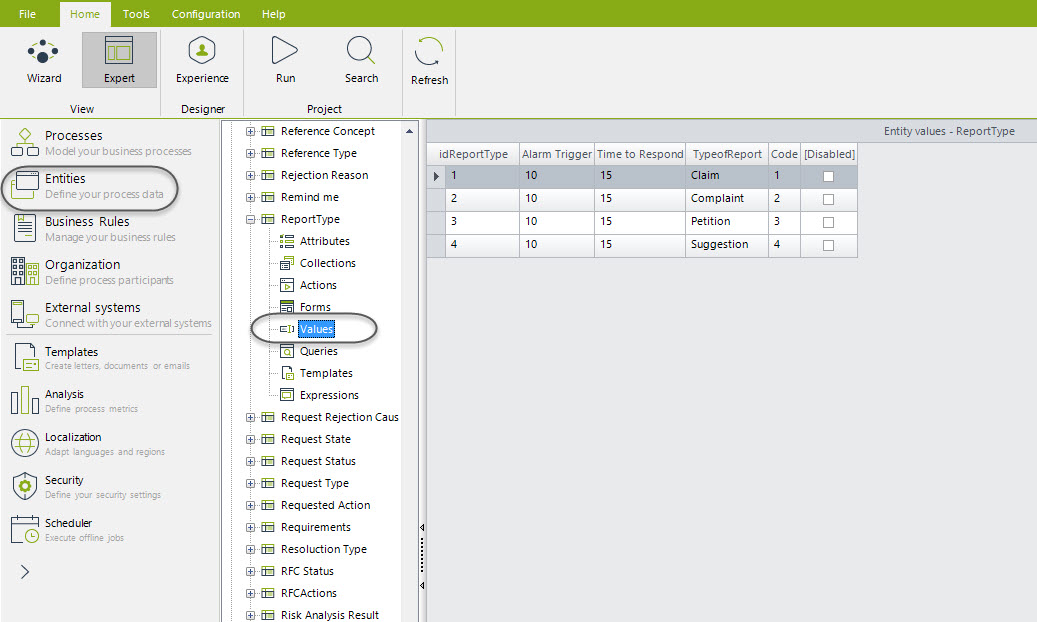
The Response Times can be adjusted to your particular needs, according to your legislation. The table Request Type stores the maximum response times for the different Requests. You can set these times (in days) in a parameter table.
By default, the values you will find are 15 days for each one. To set these parameters, in the Modules view go to the Entities option and search for the parameter table Report Type. Here you can change the values as you need.
Request Types
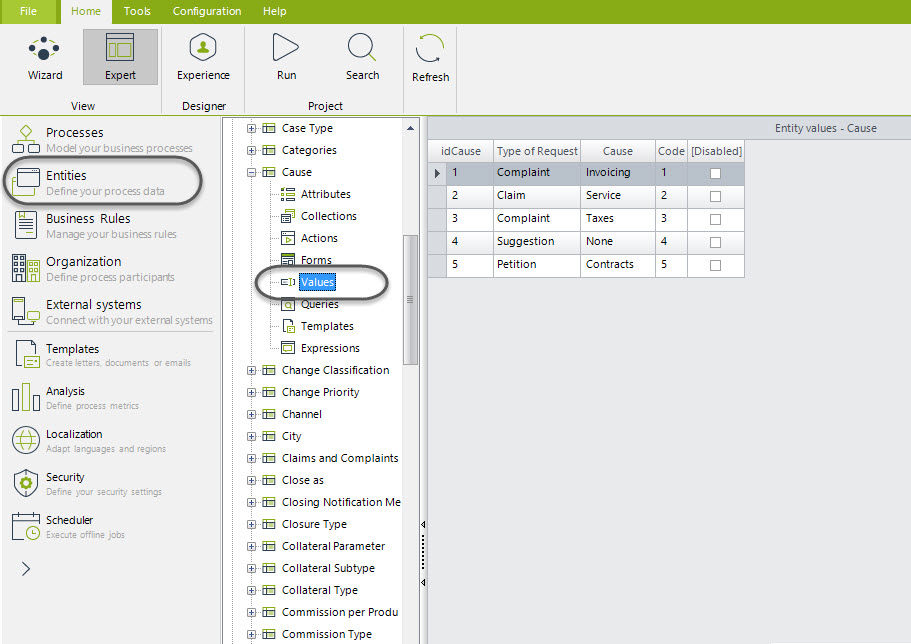
In order to make the process control easier and reduce mistakes, causes and sub-causes for each request type are established. The specialized attention of the case in the first instance of each case is achieved by sorting the Requests in two levels, each Request is related to many causes and each cause has many sub causes. You can set the causes and sub-causes of each Request according to your business conditions. To do so in the Modules view go to the Entities option and search for the parameter tables Cause and Sub-Cause, in each of them you can change the values as needed.
Assignment Table
The request types will help you to assign cases in a more accurate way. It is necessary to use the parameter entity ASSIGN, which helps you set the proper users to attend a Request according to its Cause and Sub Cause. This way, in the task “Receive Request” the assignment will be done automatically by entering the values desired.
To set the users in the table, in the Modules view and go to the Entities option. In the parameter table ASSIGN, set the user name and the cause and sub-cause that he/she will attend.
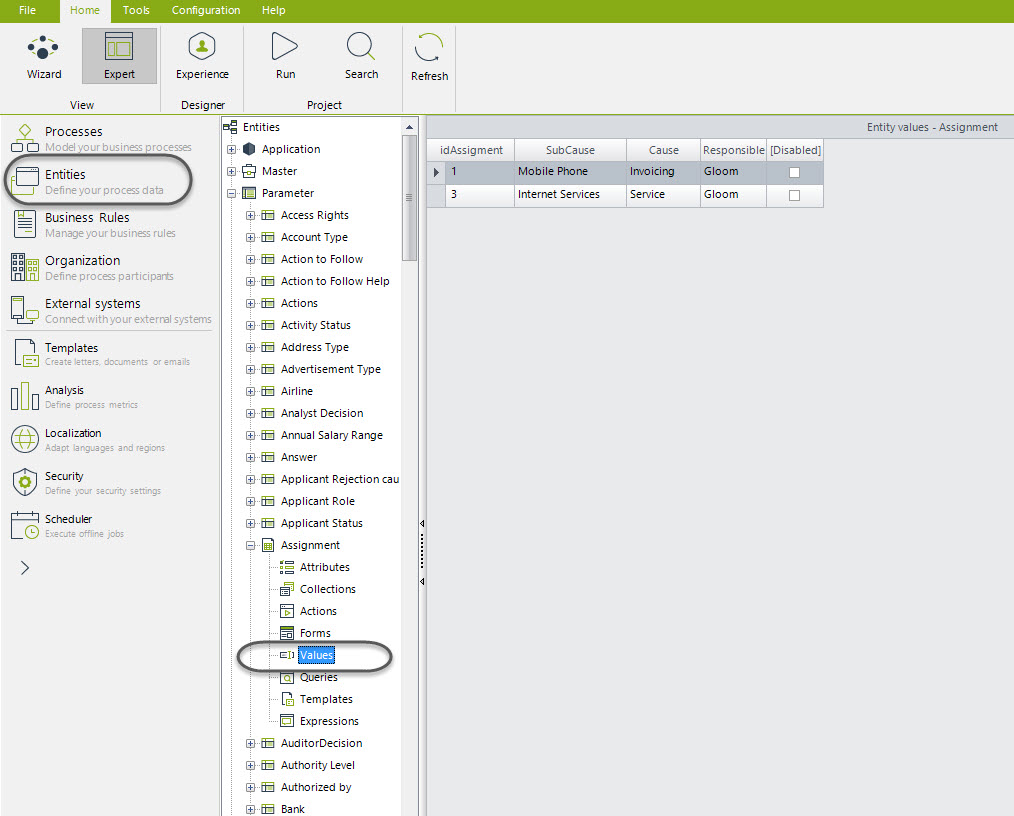
ADVISE: IF YOU WANT THE ASSIGMENTS TO WORK CORRECTLY IT IS NECESSARY TO ENTER THE USERS INFORMATION IN THIS TABLE, IF NOT, CASES WILL BE ASSIGNED TO THE ADMON USER.
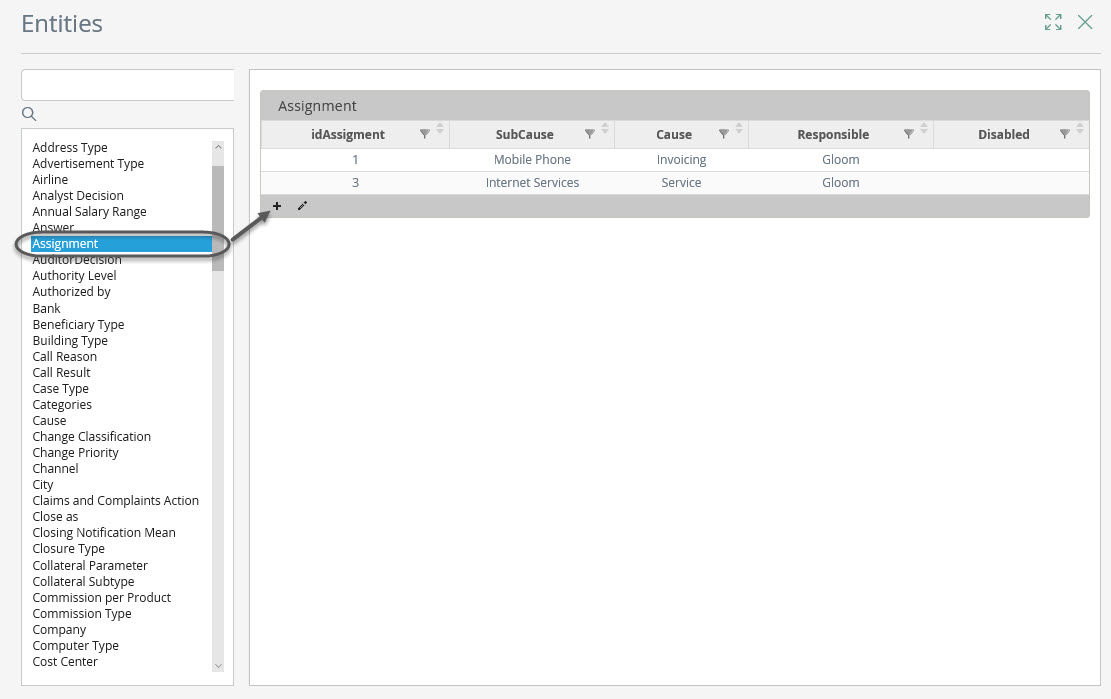
Add Values to Parameter Tables from the Work Portal
Bizagi processes should always have an administrator in charge of parameterization to ensure that the data handled by the process is always correct. In development environment these tables can be managed from Bizagi Studio, but when projects are in production they can only be managed from the Work Portal.
To add or edit values to parameter tables from the Work Portal go to the option Admin, Entities. A complete list of the entities involved in the process will be displayed; select the table you wish to add or edit values. A form will be enabled to enter the required values.
Important Rules
Assignments Rules
The main process activity is “Resolve”. The process can enter in this task many times for different reasons. Assignments are different according to the business conditions, for this reason, preconditions and expressions are used to evaluate them and this way send the task to the proper person.
We find 5 preconditions to assign this activity:
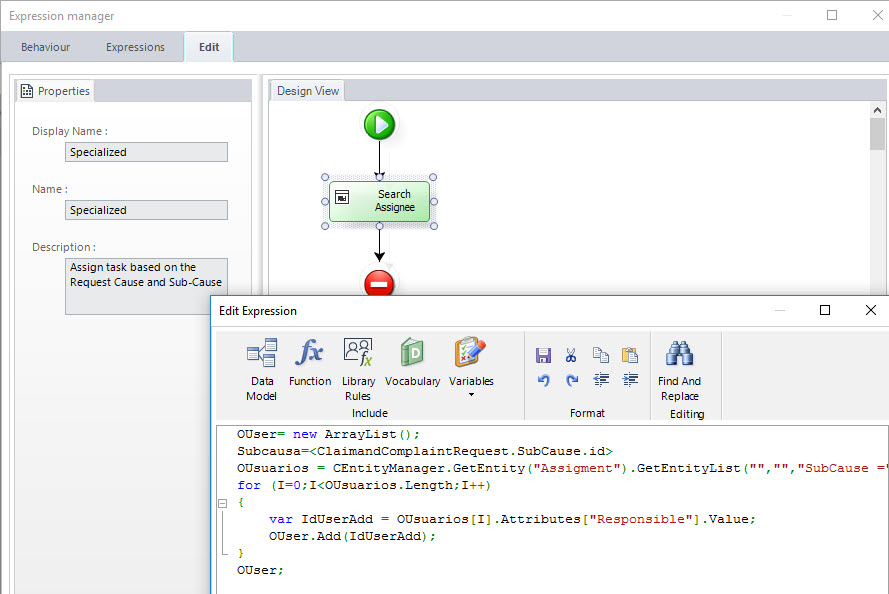
Assignment by Default (DEFAULT)
This rule assigns the activity “Resolve” according to the parameter values entered in the task “Receive Request” and based on the parameter table ASSIGN. An expression is used to search in this table the people enabled to attend a specific Request´s typing. Once the people have been found, the assignment is made by load.
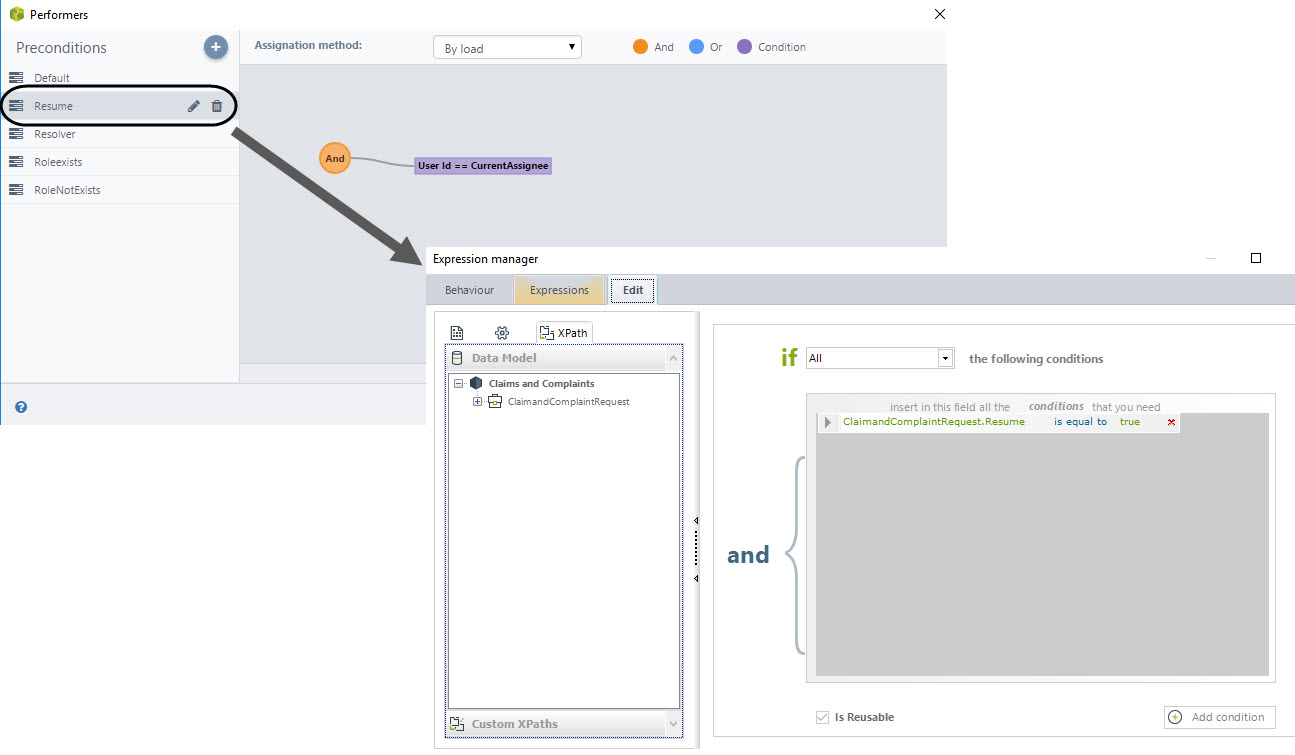
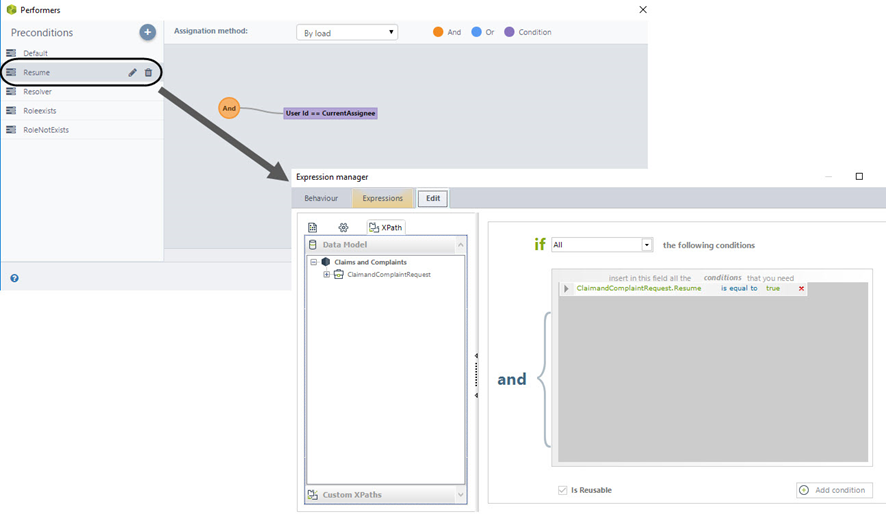
Keep Assignee (RESUME)
If more information was needed from the Requester and he/she has sent this information or a rejection for a response has been given, the Request has to be resumed by the last person that worked on it. This precondition is used to make the correct assignment. There is an attribute call Resume which is set in true if a user has sent requested information to if the Requester has rejected a solution so. In these cases, the process returns to the activity “Resolve” and this precondition is true.
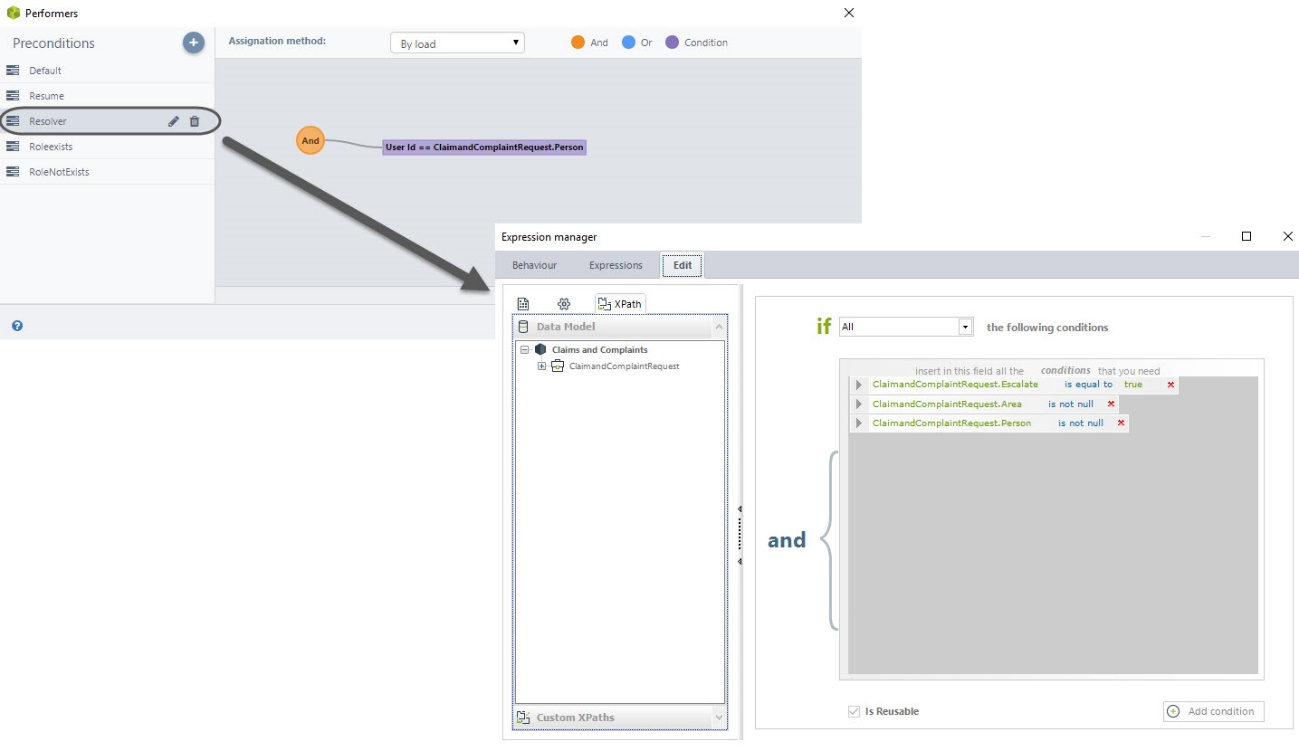
Selected Resolver (RESOLVER)
When a case is escalated, the user can select a specific area and person to escalate the case or simply select an area. When both, area and person are selected, this precondition is used to assign the task to the selected person.
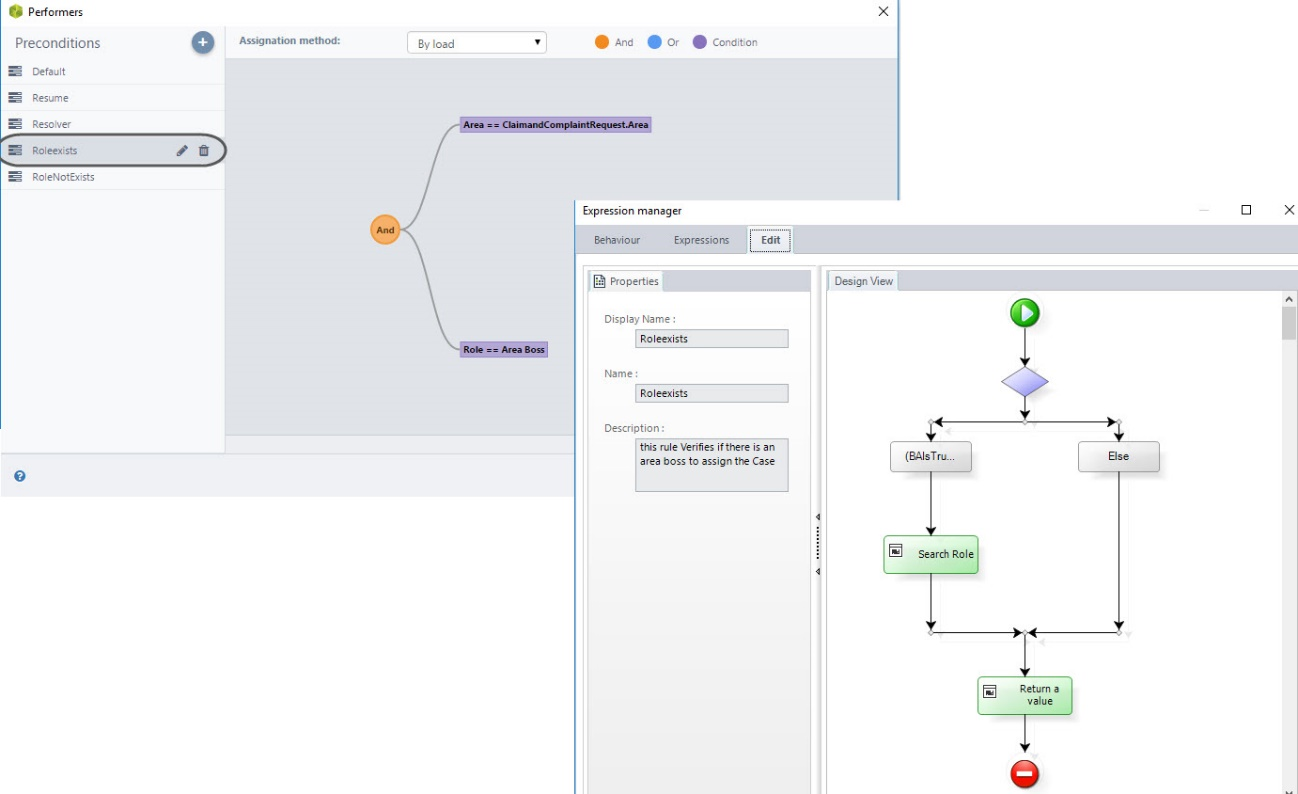
Selected Area; Role Exists (ROL EXISTS)
When a case is escalated and the user only selects an area, this precondition is used to assign the task to the person in charge of such area.
An advanced expression is used to search for the users that in that area and have the role of “Area responsible” to assign them the case. If there are no people with this role, the precondition “ROL NOT EXISTS “is evaluated.
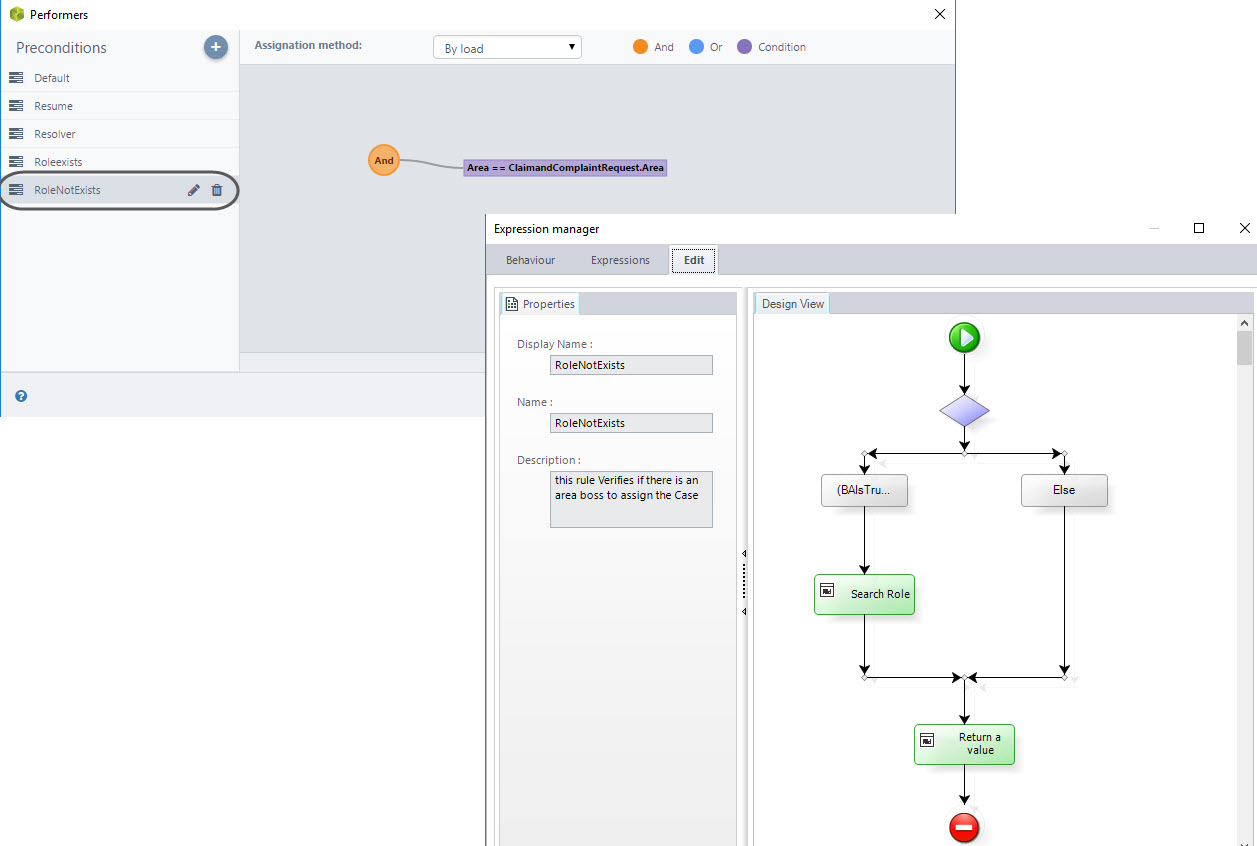
Selected Area; Role not Exists (ROL DOES NOT EXIST)
When a case is escalated and the user only selects an area, but there are no people in charge this precondition is used to assign the case to someone in that area.
An advanced expression is used to search for users that work in the selected area and have the role of “Area responsible”, if there is no person with this role; this precondition takes the value true.
Forms
Visibility Rules
Different business conditions demand to use of visibility rules in the forms to keep a specific order for the information displayed and reduce mistakes when entering the required fields. The main visibility rules are exposed below.
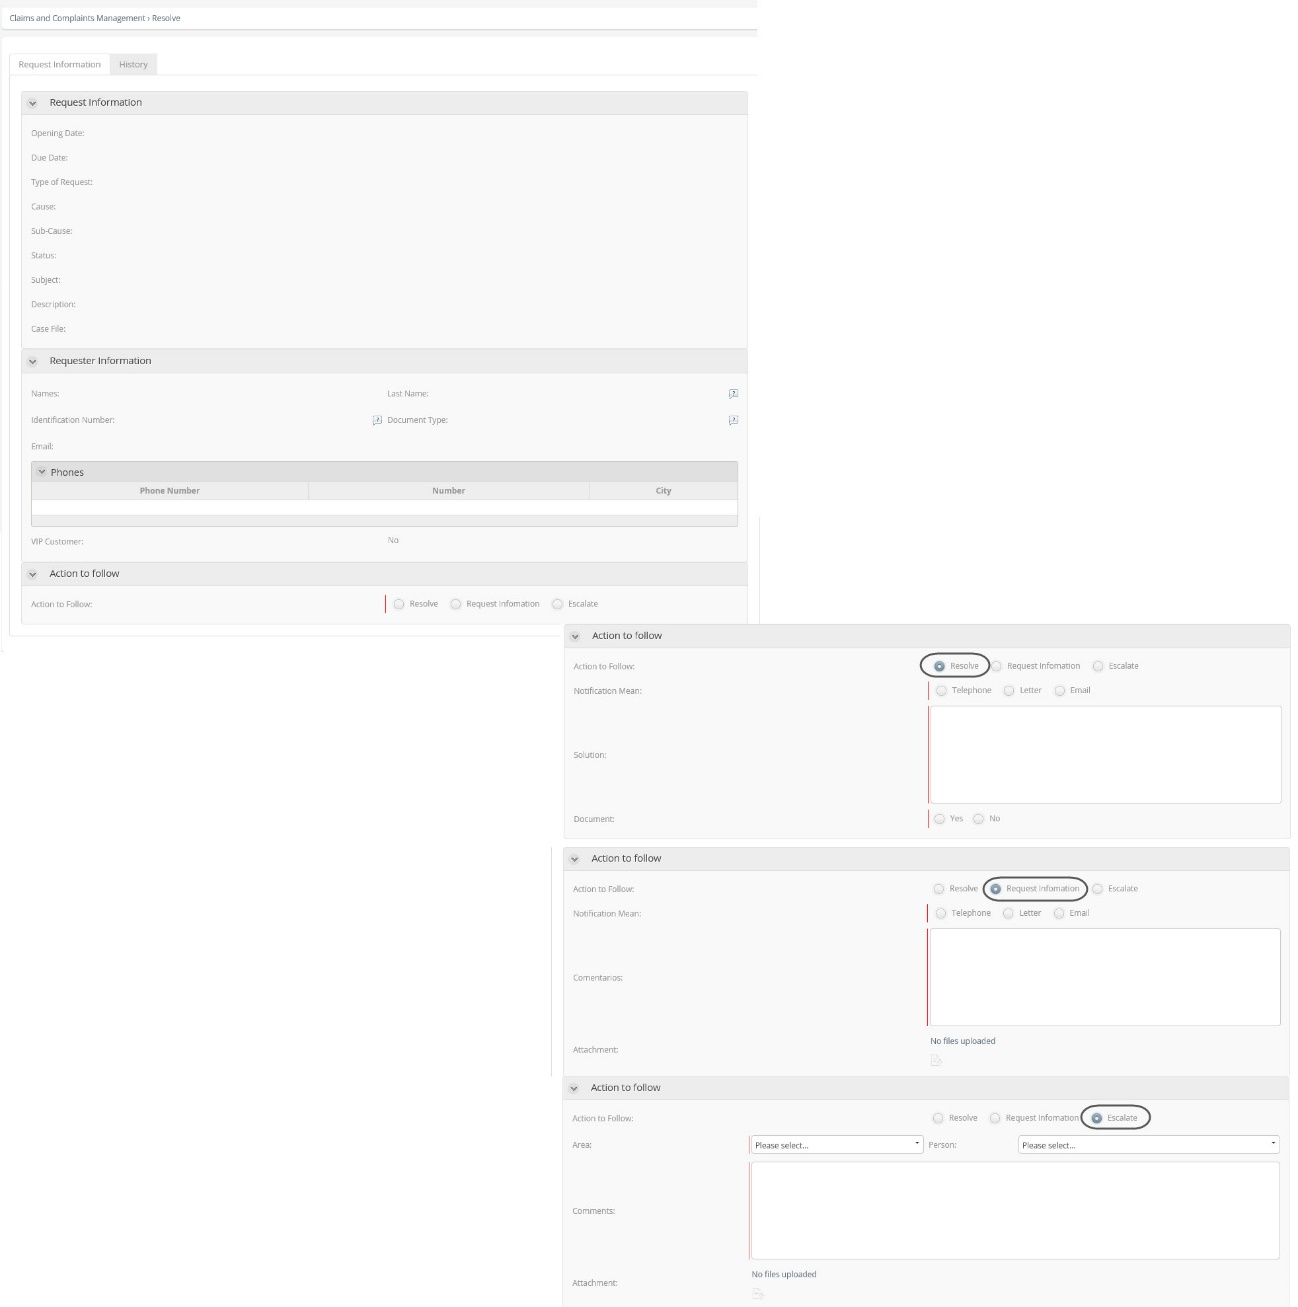
In the activity “Resolve”, the user has 3 options to choose for the case management, such options are Resolve, Request Information and Escalation. According to the selected option, the necessary attributes to enter the information will be displayed as shown in the next image:
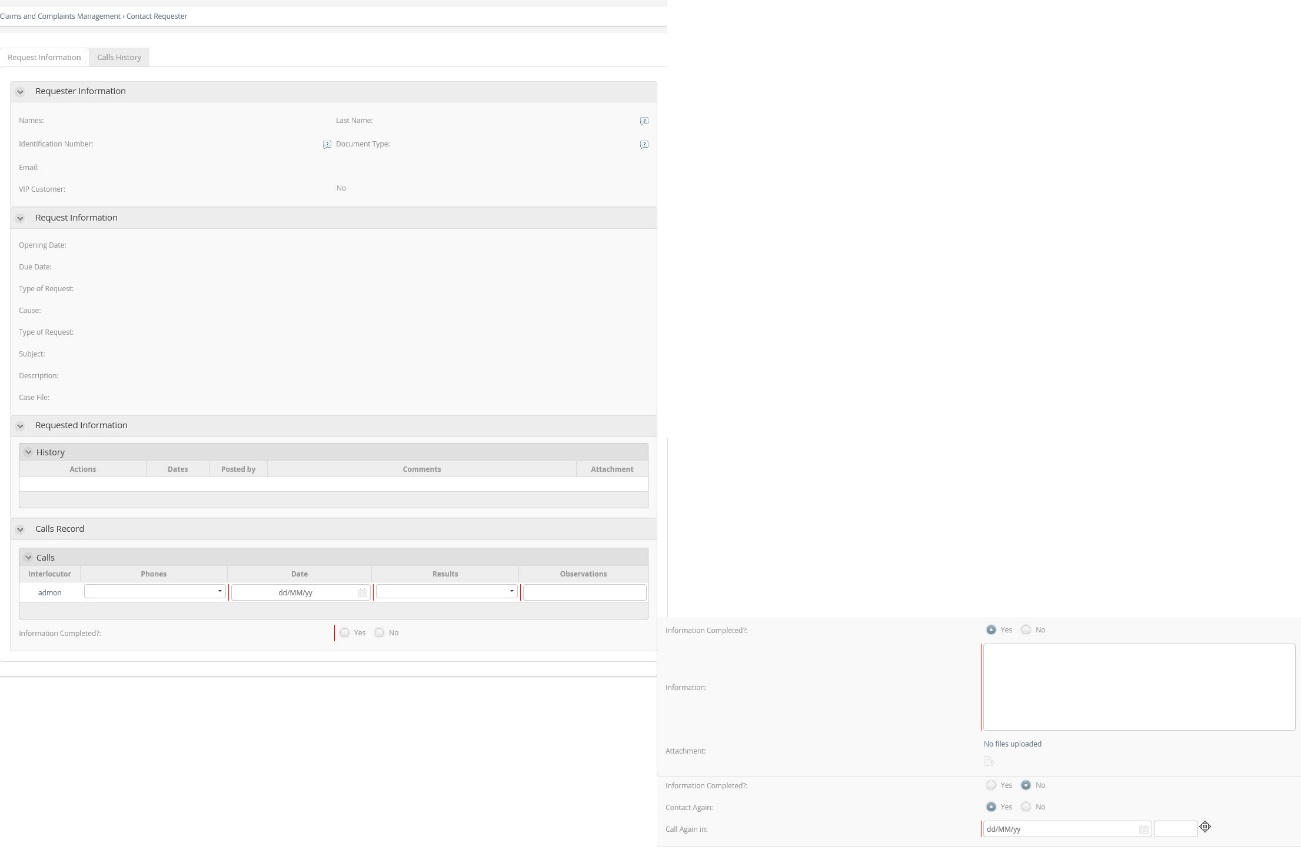
In the “Contact Requester” activity, if the Requester could not be contacted, it is necessary to use these rules to assure that a new contact date is entered or to avoid this action if the Requester was contacted
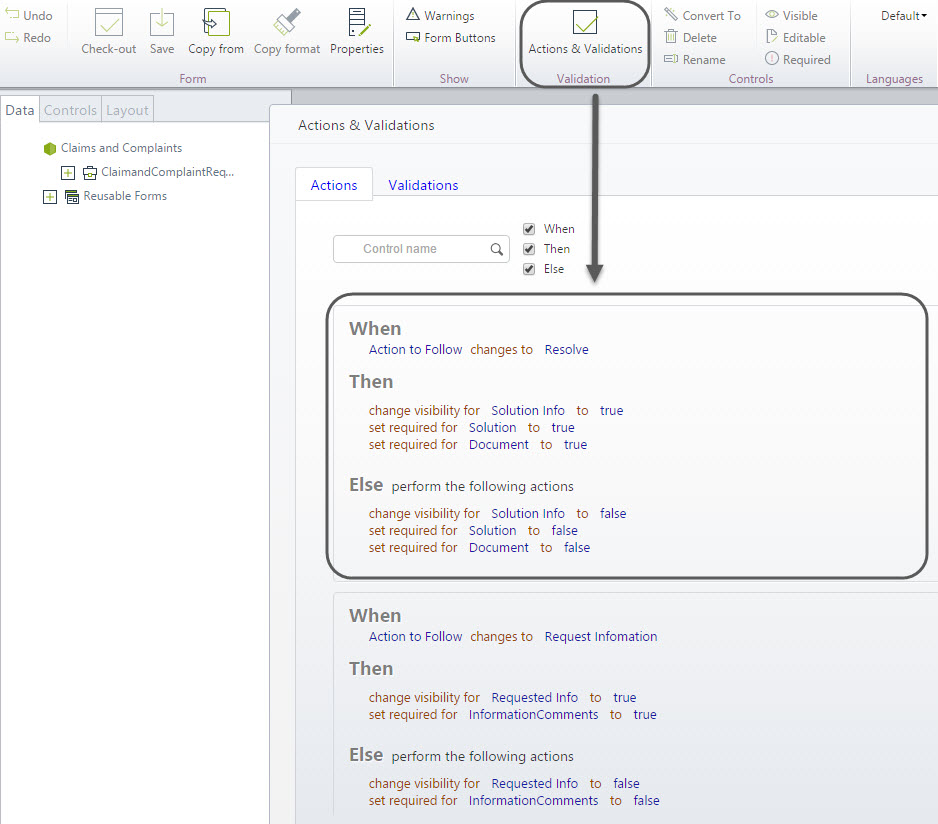
Actions and Validations are used to enter the necessary preconditions for showing or hiding the information according to the selected conditions.
Events
Set Timers Configuration
In this Process, timers are used to control the Requests response time through alarms. These are used to notify the case expiring date and to control the maximum time the Requester has to send information, when it has been requested previously. This way cases don’t stay open for an indefinite time.
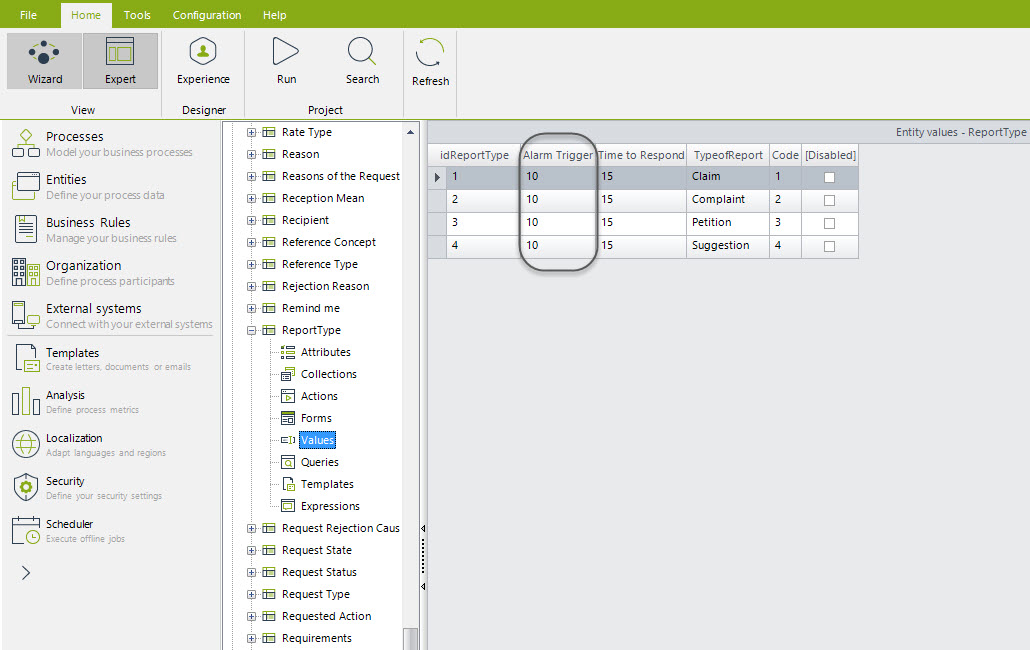
You can set timers duration according to your needs. If you want to modify the duration parameters to send alarms according the Request´s type, enter the Modules view, go to the option Entities and search the parameter table Report Type. Here you can set the field Alarm Trigger which has values in minutes.
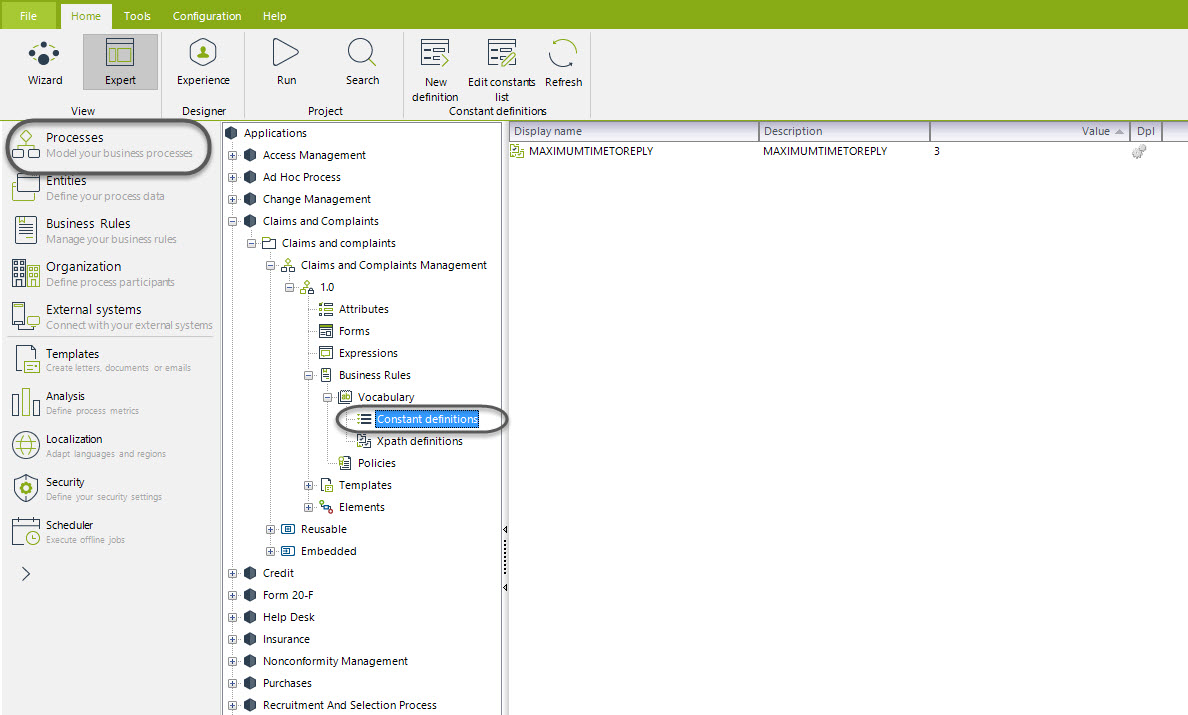
To change the maximum time that Requester has to send information when requested, go to the Modules view and select the option Processes. Then search the Business Rules options, Vocabulary and Constant Definitions. You will find the MAXIMUM TIME TO REPLY Vocabulary. Set this value according to your guidelines.
Set the Configuration for Sending E-Mails
The Petition, Claims and Complaints process templates has several e-mail messages included to ask for information, close cases, response to Requests and/or ask for improvement actions.
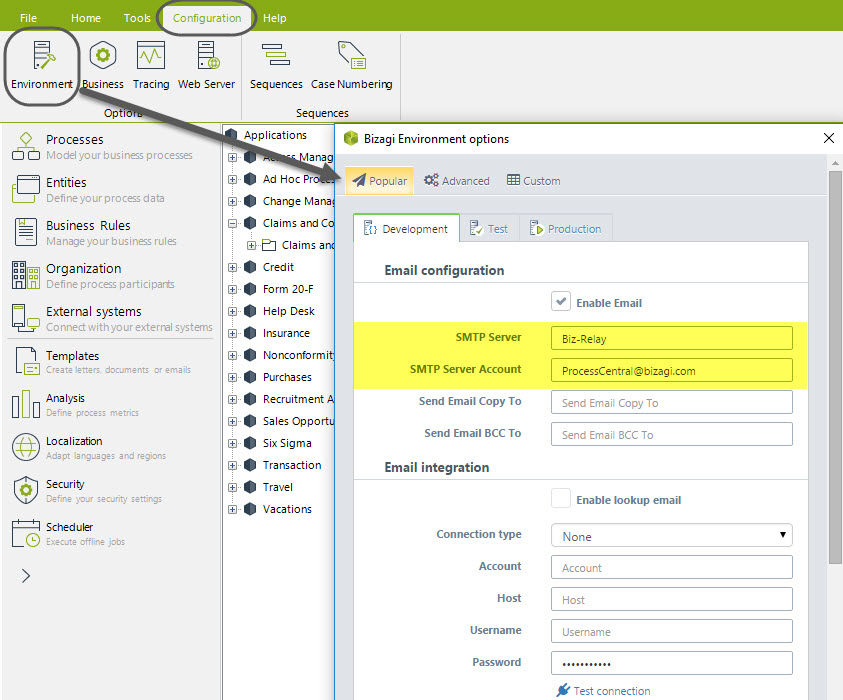
The Project has initially enabled the e-mails sending, but it doesn’t have the company’s customization. To enable them, it is necessary to configure correctly the e-mail SMTP server that your company uses.
In Bizagi Studio enter the Configuration Tab. Click over Environment and select the popular option. Enable the box to send notifications and type the name of the SMTP server and the account from which the mails are sent, as shown in the picture below
For further information, refer to the following article:
SMTP server:
https://help.bizagi.com/platform/es/index.html?smtp_configuration.htm
Indicators
This process template will help you to control your management via case queries according to criteria that will give you data useful for calculating indicators. Queries are executed through the option “Queries” in the Work Portal.
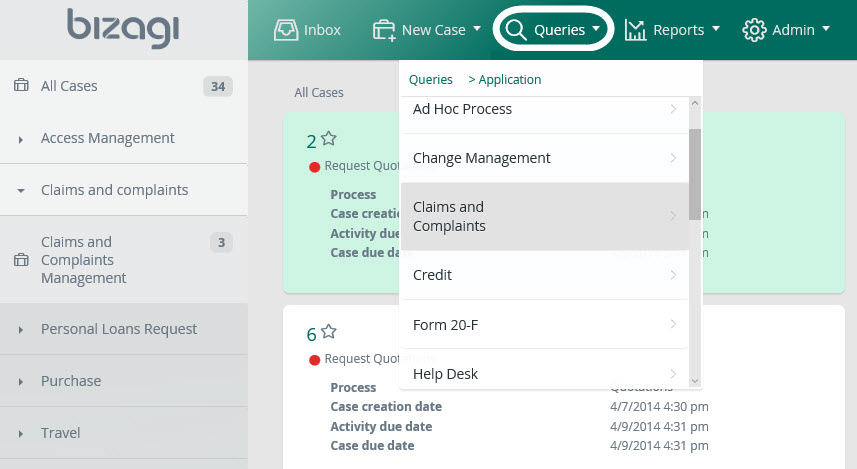
By default, the process template includes attributes useful to calculate several indicators. These attributes are:
•Request type by cause and sub-cause
•Priority
•Escalated Cases
•Cases with extended terms
•Off time Cases
•Ascribable
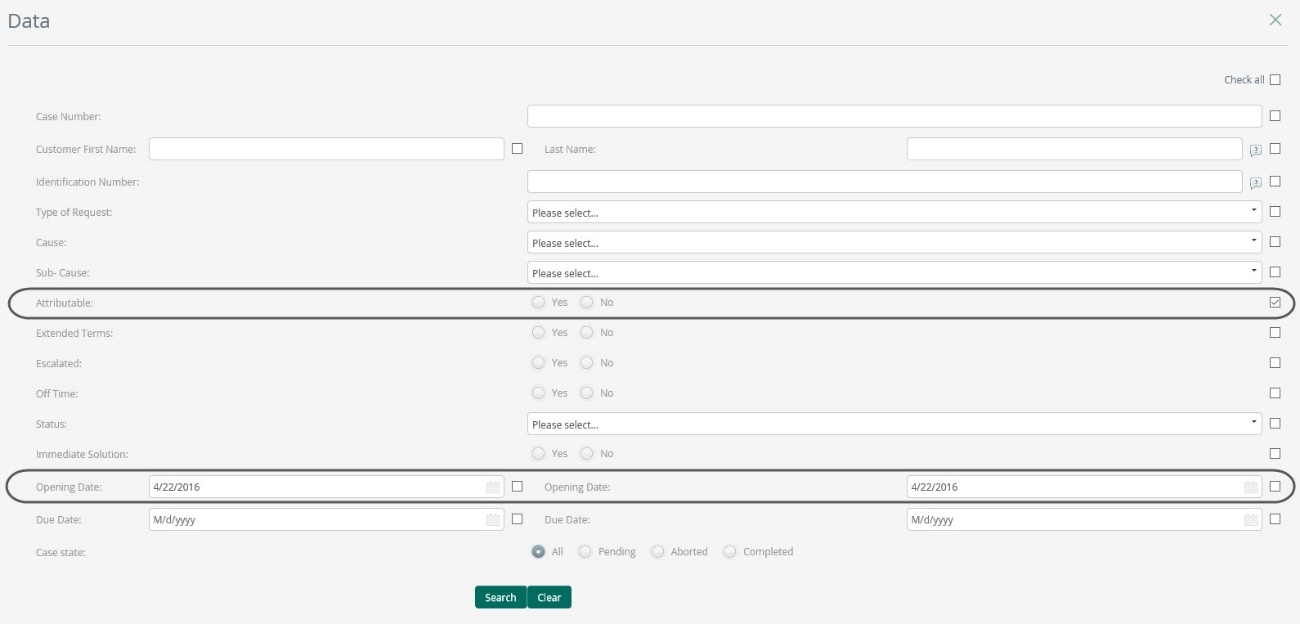
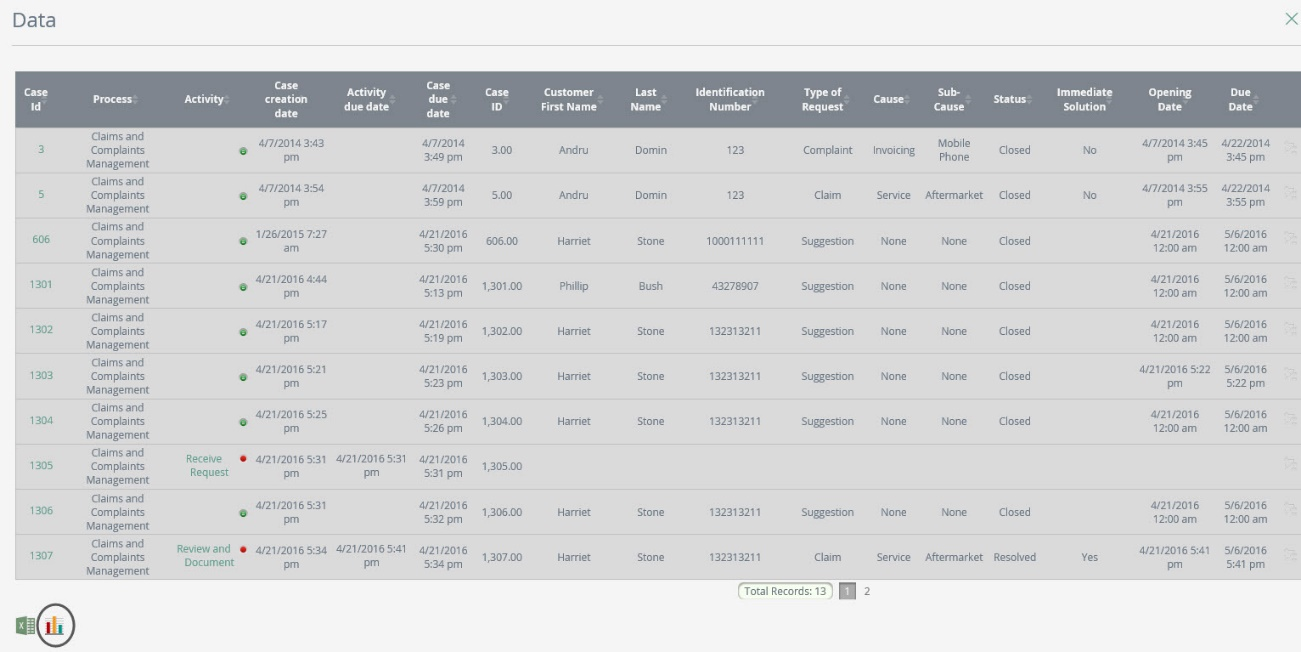
For example, if you wish to evaluate how many complaints in a month were opened for reasons attributable to the company, you can use the query form at the Work Portal in the option “Queries”. Choose the option yes on the field “Attributable” and the start and final date of the period you wish to evaluate, click on search.
In the results window click the graphical analysis link.
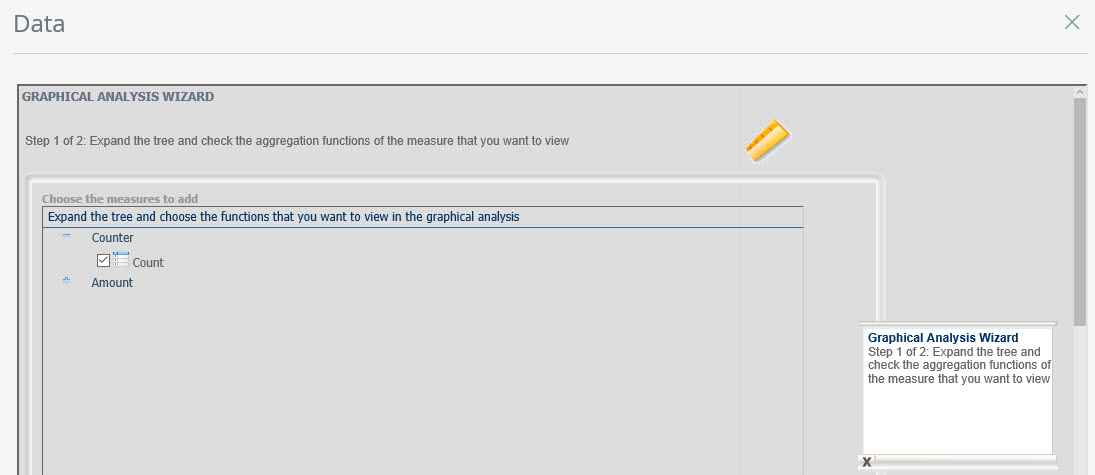
Now check the option “Count” in the Measures definition window and click on Next.
In the Dimensions definition window drag and drop the “Attributable” dimension to the selected dimensions.
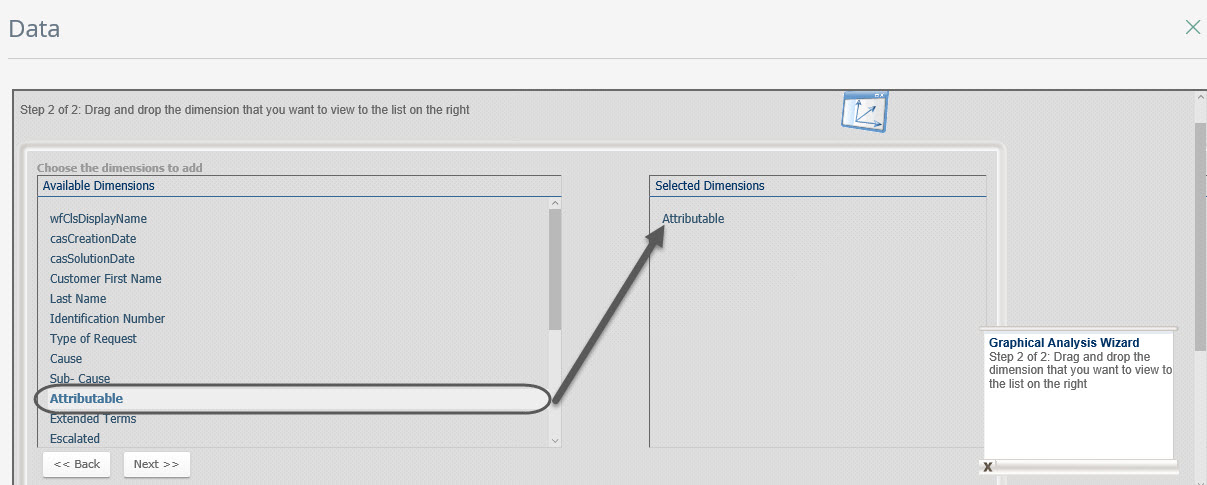
Finally click Next.
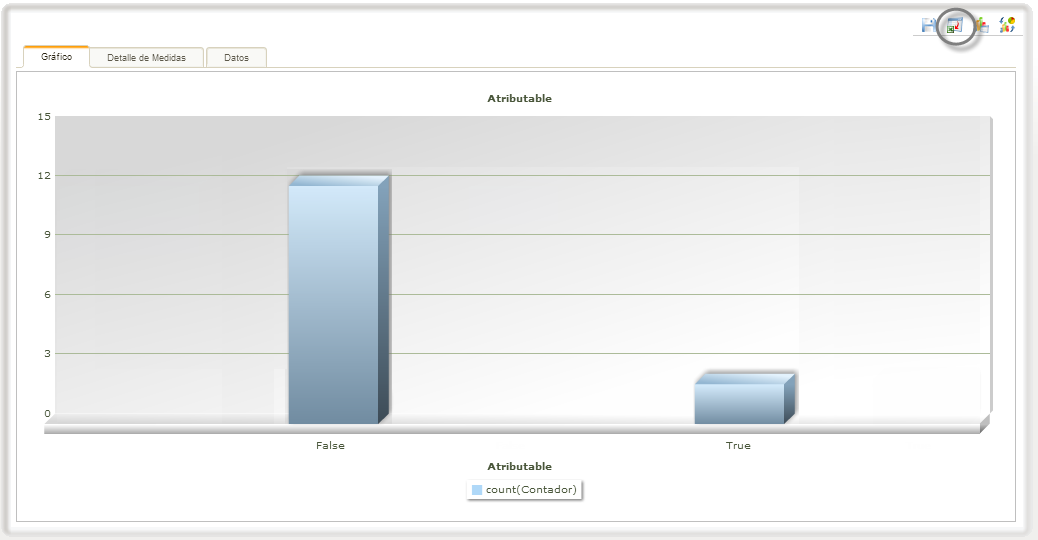
The total complaints and the total cases with the attribute “Attributable” on true, in the selected period, are shown in a bar chart.
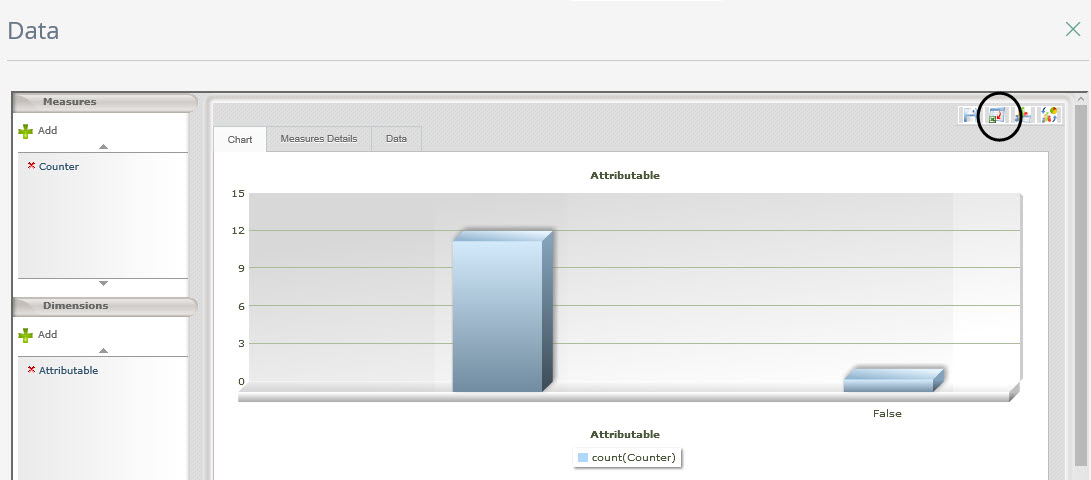
Once you have obtained the necessary data you can easily calculating the ascribable indicator, defined as:

Bizagi offers the function to export the data to excel for allowing you easily handle it.
You can define your own indicators using the attributes already created in the template or adding another. If you wish to get information about how set the configuration for queries you can go to https://help.bizagi.com/platform/en/index.html?queries.htm
Some suggested indicators are
•Cases by type

•Escalated Cases

•Cases with extended terms

•Off time Cases

Now you are ready to customize this process to your needs.
Last Updated 9/28/2022 11:19:33 AM