Overview
Bizagi supports different authentication types, some of which are actually integrated authentication mechanisms which rely on external identity providers such as federation services or LDAP systems.
Regardless of the type of authentication chosen, you will need to make sure that users are initially registered in Bizagi's database before such users attempt to log in the Work portal.
Initially registering the users means creating or synchronizing them in Bizagi's WFUser entity, and for this, you may rely on Bizagi SOAP web services.
|
Note that specifically for the LDAP authentication type, you may rely on the LDAP Import module as described at Importing LDAP users, |
Before You Start
To use Bizagi SOAP web services for this purpose, consider the following outline of steps:
Enabling the SOAP web services for your project
Enabling the SOAP web services is done with Bizagi Studio as described at Enabling Bizagi API.
We recommended you to use the web services featuring WS-Security support, for which you will need to considering using X509 certificates.
Have a client to consume the Bizagi web services
Once your project's web services are enabled, consider you need to have a client to invoke SOAP methods. For example, you can use SOAPUI or another client developed by you. The following sections describe examples for creating or updating users.
What you Need to Do
Depending on what you need to do, you have to use a specific method of Bizagi's SOAP web services:
To Create New Users
To create new users you need to use the CreateUserAsString method. For further details about this method click here. In the current article you can see a series of examples of the XML that needs to be sent when creating a new user:
•Simple user creation example (useful for initially populating user data)
•Create users with customized user properties
To Update Existing Users
To update the information of existing users you need to use the saveEntityAsString method. See more details about this method here. In the current article you can see a series of examples of the XML that needs to be sent when updating an existing user:
•Update simple information of existing users
•Updating user examples while also creating new organizational definitions like roles or areas
•Update a customized user property
Creating Users
To create users, invoke the web method called createUserAsString. Invoke and send out users information into Bizagi as illustrated in the examples below:
Simple user creation example (useful for initially populating user data)
The following example creates three users with the basic mandatory information (organization, domain and username, fullName, ContactEmail).
<BizAgiWSParam>
<Entities>
<WFUSER>
<BasicInformation>
<FullName>Tom Hall</FullName>
<UserName>tomh</UserName>
<Domain>agilityCorp</Domain>
<ContactEmail>tomh@agilityCorp.com</ContactEmail>
<Organizations>
<Organization>1</Organization>
</Organizations>
</BasicInformation>
</WFUSER>
<WFUSER>
<BasicInformation>
<FullName>Martha Lewis</FullName>
<UserName>marthal</UserName>
<Domain>agilityCorp</Domain>
<ContactEmail>marthal@agilityCorp.com</ContactEmail>
<Organizations>
<Organization>1</Organization>
</Organizations>
</BasicInformation>
</WFUSER>
<WFUSER>
<BasicInformation>
<FullName>Piotr Blanter</FullName>
<UserName>piotrb</UserName>
<Domain>agilityCorp</Domain>
<ContactEmail>piotrb@agilityCorp.com</ContactEmail>
<Organizations>
<Organization>1</Organization>
</Organizations>
</BasicInformation>
</WFUSER>
</Entities>
</BizAgiWSParam>
Take into account that a user may belong to more than one organization, though the above example considers linking the users to the default organization which is already registered in any Bizagi project (additional organizations need definition and so you would have to assign IDs accordingly for the key definition).
By default, the users created with the basic mandatory information will have activated the parameters Enabled and Enabled for assignation.
It is required that users belong at least to one organization; otherwise such user will not be able to perform actions in the Work portal (such as creating cases, running queries, etc).
A successful web service response will send back the three unique system IDs created for each user:

Comprehensive user creation example (considers reusing organizational user definitions like roles or areas)
The following example creates one user with basic information and organizational definitions such as area and location (the default ones), user information (password, picture, if the user is enabled and enabled for assignation), and also further n-m details which include roles, skills or positions (set to 2 pre-defined roles, and the default position).
<BizAgiWSParam>
<Entities>
<WFUSER>
<BasicInformation>
<FullName>Juliette Leroy</FullName>
<UserName>juliettel</UserName>
<Domain>agilityCorp</Domain>
<ContactEmail>juliettel@agilityCorp.com</ContactEmail>
<Password>Bizagi123</Password>
<Picture>/9j/4AAQSkZJRgABAQEAYABgAAD/4QHGRXhpZgAATU0AKgAAA..</Picture>
<Organizations>
<Organization>1</Organization>
</Organizations>
</BasicInformation>
<UserConfiguration>
<Roles>
<idRole key="1"></idRole>
<idRole key="9998"></idRole>
</Roles>
<idArea key="1"></idArea>
<idLocation key="1"></idLocation>
<Positions>
<Position>1</Position>
</Positions>
<Enabled>1</Enabled>
<EnabledForAssignation>1</EnabledForAssignation>
<IdDelegate>204</IdDelegate>
</UserConfiguration>
</WFUSER>
</Entities>
</BizAgiWSParam>
Make sure you send the user's profile picture encoded using Base64. You can encode this file using any of the free online encoders or developing one from scratch.
A successful web service response is the same as the one depicted above.
Take into account that a user may belong to one area and location at most; but may belong to more than one roles, skill or position. When considering these definitions, acknowledge that you need to define them previously and look up their IDs (to modify the key definition):

Create users with customized user properties
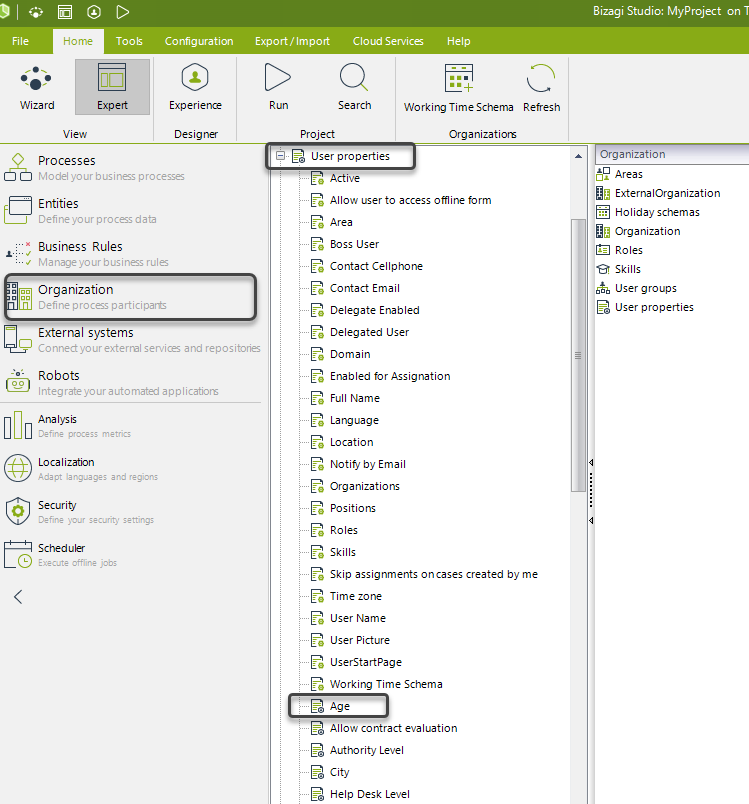
Bizagi allows to create customized user properties, for example Age, or Authority Level, when default properties are not enough to create profiles of your users. Refer to User Properties. For example, Age has been created in Studio as a custom property:

To create a user with customized user properties use the following example. If you need to include other customized properties, include them within the UserConfiguration tag.
<BizAgiWSParam>
<Entities>
<WFUSER>
<BasicInformation>
<FullName>Tom Hall</FullName>
<UserName>tomh</UserName>
<Domain>agilityCorp</Domain>
<ContactEmail>tomh@agilityCorp.com</ContactEmail>
<Organizations>
<Organization>1</Organization>
</Organizations>
</BasicInformation>
<UserConfiguration>
<Age>35</Age>
</UserConfiguration>
</WFUSER>
</Entities>
</BizAgiWSParam>
If the name of the property is wrong or does not exist, Bizagi creates the user without that property.
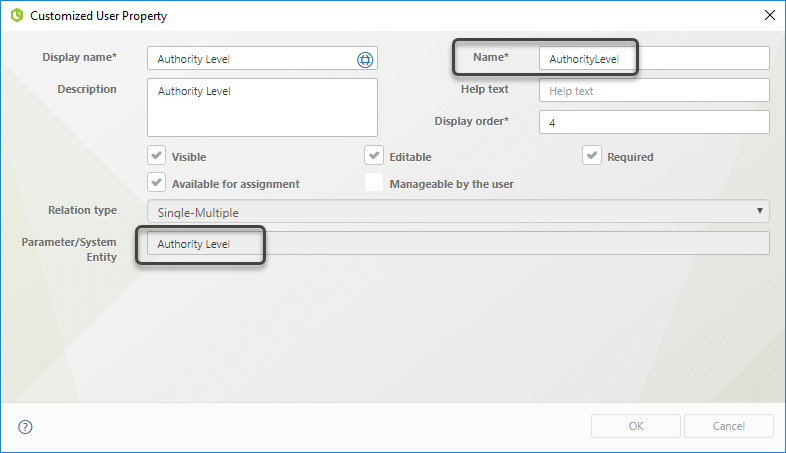
If the Customized User Property is a relationship to another entity, you must send the record's ID. Bear in mind that IDs can be different between the development and production environment. For example, you have the following User Property:

You must look for the Id of the record you want to send when creating the user.

For example, If you want to create a user with Intermediate Authority Level, you must send the ID = 2 as shown in the next example. The name of the tag is:
id + the name of the user property, for example idAuthorityLevel.
<BizAgiWSParam>
<Entities>
<WFUSER>
<BasicInformation>
<FullName>Cam</FullName>
<UserName>Cam</UserName>
<Domain>domain</Domain>
<ContactEmail>tomh@agilityCorp.com</ContactEmail>
<Organizations>
<Organization>1</Organization>
</Organizations>
</BasicInformation>
<UserConfiguration>
<idAuthorityLevel>2</idAuthorityLevel>
</UserConfiguration>
</WFUSER>
</Entities>
</BizAgiWSParam>
Updating users
To update users, invoke the web method called saveEntityAsString. Invoke and send out users information into Bizagi as illustrated in the examples below:
|
Note that for security reasons, a user's password cannot be updated via the saveEntityAsString method. This is done through the Work Portal. |
Update simple information of existing users
The following example updates information an existing user, by relying on the businessKey to search the username and domain of the user.
<BizAgiWSParam>
<Entities>
<WFUSER businessKey="userName='juliettel' AND domain='agilityCorp'">
<fullName>Juliette Leroy-Brown</fullName>
<userName>juliettel</userName>
<domain>agilityCorp</domain>
<enabled>1</enabled>
</WFUSER>
</Entities>
</BizAgiWSParam>
Keep in mind that the field we are updating is merely the fullName, and because we don't need to update other information, we may choose to skip its definition (so that existing values are kept).
A successful web service response is the same as the one treated in both examples above (either being created for the first time or being updated, the response sends back the ID of each record involved by the invocation).
Updating user example while also creating new organizational definitions like roles or areas
The following example updates a user with basic information plus a new area (you may create organizational definitions which do not have an n-m relationship with the user).
<BizAgiWSParam>
<Entities>
<WFUSER businessKey="userName='juliettel' AND domain='agilityCorp'">
<idArea>
<areaName>Research</areaName>
<areaDisplayName>Research and innovation</areaDisplayName>
<areaDescription>In charge of developing new ideas</areaDescription>
</idArea>
</WFUSER>
</Entities>
</BizAgiWSParam>
A successful web service response is the same as the one depicted above.
Keep in mind that with the example above, Bizagi automatically generates the ID for the new area and associates it to the user.
As mentioned above, creating organizational definitions such as: roles, skills, positions or organizations, need to be manually done in Bizagi beforehand.
Update a Customized User Property
If you have to update a customized user property, you have to send the tag of the property's name within the XML like the following example:
<BizAgiWSParam>
<Entities>
<WFUSER businessKey="userName='juliettel' AND domain='agilityCorp'">
<Age>35</Age>
</WFUSER>
</Entities>
</BizAgiWSParam>
If the property is a relationship with an entity, you must use the Id of the record to set. For example, if you have the Authority Level User Property.

You must look for the Id of the record you want to update to the user.

To update a user with an Intermediate Authority Level, you must send the ID = 2 as shown in the next example. The name of the tag is:
id + the name of the user property, for example, idAuthorityLevel.
<BizAgiWSParam>
<Entities>
<WFUSER businessKey="userName='juliettel' AND domain='agilityCorp'">
<idAuthorityLevel>2</idAuthorityLevel>
</WFUSER>
</Entities>
</BizAgiWSParam>
It is possible to add the Personas node on your request to set a Persona for a given user. The following example uses the businessKey definition to do so:
<BizAgiWSParam>
<Entities>
<WFUSER businesskey="username='juliettel'">
<Personas>
<PersonaName1>
<PersonaAttribute>value</PersonaAttribute>
</PersonaName1>
<PersonaName2>
<dummy></dummy>
</PersonaName2>
</Personas>
</WFUSER>
</Entities>
</BizAgiWSParam>
Keep in mind that Personas may or may not contain attributes. In case you wish to update this information, the attribute must be added as a node for the Persona. In this case the attribute PersonaAttribute for PersonaName1. Whereas if the Persona has no attributes or no attribute is going to be updated, a dummy node must be included. In this case the node dummy for PersonaName2.
Important notes
•Make sure that the following values are not repeated across your users (these values should be unique): ContactEmail for number one, as well as the combination of Domain and username.
•Enabled should vary whether or not a given user in your users repository is disabled.
Last Updated 7/28/2023 3:17:36 PM