Overview
The SharePoint – MS EntraID connector for Bizagi is available for download at Bizagi Connectors Xchange.
Through this connector, you can connect your Bizagi processes to your SharePoint account and services.
For more information about this connector's capabilities, visit Bizagi Connectors Xchange.
|
This connector was developed based on the specifications of the API and the information provided by SharePoint. Bizagi and its subsidiaries do not offer any guarantees regarding the content or potential errors resulting from calls to the API services. Furthermore, Bizagi and its subsidiaries assume no responsibility for any loss, cost, or damage arising from the use of SharePoint’s API. |

Before you start
To test and use this connector, you need:
1.Bizagi Studio installed.
2.This connector installed, via the Connectors Xchange as described in the Conectors Exchange article, or through a manual installation as described in the article Connectors Setup.
3.An account at https://products.office.com/sharepoint/collaboration.
4.Obtain the connection parameters of your SharePoint service:
a.URL
b.Tenant name
c.Tenant ID
d.Resource ID
5.Create a new app and save your application parameters:
a.Client ID
b.Client secret
6.Add the Sites.Selected application permission under SharePoint to your new SharePoint application.
Authentication
|
The authentication process can only be performed by an Admin User. |
To begin configuring the connector, you first need to set up access to SharePoint. This can be done using SharePoint Entra ID. To authenticate, follow these steps:
1.Open PowerShell and run the following script:
$app = Register-PnPAzureADApp -ApplicationName "Here the name of your application" -Store CurrentUser -Tenant yourtenant.onmicrosoft.com -Username "your-username" -Password (Read-Host -AsSecureString -Prompt "Enter Password") -CertificatePassword (Read-Host -AsSecureString -Prompt "Enter Certificate Password") -OutPath .\
$app.'AzureAppId/ClientId'
$app.'Certificate Thumbprint'
2.After executing the script, a login screen will appear. You will be prompted to provide the following information:
•User password
•Certificate password
•Authentication code
|
This information will be displayed in the script’s output. |
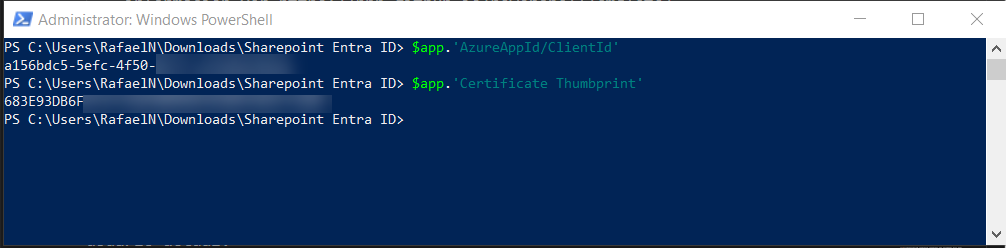
After running the script, the same window will display the ClientId and Certificate Thumbprint. Make sure to save this information, as it is required to configure the connector.
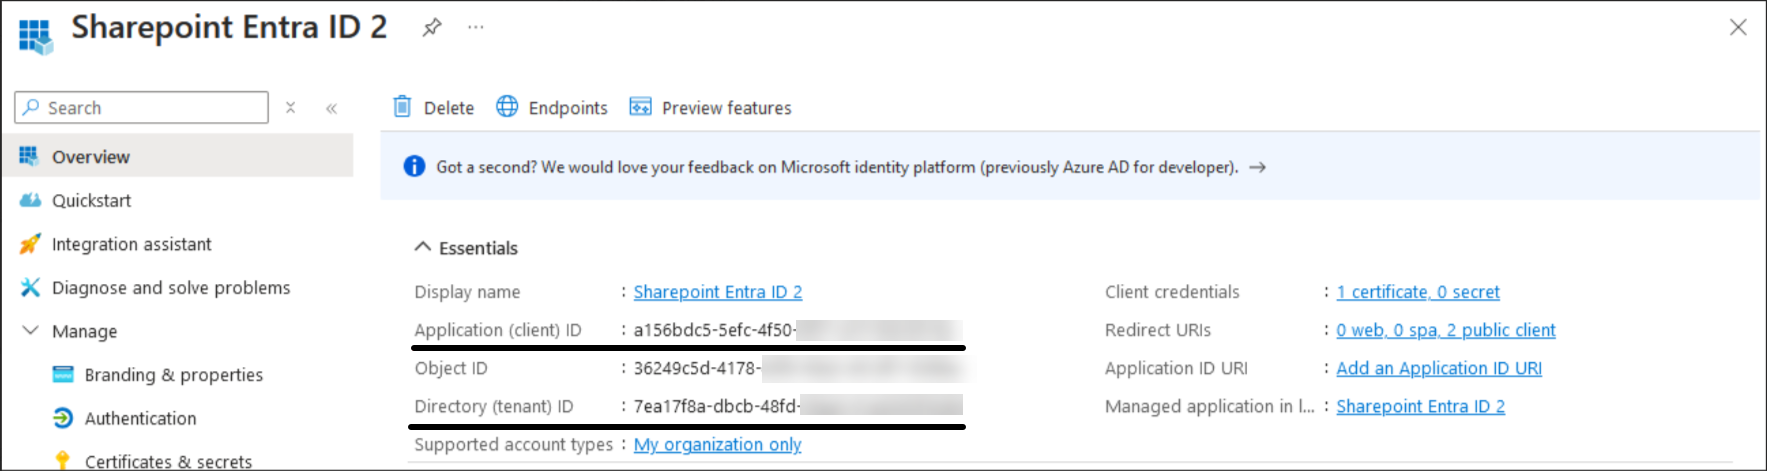
After configuring the new Entra ID app, the following summary view will appear:
|
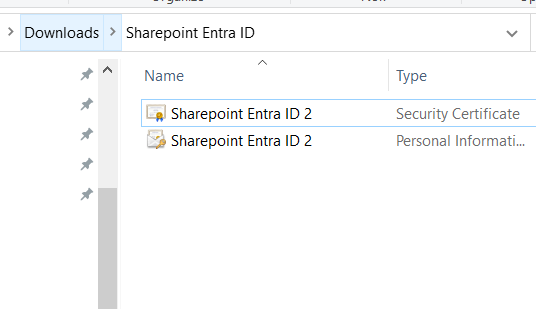
The Sharepoint Entra ID certificate (.pfx and .cer files) is stored in the path where the previous script was executed.
|
Configuring the Connector
Preparing the .PEM File for Connector configuration
1.To configure the connector, you need a .pem file. This file can be generated by converting the .pfx file located in the directory where the script was executed. You can use an online converter, such as sslshopper.com.
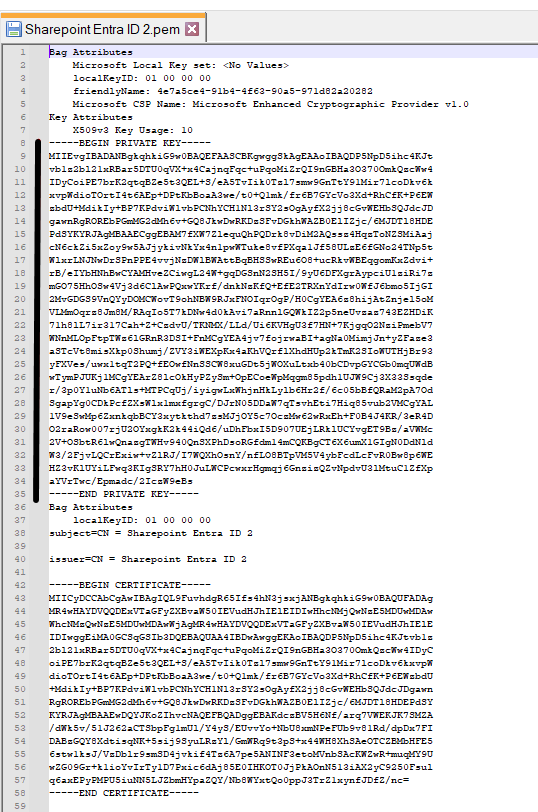
The resulting .pem file contains both the Private Key and the Certificate.
2.Open the generated .pem file in a text editor and copy the Private Key section. Paste it into a new file and save it as key.pem.
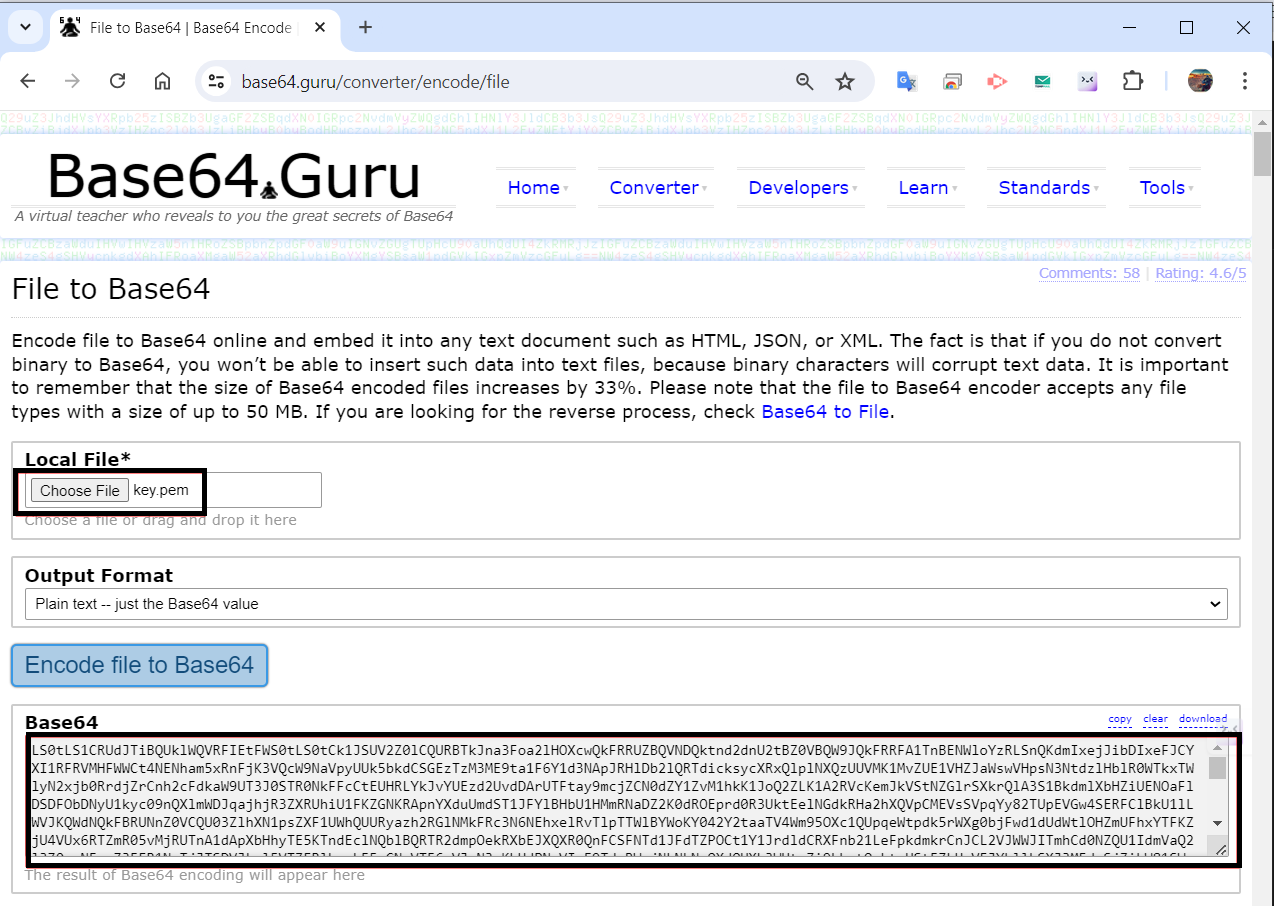
3.Transform the key.pem file to Base64 format. You can use an online encoder such as base64.guru.
URL and Tenant name
•URL: This is the base URL of the SharePoint site where the connector will operate. The URL defines the context in which the connector actions are executed through the SharePoint API.
When using granular permissions such as Sites.Selected, the URL must point directly to the SharePoint site that was authorized for the application in Microsoft Entra ID. If the application has permissions only for a specific site, the connector cannot access other sites, even if they belong to the same tenant.
The recommended format is:
https://[tenant].sharepoint.com/sites/[site]
For Microsoft Teams associated sites:
https://[tenant].sharepoint.com/teams/[site]
The paths used by connector actions must also belong to the authorized site. For example:
URL = https://contoso.sharepoint.com/sites/Purchasing
folder_path = /sites/Purchasing/Shared Documents/Invoice
Configuring the connector URL at the tenant level (URL = https://contoso.sharepoint.com) may cause authorization errors if the application was granted access only to a specific site.
|
The connector URL and the paths provided in connector actions must belong to the same authorized site. If the connector points to a different site than the one authorized in Microsoft Entra ID or SharePoint, the operation will be rejected even if authentication is successful. |
•Tenant name: The name of your SharePoint tenant is the portion of the URL that appears immediately before sharepoint.com.
Configuring Authentication Parameters
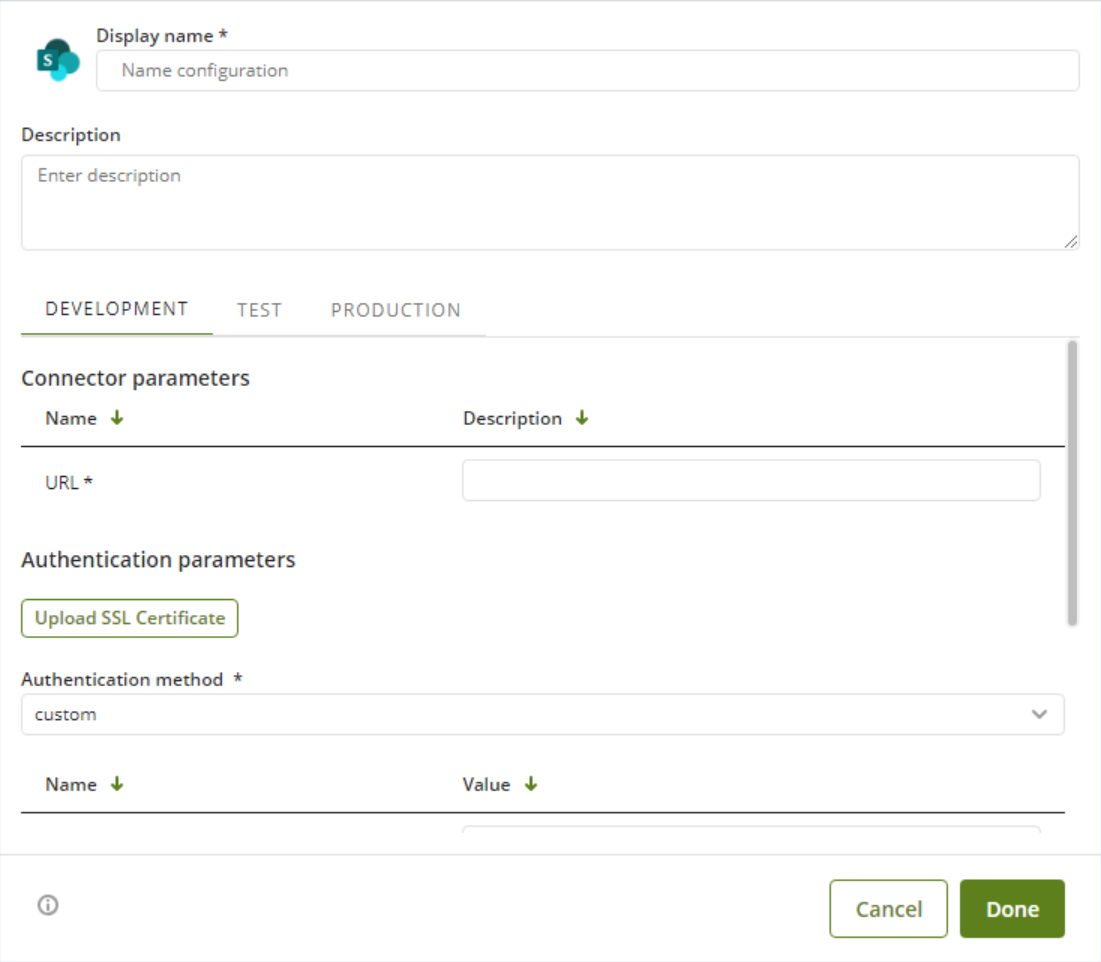
To configure the connector (in particular its authentication parameters), follow the steps presented at the Configuration chapter in the Installing and managing connectors article.
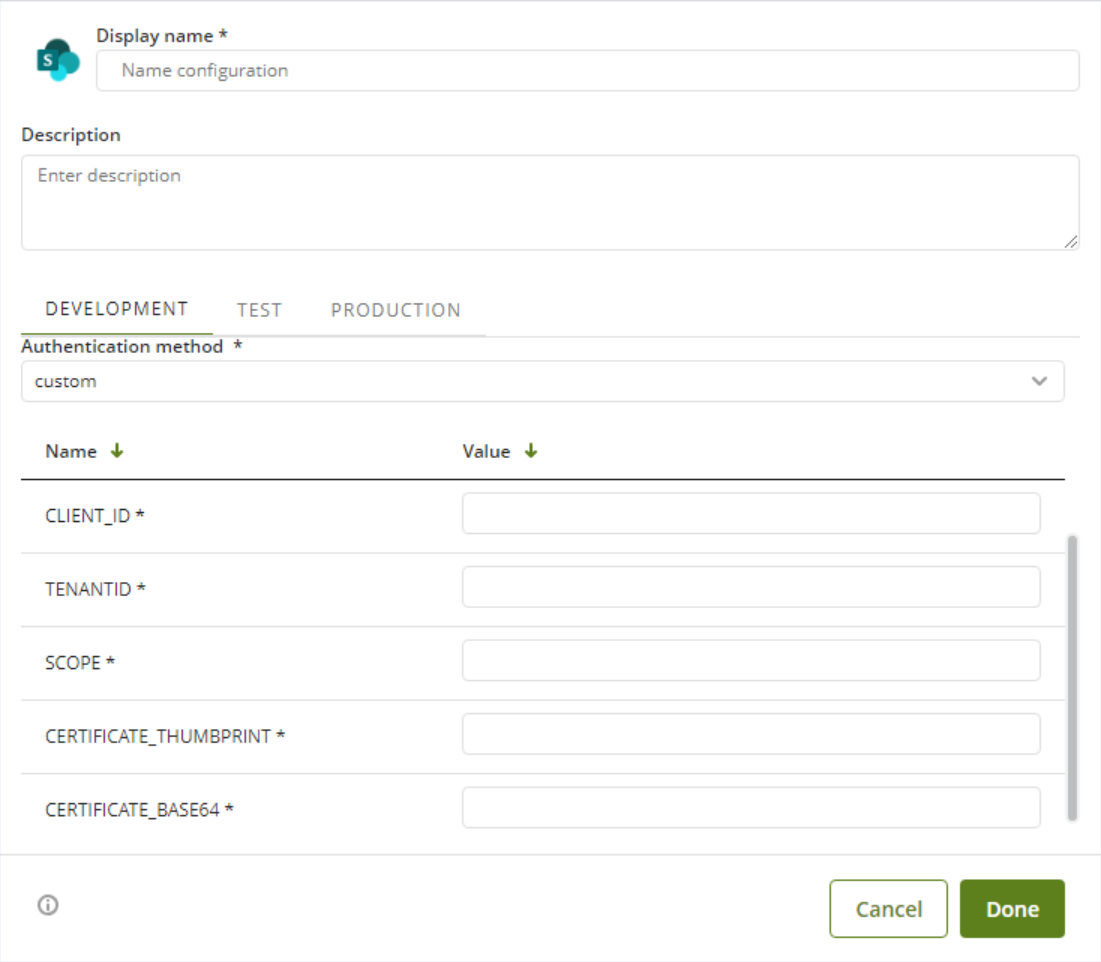
For this configuration, consider the following authentication parameters:
•Authentication method: Custom.
•CLIENT_ID: This is the unique identifier of the application registered with Azure.
•TENANTID: This is the identifier of the organization's Azure directory. It ensures that the connector only searches for users and permissions within the specified domain.
•SCOPE: This defines the specific permissions that the connector requests on the SharePoint API. For Client Credentials, this is typically the resource followed by /.default (e.g., https://[tenant].sharepoint.com/.default), indicating that all application permissions previously approved by the administrator will be used.
•CERTIFICATE_THUMBPRINT: This is the "digital fingerprint" of the certificate (a hexadecimal hash). It allows Azure to quickly identify which of the certificates uploaded to the portal to use to validate the token request signature.
•CERTIFICATE_BASE64: This is the Base64 encoded content of the key.pem file generated in the Preparing the .PEM File for Connector configuration section. Use the value obtained after converting the Private Key file to Base64 format. This value is what the connector uses to sign requests and prove its identity without exposing physical certificate files on the server.
Using the Connector
This connector features a set of methods to help you take advantage of the capabilities of SharePoint's API services.
To learn overall how/where to configure the use of a connector, refer to the article Using connectors.
When using the connector, keep in mind the following details for the available method.
Copy File
This action copies a file to a new folder.
To configure its inputs, take into account the following descriptions:
•file_path: Full file path, including name and extension.
•destination_path: New path of the file, including name and extension. You can change the file name in the new folder using this field.
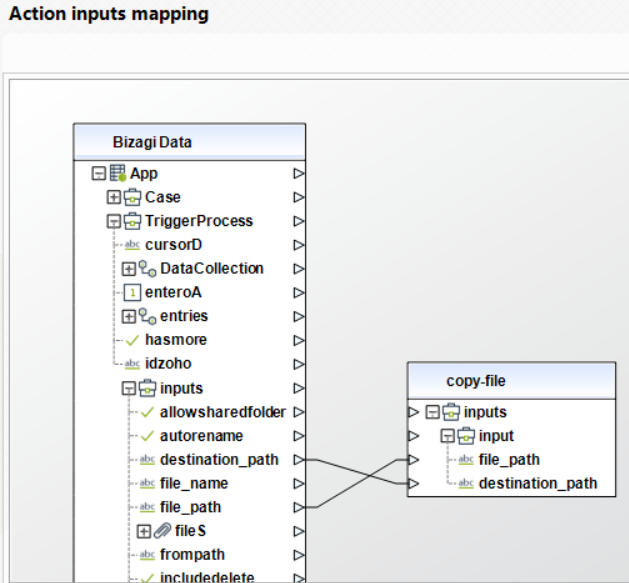
To configure the outputs of this action, you can map the output object to the corresponding entity in Bizagi. Make sure you map the attributes of the entity appropriately.
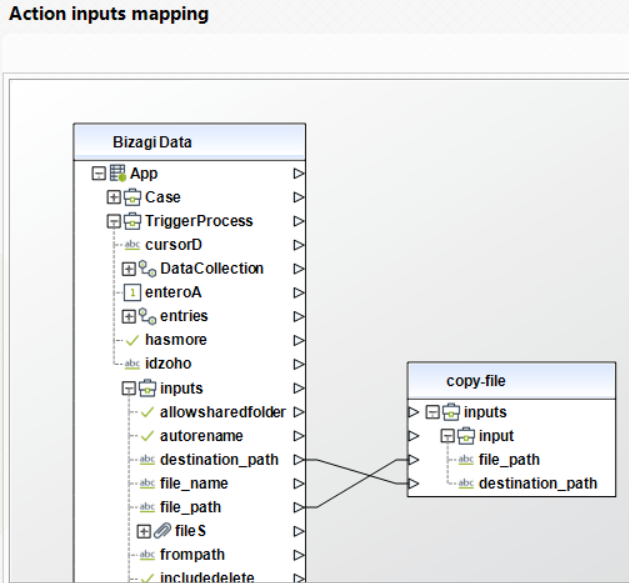
For more information about using this method, refer to SharePoint's official documentation at https://docs.microsoft.com/en-us/sharepoint/dev/sp-add-ins/working-with-folders-and-files-with-rest.
Create File
This action creates a new file in the specified SharePoint folder.
|
If a file with the same name and extension exists inside the folder, this action overwrites it without throwing an error. |
To configure its inputs, take into account the following descriptions:
•folder_path: Full path of the folder where the file will be created. This folder must exist.
•file_name: Name and extension of the file.
•file: File encoded in base64 format. The maximum weight of the file is restricted by Bizagi's file size configuration.
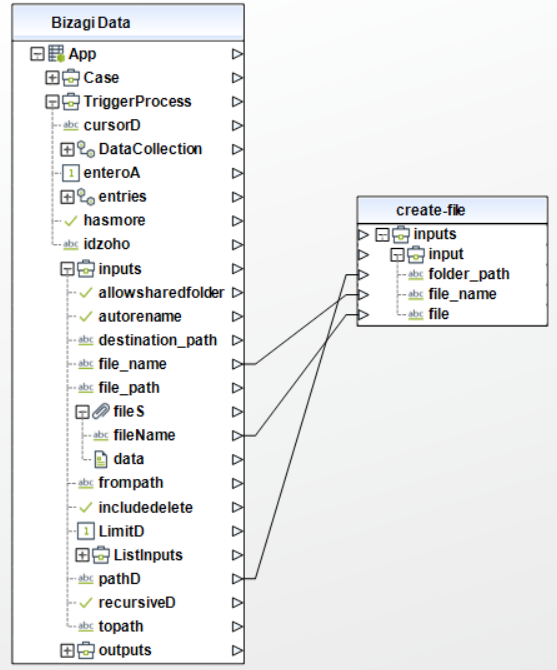
To configure the outputs of this action, you can map the output object to the corresponding entity in Bizagi. Make sure you map the attributes of the entity appropriately.
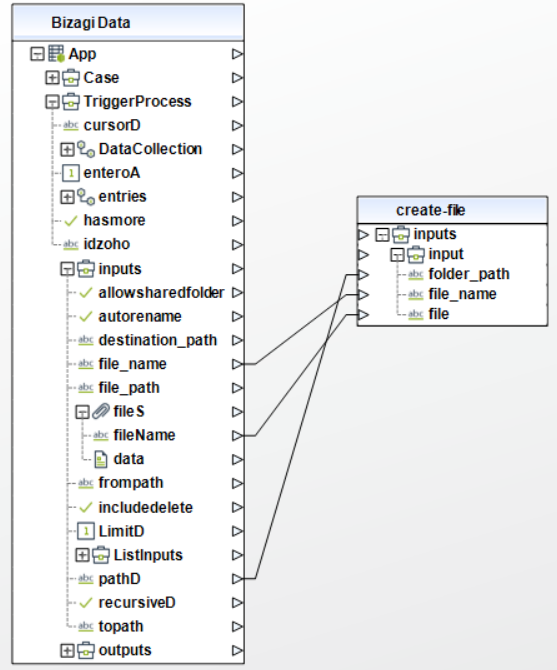
For more information about using this method, refer to SharePoint's official documentation at https://docs.microsoft.com/en-us/sharepoint/dev/sp-add-ins/working-with-folders-and-files-with-rest.
Delete a Folder
This action deletes a specific folder. If the folder doesn't exist, this action doesn't throw an error.
To configure its inputs, take into account the following descriptions:
•folder_path: Full path of the folder. You can't delete a folder that contains a file inside it. You must first delete all the files in the folder.
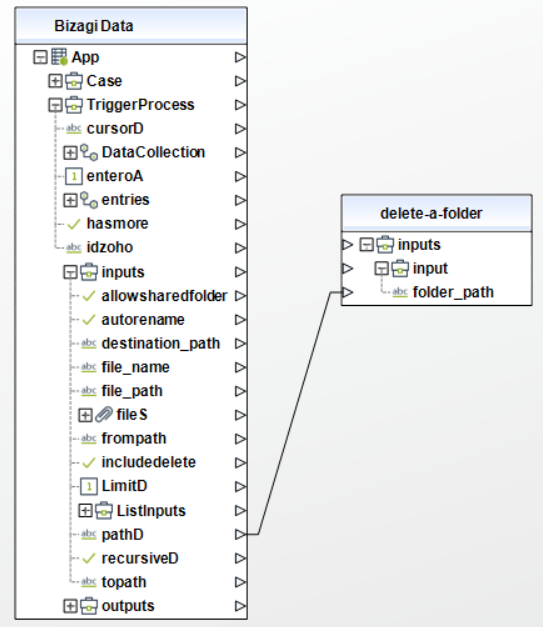
To configure the outputs of this action, you can map the output object to the corresponding entity in Bizagi. Make sure you map the attributes of the entity appropriately.
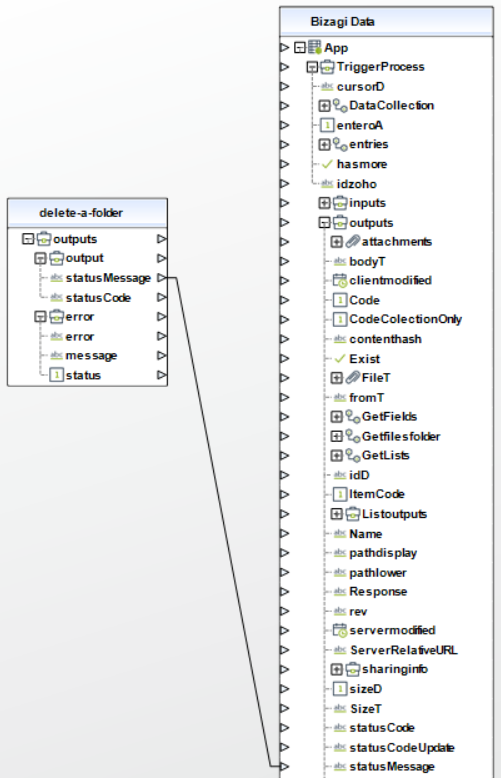
For more information about using this method, refer to SharePoint's official documentation at https://docs.microsoft.com/en-us/sharepoint/dev/sp-add-ins/working-with-folders-and-files-with-rest.
Create a Folder
This action creates a new folder in SharePoint.
|
If a folder with the same name and path already exists, no new folder will be created. Instead, the information from the existing folder will be retrieved. |
To configure its inputs, take into account the following descriptions:
•folder_path: Full path of the folder. It must include the folder name at the end.
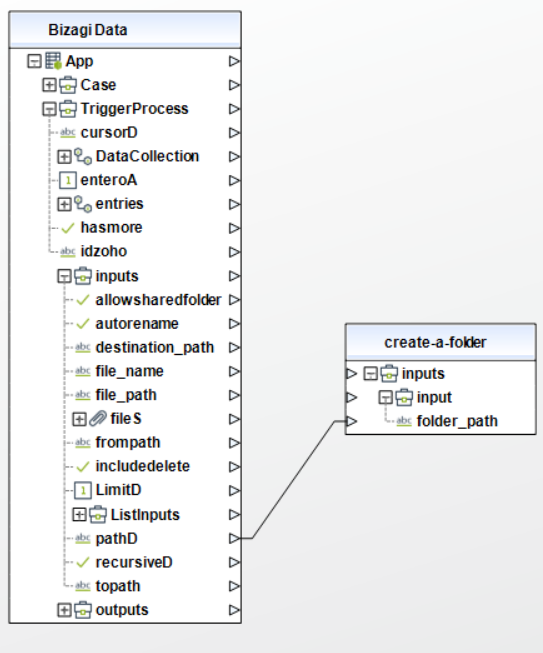
To configure the outputs of this action, you can map the output object to the corresponding entity in Bizagi. Make sure you map the attributes of the entity appropriately.
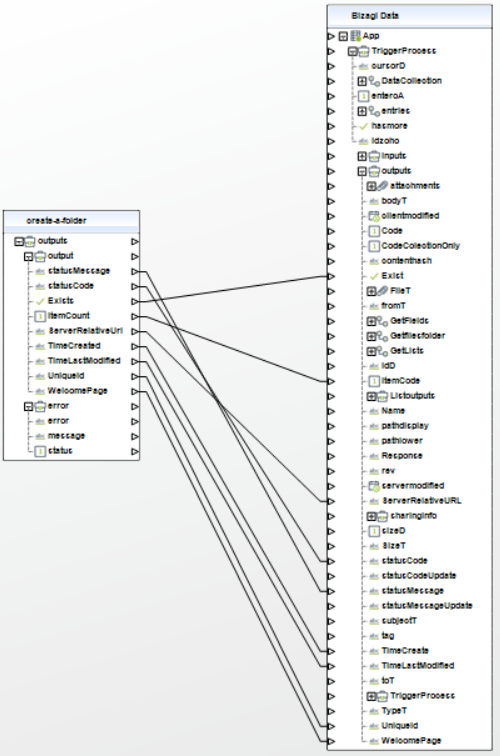
For more information about using this method, refer to SharePoint's official documentation at https://docs.microsoft.com/en-us/sharepoint/dev/sp-add-ins/working-with-folders-and-files-with-rest.
Delete File
This action deletes a file using its full path. If the file doesn't exist, this action doesn't throw an error.
To configure its inputs, take into account the following descriptions:
•file_fullpath: File path, including name and extension of the file to delete.
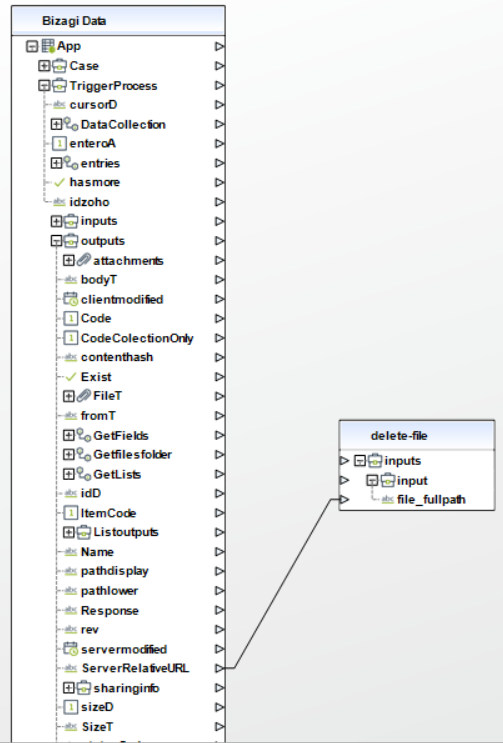
To configure the outputs of this action, you can map the output object to the corresponding entity in Bizagi. Make sure you map the attributes of the entity appropriately.
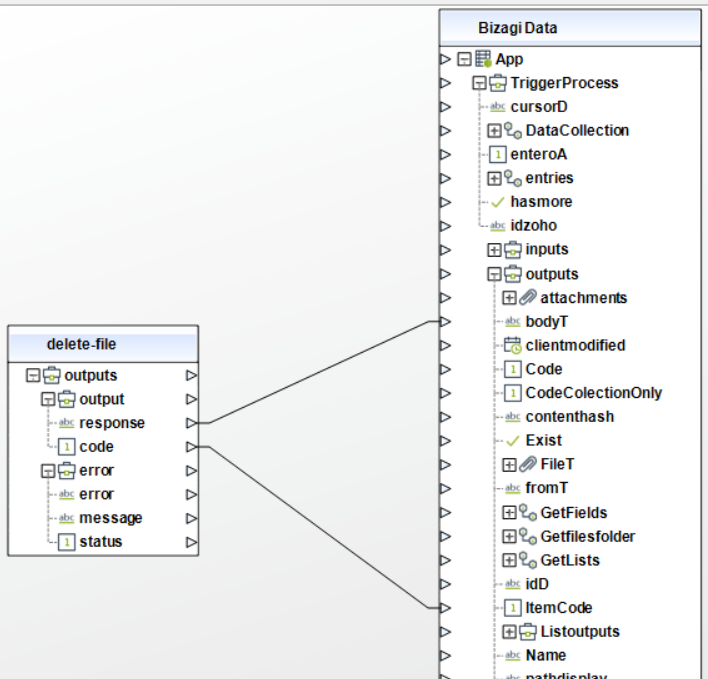
For more information about using this method, refer to SharePoint's official documentation at https://docs.microsoft.com/en-us/sharepoint/dev/sp-add-ins/working-with-folders-and-files-with-rest.
Get File Content
This action downloads a specific file.
To configure its inputs, take into account the following descriptions:
•folder_path: Path of the folder that contains the file.
•file_name: Name and extension of the file.
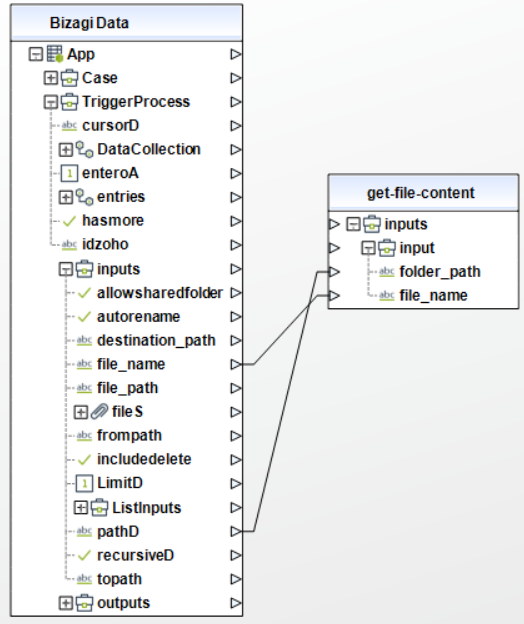
To configure the outputs of this action, you can map the output object to the corresponding entity in Bizagi. Make sure you map the attributes of the entity appropriately.
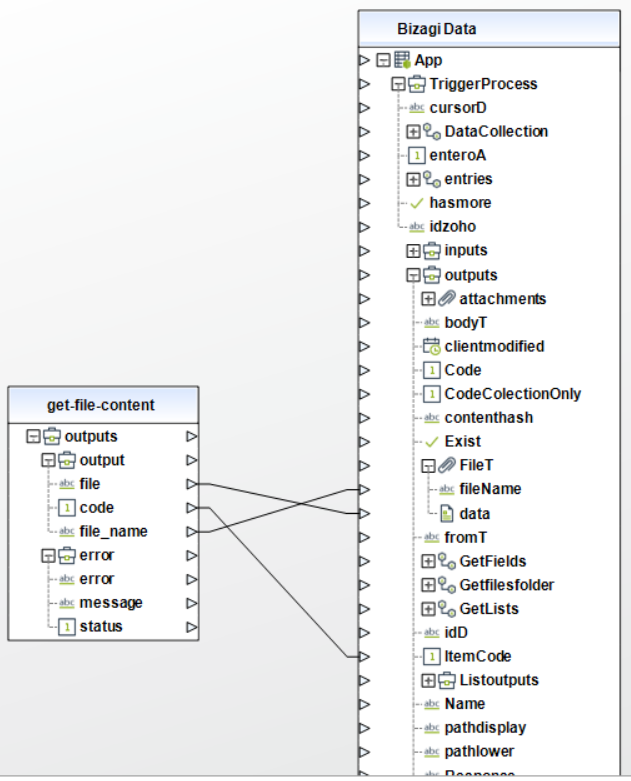
For more information about using this method, refer to SharePoint's official documentation at https://docs.microsoft.com/en-us/sharepoint/dev/sp-add-ins/working-with-folders-and-files-with-rest.
Get Files in Folder
This action gets a list of all the files in a folder.
To configure its inputs, take into account the following descriptions:
•folder_path: Folder path.
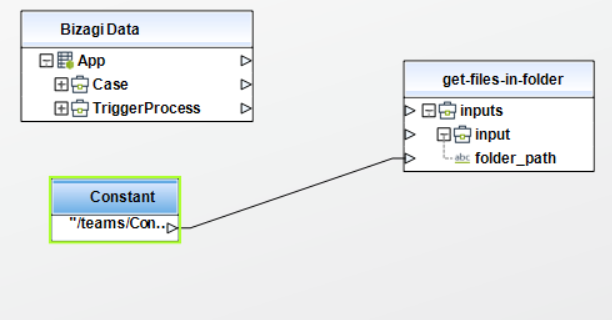
To configure the outputs of this action, you can map the output array to the corresponding collection in Bizagi. Make sure you map the attributes of the entity appropriately.
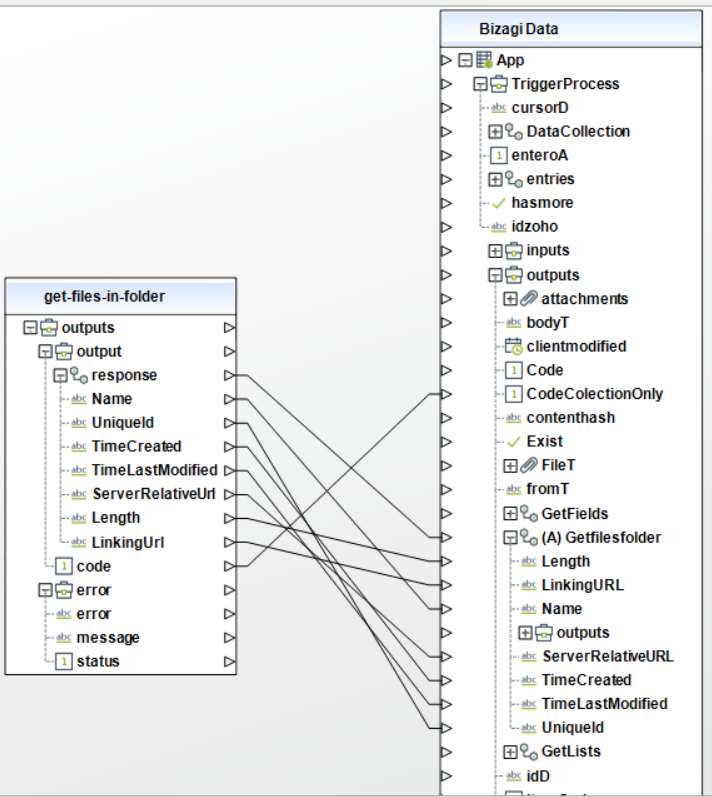
For more information about using this method, refer to SharePoint's official documentation at https://docs.microsoft.com/en-us/sharepoint/dev/sp-add-ins/working-with-folders-and-files-with-rest.
Update a File
This action updates an existing file.
To configure its inputs, take into account the following descriptions:
•folder_path: Path of the folder that contains the file.
•file_name: Name and extension of the file.
•file: new data of the file encoded in base64.
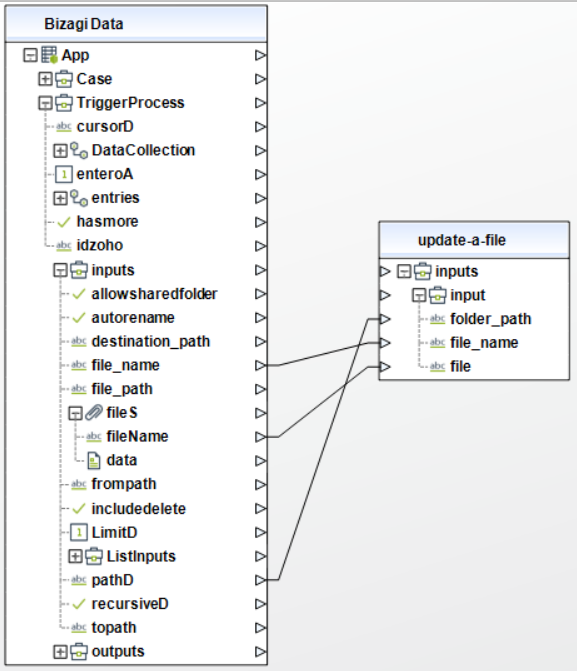
To configure the outputs of this action, you can map the output object to the corresponding entity in Bizagi. Make sure you map the attributes of the entity appropriately.
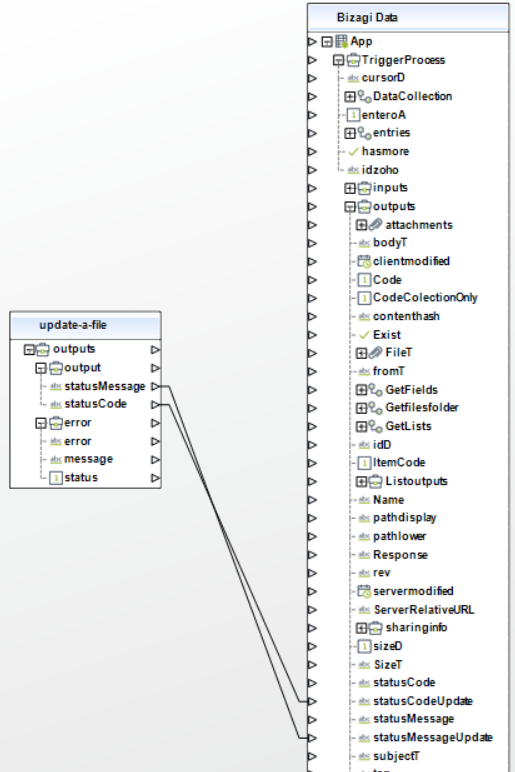
For more information about using this method, refer to SharePoint's official documentation at https://docs.microsoft.com/en-us/sharepoint/dev/sp-add-ins/working-with-folders-and-files-with-rest.
Get Lists
This action shows all the available lists.
To configure its inputs, take into account the following descriptions:
•list_hidden: Specifies whether hidden lists should be included. This parameter must be defined as a Boolean value in your Bizagi model.
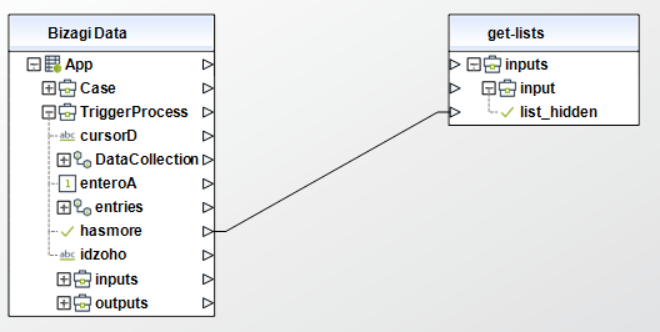
To configure the outputs of this action, you can map the output array to the corresponding collection in Bizagi. Make sure you map the attributes of the entity appropriately.
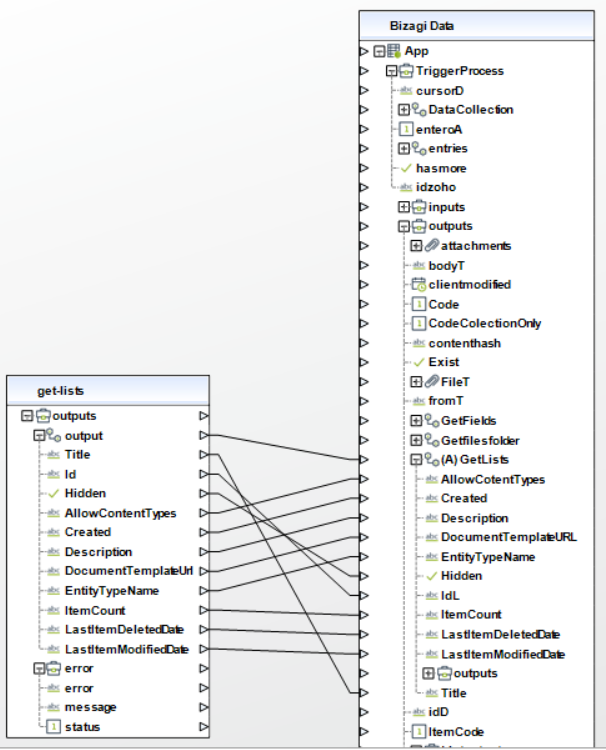
For more information about using this method, refer to SharePoint's official documentation at https://docs.microsoft.com/en-us/sharepoint/dev/sp-add-ins/working-with-lists-and-list-items-with-rest.
Create a List
This action creates a new SharePoint list.
To configure its inputs, take into account the following descriptions:
•title: Title of the list.
•description: Description of the list.
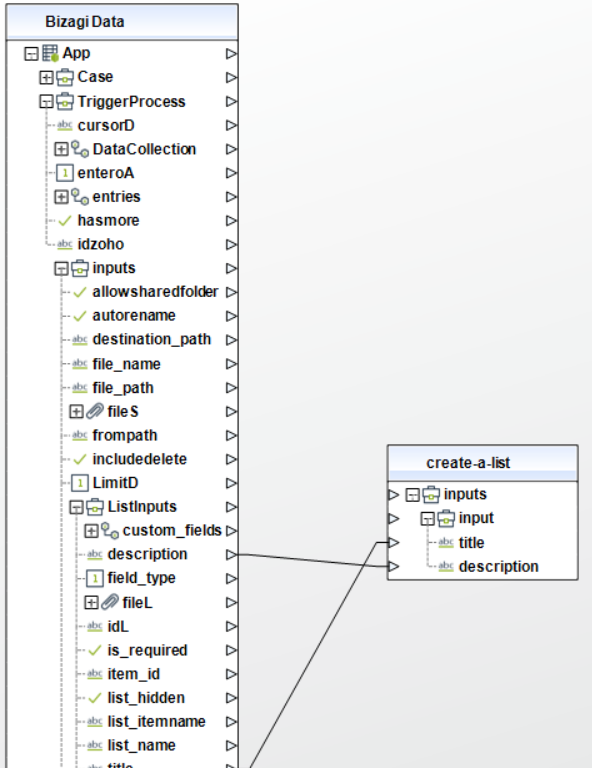
To configure the outputs of this action, you can map the output object to the corresponding entity in Bizagi. Make sure you map the attributes of the entity appropriately.
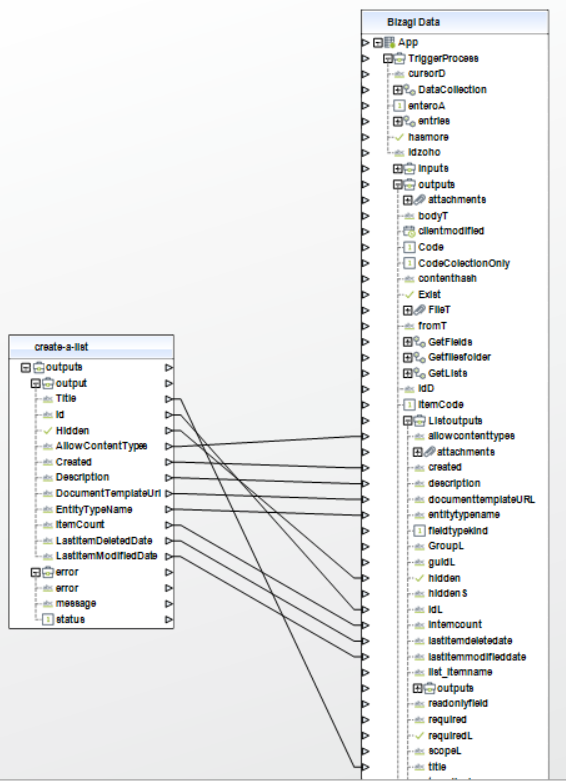
For more information about using this method, refer to SharePoint's official documentation at https://docs.microsoft.com/en-us/sharepoint/dev/sp-add-ins/working-with-lists-and-list-items-with-rest.
Update List by ID
This action updates a list using its ID.
To configure its inputs, take into account the following descriptions:
•id: GUID of the list.
•title: Title of the list.
•description: Description of the list.
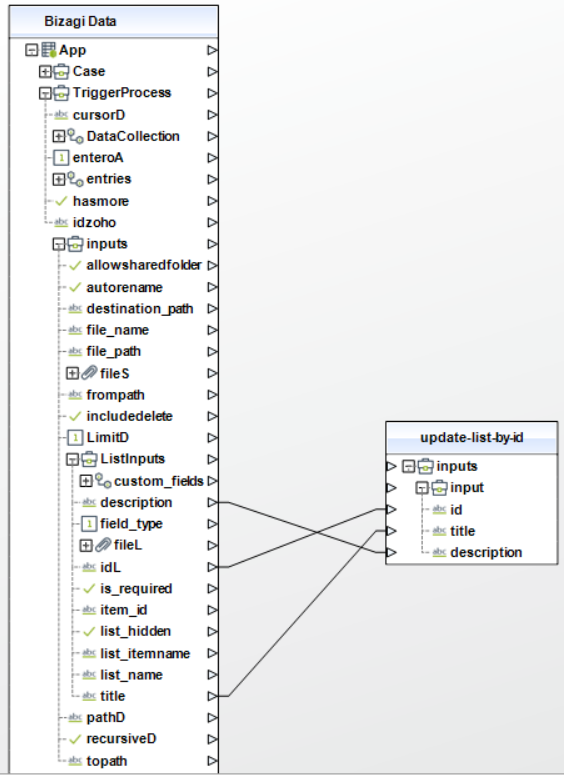
To configure the outputs of this action, you can map the output object to the corresponding entity in Bizagi. Make sure you map the attributes of the entity appropriately.
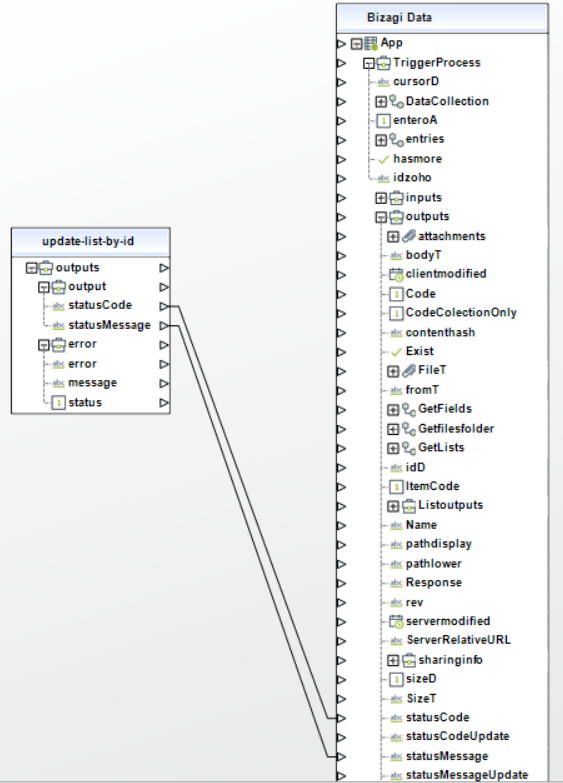
For more information about using this method, refer to SharePoint's official documentation at https://docs.microsoft.com/en-us/sharepoint/dev/sp-add-ins/working-with-lists-and-list-items-with-rest.
Create a Custom Field for a List by ID
This action creates a custom field (column) in a SharePoint list by specifying its unique list ID.
|
This action can create duplicated custom fields. |
To configure its inputs, take into account the following descriptions:
•guid_list: GUID of the list.
•title: Title of the custom field.
•description: Description of the custom field.
•is_required: Whether the custom field is required. This parameter should be a boolean in your Bizagi model.
•field_type: Type of the custom field.
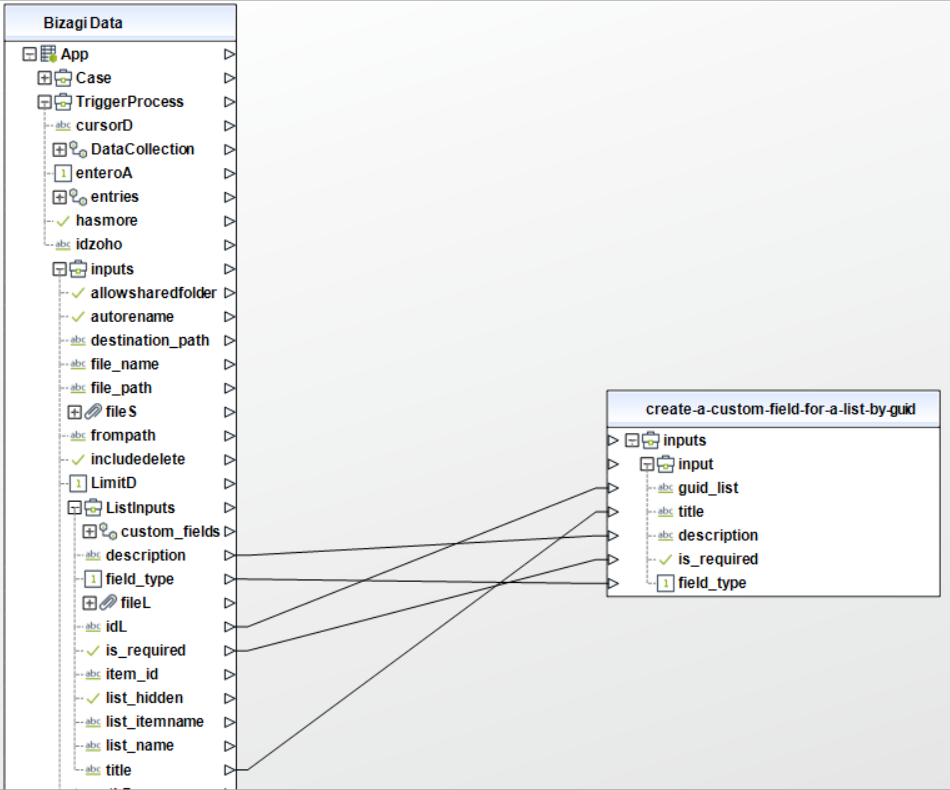
To configure the outputs of this action, you can map the output object to the corresponding entity in Bizagi. Make sure you map the attributes of the entity appropriately.
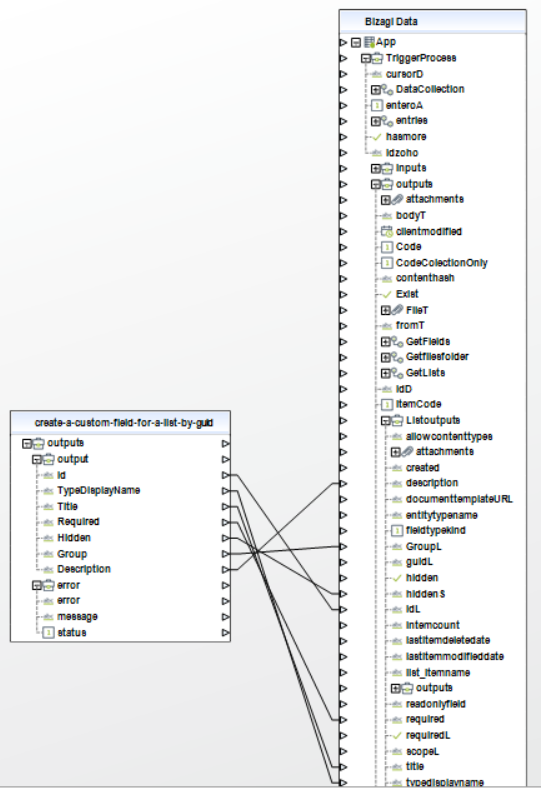
For more information about using this method, refer to SharePoint's official documentation at https://docs.microsoft.com/en-us/previous-versions/office/sharepoint-server/ee540543(v%3Doffice.15).
Get Fields from a List
This action gets a field from a list.
To configure its inputs, take into account the following descriptions:
•list_name: Name of the list.
•list_hidden: whether hidden fields must be included. This parameter should be a boolean in your Bizagi model.
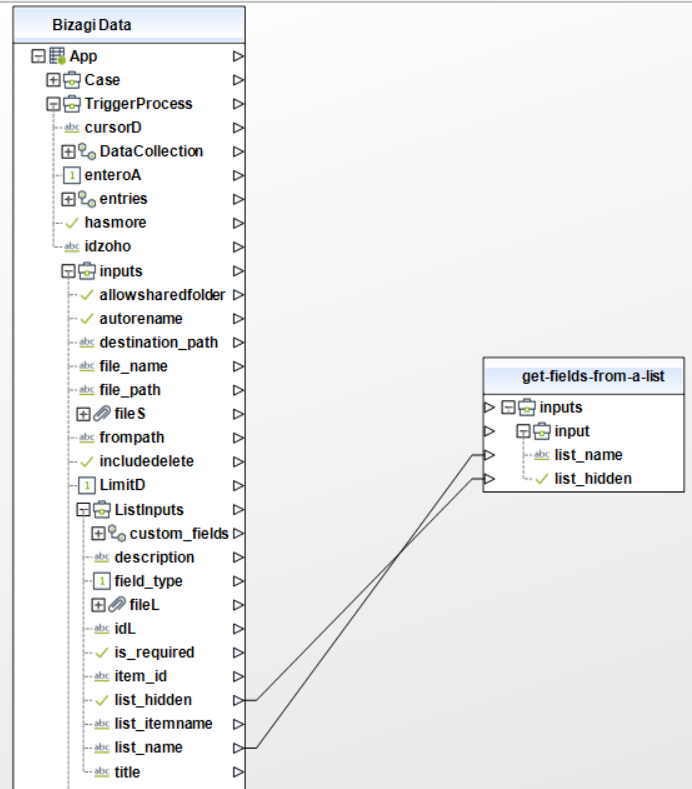
To configure the outputs of this action, you can map the output array to the corresponding collection in Bizagi. Make sure you map the attributes of the entity appropriately.
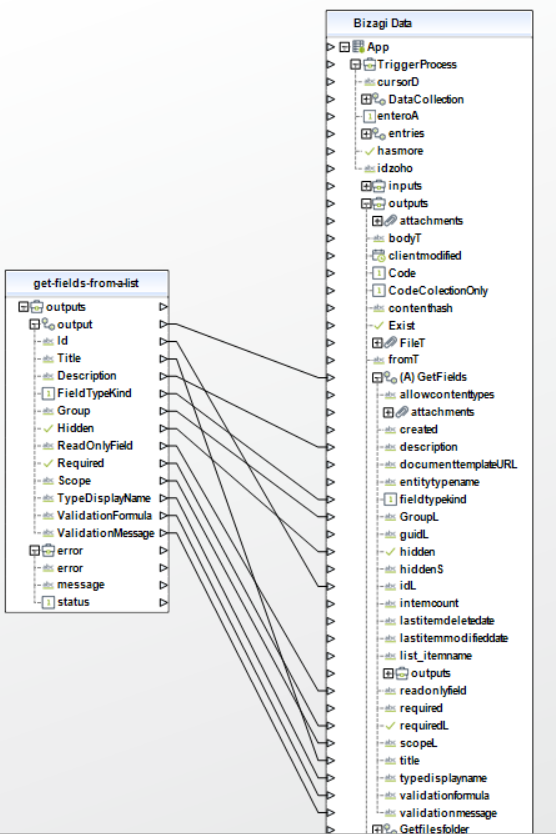
For more information about using this method, refer to SharePoint's official documentation at https://docs.microsoft.com/en-us/sharepoint/dev/sp-add-ins/working-with-lists-and-list-items-with-rest.
Delete a List
This action deletes a list. If the list doesn't exist, this action doesn't throw an error.
To configure its inputs, take into account the following descriptions:
•guid: GUID of the list.
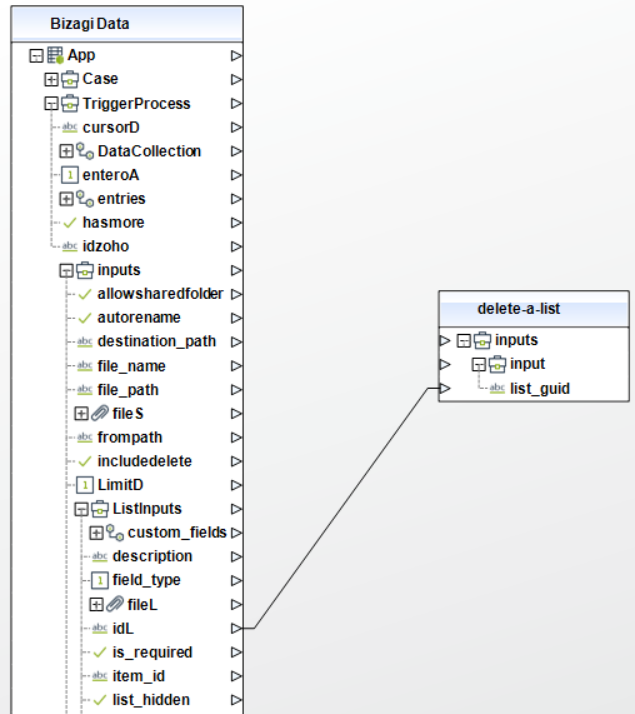
To configure the outputs of this action, you can map the output object to the corresponding entity in Bizagi. Make sure you map the attributes of the entity appropriately.
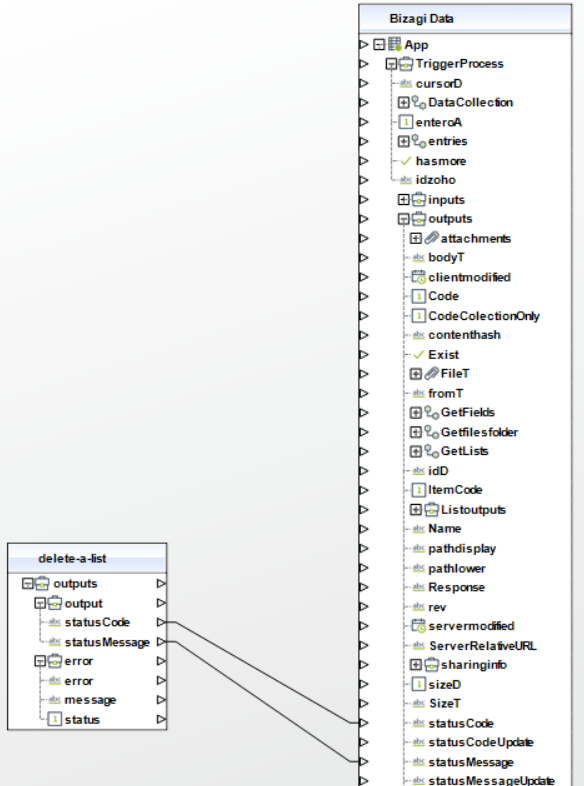
For more information about using this method, refer to SharePoint's official documentation at https://docs.microsoft.com/en-us/sharepoint/dev/sp-add-ins/working-with-lists-and-list-items-with-rest.
Create List Item
This action creates a new item in a list.
|
This action can create duplicated list items. |
To configure its inputs, take into account the following descriptions:
•list_name: Title of the list.
•list_itemName: Name of the new item.
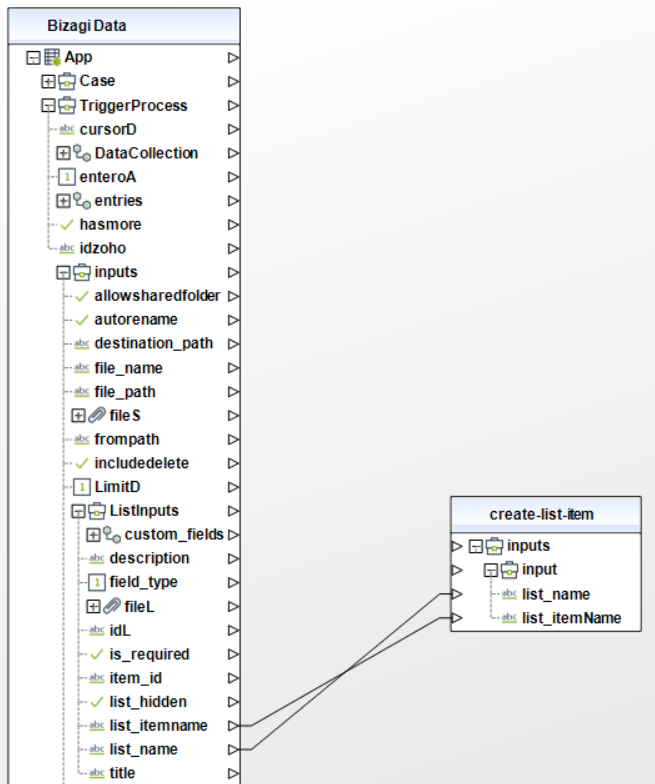
To configure the outputs of this action, you can map the output object to the corresponding entity in Bizagi. Make sure you map the attributes of the entity appropriately.
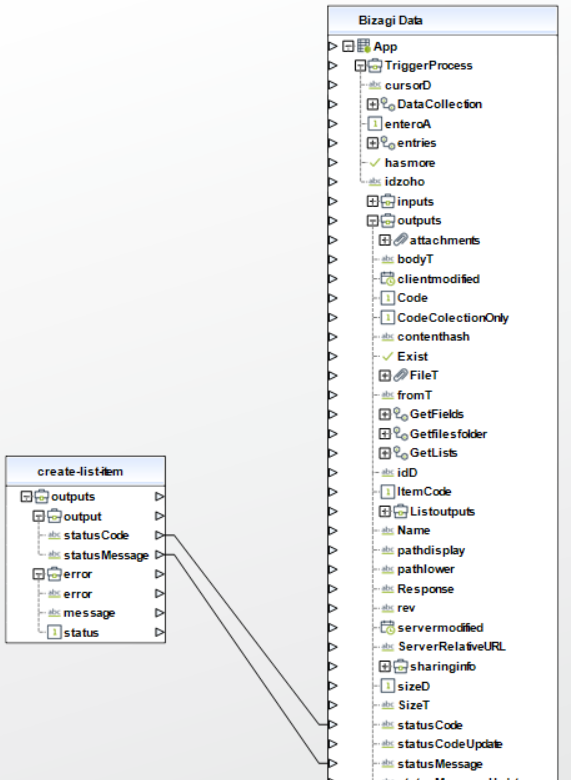
For more information about using this method, refer to SharePoint's official documentation at https://docs.microsoft.com/en-us/sharepoint/dev/sp-add-ins/working-with-lists-and-list-items-with-rest.
Get List Items
This action retrieves the item list from a SharePoint list.
To configure its inputs, take into account the following descriptions:
•lit_name: Name of the list.
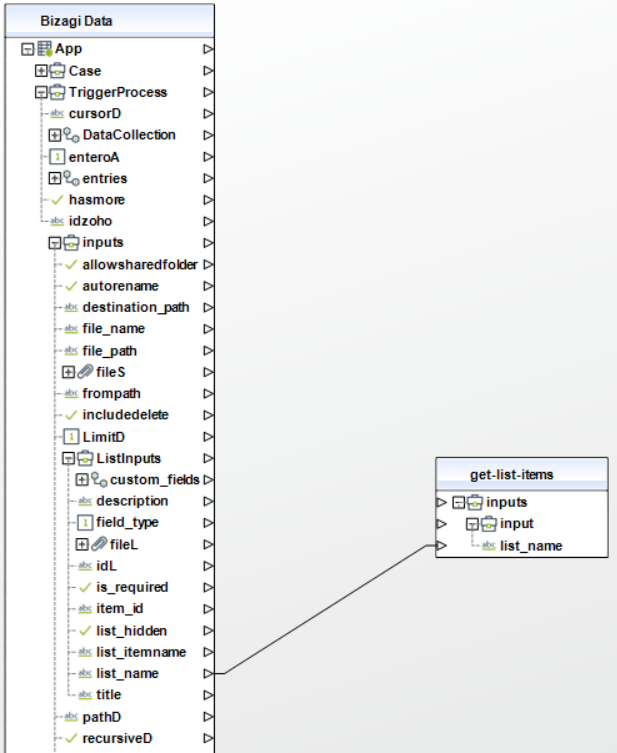
To configure the outputs of this action, you can map the output array to the corresponding collection in Bizagi. Make sure you map the attributes of the entity appropriately.
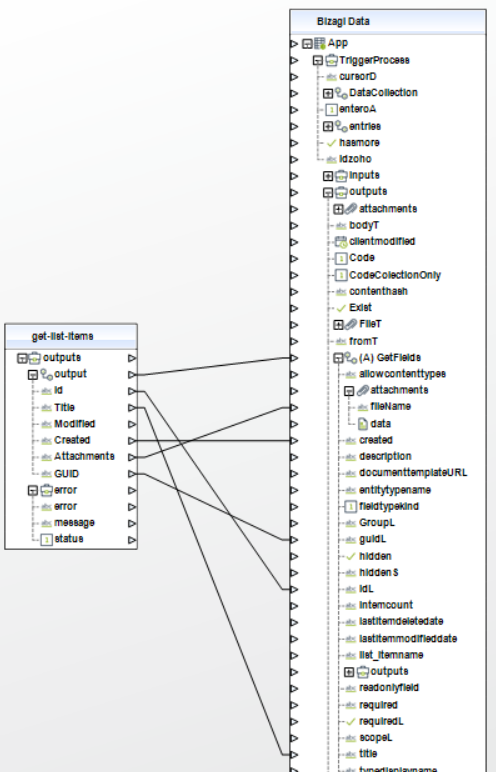
For more information about using this method, refer to SharePoint's official documentation at https://docs.microsoft.com/en-us/sharepoint/dev/sp-add-ins/working-with-lists-and-list-items-with-rest.
Update List Item
This action updates the title of a specific item from a list.
To configure its inputs, take into account the following descriptions:
•list_itemId: Id of the item inside the list.
•list_itemName: New name of the list item.
•list_name: Name of the list that contains the item.
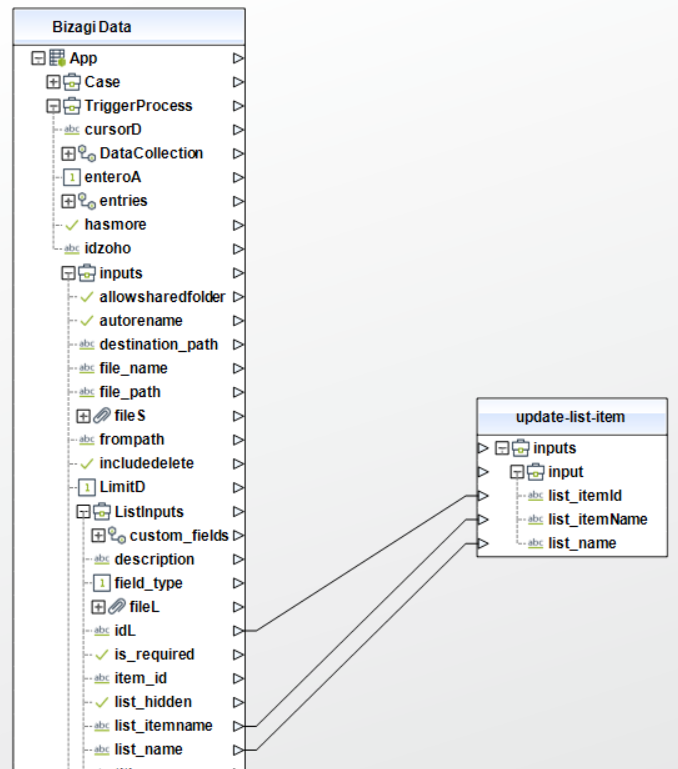
To configure the outputs of this action, you can map the output object to the corresponding entity in Bizagi. Make sure you map the attributes of the entity appropriately.
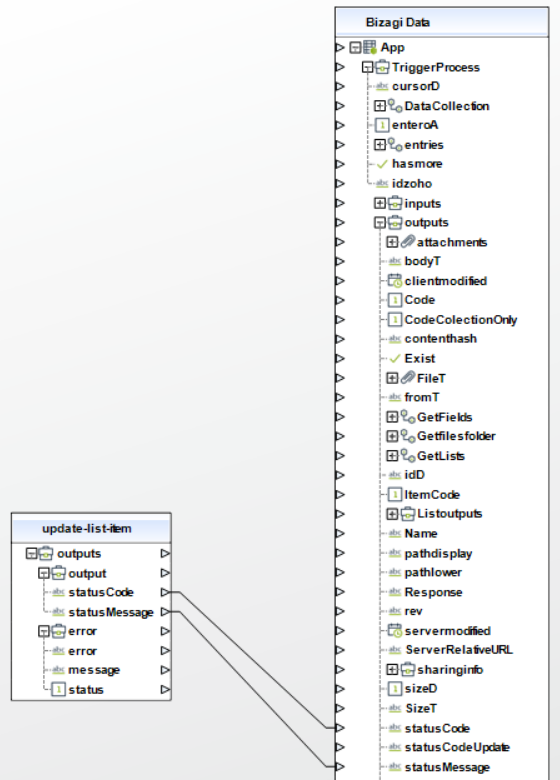
For more information about using this method, refer to SharePoint's official documentation at https://docs.microsoft.com/en-us/sharepoint/dev/sp-add-ins/working-with-lists-and-list-items-with-rest.
Delete List Item by ID
This action deletes a specific item from a list by providing its ID.
To configure its inputs, take into account the following descriptions:
•list_itemId: Id of the item inside the list.
•list_name: Name of the list that contains the item.
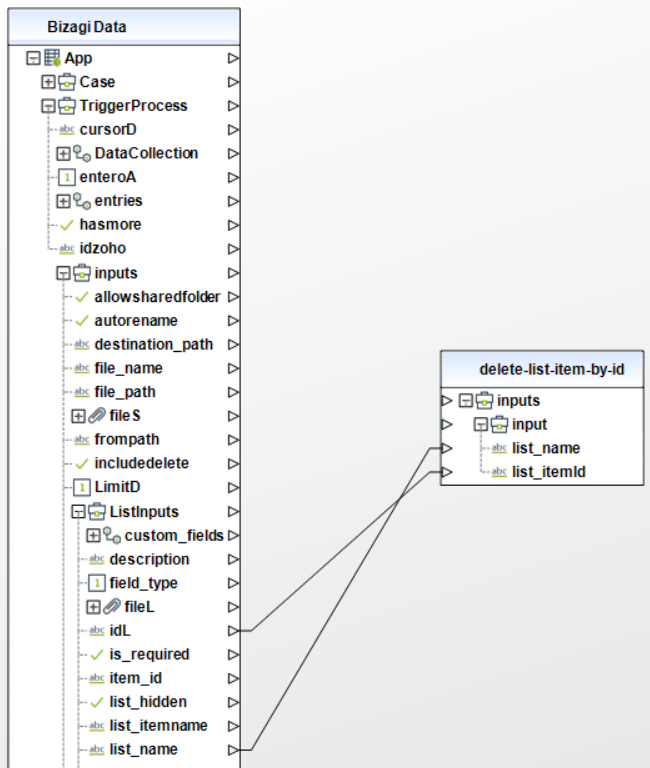
To configure the outputs of this action, you can map the output object to the corresponding entity in Bizagi. Make sure you map the attributes of the entity appropriately.
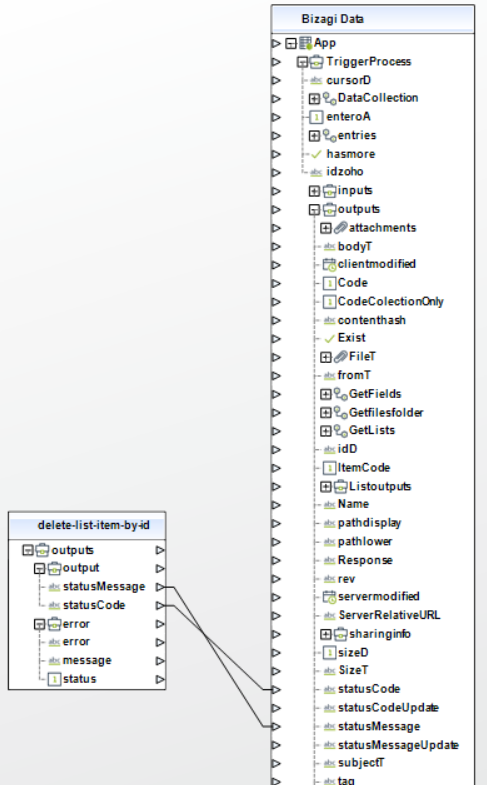
For more information about using this method, refer to SharePoint's official documentation at https://docs.microsoft.com/en-us/sharepoint/dev/sp-add-ins/working-with-lists-and-list-items-with-rest.
Create a File Attachment to a List Item
This action attaches a file to a specific list.
To configure its inputs, take into account the following descriptions:
•list_name: Name of the list that contains the item.
•item_id: id of the item inside the list (not its GUID).
•file: file in base 64 format.
•file_name: name of the file.
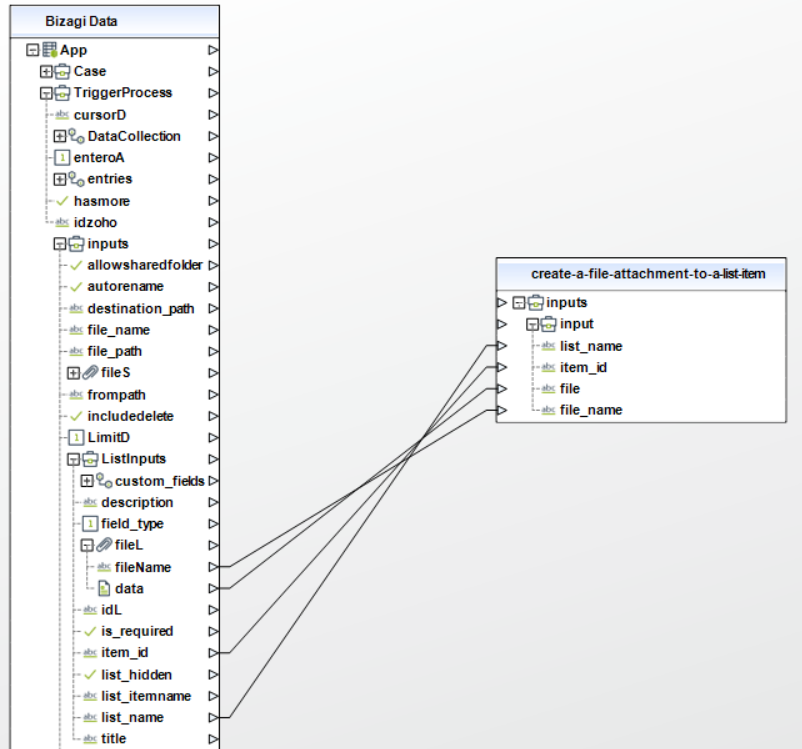
To configure the outputs of this action, you can map the output object to the corresponding entity in Bizagi. Make sure you map the attributes of the entity appropriately.
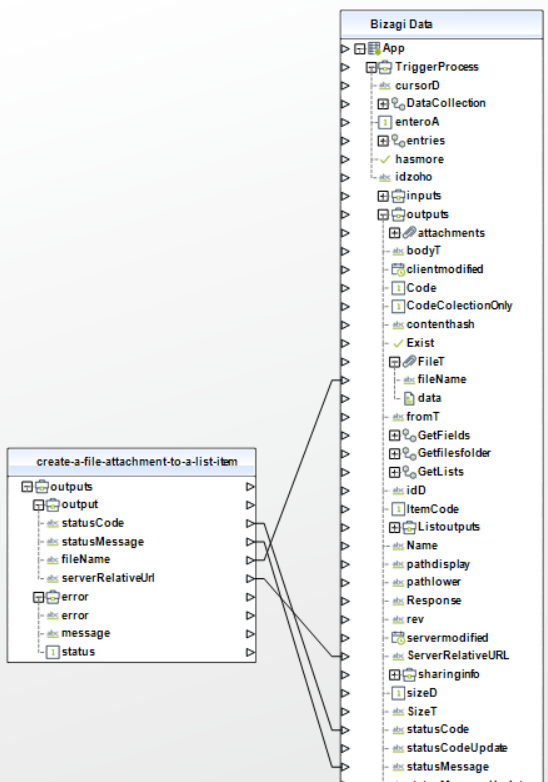
For more information about using this method, refer to SharePoint's official documentation at https://docs.microsoft.com/en-us/sharepoint/dev/sp-add-ins/working-with-lists-and-list-items-with-rest.
Create List Item with Multiple Fields
This action creates a new item in a list with multiple custom fields.
|
This action can create duplicated list items. |
To configure its inputs, take into account the following descriptions:
•list_name: Name of the list.
•custom_fields: List of the object's custom fields and its values.
•field_name: Name of the custom field.
•field_value: value of the custom field.
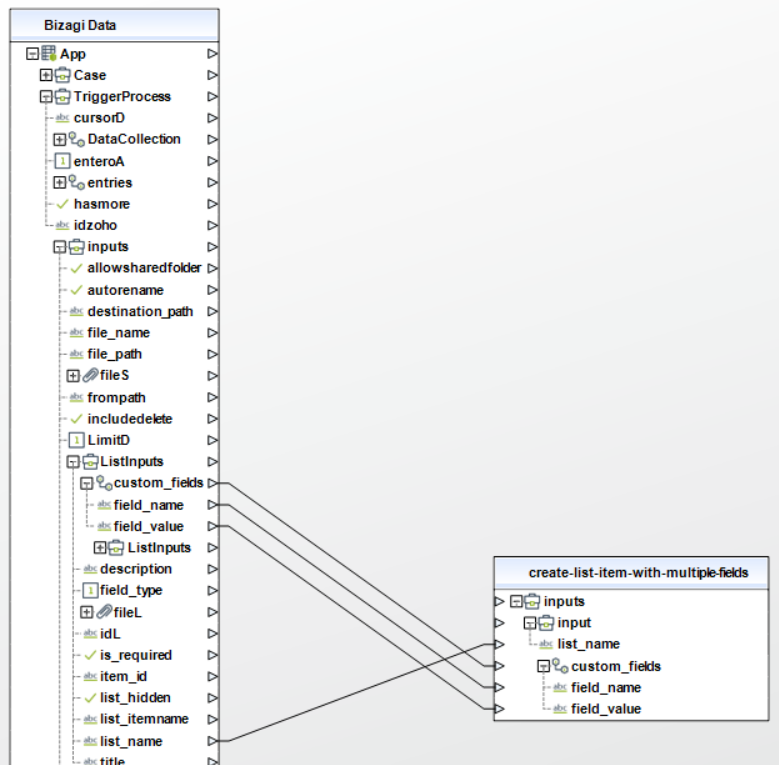
To configure the outputs of this action, you can map the output object to the corresponding entity in Bizagi. Make sure you map the attributes of the entity appropriately.
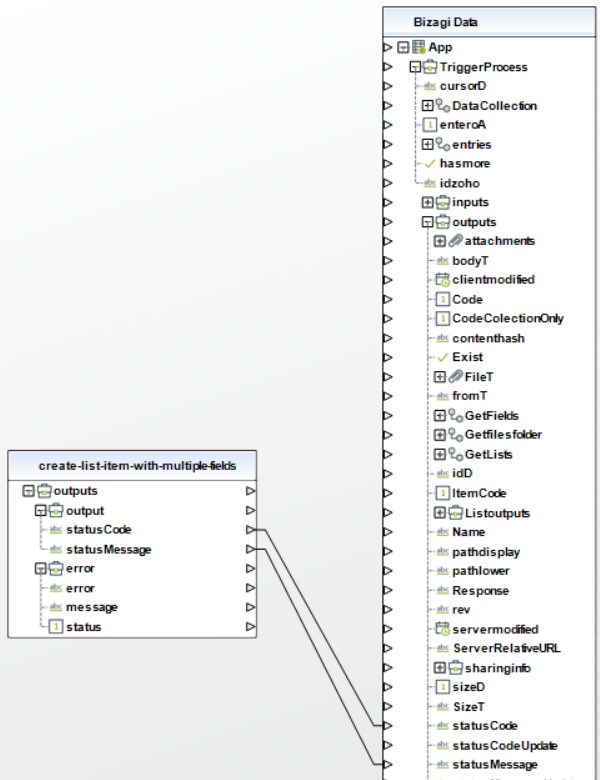
For more information about using this method, refer to SharePoint's official documentation at https://docs.microsoft.com/en-us/previous-versions/office/sharepoint-server/ee540543(v%3Doffice.15).
Get File Metadata
This action gets the metadata of a specific file.
To configure its inputs, take into account the following descriptions:
•file_full_path: Full file path, including name and extension.
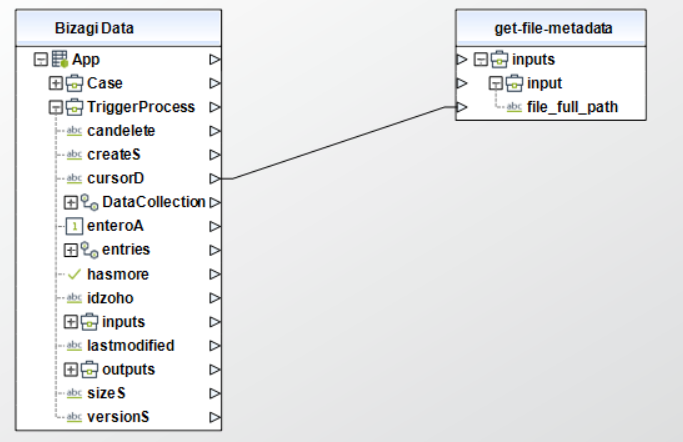
To configure the outputs of this action, you can map the output object to the corresponding entity in Bizagi. Make sure you map the attributes of the entity appropriately.
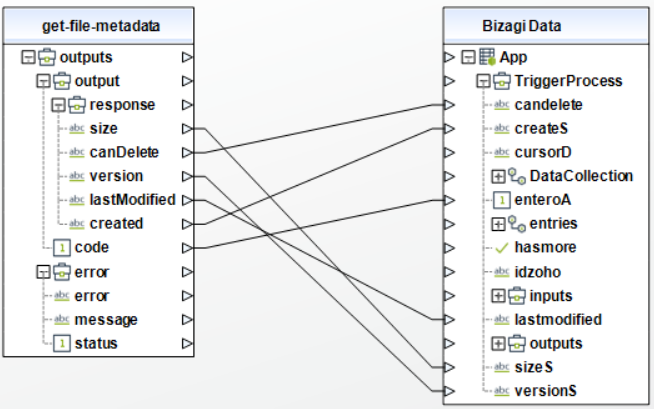
For more information about using this method, refer to SharePoint's official documentation at https://docs.microsoft.com/en-us/sharepoint/dev/sp-add-ins/working-with-folders-and-files-with-rest.
Troubleshooting
After configuring the SharePoint MS EntraID connector, you may encounter some of the following error messages in the Work Portal:
When the message shown in the image appears, you must check the path of the action that is being executed. Generally, the path for all the SharePoint connections is: Shared Documents/[Folder].

If the following message appears, in addition to specifying the path, ensure that the CLIENT_ID, CLIENT_SECRET, and RESOURCE_ID are correctly configured.

Last Updated 7/16/2026 2:05:36 PM