What you need to do
Bizagi Web Parts is an integration between Bizagi and SharePoint. Therefore, you need to perform some configuration in both sides, client and server, so the communication between the systems is successful. To install Bizagi Web Parts you need to follow these steps:
1. Fulfill SharePoint prerequisites.
2. Configure the authentication method in Bizagi.
3. Install Bizagi Web Parts in SharePoint servers and sites.
4. Configure Bizagi Web Parts in your SharePoint site.
This article describes the installation and upgrade steps.
SharePoint version |
Installer |
|---|---|
SharePoint 2010 |
|
SharePoint 2013 |
|
If you use Bizagi Studio version 11.2.2 or below, follow the procedure mentioned in Installing or upgrading Web Parts v11.2.2. |
Before you start
A SharePoint administrator (with expertise in deploying solutions to web farms) should carry out this installation, especially when installing the add-on by deploying the WSP file.
Prerequisites for your SharePoint server in order to use Bizagi Web Parts are:
•Have your SharePoint configured by following the best practices enforced by the vendor (Microsoft).
With the best practices recommended by SharePoint, it is fundamental to install SharePoint under a domain (without using local accounts, which is not supported).
For further detail about this, and to view the list of SharePoint's requirements, refer to their official page at http://technet.microsoft.com/en-us/library/cc262485%28v=office.15%29.aspx.
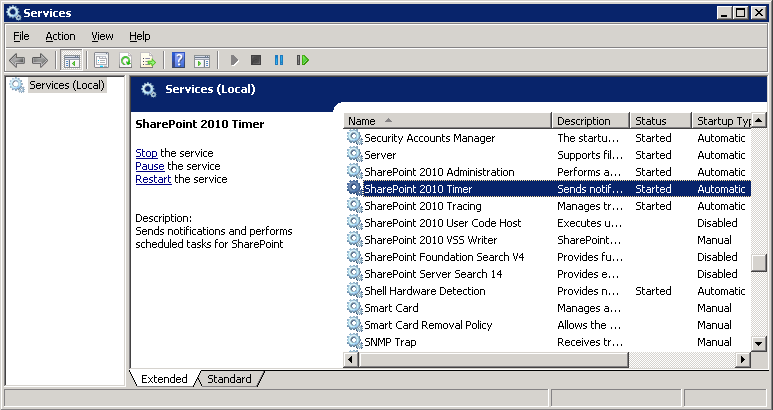
•Make sure that you have SharePoint Timer Service started.
•Make sure that you have SharePoint Administrator Service started.
 .
.
•Make sure you have a service account that has Web Farm administrator rights.
Use this account to connect between SharePoint and Bizagi and it needs to:
oBe a domain account.
oHave administrator rights at the Bizagi Server.
oHave execution permissions for Bizagi Work portal.
oBe created as a user in Bizagi.
•Make sure that your site collection is configured to use the same base URL as your web application.
For example: http://[SharePoint_server].
This URL must not specify any suffixes (e.g: http://[SharePoint_server]/[site]/).
•Follow all usual and regular recommendations, which are oriented towards hardware and software configuration and tuning in SharePoint.
Refer to https://technet.microsoft.com/en-us/library/cc262485.aspx#hwforwebserver for official information.
Microsoft encourages the use of a SharePoint 2013 Standard or Enterprise edition.
Supported versions
Web Parts are supported in SharePoint 2010 or SharePoint 2013 installations. All editions are supported (Enterprise, Standard or Foundation) and SharePoint installations must be set On-Premise.
2. Configure the authentication method in Bizagi
Keep in mind that this integration scheme relies on the Single Sign-On capabilities provided by an integrated type of authentication (set in both Bizagi and SharePoint).
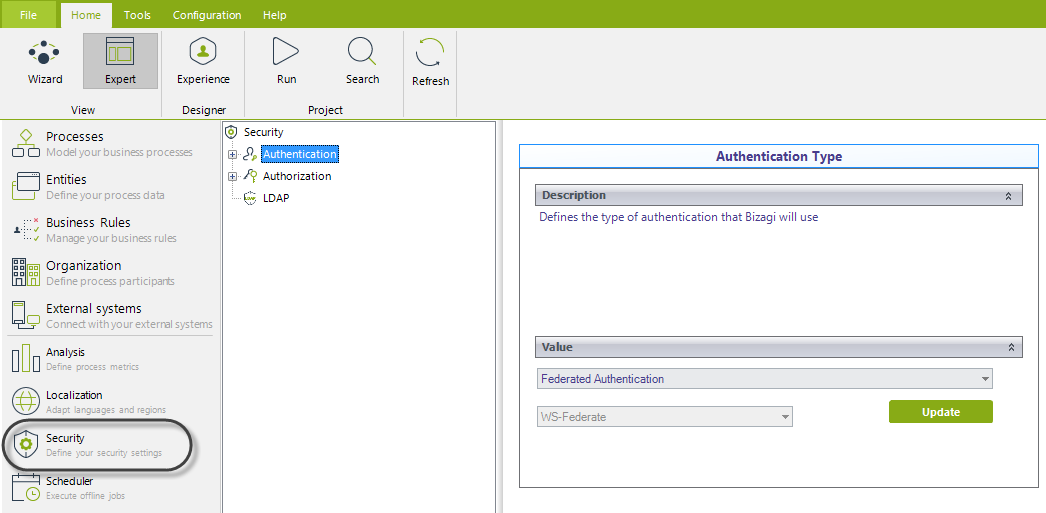
To complete this, authentication must be configured using Federated authentication with SAML 2.0
To authenticate users in Bizagi through Web Parts using SAML 2.0 requires that the SharePoint server authenticates those users with the same identity provider (IdP) using only the WS-Fedeartion protocol.
|
No further authentication protocols are supported by Bizagi Web Parts between the SharePoint site server and the IdP. Only the WS-Fedeartion protocol is supported. |
The following diagram illustrates the steps of user authentication in Web Parts using SAML 2.0 in Bizagi:
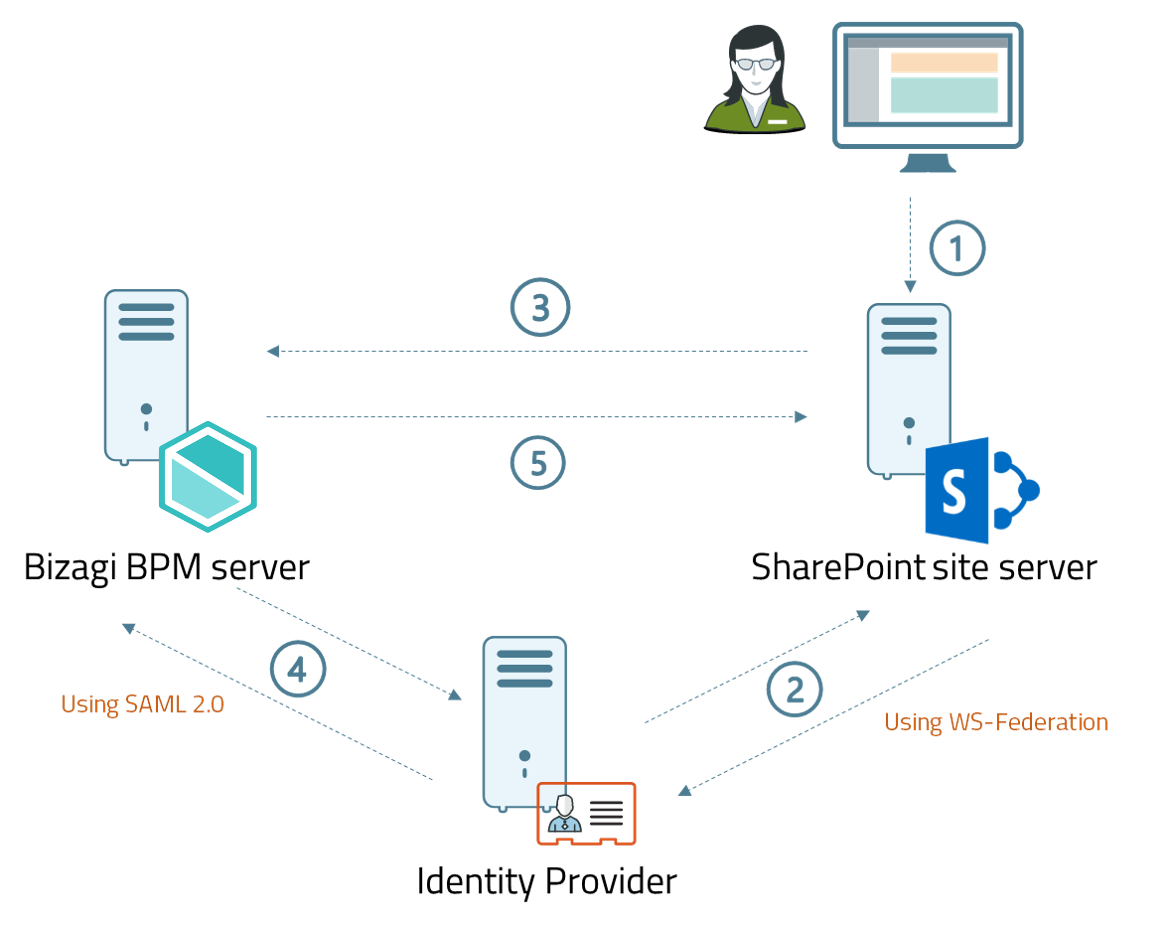
1. User accesses the SharePoint site.
2. The SharePoint site server authenticates the user with the identity provider using the WS-Federation protocol. No further protocols between SharePoint and the identity provider are supported if you are using SAML 2.0 in Bizagi.
3. The user accesses the Web part, and the request is re directed to the BPM server.
4. The Bizagi BPM server authenticates the user using SAML 2.0 with the same identity provider used in step 2.
5. Bizagi displays the information requested by the Web part in the SharePoint site.
You need to set the authentication in Bizagi as shown below, making sure you also configure the parameters regarding your identity provider:
For further information about the configuration of SAML 2.0 in Bizagi click here.
Installing Bizagi Web Parts for SharePoint can be carried out in two ways: through an installer which guides the procedure, or by manually deploying the Web Parts from a WSP file (Windows SharePoint file).
For more information about this feature, refer to Bizagi Web Parts for SharePoint.
Refer to the two alternatives presented in the sections below to either: install the Web Parts from an executable installer, or manually deploy a WSP file.
|
Installing the Web Parts will eventually restart your SharePoint Web applications. Therefore, make sure you schedule this step and execute it at non-working hours, and that you take the proper precautions. |
Running the Web Parts installer
Once the prerequisites are met, you can install Bizagi Web Parts in your SharePoint is simply done by running an installer. To do so, follow these steps:
1. Download Bizagi Web Parts for SharePoint, as an add-on installer.
Make sure you choose the appropriate installer for your SharePoint version (2013 or 2010).
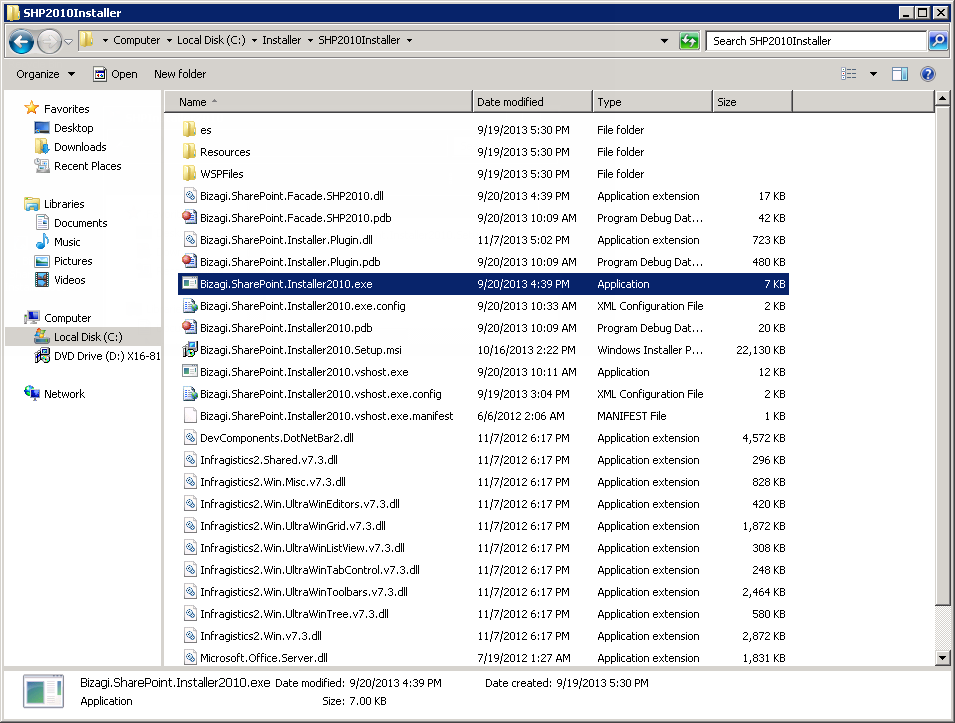
2. Unzip the downloaded file and run the installer's exe file for the Web Parts add-on installation.
Use the Bizagi.SharePoint.Installer2013.exe or Bizagi.SharePoint.Installer2010.exe executable file according to your SharePoint server version:
A wizard guides you through the installation process.
Click Next.
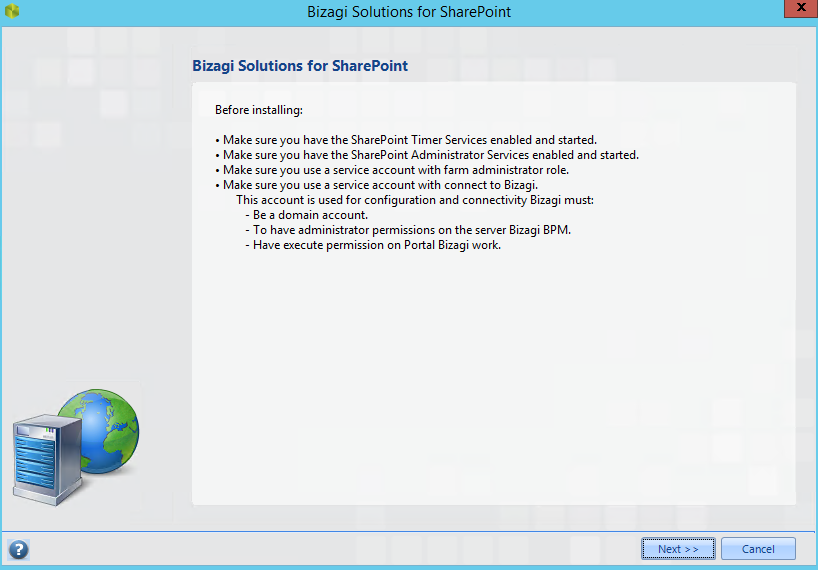
The installer recommends you to review the prerequisites and run a system check to make sure these are met.
Once this is successful, click Next.
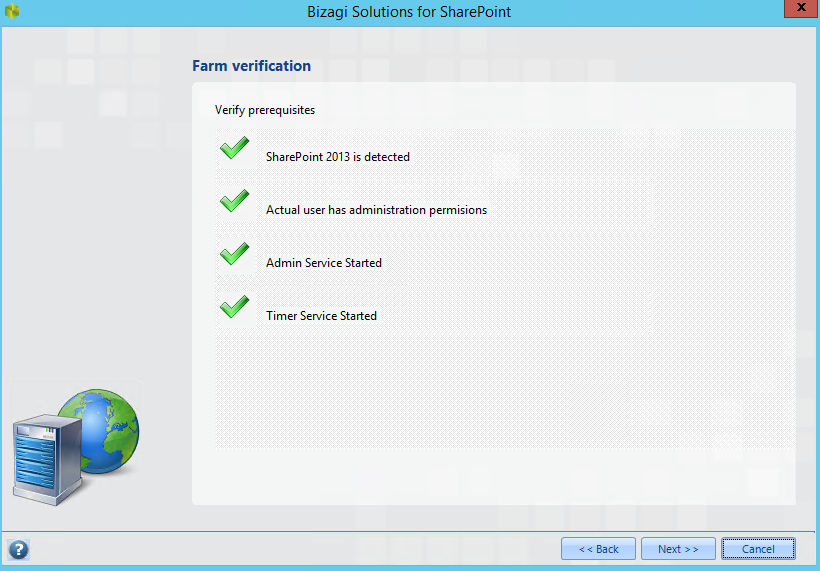
The installer validates that is an existing installation of Bizagi Web Parts.
When you install Bizagi Web Parts for the very first time, no existing installation will be found and you may click Next.
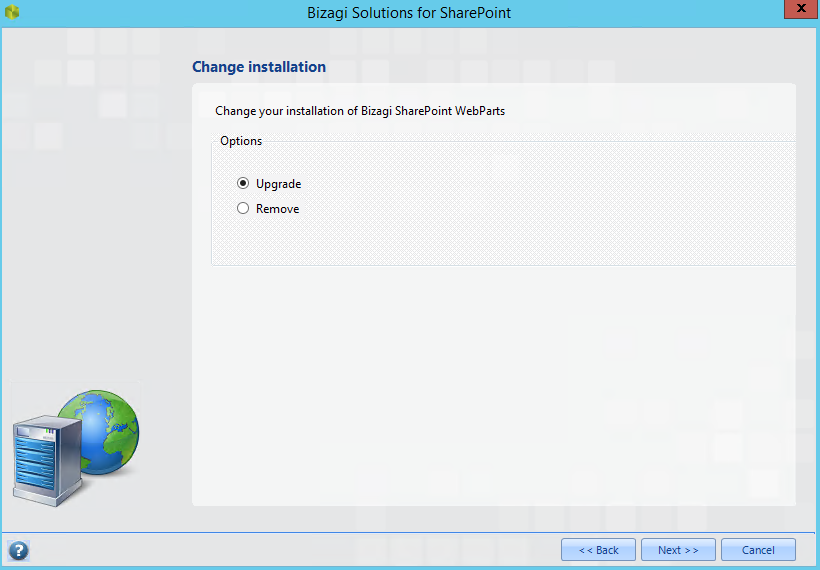
If you are updating to a newer Bizagi Web Parts installation, you will be have the option to upgrade the installed version.
Make sure you carefully read and accept the End-User license agreement. Note you may also use the installer to uninstall Bizagi Web Parts. Mark the SharePoint sites of your site collection and farm, so that you select those in which you will install Bizagi Web Parts for SharePoint.
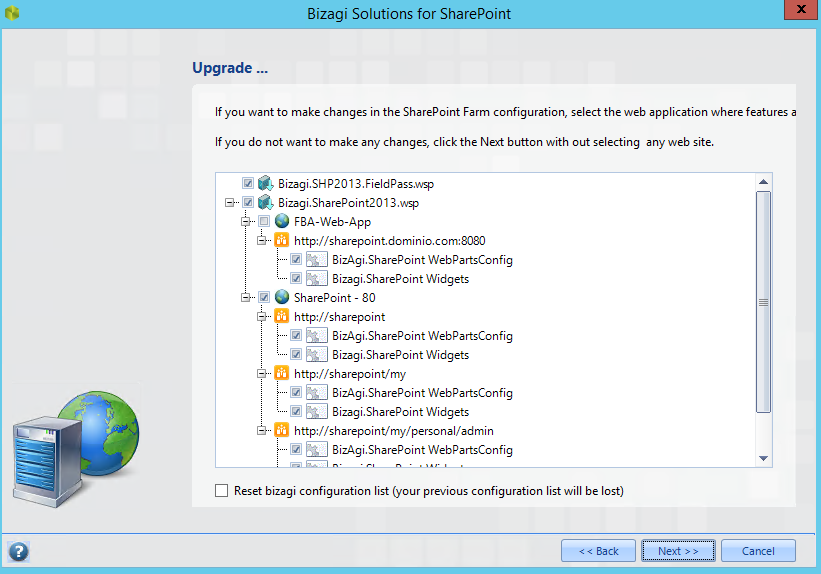
Select both Bizagi.SharePoint.WebpartsConfig and Bizagi.SharePoint.Widgets items.
Click Next.
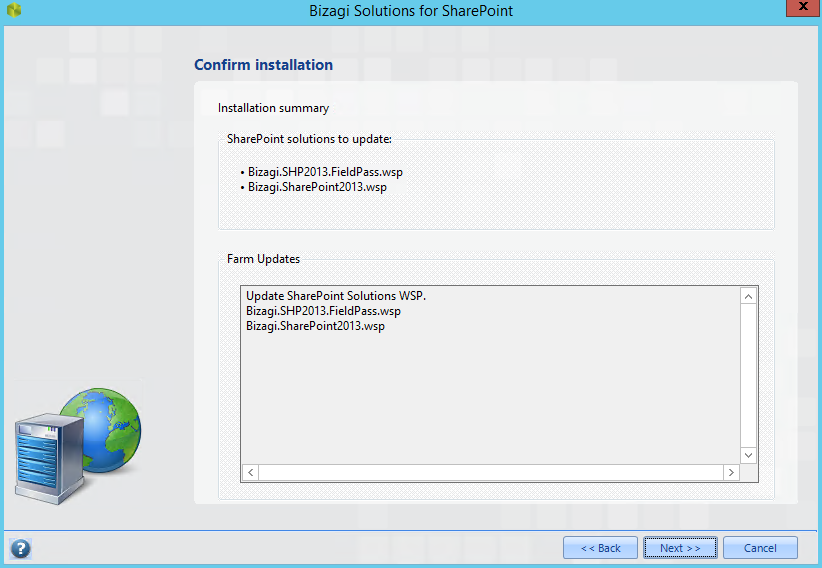
Verify the installation preferences in the summary.
Click Next when you are done, to start the installation.
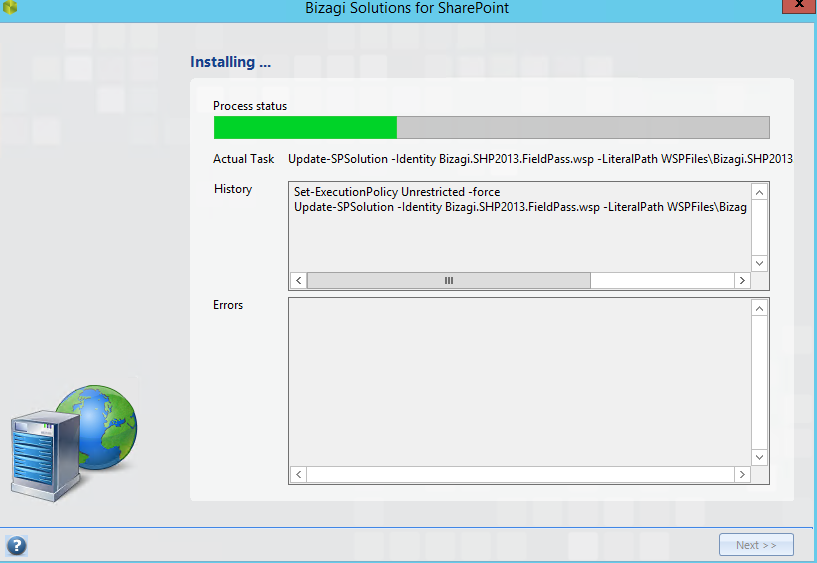
Once the installation completes, you may close the wizard.
Manually deploying the Web Parts
Once the prerequisites are met, follow these steps:
1. Download from Bizagi SharePoint resources the Bizagi Web Parts for SharePoint, as a zipped wsp file.
Choose the appropriate one for your SharePoint version (2013 or 2010).
2. Unzip the downloaded file into a local path of one of your SharePoint WFE servers (we recommend to use a server having central administration role).
This local path will be referred to as <BIZAGI_WSP_PATH>.
This will uncompress these two WSP files.
•For SharePoint 2013, these are: Bizagi.SharePoint2013.wsp and Bizagi.SHP2013.FieldPass.wsp.
•For SharePoint 2010, these are: Bizagi.SharePoint.wsp, and Bizagi.SharePoint.FieldPass.wsp.
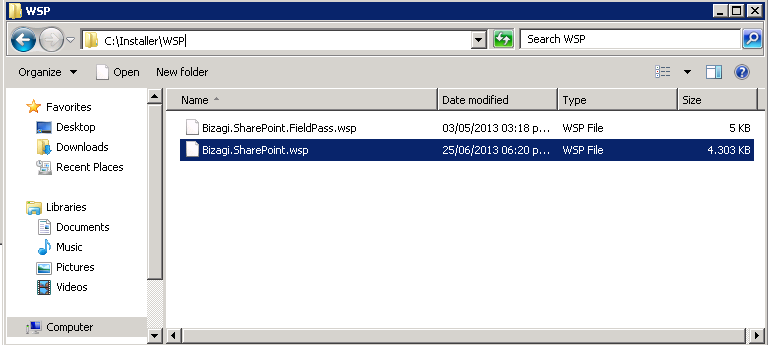
In this example, our <BIZAGI_WSP_PATH> is C:\Installer\WSP.
3. Run the SharePoint Management Shell.
Make sure you run it as an administrator.
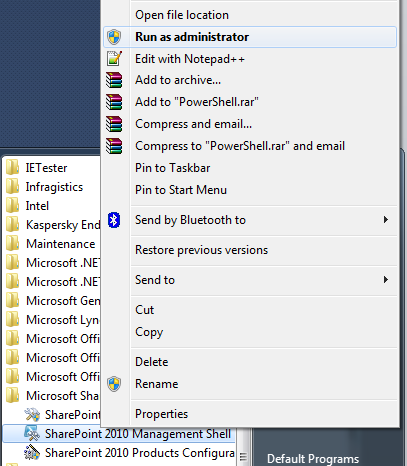
4. Run the following commands to install the 2 WSP files:
Add-SPSolution -LiteralPath <BIZAGI_WSP_PATH>\Bizagi.SharePoint.wsp
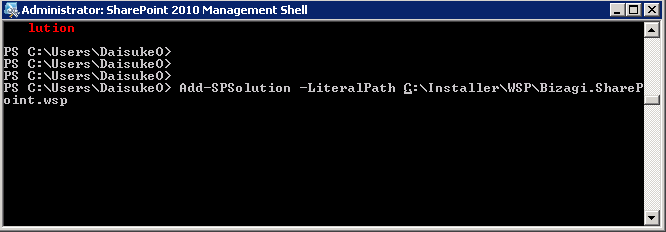
Once this is installed, run as well:
Add-SPSolution -LiteralPath <BIZAGI_WSP_PATH>\Bizagi.SharePoint.FieldPass.wsp
This command and wsp installs a set of controls used mainly when you configure the Web Parts connection to Bizagi.
|
If you already have the Web Parts installed, and need to do an upgrade (i.e to a newer release), run the following command: Update-SPSolution -Identity Bizagi.SharePoint.wsp -LiteralPath <BIZAGI_WSP_PATH>\Bizagi.SharePoint.wsp -GACDeployment |
5. Run the SharePoint Central Administration.

6. Browse to the System settings section, to the Farm Management options, and into the Manage farm solutions option.
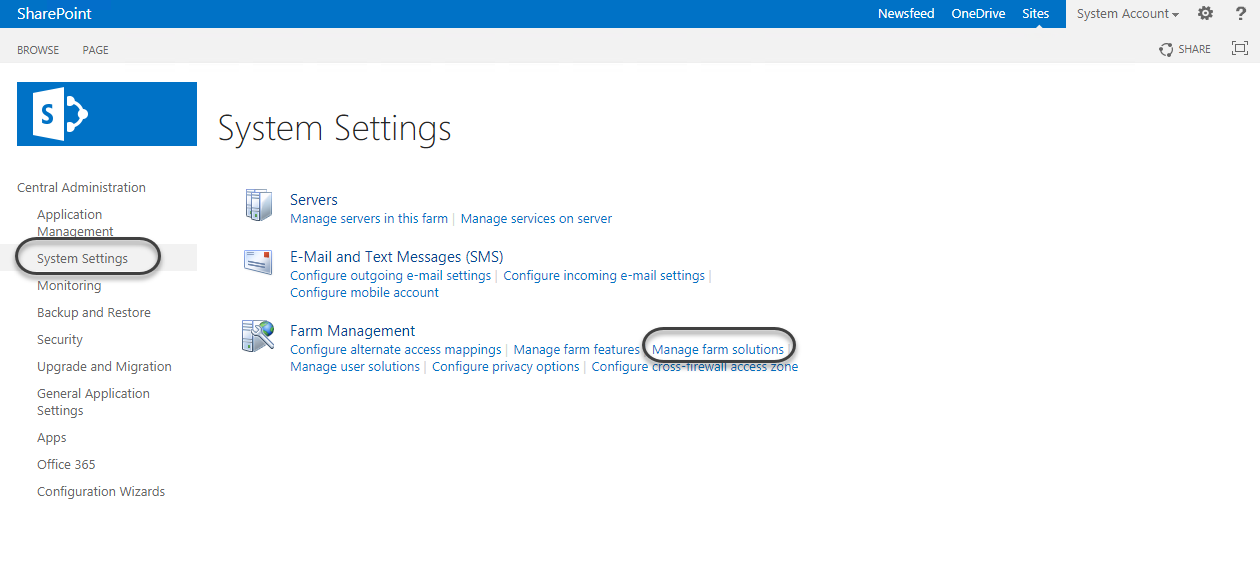
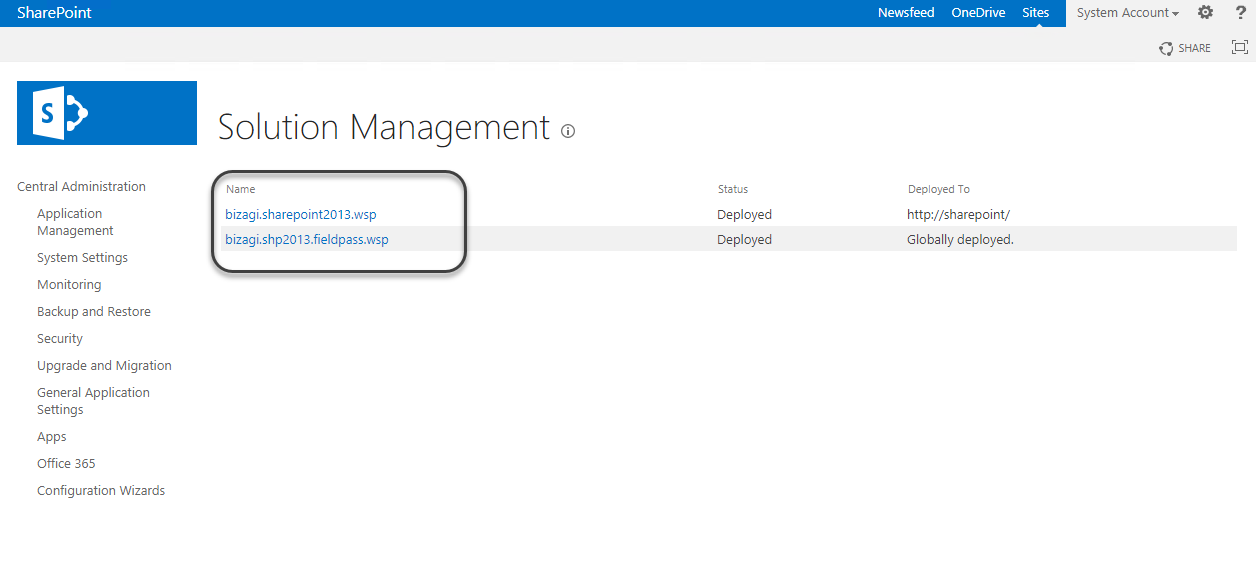
7. Deploy both WSP solutions.
Bizagi.SharePoint.wsp and Bizagi.SharePoint.Fieldpass.wsp.
To do this, first click bizagi.sharepoint.wsp.
Then click Deploy solution.
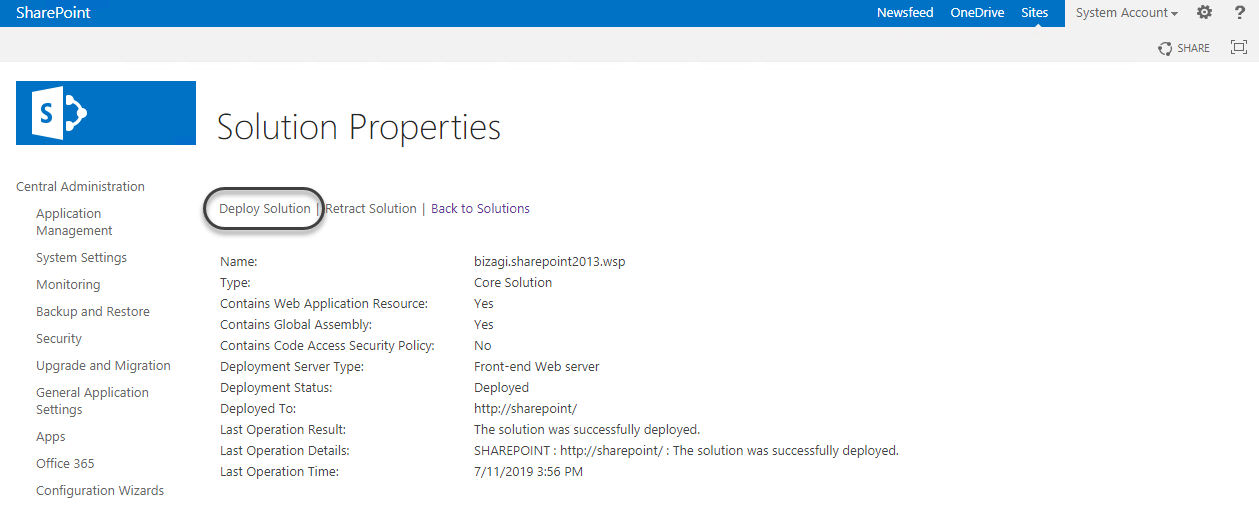
Make sure you select the specific sites on which you want to include Bizagi Web Parts.
Once you click OK, the SharePoint Central Administration will restart the application pools of your SharePoint sites when this deployment is executed (and it will temporarily disrupt the SharePoint site and its services).
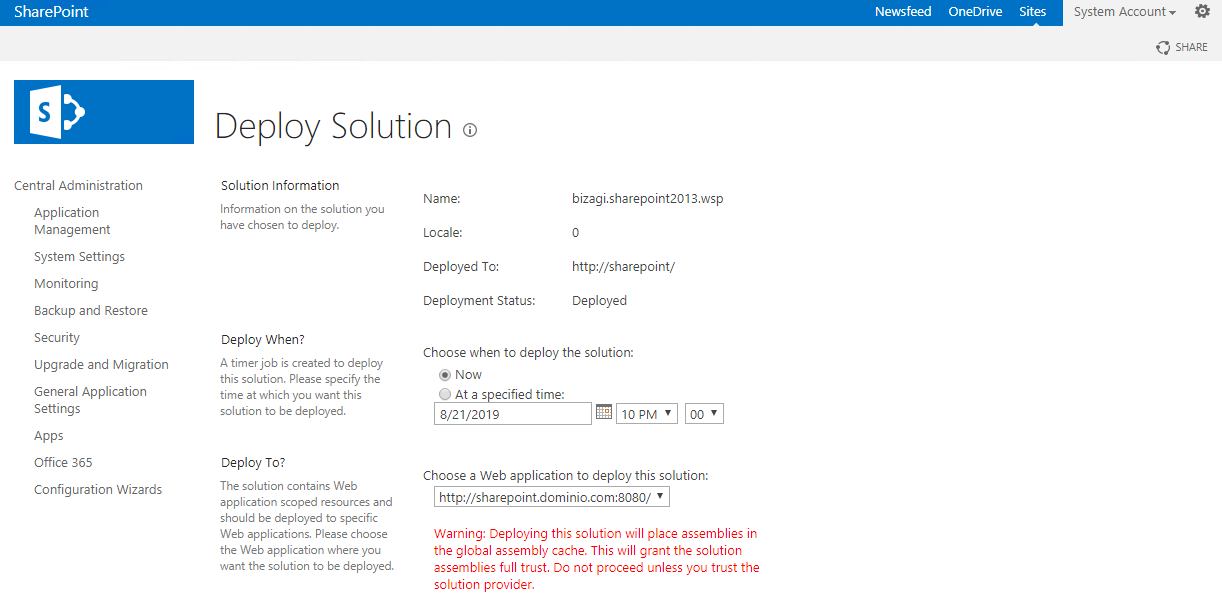
Repeat this step for bizagi.sharepoint.fieldpass.wsp.
That is, click it, and then on Deploy solution to run or schedule its deployment to the SharePoint sites.
You can verify a successful Web Parts installation by following the step described below.
Verifying the installation
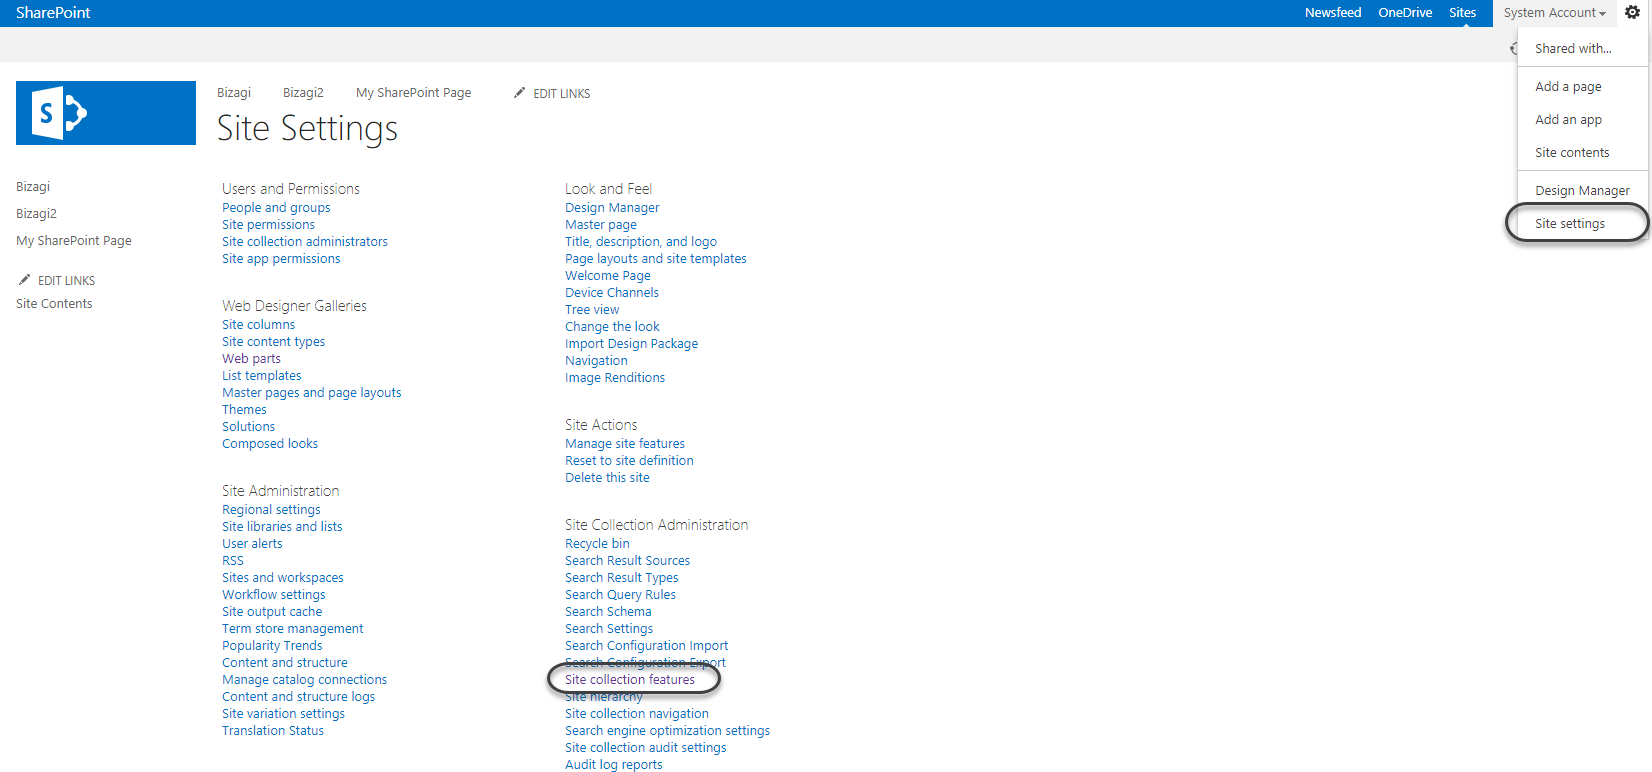
You can verify that Bizagi Web Parts were successfully installed by accessing your SharePoint site through a browser. Make sure that the Bizagi Web Parts components are active for your site collection by reviewing the Site collection features option:
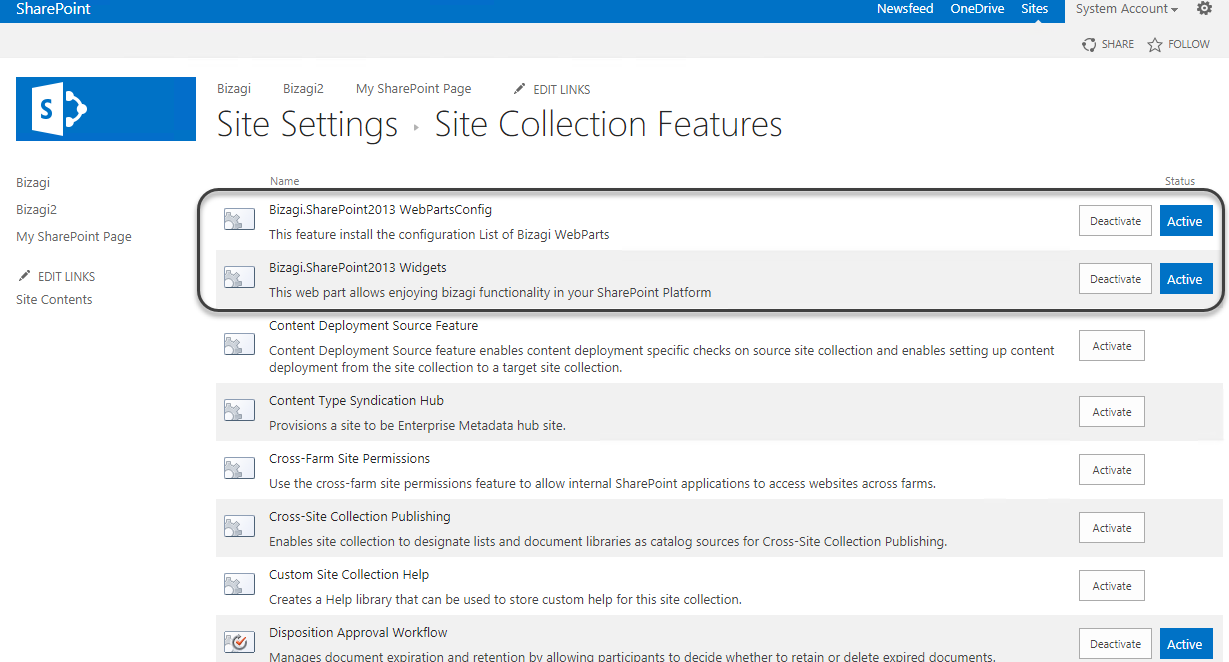
You should be able to see two Bizagi features installed and active: Bizagi.SharePoint.WebPartsConfig (used for the central Web Parts configuration), and Bizagi.SharePoint.Widgets (containing the actual Bizagi Web Parts).
|
No actions are needed for these verification steps. You may only need to reactivate the features (by using the Deactivate button and then the Activate button), to force a refresh of the Web Parts, but that is only if: you have recently updated the WSP file and the newer file contains new Bizagi Web Parts. |
Similarly, you may browse to the Web Parts option, and check that they are now listed at the SharePoint galleries:
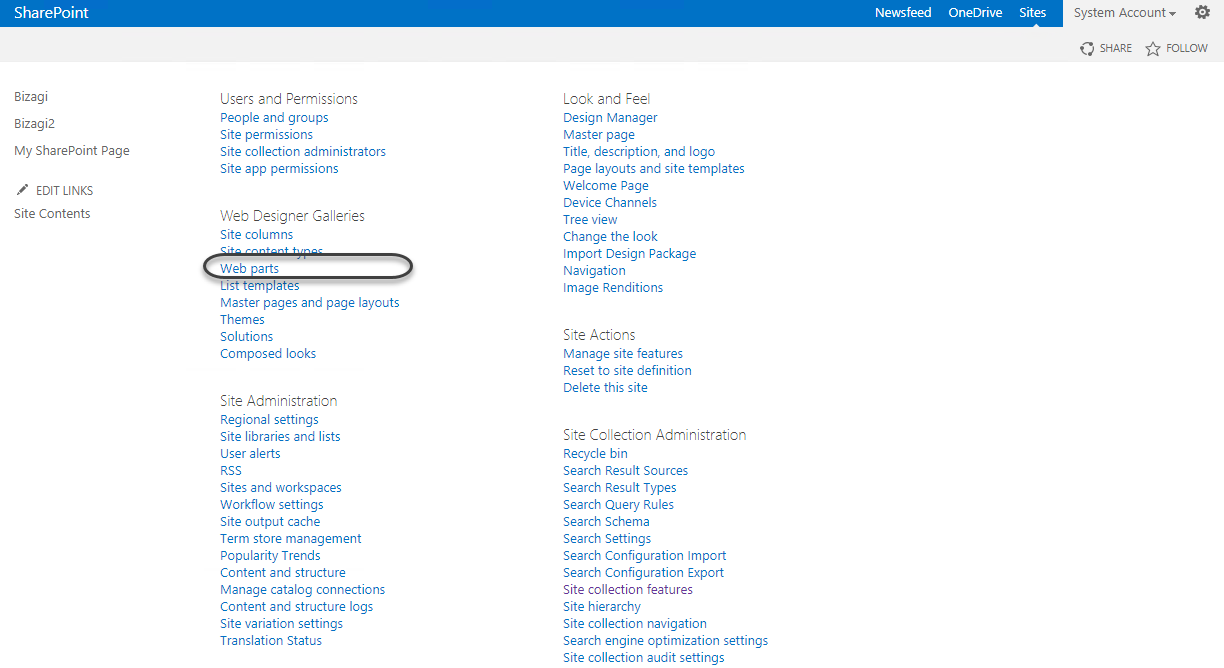
By sorting the list so it groups features which belong to the Bizagi group, you may see the newly listed Web Parts:

At this point, we are done installing Bizagi Web Parts in SharePoint and we have verified their successful installation!
The next step is to configure the connection to your Bizagi Work portal, so your SharePoint Web designer may include the Web Parts into SharePoint pages.
For more information about the next step, refer to Configuring Bizagi Web Parts.
Web Parts upgrades and uninstall
If you are updating to a newer Bizagi Web Parts installation or uninstalling the Web Parts, run the installer as well.
You see the options to upgrade the installed version or remove the installed Web Parts:

Last Updated 1/31/2023 10:24:16 AM