Overview
You can use an Excel file to import users in Bizagi. However to do that you need to build a process where you upload the file, and using a business rule, import users.
What you need to do
The general outline to build the Bizagi process mentioned above, has three main steps:
1. Download, customize or create an Excel connector
To read the incoming information of users from an Excel file, you will need an specialized Bizagi Connector.
You can create a connector using our Connector Editor, or download the one used in this example.
At this point, you should already know which format (i.e, columns definitions) you will employ for user information.
2. Implement the basics of the Bizagi process
Create a process using Bizagi Studio which expects as input an Excel file with the users to be added or synchronized to your project.
When modeling the process, you define basic aspects such as the data model employed and the user interfaces.
At this point you can also add other configuration aspects to the process, such as making sure it has adequate access rights (i.e, restricted to non-admins).
3. Define processing rules
Define business rules to be executed to interpret incoming information.
Example
In this example, all users are uploaded to a single organization (the default one), using the following attributes:
•Username: should be unique per user, when combined with the Domain information.
•Email: should be unique per user.
•Full Name
•Domain: should be unique per user, when combined with the Username information.
•Role: this information has a multiple relationship with users. One user may have multiple roles, and a same role can be applicable to many users.
•Enabled
•Persona: this information has a multiple relationship with users. One user may be multiple Persona, and a same Persona can be applicable to many users.
Because a single user can have more than one role, it is best to have multiple rows in the Excel file where each row defines a role for a user (so a users basic information could be repeated within several rows).
The structure of the Excel file employed in this example is:
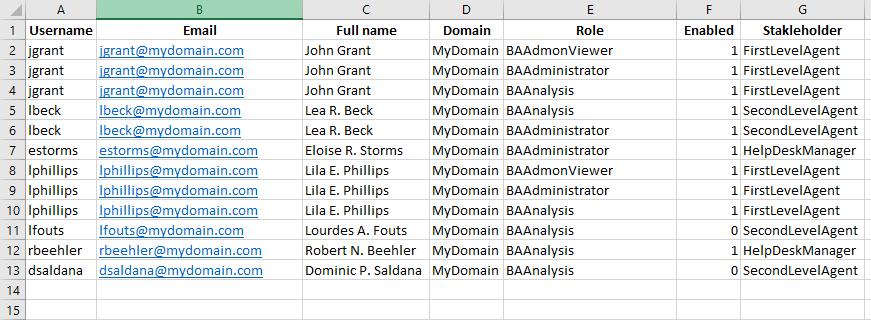
If you want to reuse this Excel file so that it works with the example in this article, download it from: https://resources.bizagi.com/docs/UsersUploadSample.xlsx.
Procedure
Follow these steps:
1. Download, customize or create an Excel connector
Download a ready-to-use connector to use with this example from https://resources.bizagi.com/docs/Read Users From Excel.bizc.
Alternatively, create a connector from scratch or edit the downloaded one using our Connector Editor.
In the end, you should have a connector which complies to the Excel file structure, in a .bizc file:
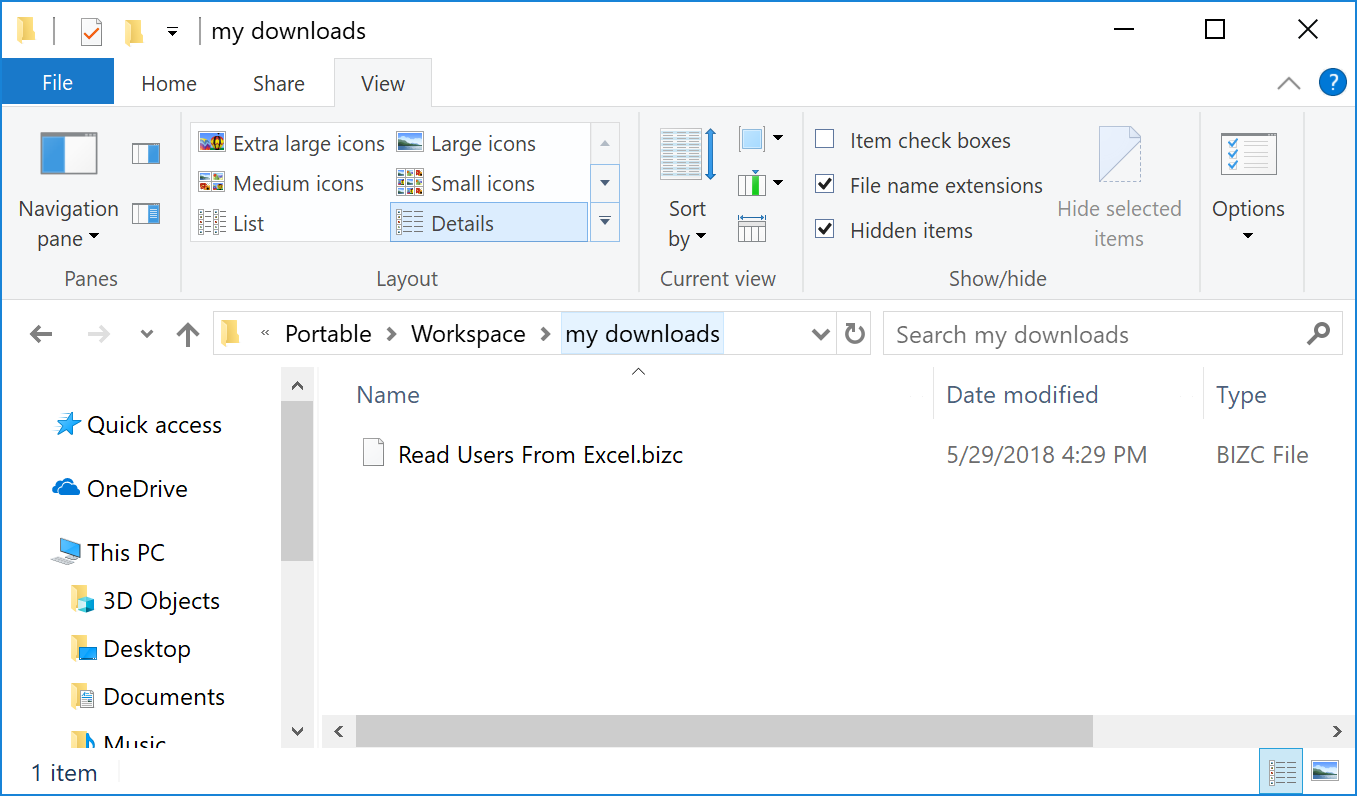
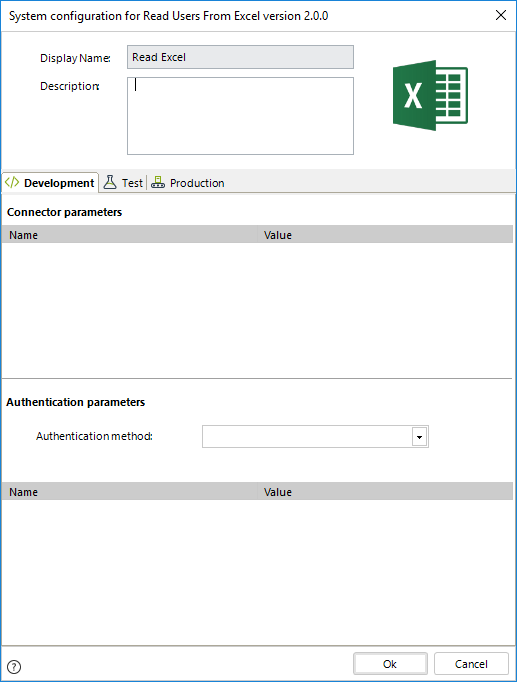
When you move to Bizagi Studio, you should make sure you install and create an instance of this connector.
Its configuration demands no specific settings:
2. Implement the basics of the Bizagi process
This step is about using Bizagi Studio to implement the process to import, update or disable users, through assisted steps.
2.1 Model the process
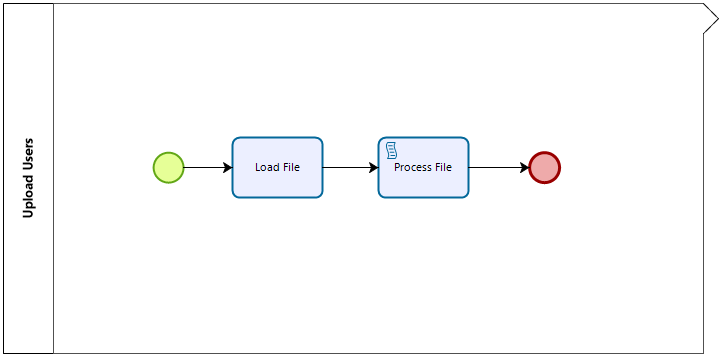
Model a process consisting of just two activities: a manual activity in which you upload the Excel file, and a system activity which processes the file.
The following image illustrates this model:
2.2 Define the data model
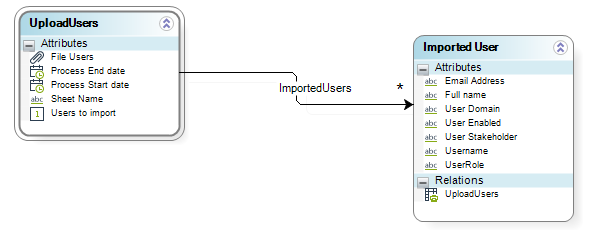
Define a data model to support this process's use case. It needs a collection to temporarily store users, a file attachment attribute to capture the incoming Excel file, and other data for configuration so you can target specific information within the Excel file.
The following image illustrates the suggested data model:
2.3 Design the user interfaces
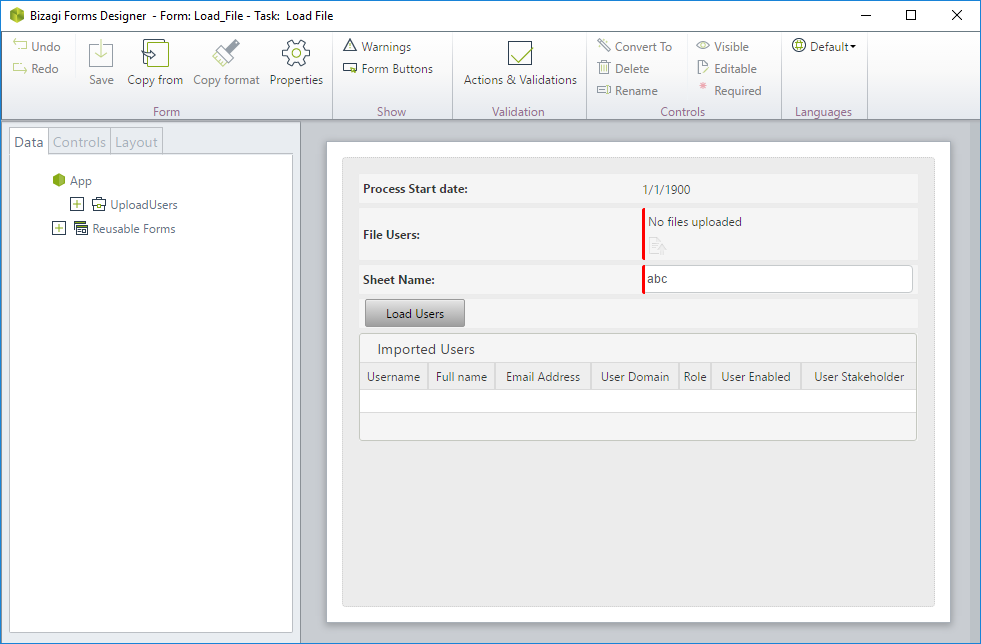
The only activity in this process which needs user intervention is the Load File activity.
Create a form like the following to support uploading the Excel file and previewing the records it holds.
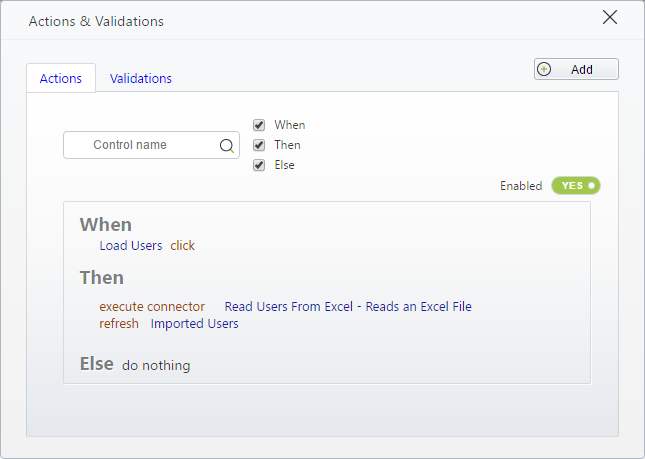
For this form, create an action to execute the connector (to fetch all information coming from the uploaded Excel file).
The actions should be set as suggested in the following image:
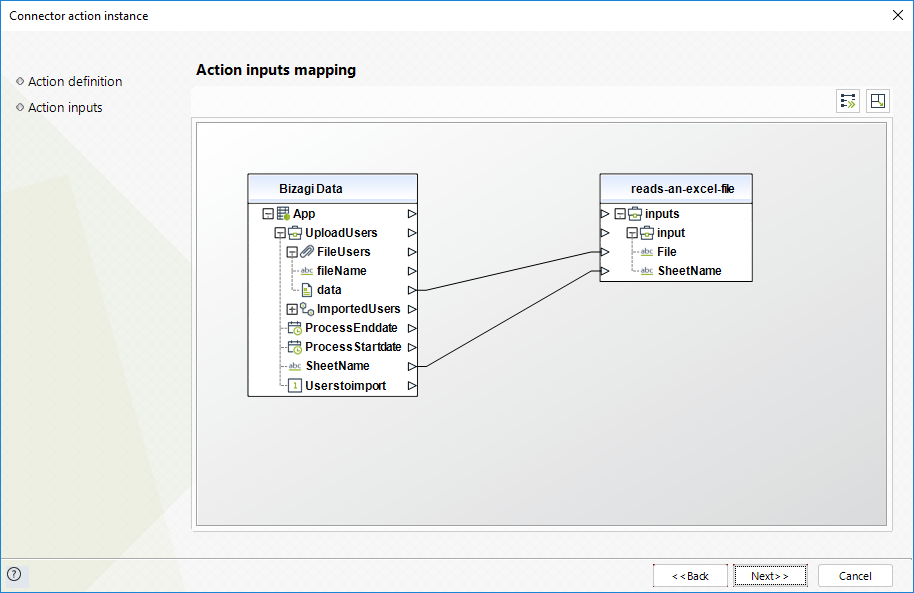
Inputs for executing the connector are the following:
Outputs for the execution of the connector are the following:
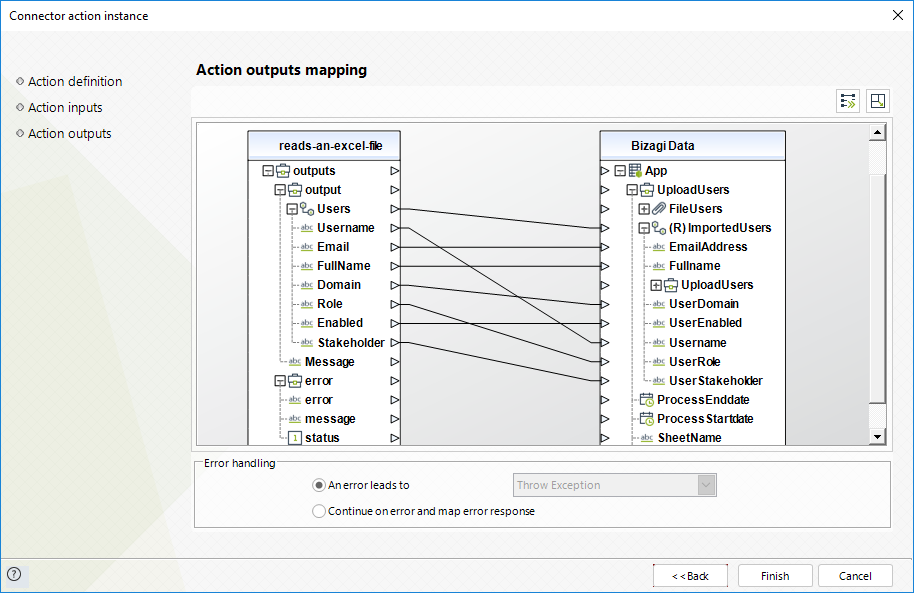
No error handling configuration is needed.
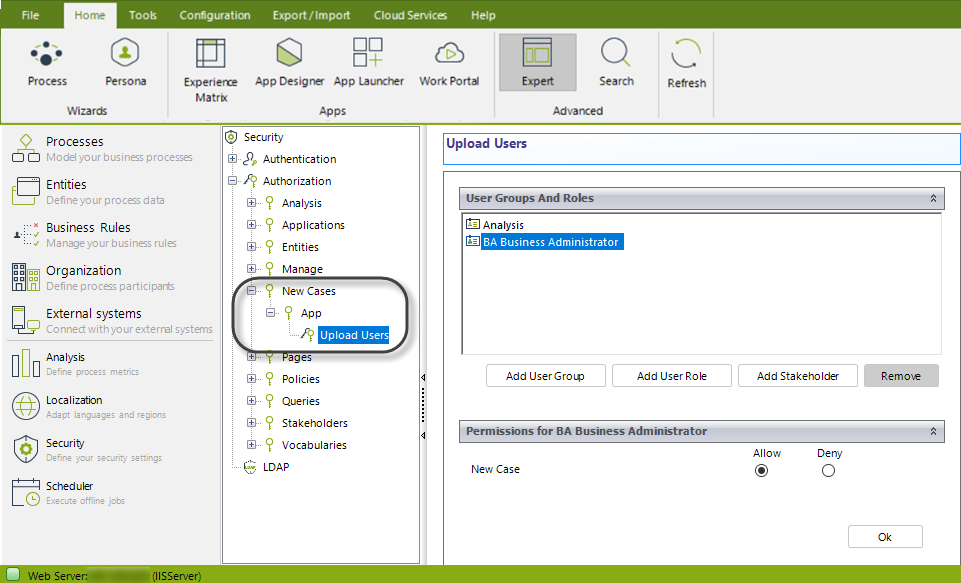
2.4 Grant access rights for case creation to admin users
At this point we recommend you carry out configuration tweaks such as granting access to this process to admin users only.
3. Define processing rules
Now that the basics have been taken care of, you can create rules that process what has been temporarily stored in a collection to the final users entity.
|
The Process File activity is where the uploaded file is processed. As mentioned before, the Excel file has a multiple relation property (Role), so the processing need to make sure that multiple user entries or duplicates of existing users are not imported. |
3.1 Define rules as activity actions
Create the following Expression in the On Exit event of the activity as shown below:
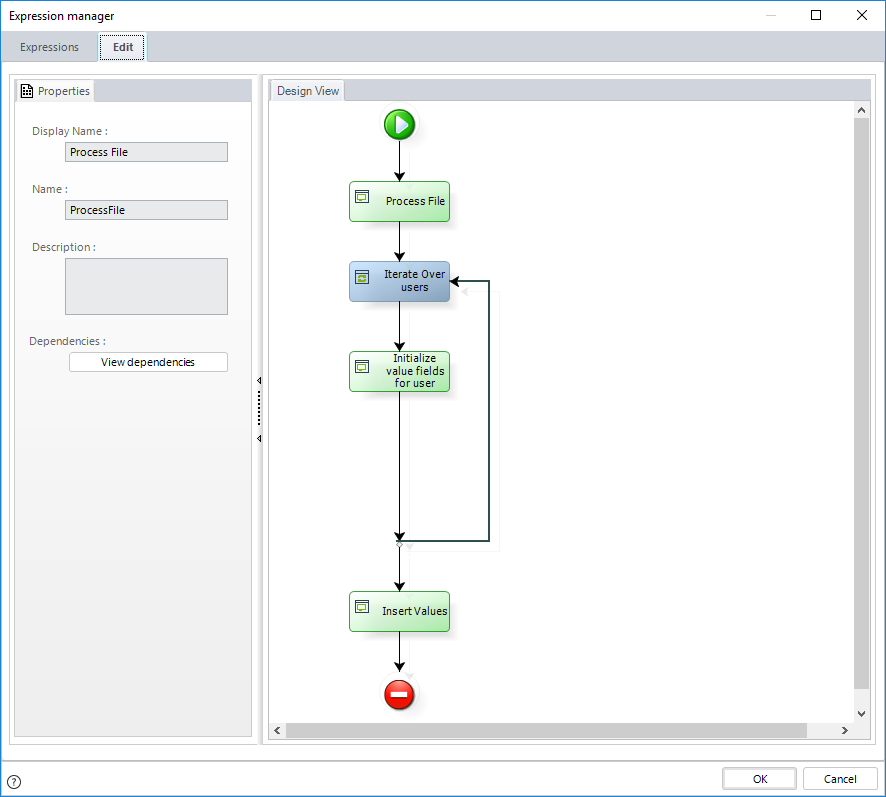
To do this, first declare variables as we suggest below:
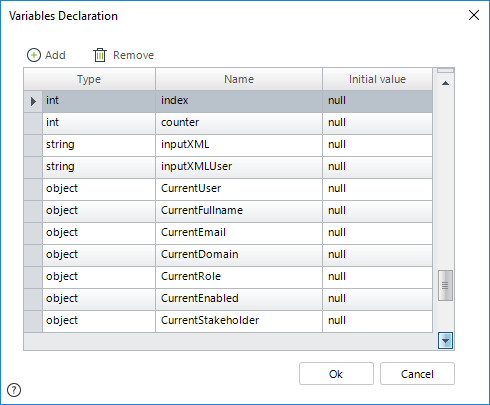
Type |
Name |
Initial Value |
|---|---|---|
int |
index |
Index of the current element in the list of imported users |
int |
counter |
Number of users imported |
string |
inputXML |
String to be executed using the Bizagi SOA Layer |
string |
inputXMLUser |
String with the XML of a user |
List |
CurrentUser |
Collection to control that a user is not processed more than once |
List |
CurrentFullname |
Collection to control that a user with multiple roles does not have different full names |
List |
CurrentEmail |
Collection to control that a user with multiple roles does not have different emails |
List |
CurrentDomain |
Collection to control that a user with multiple roles does not have different domains |
List |
CurrentRole |
Collection to control that a role is not assigned more than once to the same user |
List |
CurrentEnabled |
Collection to control that a status is not assigned more than once to the same user |
List |
CurrentPersona |
Collection to control that an Persona is not assigned more than once to the same user |
3.2 Add coding into the first expression box
For the Process file graphical expression box in the image above, add the following code:
// Get a collection with the users uploaded. Use this method to return a collection even if only one record is sent
var colUsers = CHelper.GetValueAsCollection(<UploadUsers.ImportedUsers>);
// number of records in the file
counter = colUsers.size();
// This collections lets you control that a user with multiple roles does not have multiple domains, full names, etc.
CurrentUser = new ArrayList();
CurrentDomain = new ArrayList();
CurrentEmail = new ArrayList();
CurrentFullname = new ArrayList();
CurrentRole = new ArrayList();
CurrentEnabled = new ArrayList();
CurrentPersona = new ArrayList();
// Pploading of the users is done through the Bizagi SOA Layer.
inputXML = "<BizAgiWSParam>";
inputXML += "<Entities>";
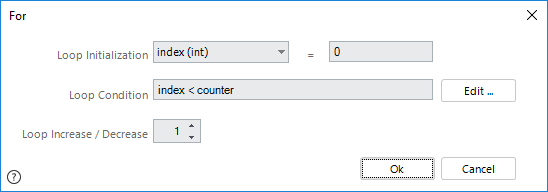
3.3 Configure the For graphical element
For the Iterate over users graphical element, configure the following:
3.4 Add coding into the second expression box
For the Initialize value fields for user graphical expression box shown in the image in the step 3.1, add the following code:
// gets the i-th user
var oUser = colUsers.get(index);
var sUsername = oUser.getXPath("Username");
// This variable is to search if a user already exists
var sSearchDomain = "";
// If the user is already in the collection, this user will not be processed
if(!CurrentUser.Contains(sUsername.ToLower())) {
CurrentUser.Add(sUsername.ToLower());
inputXMLUser = "<WFUSER>";
inputXMLUser += "<userName>" + sUsername + "</userName>";
inputXMLUser += "<Organizations><idOrg key=\"1\"/></Organizations>";
// The collections are cleared to start over again
CurrentFullname.Clear();
CurrentEmail.Clear();
CurrentRole.Clear();
CurrentDomain.Clear();
CurrentEnabled.Clear();
CurrentPersona.Clear();
var colUsernames = CHelper.GetValueAsCollection(<UploadUsers.ImportedUsers>);
// New iteration to get multiple values for the current user
for(var i = 0; i < colUsernames.size(); i++) {
var oUsername = colUsernames.get(i);
if(oUsername.getXPath("Username").ToLower().Trim() == sUsername.ToLower()) {
var sFullName = oUsername.getXPath("Fullname");
var sEmail = oUsername.getXPath("EmailAddress");
var sDomain = oUsername.getXPath("UserDomain");
var sRole = oUsername.getXPath("UserRole");
var sEnabled = oUsername.getXPath("UserEnabled");
//To add single attributes, the attribute must not be empty and:
//if the collection is empty, the attribute has to be added
//if the collection contains the given attribute, this will not be processed
//if the collection does not contain the given attribute and is not empty, an error must be thrown
//set domain
if(sDomain && !CurrentDomain.Contains(sDomain.ToLower().Trim())) {
CurrentDomain.Add(sDomain.ToLower().Trim());
// set the domain to search if the user exists
sSearchDomain = sDomain;
if(CurrentDomain.Count > 1)
CHelper.ThrowValidationError("Username " + sUsername + " has different Domains");
sDomain = sDomain.Replace(" ", "");
inputXMLUser += "<domain>" + sDomain + "</domain>";
}
//set fullname
if(sFullName && !CurrentFullname.Contains(sFullName.ToLower().Trim())){
CurrentFullname.Add(sFullName.ToLower().Trim());
if(CurrentFullname.Count > 1)
CHelper.ThrowValidationError("Username " + sUsername + " has different Fullnames");
inputXMLUser += "<fullName>" + sFullName.Trim() + "</fullName>";
}
//set email
if(sEmail && !CurrentEmail.Contains(sEmail.ToLower().Trim())){
CurrentEmail.Add(sEmail.ToLower().Trim());
if(CurrentEmail.Count > 1)
CHelper.ThrowValidationError("Username " + sUsername + " has different Emails");
inputXMLUser += "<contactEmail>" + sEmail.Trim() + "</contactEmail>";
}
//set enabled
if(sEnabled && !CurrentEnabled.Contains(sEnabled.Trim())){
sEnabled = sEnabled.Trim();
if(sEnabled != "1" && sEnabled != "0")
CHelper.ThrowValidationError("Username " + sUsername + " has an invalid status");
CurrentEnabled.Add(sEnabled);
if(CurrentEmail.Count > 1)
CHelper.ThrowValidationError("Username " + sUsername + " has different status");
inputXMLUser += "<enabled>" + sEnabled + "</enabled>";
}
//To add multiple attributes, the attribute must not be empty and:
//if the collection is empty, the attribute has to be added
//if the collection contains the given attribute, it will not be processed
//set multiple roles
var sPersona = oUsername.getXPath("UserPersona");
if(!sPersona)
sPersona = "EmptyStk2018";
if(sRole && !CurrentRole.Contains(sRole.ToLower().Trim())){
CurrentRole.Add(sRole.ToLower().Trim());
sRole = sRole.Replace(" ", "");
var parameters = new FilterParameters();
parameters.AddParameter("@roleName", sRole.ToLower());
var iRoleId = CHelper.getEntityAttrib("Role","idRole","LOWER(roleName) = @roleName",parameters);
if(!iRoleId)
CHelper.ThrowValidationError("The Role " + sRole + " does not exist.");
inputXMLUser += "<Roles><idRole key='" + iRoleId + "'/></Roles>";
}
//Personas may be empty
if(!CurrentPersona.Contains(sPersona.ToLower().Trim())) {
CurrentPersona.Add(sPersona.ToLower().Trim());
if(sPersona != "EmptyStk2018") {
sPersona = sPersona.Replace(" ", "");
inputXMLUser += "<Personas><"+sPersona+"><a></a></"+sPersona+"></Personas>";
}
}
}
}
//Validations
//If any required user attributes is empty
if(CurrentDomain.Count == 0)
CHelper.ThrowValidationError("No domain was set for user " + sUsername);
if(CurrentFullname.Count == 0)
CHelper.ThrowValidationError("No full name was set for user " + sUsername);
if(CurrentEmail.Count == 0)
CHelper.ThrowValidationError("No email was set for user " + sUsername);
if(CurrentRole.Count == 0)
CHelper.ThrowValidationError("No roles was set for user " + sUsername);
if(CurrentEnabled.Count == 0)
CHelper.ThrowValidationError("No status was set for user " + sUsername);
//Serch for the user with the domain to see if the user already exists
var parameters = new FilterParameters();
parameters.AddParameter("@userName", sUsername);
parameters.AddParameter("@domain", sSearchDomain);
var oUserCount = Me.getXPath("entity-list('WFUSER','userName = @userName AND domain = @domain')",parameters);
if(oUserCount.size() == 1) {
inputXMLUser = inputXMLUser.Replace("<WFUSER>", "<WFUSER businessKey=\"userName = '" + sUsername + "' AND domain = '" + sSearchDomain + "'\">");
}
//Close the XML of the user
inputXMLUser += "</WFUSER>";
//Add the user XML to the XML to be processed
inputXML += inputXMLUser;
<UploadUsers.ProcessEnddate> = DateTime.Now;
}
3.5 Add coding into the third expression box
For the Insert values graphical expression box shown in the image in step 3.1, add the following code:
//Close the XML string
inputXML += "</Entities>";
inputXML += "</BizAgiWSParam>";
//save records
var sResult = CEntityXmlHelper.fromXmlToEntity(inputXML);
Execution
When you are done, run the process to test it thoroughly in your Development environment.
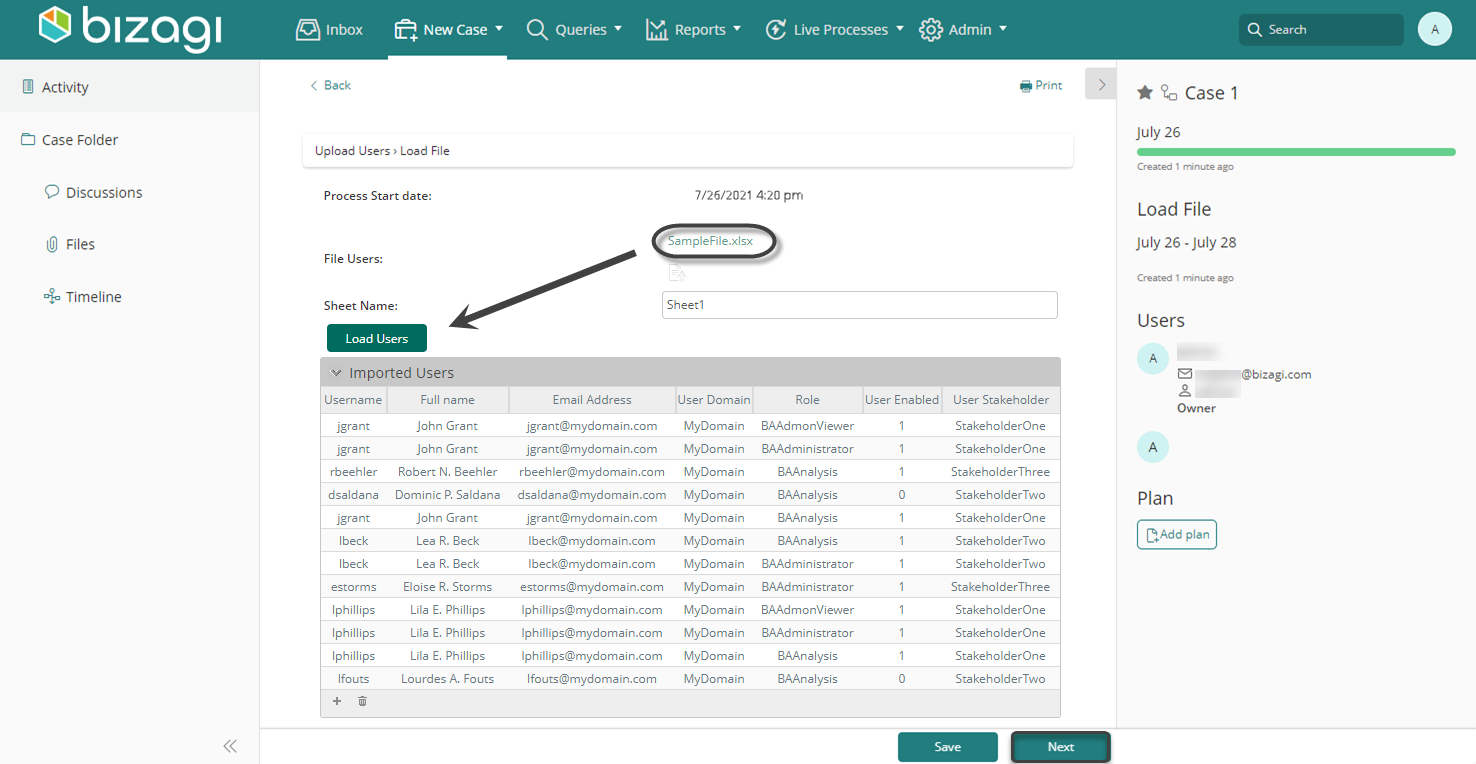
Create a new case, upload the sample Excel file, and click the Load users button to preview the information. Finally, click Next.
Once you have verified everything works adequately in your development and Testing environments, you can deploy this process to Production environments.
What's next?
The procedure described here is recommended for every project.
Nevertheless, you may customize the process and how it is executed. For instance:
•If you need to consider additional user attributes, such as user properties, you need to customize and update the connector used for this purpose so that it fetches other information. You would also need to include these additional attributes in your data model and within the business rules that process the uploaded information.
•On top of this process, you can rely on Bizagi SOAP web services. This means that you could choose to avoid creating the cases manually and further automate user management by having a SOAP web services client periodically invoke the Bizagi SOAP createCasesAsString web method.
Last Updated 6/9/2023 3:30:00 AM