Methods
The CHelper is an object that contains a group of functions used to perform operations or get information about non-contextualized information. Non-contextualized means that these functions are not necessarily related to the case or BPMN element where the rule is executed. So you can operate two numbers, or get information from other elements in the project.

|
The rules described in this API apply for the latest version available only. Previous versions are not considered. |
|---|
Inheritance
Inherited Members
Namespace: CHelper
Assembly: BizagiApiDoc.dll
Syntax
public class MethodsMethods
View SourceabortProcess(ICAPIWorkItem, Int32, EProcessAbortOptions, String)
Sometimes it is needed to abort a process. Bizagi offers a function that can abort cases and those related to them.
The abort options parameter receives the following options:
- 1- Abort the process and its children.
- 2- Abort the process, its children, parent, and siblings.
- 3- Abort the process's parent process, its siblings and children excluding the process received as parameter.
Syntax
CHelper.abortProcess(ICAPIWorkItem Me, int iCaseId, EProcessAbortOptions eAbortOptions, string sAbortReason)Declaration
public static void abortProcess(ICAPIWorkItem Me, int iCaseId, EProcessAbortOptions eAbortOptions, string sAbortReason)Parameters
| Type | Name | Description |
|---|---|---|
| ICAPIWorkItem | Me | This parameter is fixed |
| System.Int32 | iCaseId | The ID for the case to be aborted |
| EProcessAbortOptions | eAbortOptions |
The type of operation you wish to execute. The available types are:
|
| System.String | sAbortReason | A string where the abort reason is given |
Examples
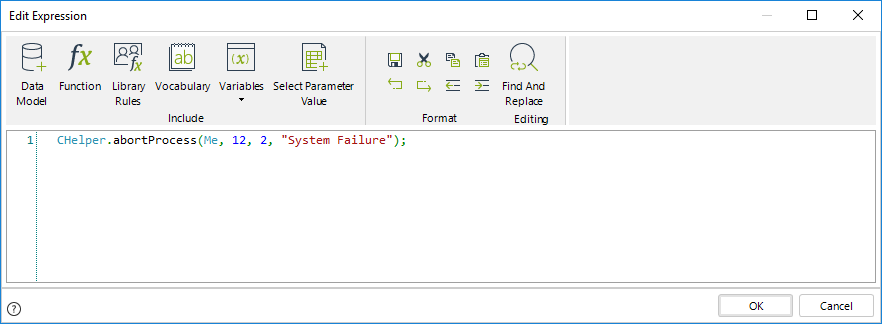
Let's suppose we need to abort case number 12, its parent,
siblings, and children. The expression would be as follows:
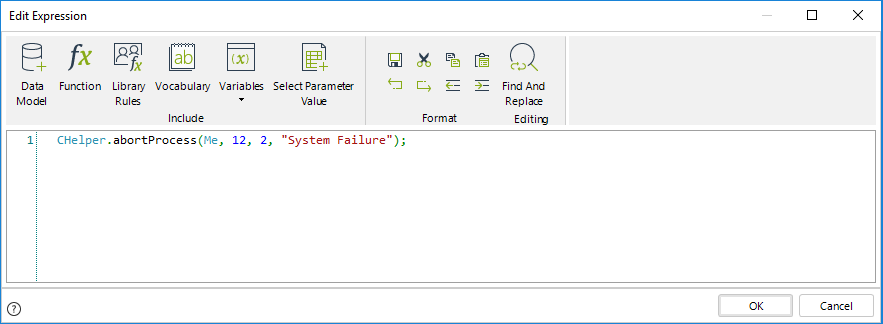
CHelper.abortProcess(Me, 12, 2, "System Failure");
To abort only the case and its children, the expression would
be:
CHelper.abortProcess(Me, 12, 1, "System Failure");
Finally, to abort the case's parent, siblings, and children
ignoring the case, the expression would be:

CHelper.abortProcess(Me, 12, 3, "System Failure");ClearCaseAccess(ArrayList)
Overview
The following expression removes all the users with access to the list of cases, including the creator user. It is strongly recommended to grant access to a user after using this method. Otherwise, the case will be inaccessible.
Syntax
CHelper.ClearCaseAccess(ArrayList idCases)Declaration
public static void ClearCaseAccess(ArrayList idCases)Parameters
| Type | Name | Description |
|---|---|---|
| System.Collections.ArrayList | idCases | Array with idcases |
Examples
Expression to clear the access to a list of cases
For revoking the access to the children cases of the current case, you need to clear the access to the case and its children and grant access to these users using an expression.
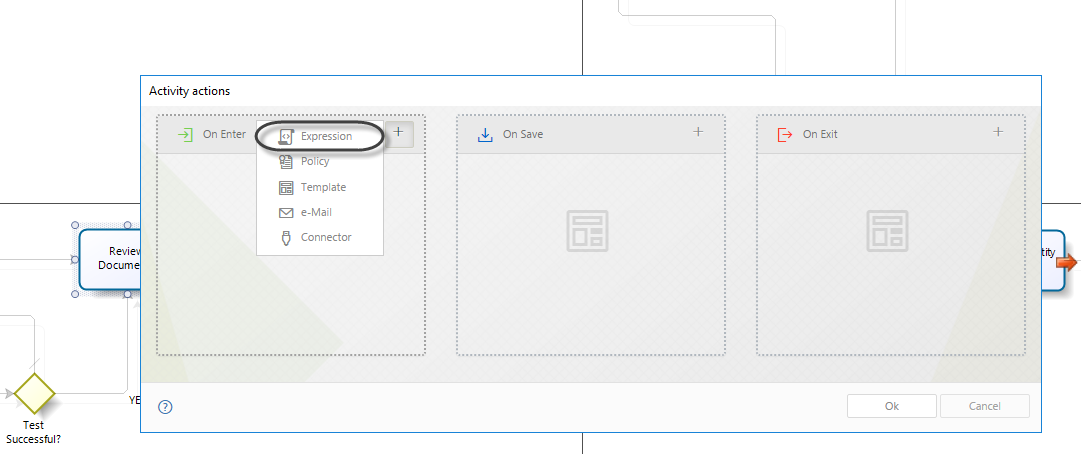
In step four of the Process Wizard, select Activity Actions to create an expression On Enter of the activity.
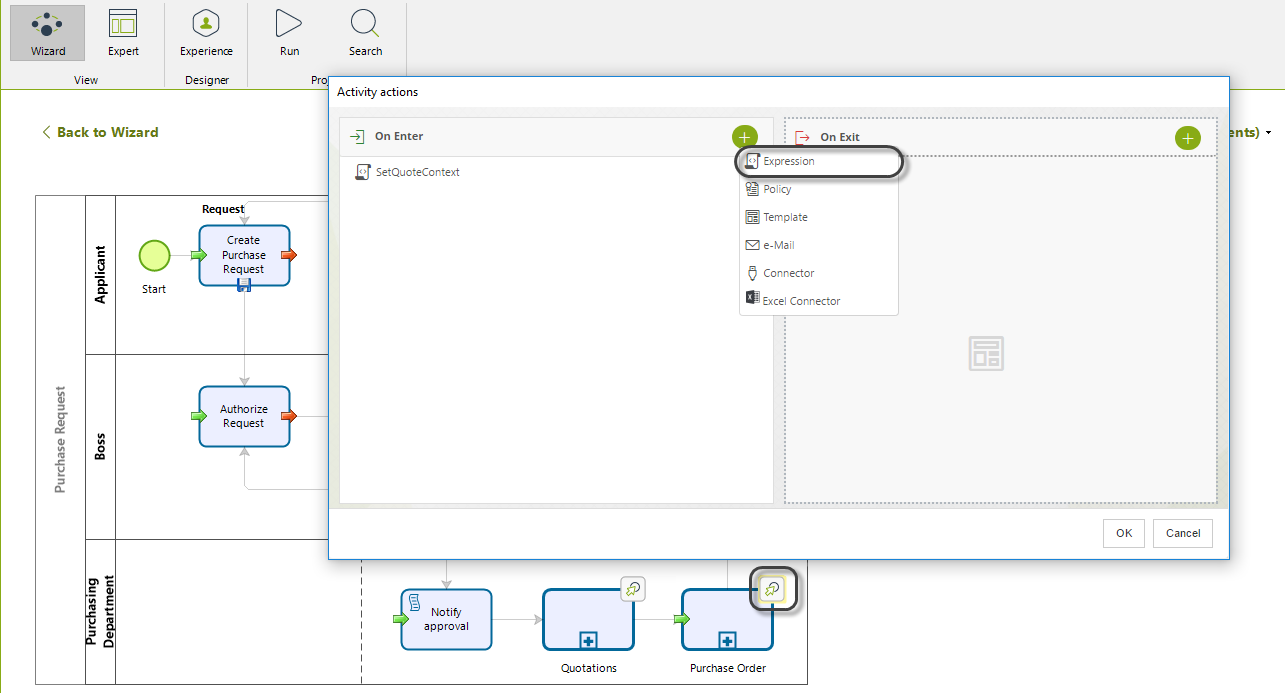
The expression revokes the access to the case to all the users, including the case creator. Then, it retrieves the users in the Purchases area to grant access to them.

//Get subprocesses Ids
var CasesArray=CHelper.getSubProcessesId(Me);
//Add the current case Id.
CasesArray.Add(Me.Case.Id);
//Clear the access to the current case
CHelper.ClearCaseAccess(CasesArray);
//Get the id of the Purchases area
var AreaId=CHelper.getEntityAttrib("Area","idArea","areaName ='Purchases'");
//Get the list of users in the Purchase Area
UserList = Me.getXPath("entity-list('WFUSER','idArea = " + AreaId + "')");
for (Counter=0; UserList.size()>Counter;Counter++)
{
//Get the user id
IdUser=UserList[Counter].getXPath("Id");
//Validate there are no duplicities
if(!MyArray.Contains(IdUser))
{
//Store users
       MyArray.Add(IdUser);
}
}
//Grant access to the users list
CHelper.GrantCaseAccessToUsers(Me.Case.Id,MyArray);ClearCaseAccess(Int32)
The following expression removes all the users with access to the case, including the creator user. It is strongly recommended to grant access to a user after using this method. Otherwise, the case will be inaccessible.
Syntax
CHelper.ClearCaseAccess(int idCase)Declaration
public static bool ClearCaseAccess(int idCase)Parameters
| Type | Name | Description |
|---|---|---|
| System.Int32 | idCase | Case id |
Returns
| Type | Description |
|---|---|
| System.Boolean |
Return value is true if the operation is successful |
Examples
Expression to clear the access to a case
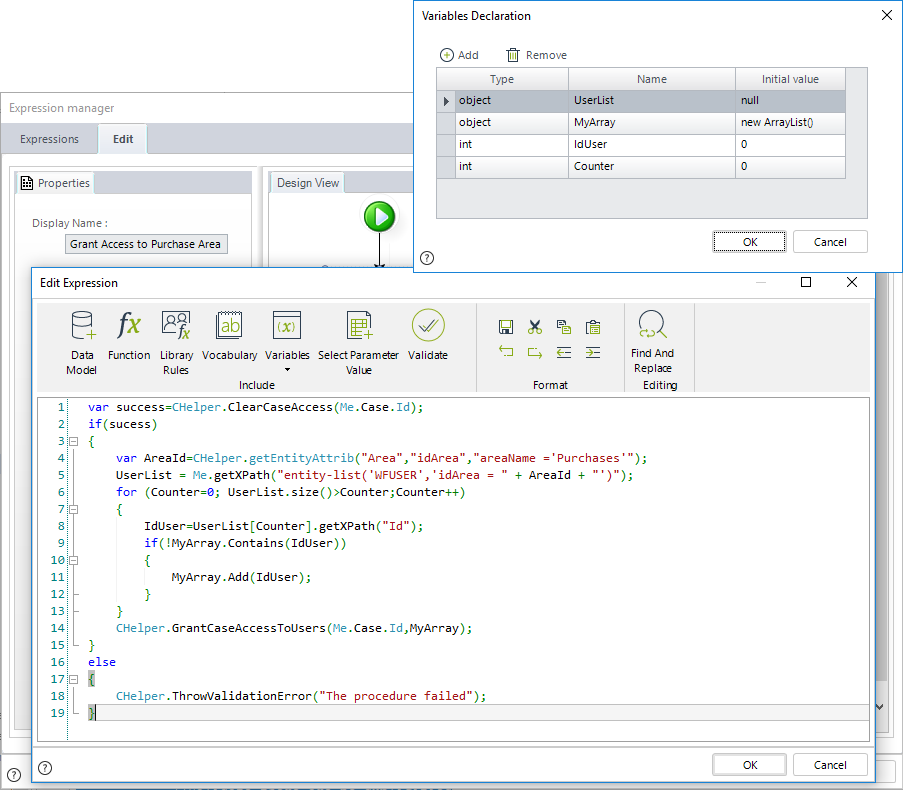
In a Purchase Request Process of the example mentioned in Grant case access Due to security reasons, when the process reaches the Purchase Order Sub-process, we need to revoke the access to this case to all the users and grant access only to the users of the Purchase area, the users in this area may not have any assignment in such cases. Therefore, you need to clear the access to the case
In step four of the Process Wizard, select the Activity Actions to create an expression On Enter of the Activity.
The expression revokes the access to the case to all the users, including the case creator. Then, it retrieves the users in the Purchases area to grant access to them.
//Clear the access to the current case
var success=CHelper.ClearCaseAccess(Me.Case.Id);

//If the procedure is success, add the Users in Purchase areas.
//If the procedure is success, add the Users in Purchase areas. Otherwise, throws an error
if(success)
{
//Get the id of the Purchases area
var AreaId=CHelper.getEntityAttrib("Area","idArea","areaName ='Purchases'");
//Get the list of users in the Purchase Area
UserList = Me.getXPath("entity-list('WFUSER','idArea = " + AreaId + "')");
for (Counter=0; UserList.size()>Counter;Counter++)
{
       //Get the user id
       IdUser=UserList[Counter].getXPath("Id");
       //Validate there are no duplicities
       if(!MyArray.Contains(IdUser))
       {
       //Store users
               MyArray.Add(IdUser);
       }
}
//Grant access to the users list
CHelper.GrantCaseAccessToUsers(Me.Case.Id,MyArray);
}
else
{
// Throw an error if the case access could not be cleared
CHelper.ThrowValidationError("The procedure failed");
}ConcatDocumentsFromFilesArrayToPDF(ArrayList)
Overview
This section describes how to use the feature to concatenate documents from a files array.
Syntax
CHelper.ConcatDocumentsFromFilesArrayToPDF(ArrayList filesArray)Declaration
public static byte[] ConcatDocumentsFromFilesArrayToPDF(ArrayList filesArray)Parameters
| Type | Name | Description |
|---|---|---|
| System.Collections.ArrayList | filesArray | List of files to concatenate |
Returns
| Type | Description |
|---|---|
| System.Byte[] |
A PDF file with the concatenation of the files within the array as a binary array |
Examples
In the following sample process, assume we have a process entity called OfficeSupplyRequest.
Such process uses the following data model:

We want the attribute Request Summary to have all the documents uploaded to the Quotations collection. To do so, we will use the Concatenate documents from files array method.

|
The documents to concatenate should be the same format, either PDF or Microsoft Word document. Otherwise, the method will not work correctly. |
|---|
Concatenating PDF Documents
In this case, the syntax of the function is:
CHelper.ConcatDocumentsFromFilesArrayToPDF(filesArray)The main parameters of this function are:
•The filesArray: the array of File data to be concatenated.
To concatenate the files of our example we will need an expression box:

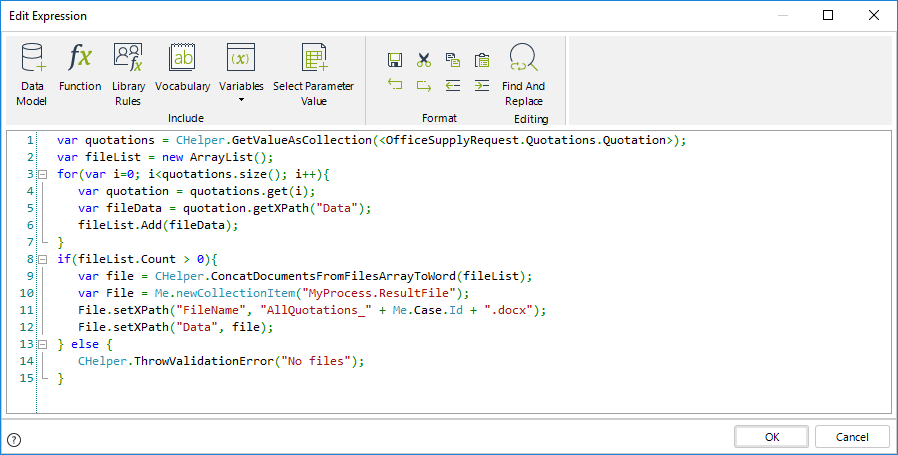
The expression above is as follows:
var quotations = CHelper.GetValueAsCollection(<OfficeSupplyRequest.Quotations.Quotation>);
var fileList = new ArrayList();
for(var i=0; i<quotations.size(); i++)
{
var quotation = quotations.get(i);
var fileData = quotation.getXPath("Data");
fileList.Add(fileData);
}
if(fileList.Count > 0)
{
var file = CHelper.ConcatDocumentsFromFilesArrayToPdf(fileList);
var File = Me.newCollectionItem("MyProcess.ResultFile");
File.setXPath("FileName", "AllQuotations_" + Me.Case.Id + ".pdf");
File.setXPath("Data", file);
}
else
{
CHelper.ThrowValidationError("No files");
}
The resulting file will have as name AllQuotations_[CaseNumber].pdf.
|
|
Please make sure the file extension matches the document type the method uses. |
|---|
ConcatDocumentsFromFilesArrayToWord(ArrayList)
Overview
This section describes how to use the feature to concatenate documents from a files array.
Syntax
CHelper.ConcatDocumentsFromFilesArrayToWord(ArrayList filesArray)Declaration
public static byte[] ConcatDocumentsFromFilesArrayToWord(ArrayList filesArray)Parameters
| Type | Name | Description |
|---|---|---|
| System.Collections.ArrayList | filesArray | List of files to concatenate |
Returns
| Type | Description |
|---|---|
| System.Byte[] | Word file as a binary array |
Examples
In the following sample process, assume we have a process entity called OfficeSupplyRequest.
Such process uses the following data model:
We want the attribute Request Summary to have all the documents uploaded to the Quotations collection. To do so, we will use the Concatenate documents from files array method.
|
|
The documents to concatenate should be the same format, either PDF or Microsoft Word document. Otherwise, the method will not work correctly. |
|---|
Concatenating Word Documents
In this case, the syntax of the function is:
CHelper.ConcatDocumentsFromFilesArrayToWord(filesArray)The main parameters of this function are:
•The filesArray: the array of File data to be concatenated.
To concatenate the files of our example we will need an expression box:
The expression above is as follows:
var quotations = CHelper.GetValueAsCollection(<OfficeSupplyRequest.Quotations.Quotation>);
var fileList = new ArrayList();
for(var i=0; i<quotations.size(); i++){
var quotation = quotations.get(i);
var fileData = quotation.getXPath("Data");
fileList.Add(fileData);
}
if(fileList.Count > 0)
{
var file = CHelper.ConcatDocumentsFromFilesArrayToWord(fileList);
var File = Me.newCollectionItem("MyProcess.ResultFile");
File.setXPath("FileName", "AllQuotations_" + Me.Case.Id + ".docx");
File.setXPath("Data", file);
}
else {
CHelper.ThrowValidationError("No files");
}
The resulting file will have as name AllQuotations_[CaseNumber].docx.

|
Please make sure the file extension matches the document type the method uses. |
|---|
ConcatDocumentsFromTwoXpathsToPDF(ICAPIWorkItem, String, String)
Overview
This section describes how to use the feature to concatenate documents from two different Xpaths.
Syntax
CHelper.ConcatDocumentsFromTwoXpathsToPDF(ICAPIWorkItem Me, string Xpath1, string Xpath2)Declaration
public static byte[] ConcatDocumentsFromTwoXpathsToPDF(ICAPIWorkItem Me, string Xpath1, string Xpath2)Parameters
| Type | Name | Description |
|---|---|---|
| ICAPIWorkItem | Me | This parameter is fixed |
| System.String | Xpath1 | First XPath |
| System.String | Xpath2 | Second XPath |
Returns
| Type | Description |
|---|---|
| System.Byte[] | PDF file as a binary array |
Examples
In the following sample process, assume we have a process entity called OfficeSupplyRequest.
Such process uses the following data model:

We want the attribute Request Summary to have the information uploaded into Quotation Request and Invoice attributes. To do so, we will use the Concatenate documents from two Xpaths method.

|
The documents to concatenate should be the same format, either PDF or Microsoft Word document. Otherwise, the method will not work correctly. |
|---|
Concatenating PDF Documents
In this case, the syntax of the function is:
CHelper.ConcatDocumentsFromTwoXpathsToPdf(Me, fileXpath1, fileXpath2)The main parameters of this function are:
•The first parameter (Me) is fixed.
•The fileXpath1: the XPath to the first document as a string.
•The fileXpath2: the XPath to the second document as a string.
To concatenate the files of our example, we will need an expression box:
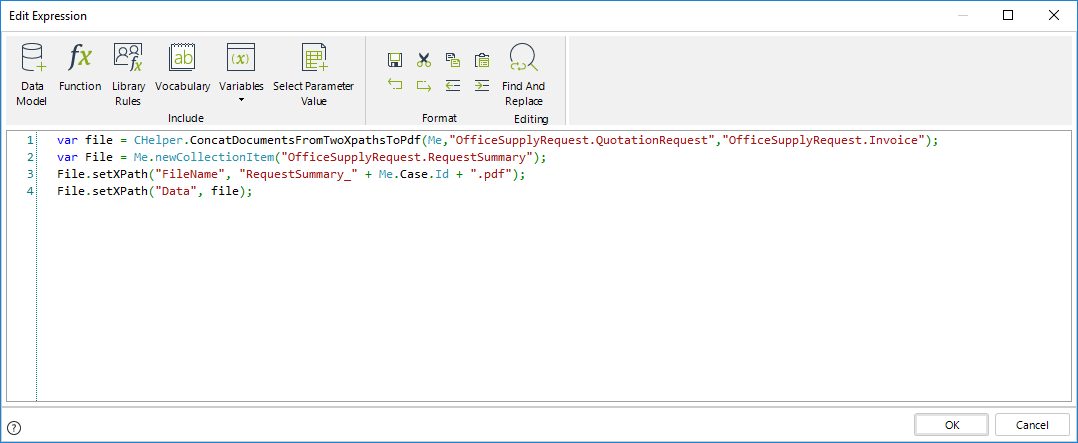
The expression above is as follows:
var file = CHelper.ConcatDocumentsFromTwoXpathsToPdf(Me,"OfficeSupplyRequest.QuotationRequest","OfficeSupplyRequest.Invoice");
var File = Me.newCollectionItem("OfficeSupplyRequest.RequestSummary");
File.setXPath("FileName", "RequestSummary_" + Me.Case.Id + ".pdf");
File.setXPath("Data", file);
The resulting file will have as name RequestSummary_[CaseNumber].pdf.

|
Please make sure the file extension matches the document type the method uses. |
|---|
ConcatDocumentsFromTwoXpathsToWord(ICAPIWorkItem, String, String)
Overview
This section describes how to use the feature to concatenate documents from two different Xpaths.
Syntax
CHelper.ConcatDocumentsFromTwoXpathsToWord(ICAPIWorkItem Me, string Xpath1, string Xpath2)Declaration
public static byte[] ConcatDocumentsFromTwoXpathsToWord(ICAPIWorkItem Me, string Xpath1, string Xpath2)Parameters
| Type | Name | Description |
|---|---|---|
| ICAPIWorkItem | Me | This parameter is fixed |
| System.String | Xpath1 | First XPath |
| System.String | Xpath2 | Second XPath |
Returns
| Type | Description |
|---|---|
| System.Byte[] | Word file as a binary array |
Examples
In the following sample process, assume we have a process entity called OfficeSupplyRequest.
Such process uses the following data model:
We want the attribute Request Summary to have the information uploaded into Quotation Request and Invoice attributes. To do so we will use the Concatenate documents from two Xpaths method.
|
|
The documents to concatenate should be the same format, either PDF or Microsoft Word document. Otherwise, the method will not work correctly. |
|---|
Concatenating Word Documents
In this case, the syntax of the function is:
CHelper.ConcatDocumentsFromTwoXpathsToWord(Me, fileXpath1, fileXpath2)The main parameters of this function are:
•The first parameter (Me) is fixed.
•The fileXpath1: the XPath to the first document as a string.
•The fileXpath2: the XPath to the second document as a string.
To concatenate the files of our example we will need an expression box:
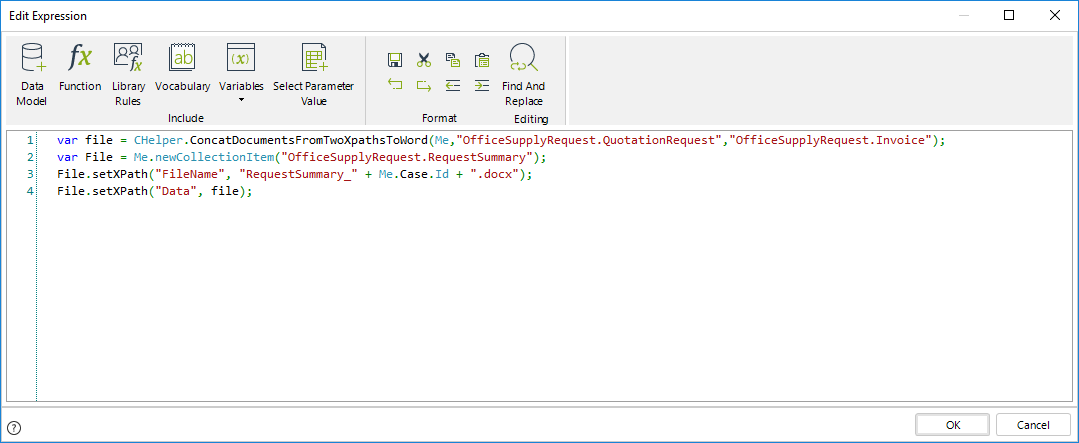
The expression above is as follows:
var file = CHelper.ConcatDocumentsFromTwoXpathsToWord(Me,"OfficeSupplyRequest.QuotationRequest","OfficeSupplyRequest.Invoice");
var File = Me.newCollectionItem("OfficeSupplyRequest.RequestSummary");
File.setXPath("FileName", "RequestSummary_" + Me.Case.Id + ".docx");
File.setXPath("Data", file);
The resulting file will have as name RequestSummary_[CaseNumber].docx.

|
Please make sure the file extension matches the document type the method uses. |
|---|
ConcatDocumentsFromXpathFileToPdf(ICAPIWorkItem, String)
Overview
This section describes how to use the feature to concatenate documents from an XPath.
Syntax
CHelper.ConcatDocumentsFromXpathFileToPdf(ICAPIWorkItem Me, string fileXpath)Declaration
public static byte[] ConcatDocumentsFromXpathFileToPdf(ICAPIWorkItem Me, string fileXpath)Parameters
| Type | Name | Description |
|---|---|---|
| ICAPIWorkItem | Me | This parameter is fixed |
| System.String | fileXpath | Xpath to the file |
Returns
| Type | Description |
|---|---|
| System.Byte[] | PDF file as binary array |
Examples
In the following sample process, assume we have a process entity called OfficeSupplyRequest.
Such process uses the following data model:

The Quotation Request attribute allows users to upload several files; we want the attribute Request Summary to have all the documents uploaded. To do so, we will use the Concatenate documents from XPath file method.
|
|
The documents to concatenate should be the same format, either PDF or Microsoft Word document. Otherwise, the method will not work correctly. |
|---|

Concatenating PDF Documents
In this case, the syntax of the function is:
CHelper.ConcatDocumentsFromXpathFileToPdf(Me, fileXpath)The main parameters of this function are:
•The first parameter (Me) is fixed.
•The fileXpath: the XPath to the uploaded documents as a string.
To concatenate the files of our example we will need an expression box:
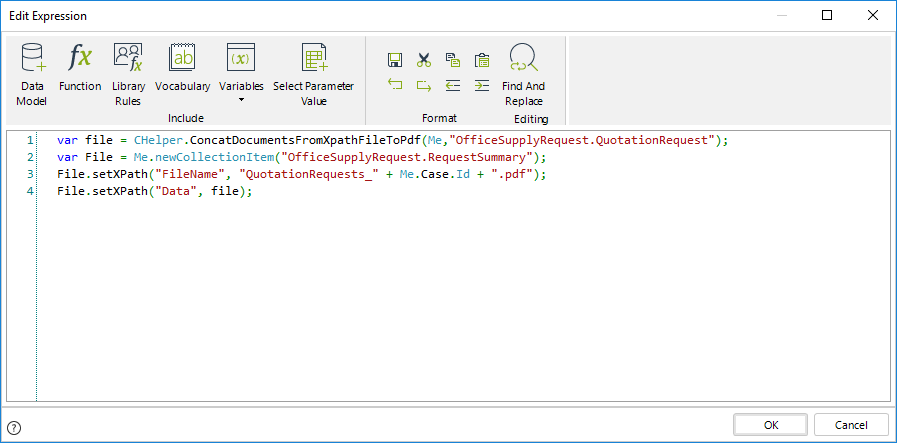
The expression above is as follows:
var file = CHelper.ConcatDocumentsFromXpathFileToPdf(Me,"OfficeSupplyRequest.QuotationRequest");
var File = Me.newCollectionItem("OfficeSupplyRequest.RequestSummary");
File.setXPath("FileName", "QuotationRequests_" + Me.Case.Id + ".pdf");
File.setXPath("Data", file);
The resulting file will have as name QuotationRequests_[CaseNumber].pdf.
|
|
Please make sure the file extension matches the document type the method uses. |
|---|

ConcatDocumentsFromXpathFileToWord(ICAPIWorkItem, String)
Overview
This section describes how to use the feature to concatenate documents from an XPath.
Syntax
CHelper.ConcatDocumentsFromXpathFileToWord(ICAPIWorkItem Me, string fileXpath)Declaration
public static byte[] ConcatDocumentsFromXpathFileToWord(ICAPIWorkItem Me, string fileXpath)Parameters
| Type | Name | Description |
|---|---|---|
| ICAPIWorkItem | Me | This parameter is fixed |
| System.String | fileXpath | Xpath to the files |
Returns
| Type | Description |
|---|---|
| System.Byte[] | Word file as a binary array |
Examples
In the following sample process, assume we have a process entity called OfficeSupplyRequest.
Such process uses the following data model:
The Quotation Request attribute allows users to upload several files; we want the attribute Request Summary to have all the documents uploaded. To do so, we will use the Concatenate documents from XPath file method.
|
|
The documents to concatenate should be the same format, either PDF or Microsoft Word document. Otherwise, the method will not work correctly. |
|---|
Concatenating Word Documents
In this case, the syntax of the function is:
CHelper.ConcatDocumentsFromXpathFileToWord(Me, fileXpath)The main parameters of this function are:
The first parameter (Me) is fixed.
The fileXpath: the XPath to the uploaded documents as a string.
To concatenate the files of our example we will need an expression box:

The expression above is as follows:
var file = CHelper.ConcatDocumentsFromXpathFileToWord(Me,"OfficeSupplyRequest.QuotationRequest");
var File = Me.newCollectionItem("OfficeSupplyRequest.RequestSummary");
File.setXPath("FileName", "QuotationRequests_" + Me.Case.Id + ".docx");
File.setXPath("Data", file);
The resulting file will have as name QuotationRequests_[CaseNumber].docx.
|
|
Please make sure the file extension matches the document type the method uses. |
|---|

ConvertServerTimetoUserTime(Int32, DateTime)
Converts a date in UTC+0 (server time) to the equivalent date and time in the user's time zone.
Declaration
public static object ConvertServerTimetoUserTime(int idUser, DateTime serverTime)Parameters
| Type | Name | Description |
|---|---|---|
| System.Int32 | idUser | The ID of the user whose time zone will be used for the conversion. |
| System.DateTime | serverTime | The server date and time in UTC+0 (this value corresponds to DateTime.Now). |
Returns
| Type | Description |
|---|---|
| System.Object | The equivalent date and time in the user's current time zone. |
Examples
Consider the following scenario: An employee needs to submit a travel request for a business trip in another time zone. Accurate handling of time differences is essential to ensure that meetings and notifications are scheduled appropriately. In this case, the system uses the CHelper.ConvertServerTimetoUserTime function to convert the server time (UTC+0) to the user's local time zone, helping align communications and event planning with the user's local context.
// Define the date in server time (UTC+0)
var varEjDate = DateTime.Now;
// Convert it to the user's local time
var result = CHelper.ConvertServerTimetoUserTime(Me.Case.WorkingCredential.UserId, varEjDate);
// Log the converted local date-time
CHelper.trace("ConvertedTime", "Local Time for User = " + result);
// Store this value in a process attribute if needed
var userLocalTimeAttribute = result;
ConvertServerTimeToTimeZoneTime(String, DateTime)
Converts a date in UTC+0 (server time) to the equivalent date in the specified time zone.
Declaration
public static object ConvertServerTimeToTimeZoneTime(string sTimeZoneName, DateTime serverTime)Parameters
| Type | Name | Description |
|---|---|---|
| System.String | sTimeZoneName | The name of the destination time zone (e.g., "Europe/Berlin") used for the conversion. |
| System.DateTime | serverTime | The server date and time in UTC+0 (this value corresponds to DateTime.Now). |
Returns
| Type | Description |
|---|---|
| System.Object | The equivalent date-time value in the specified time zone. |
Examples
Consider this example: an employee needs to submit a travel request for a business trip in another time zone. Handling time differences is key to ensuring that meetings and communications are scheduled correctly. In this case, the employee provides a date in server time (UTC+0), and the system converts it to the appropriate local time using the time zone specified in sTimeZoneName.
// Server time (UTC+0)
var varEjDate = DateTime.Now;
// Convert to specified time zone
var result = CHelper.ConvertServerTimeToTimeZoneTime("Europe/Berlin", varEjDate);
// Log the converted value
CHelper.trace("ConvertedTime", "Local time for the specified time zone = " + result);
ConvertTimeZoneTimeToServerTime(String, DateTime)
Converts a date-time value from a specified time zone to server time (UTC+0). This method is useful for converting date-time values that contain hours in cloud environments where the user's time zone differs from the server's.
Declaration
public static object ConvertTimeZoneTimeToServerTime(string sTimeZoneName, DateTime timeZoneTime)Parameters
| Type | Name | Description |
|---|---|---|
| System.String | sTimeZoneName | The name of the source time zone (e.g., "America/Los_Angeles") from which the date-time will be converted. |
| System.DateTime | timeZoneTime | The original date-time value in the specified time zone. |
Returns
| Type | Description |
|---|---|
| System.Object | The equivalent date-time value in server time (UTC+0). |
Examples
Consider this example: an employee needs to submit a travel request for a business trip in another time zone. Handling time differences is key to ensuring meetings and communications are scheduled correctly. In this case, the employee provides a return date relative to their local time zone, and the system converts this value to server time using the CHelper.ConvertTimeZoneTimeToServerTime function for consistent processing and coordination.
expirationDate = expirationDate.AddHours(23);
expirationDate = expirationDate.AddMinutes(59);
expirationDate = expirationDate.AddSeconds(59);
expirationDate = CHelper.ConvertTimeZoneTimeToServerTime("America/Los_Angeles",expirationDate);
<Cases_dates.expirationDate> = expirationDate;
ConvertUserTimetoServerTime(Int32, DateTime)
Converts a date-time value that is relative to a user's time zone into server time (UTC+0). This utility is useful for persisting date-time values that include hour information in cloud environments where the user's time zone differs from the server's. It ensures consistency by converting values interpreted in the user's time zone into the server's standardized time.
Declaration
public static DateTime ConvertUserTimetoServerTime(int idUser, DateTime userTime)Parameters
| Type | Name | Description |
|---|---|---|
| System.Int32 | idUser |
ID of the user whose time zone is used for the calculation. |
| System.DateTime | userTime |
Date-time value to convert, interpreted using the user’s time zone. |
Returns
| Type | Description |
|---|---|
| System.DateTime | The equivalent date-time in server time (UTC+0). |
Examples
Using the ConvertUserTimetoServerTime function to convert an Expiration date
var expirationDate=new DateTime(2021,04,30);
expirationDate=expirationDate.AddHours(23);
expirationDate=expirationDate.AddMinutes(59);
expirationDate=expirationDate.AddSeconds(59);
expirationDate=CHelper.ConvertUserTimetoServerTime(Me.WorkingCredential.UserId,expirationDate);
<Cases_dates.expirationDate>=expirationDate;DateTimeParse(String, String)
Parses a date based on an input format
Declaration
public static DateTime DateTimeParse(string dateString, string dateFormat)Parameters
| Type | Name | Description |
|---|---|---|
| System.String | dateString | Date in a valid input format |
| System.String | dateFormat | Format for the dateString parameter |
Returns
| Type | Description |
|---|---|
| System.DateTime | Datetime for the input and format date |
Examples
Using a dd/MM/yyyy HH:mm:ss format for parsing an input date
CHelper.DateTimeParse("29/04/2021 12:12:12", "dd/MM/yyyy HH:mm:ss");
//Resulting date: Thu Apr 29 12:12:12 EST 2021EnableAsynchExecution(Int64)
Enable a blocked asynchronous activity.
This function takes the id of the asynchronous activity you wish to enable as a parameter.
Syntax
CHelper.EnableAsynchExecution(long idAsynchWorkitem);Declaration
public static object EnableAsynchExecution(long idAsynchWorkitem)Parameters
| Type | Name | Description |
|---|---|---|
| System.Int64 | idAsynchWorkitem | Id of an asynchronous activity. |
Returns
| Type | Description |
|---|---|
| System.Object |
Examples
During a loan request, a notification to a bank auditor has gotten blocked. This notification is done through an asynchronous task.
We wish to enable the blocked asynchronous task in order to continue with the process.
var dtAsyncWorkitems = CHelper.GetAllStuckAsyncWorkitems();
for(var i=0; i < dtAsyncWorkitems.Rows.Count; i++)
{
  var idAsynchWorkitem = dtAsyncWorkitems.Rows[i]["idAsynchWorkitem"];
  CHelper.EnableAsynchExecution(idAsynchWorkitem);
}
EnableWaitJob(Int32)
Enable a blocked scheduled job.
This function takes the id of the scheduled job you wish to enable as a parameter.
Syntax
CHelper.EnableWaitJob(int idWaitJob);Declaration
public static object EnableWaitJob(int idWaitJob)Parameters
| Type | Name | Description |
|---|---|---|
| System.Int32 | idWaitJob | Id of a blocked scheduled job. |
Returns
| Type | Description |
|---|---|
| System.Object |
Examples
During a weekly report, a report had issues and got blocked.
We wish to enable the blocked scheduled job in order to continue with the process.
var dtWaitJobs = CHelper.GetAllStuckWaitJobs();
for(var i=0; i < dtWaitJobs.Rows.Count; i++)
{
  var idJob = dtWaitJobs.Rows[i]["idJob"];
  CHelper.EnableWaitJob(idJob);
}
entityListCount(String, String)
Obtain the count of entity values in an expression.
Syntax
entityListCount(String entityName, String filter)Declaration
public static object entityListCount(string entityName, string filter)Parameters
| Type | Name | Description |
|---|---|---|
| System.String | entityName |
The Entity Name to count the number of the entity values (instances). |
| System.String | filter |
Add a filter to do the count with some special condition. |
Returns
| Type | Description |
|---|---|
| System.Object |
The integer value of the entity values count. |
Remarks
Available in Bizagi Studio 11.2.4 R2, this performance improvement retrieves only the count of the entity values, instead of building and getting all the entity list with his attributes only to know the entity size.
Best Practices:
Change the current common count function for example::
Me.getXPath("entity-list('MP_SIU', 'BActive = true AND MP_Claim = " + x + "')").size() > 0For the new count function:
CHelper.entityListCount('MP_SIU', 'BActive = true AND MP_Claim = ' + x) > 0Examples
Count all entities
var integer1 = CHelper.entityListCount("Opportunities","");Filtering using comparison operators
var integer2 = CHelper.entityListCount("Opportunities","Opportunity = 101 AND Customer = 352");Filtering using a single attribute (Rejected options)
var integer3 = CHelper.entityListCount("Options","Options = 'Reject'");Filtering using a single attribute (Completed tasks)
var integer4 = CHelper.entityListCount("TskStatus","TskStatus = 'Completed'");GetAllStuckAsyncWorkitems()
Get all the blocked asynchronous activities.
This function obtains information about your blocked asynchronous activities.
Syntax
CHelper.GetAllStuckAsyncWorkitems()Declaration
public static object GetAllStuckAsyncWorkitems()Returns
| Type | Description |
|---|---|
| System.Object | A list of all the blocked asynchronous activities. |
Examples
During a loan request, several notifications to bank auditors have gotten blocked.
This notifications are done through an asynchronous task, and in order to know which tasks have gotten blocked, we need to get all the stuck asynchronous task.
var dtAsyncWorkitems = CHelper.GetAllStuckAsyncWorkitems();
for(var i=0; i < dtAsyncWorkitems.Rows.Count; i++)
{
	var idAsynchWorkitem = dtAsyncWorkitems.Rows[i]["idAsynchWorkitem"];
}
GetAllStuckWaitJobs()
Get all the blocked scheduled jobs
This function will retrieve all the blocked scheduled jobs.
Syntax
CHelper.GetAllStuckWaitJobs()Declaration
public static object GetAllStuckWaitJobs()Returns
| Type | Description |
|---|---|
| System.Object | A list of all the stuck scheduled jobs. |
Examples
During a weekly report, several reports have had issues for some users.
This reports are done through a scheduled job, and in order to know which job has gotten stuck, we need to get all the stuck scheduled jobs.
var dtWaitJobs = CHelper.GetAllStuckWaitJobs();
for(var i=0; i < dtWaitJobs.Rows.Count; i++)
{
	var idJob = dtWaitJobs.Rows[i]["idJob"];
}
getAssignedWorkItems(ICAPIWorkItem, Int32, Int32, Boolean)
Overview
Bizagi offers a function where you can obtain an array of the WorkItems assigned to a given user.
Syntax
CHelper.getAssignedWorkItems(ICAPIWorkItem Me, int CaseId, int CurrentAssigneeId, bool IncludeSubProcesses)Declaration
public static ArrayList getAssignedWorkItems(ICAPIWorkItem Me, int CaseId, int CurrentAssigneeId, bool IncludeSubProcesses)Parameters
| Type | Name | Description |
|---|---|---|
| ICAPIWorkItem | Me | This parameter is fixed |
| System.Int32 | CaseId | Id of the case to request |
| System.Int32 | CurrentAssigneeId | Id of the current assignee |
| System.Boolean | IncludeSubProcesses |
If set to true, then the request includes Sub-processes; otherwise, it excludes the Sub-processes. |
Returns
| Type | Description |
|---|---|
| System.Collections.ArrayList | List of assigned work items |
Examples
In the following sample rule, we'll be obtaining the creator user's assigned WorkItems for a simple process. This rule is executed On Enter for the task Simple Example.
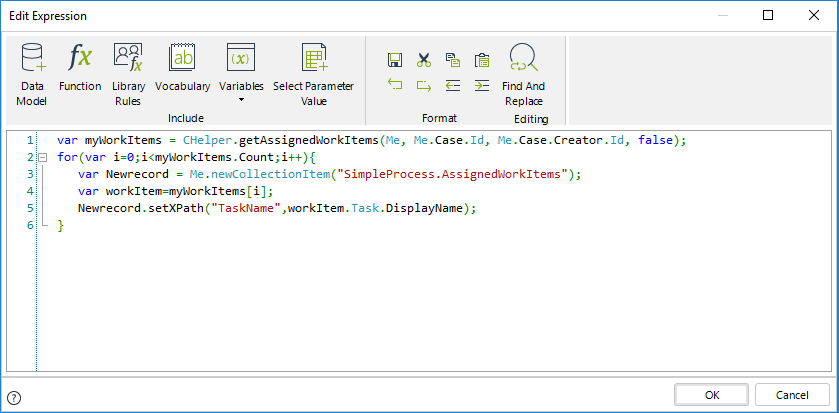
The code is as follows.
var myWorkItems = CHelper.getAssignedWorkItems(Me, Me.Case.Id, Me.Case.Creator.Id, false);
for(var i=0;i<myWorkItems.Count;i++)
{
var Newrecord = Me.newCollectionItem("SimpleProcess.AssignedWorkItems");
var workItem=myWorkItems[i];
Newrecord.setXPath("TaskName",workItem.Task.DisplayName);
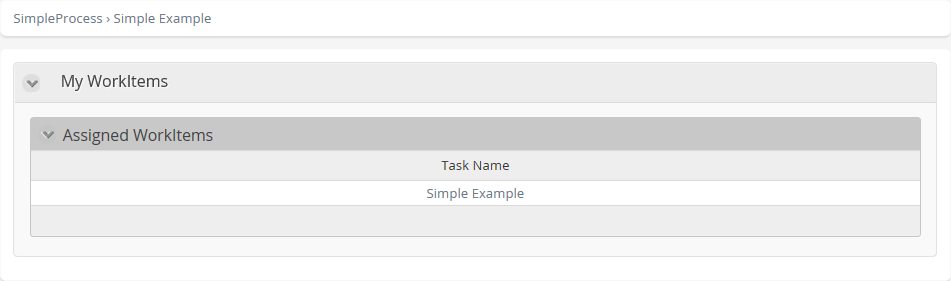
}The collection is shown like this:
getAttrib(String, Object, String)
This function returns the value of a given attribute of a specific record in an entity.
Syntax
CHelper.getAttrib(string sEntityName, object oEntityKey, string sAttribName)Declaration
public static object getAttrib(string sEntityName, object oEntityKey, string sAttribName)Parameters
| Type | Name | Description |
|---|---|---|
| System.String | sEntityName | Entity name |
| System.Object | oEntityKey | Record id within the entity |
| System.String | sAttribName |
Entity attribute name |
Returns
| Type | Description |
|---|---|
| System.Object | Value of the requested attribute |
Examples
Obtain a specific attribute's values from a specific record of an entity
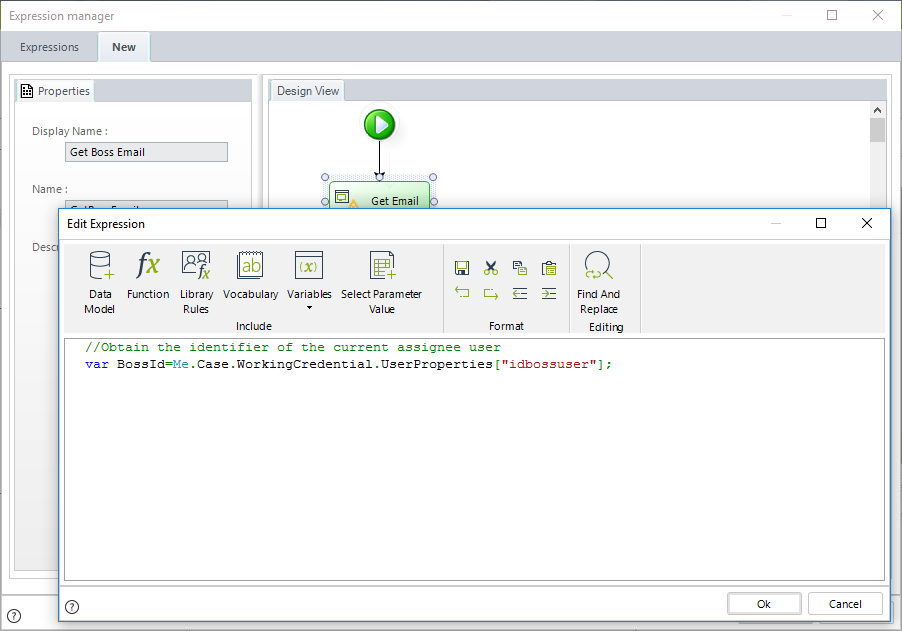
Suppose in a Contact Center a notification is sent when the time to respond the request expires. The notification is addressed to the boss of the person who is assisting a request. You need to obtain the email of the boss.
To do so, you can use the CHelper.getAttrib function.
Include an expression as an activity action.
Obtain the id of the current assignee boss using the Me.Case.WorkingCredential.UserProperties[] function
Use the CHelper.getattrib() function to obtain the email of the desired user from the WFUser entity. In this case store this value in an attribute of the data model (BossEmail).
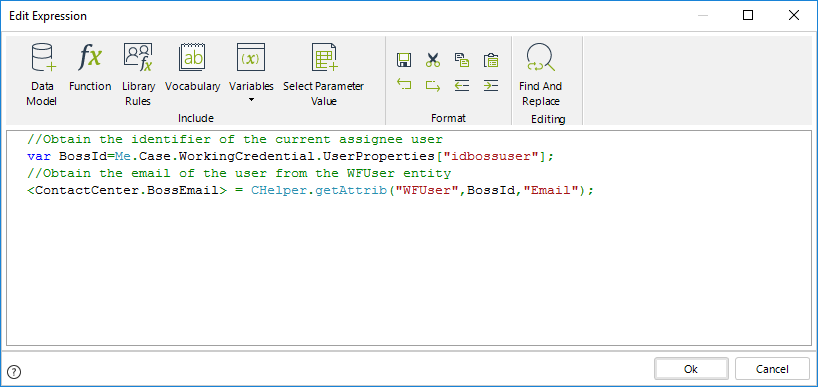
//Obtain the identifier of the current assignee user
var BossId=Me.Case.WorkingCredential.UserProperties["idbossuser"];
//Obtain the email of the user from the WFUser entity
<ContactCenter.BossEmail> = CHelper.getAttrib("WFUser",BossId,"Email");
Example 2: Obtain a single attribute value from a specific record of an entity
The following expressions are equivalent for locating the record Id within the entity:
//Getting a single attribute using record id
<RequestForSupplies.JustificationoftheRequest> =
CHelper.getAttrib("RequestForSupplies",<RequestForSupplies>.getXPath("idRequestForSupplies")-1,"OrderTotal");
//Getting a single attribute using surrogate key
<RequestForSupplies.JustificationoftheRequest> =
CHelper.getAttrib("RequestForSupplies",<RequestForSupplies>.getXPath("Id")-1,"OrderTotal");getBoolean(String)
Overview
Bizagi offers a function where you can obtain the Boolean value of a parameter. It returns true if the parameter equals 1 or true.
This function is useful when you have string-like controls, where you need users to type in an answer.
Syntax
CHelper.getBoolean(string value)Declaration
public static bool getBoolean(string value)Parameters
| Type | Name | Description |
|---|---|---|
| System.String | value | String to be evaluated |
Returns
| Type | Description |
|---|---|
| System.Boolean |
True if the parameter equals 1 or true; otherwise, it returns false. |
Examples
In the following example, Office Supply Request, the request is approved by an external system, the response must be stored in the attribute Approved of the Product Request entity.

The response will come as 1 if the request is approved and 0 if not. To store this value in our Boolean attribute, we will store it in the sApproved parameter and then transform it into a Boolean value like this:
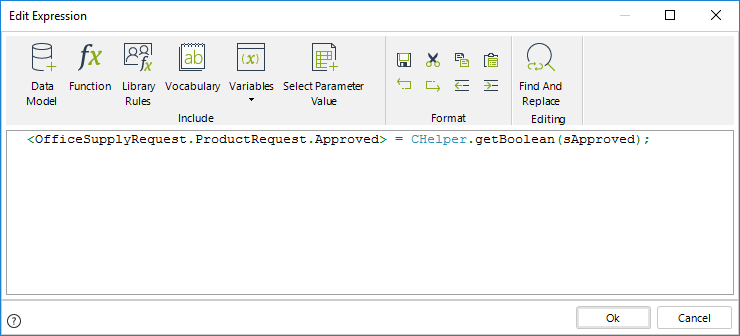
The code in the image above is as follows:
<OfficeSupplyRequest.ProductRequest.Approved> = CHelper.getBoolean(sApproved);GetCaseAccessUsers(Int32)
The following expressions allows you to retrieve the list of privileged users of the case
Syntax
CHelper.GetCaseAccessUsers(int idCase, int idUser)Declaration
public static void GetCaseAccessUsers(int idCase)Parameters
| Type | Name | Description |
|---|---|---|
| System.Int32 | idCase | Case id |
Examples
Expression to retrieve privileged users
The expression retrieves the list of privileged users of the case and stores them in the collection UsersCaseAccess
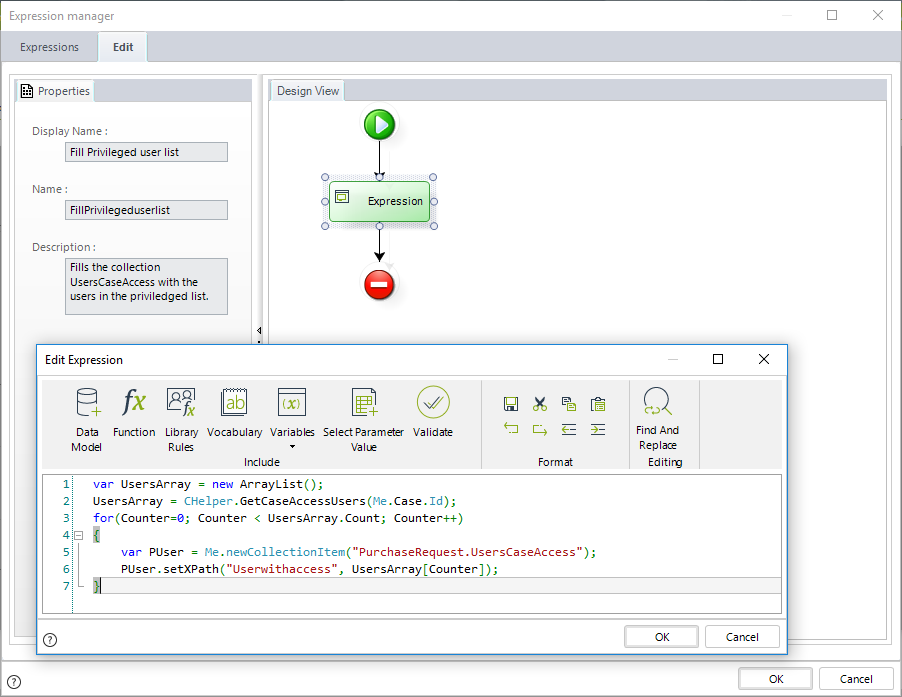
//var UsersArray = new ArrayList();
// Get the list of privileged users
UsersArray = CHelper.GetCaseAccessUsers(Me.Case.Id);
for(Counter=0; Counter < UsersArray.Count; Counter++)
{
// Add users to the UsersCaseAccess collection
var PUser = Me.newCollectionItem("PurchaseRequest.UsersCaseAccess");
PUser.setXPath("Userwithaccess", UsersArray[Counter]);
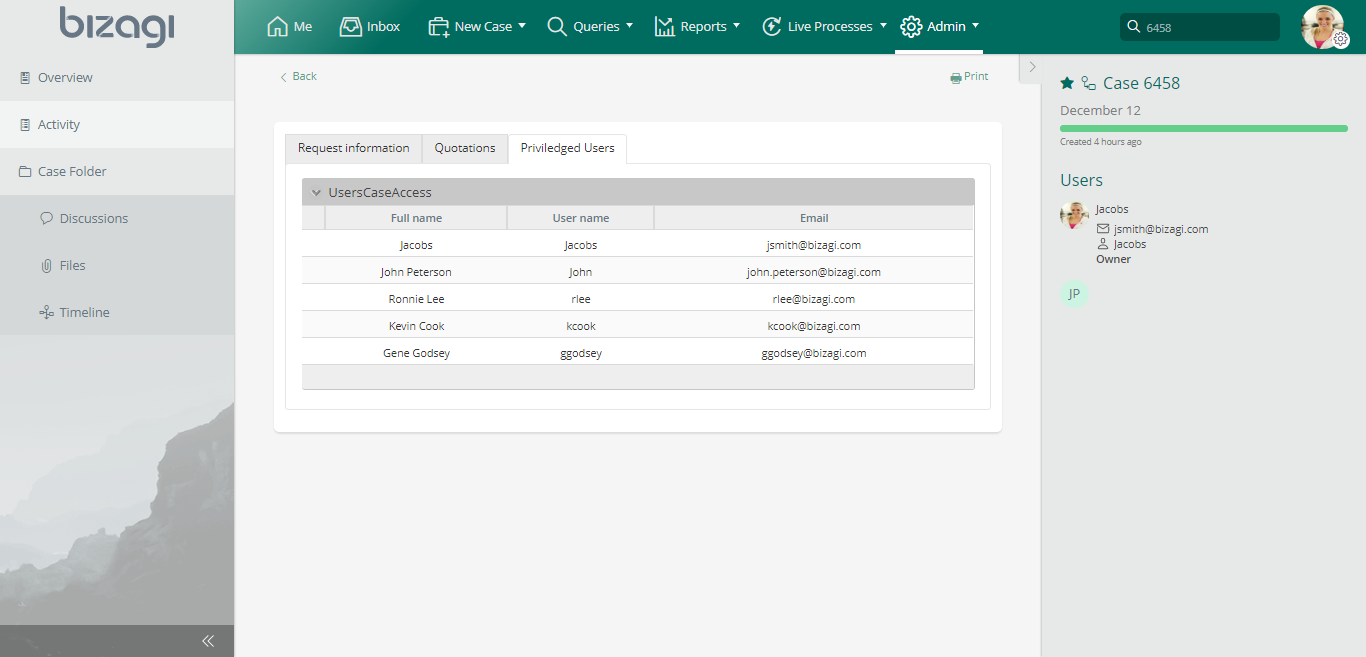
}When the case is advanced, the users in the privileged list are displayed in the collection added in the Summary form.
getCaseById(Int32)
Overview
Bizagi offers a function where you can obtain the case object without the need for context. This function returns a case object type with the information you need.
You can perform the actions described on Getinformation from the current case on the returned object.
Syntax
CHelper.getCaseById(int CaseId)Declaration
public static CAPICase getCaseById(int CaseId)Parameters
| Type | Name | Description |
|---|---|---|
| System.Int32 | CaseId | Case Id |
Returns
| Type | Description |
|---|---|
| CAPICase | Case object filtered by Id |
Examples
On this example, we'll be using the getCaseById function to obtain a Sub-Process's state.
To do so, we'll first obtain the list of Sub-Process Ids as an array and from those Id's we'll get each Sub-Process's state.
The expression would be as follows:
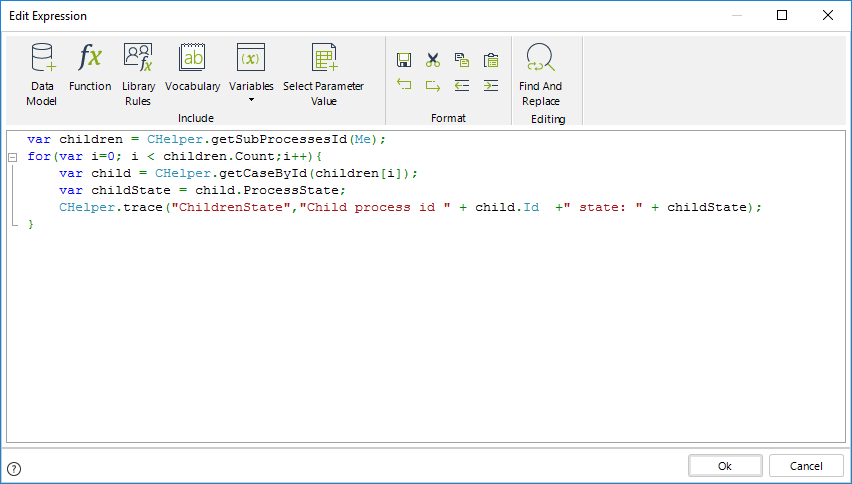
The code shown in the image is:
var children = CHelper.getSubProcessesId(Me);
for(var i=0; i < children.Count;i++)
{
var child = CHelper.getCaseById(children[i]);
var childState = child.ProcessState;
CHelper.trace("ChildrenState","Child process id " + child.Id +" state: " + childState);
}getCaseUsers(Int32)
Obtain the list of users who have worked in a case
You can obtain the users that have worked on a case by using the CHelper.getCaseUsers() function. This function returns an array list (ArrayList) with the id´s of the users (WFUser) who have worked in a particular case.
The Case number needs to be provided as an input parameter.
Syntax
CHelper.getCaseUsers(int CaseNumber)Declaration
public static ArrayList getCaseUsers(int CaseNumber)Parameters
| Type | Name | Description |
|---|---|---|
| System.Int32 | CaseNumber | Case number to request |
Returns
| Type | Description |
|---|---|
| System.Collections.ArrayList | List of user id's |
Examples
In a Help Desk Process, many people can assist a Ticket. It is possible that a log of people who worked in a specific case is needed for analysis purposes. To obtain this log, you need to store the list of users who worked in a Ticket in the Users Log collection (shown in the data model below).
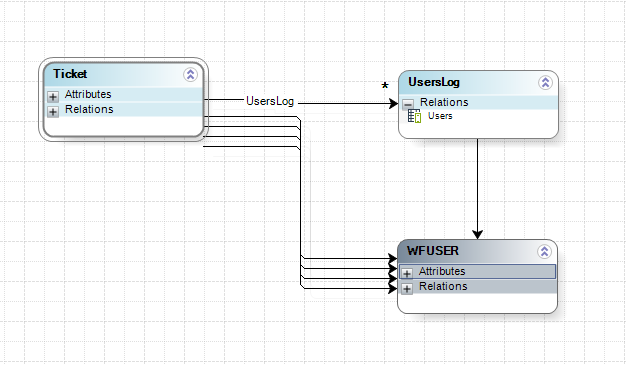
To obtain the list of users who worked in a Ticket, you can use the CHelper.getCaseUsers function.
Include a Bizagi expression as an activity action and make use this function (as well as other methods) to add new records to the UsersLog collection.
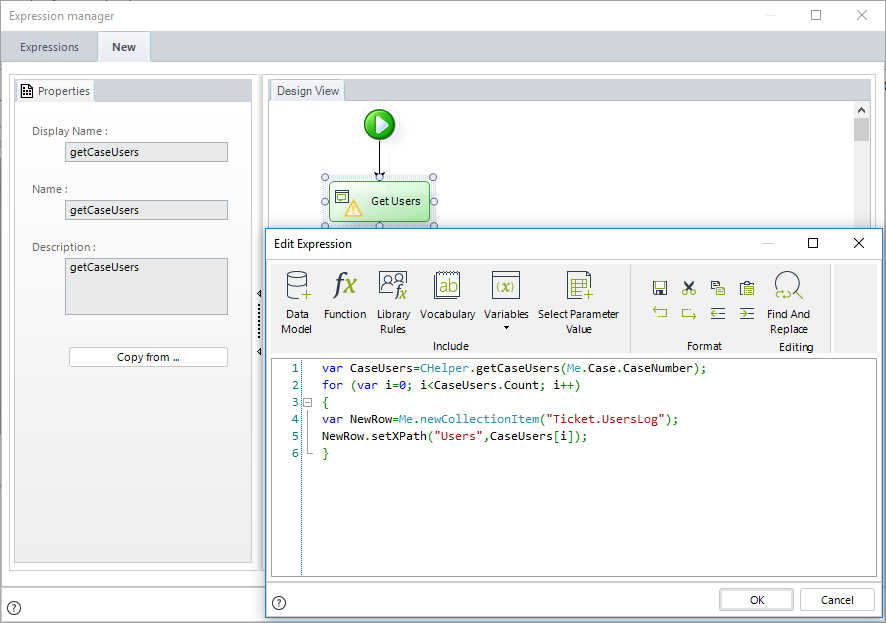
//Get Users
var CaseUsers=CHelper.getCaseUsers(Me.Case.CaseNumber);

//Go through users
for (var i=0; i<CaseUsers.Count; i++)
{
//Create new record in the Users Log collection
var NewRow=Me.newCollectionItem("Ticket.UsersLog");
NewRow.setXPath("Users",CaseUsers[i]);
}
The resultant Table in the Work Portal looks like this:

GetCurrentTimeForUser(Int32)
Overview
Bizagi offers a function where you can obtain the current user's time. You might need this information for such things as timers and notifications.
To obtain the current user's time, use the following function that returns a Date-time type with the information you need.
Syntax
CHelper.GetCurrentTimeForUser(int idUser)Declaration
public static DateTime GetCurrentTimeForUser(int idUser)Parameters
| Type | Name | Description |
|---|---|---|
| System.Int32 | idUser | Current user Id |
Returns
| Type | Description |
|---|---|
| System.DateTime | Current user time |
Examples
In the following sample process, assume we have a process entity called OfficeSupplyRequest.
Such process uses the following data model:

The delivery date must be seven days after the request is made. For this, we will use the GetCurrentTimeForUser function to obtain the user's current date and add seven days to it. We will then set this value to the Delivery Date attribute.
The expression would be as follows:
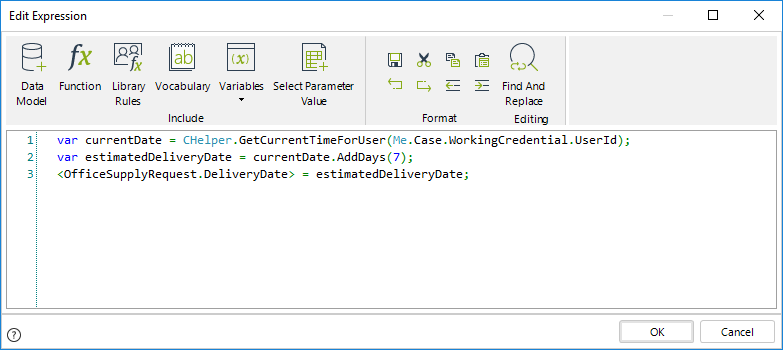
var currentDate = CHelper.GetCurrentTimeForUser(Me.Case.WorkingCredential.UserId);
var estimatedDeliveryDate = currentDate.AddDays(7);
<OfficeSupplyRequest.DeliveryDate> = estimatedDeliveryDate;
The expression above obtains the current user time and adds seven days to it on the estimatedDeliveryDate variable. Then sets that value to the attribute Delivery Date.
View SourceGetDataTableFromWorkSheetAsString(SByte[], Int32)
The method reads an excel file and returns the file content as a data table object. It changes the data types of the input values to string.
The method requires the file data (oFileData) and the index of the sheet to read (iSheetId) as parameters.
Syntax
CHelper.GetDataTableFromWorkSheetAsString(SByte[] oFileData, int iSheetId)Declaration
public static DataTable GetDataTableFromWorkSheetAsString(sbyte[] oFileData, int iSheetId)Parameters
| Type | Name | Description |
|---|---|---|
| System.SByte[] | oFileData | Data of the excel file to read |
| System.Int32 | iSheetId |
The index of the excel sheet to read. The first sheet corresponds to 0. |
Returns
| Type | Description |
|---|---|
| System.Data.DataTable |
File content as a data table object, changing the data types of the values to string. |
Examples
Populate a collection using data from an excel file
Suppose you have to register the information of customers in a Bizagi process, and you have the information in an excel file.
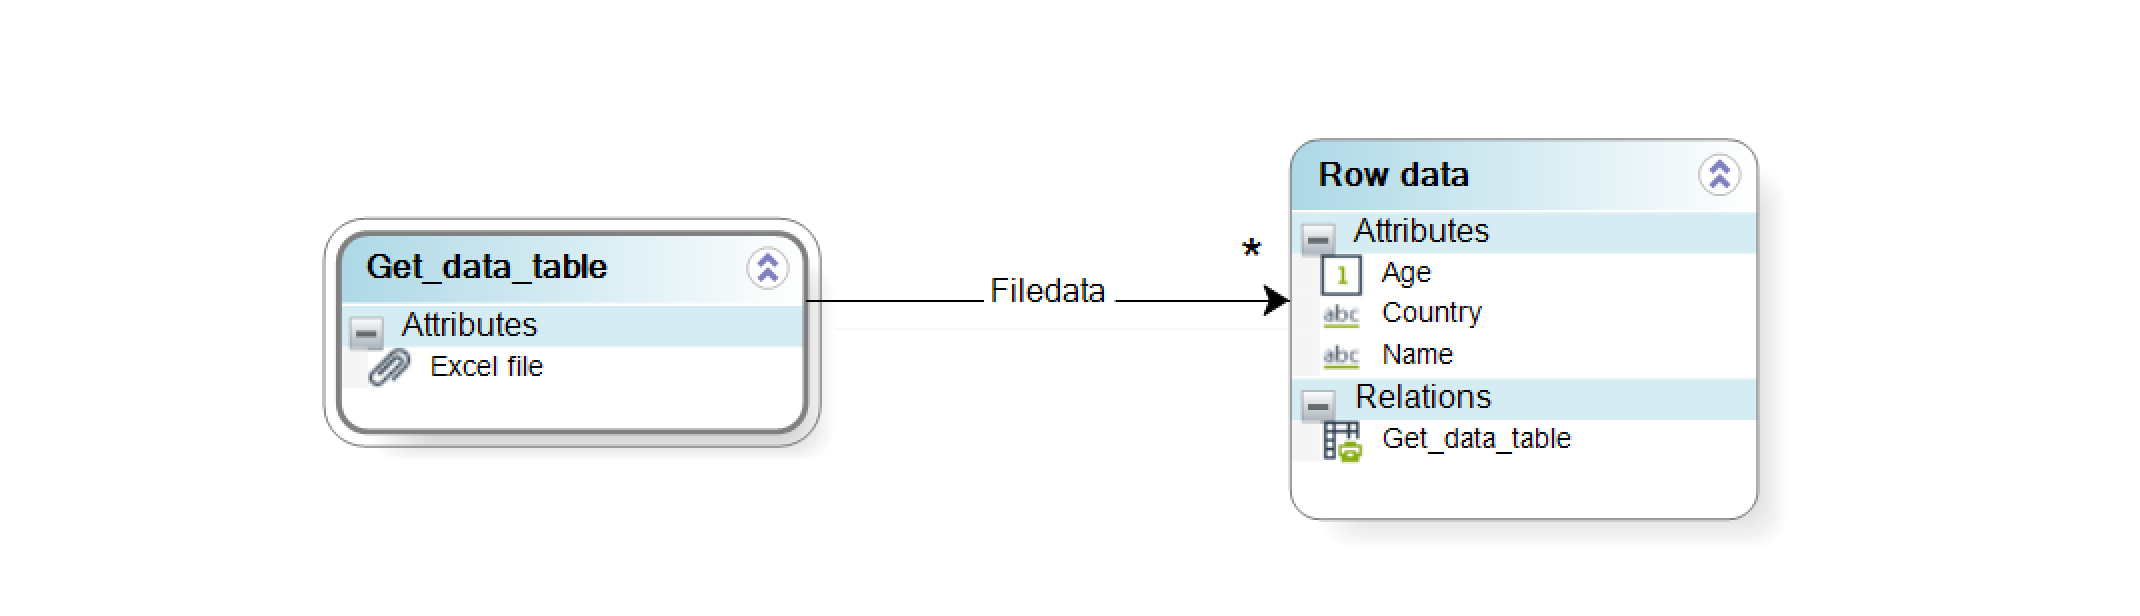
You need to have the information in a collection to access each user data from the data model (name, age, and country).
The process has the following tasks.
- Upload Excel file- Allows the user to upload the excel with the information to register
- Copy Excel information- Shows the information registered in the collection
The following image shows the data model to register the data.
Follow the steps shown below to register the customers in the collection.
- On the fourth step of the Bizagi Process Wizard, select Activity Actions.
- Select the task to perform the action (Upload Excel file) and create an On Exit expression.
-
Get the XPath expression corresponding to the excel file from
the data model.
var oFile = <Get_data_table.Excelfile>; -
Get the Data attribute from the
oFile variable.
var oFileData = oFile.get(0).getXPath("Data"); -
Define the index of the excel sheet to read.
var iSheetId = 0; -
Save the information of the defined sheet in the
dtContent variable, using the
GetDataTableFromWorkSheet function.
var dtContent = CHelper.GetDataTableFromWorkSheetAsString(oFileData,iSheetId); -
Populate the collection creating the new collection records
and matching the collection attributes with the excel columns.
for(var i=0; i<dtContent.Rows.Count; i++)
{
  var oRecord = dtContent.Rows[i];
  var newRecord = Me.newCollectionItem("Get_data_table.Filedata");
  newRecord.setXPath("Name",oRecord[0]);
  newRecord.setXPath("Age",oRecord[1]);
  newRecord.setXPath("Country",oRecord[2]);
}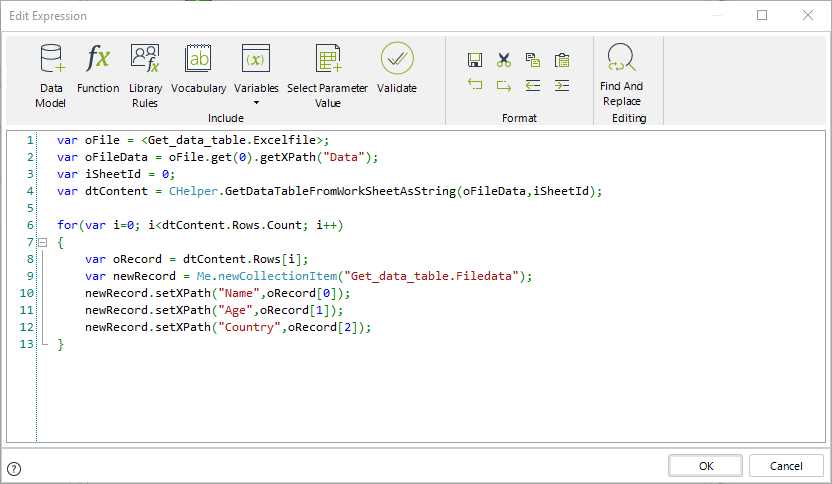
-
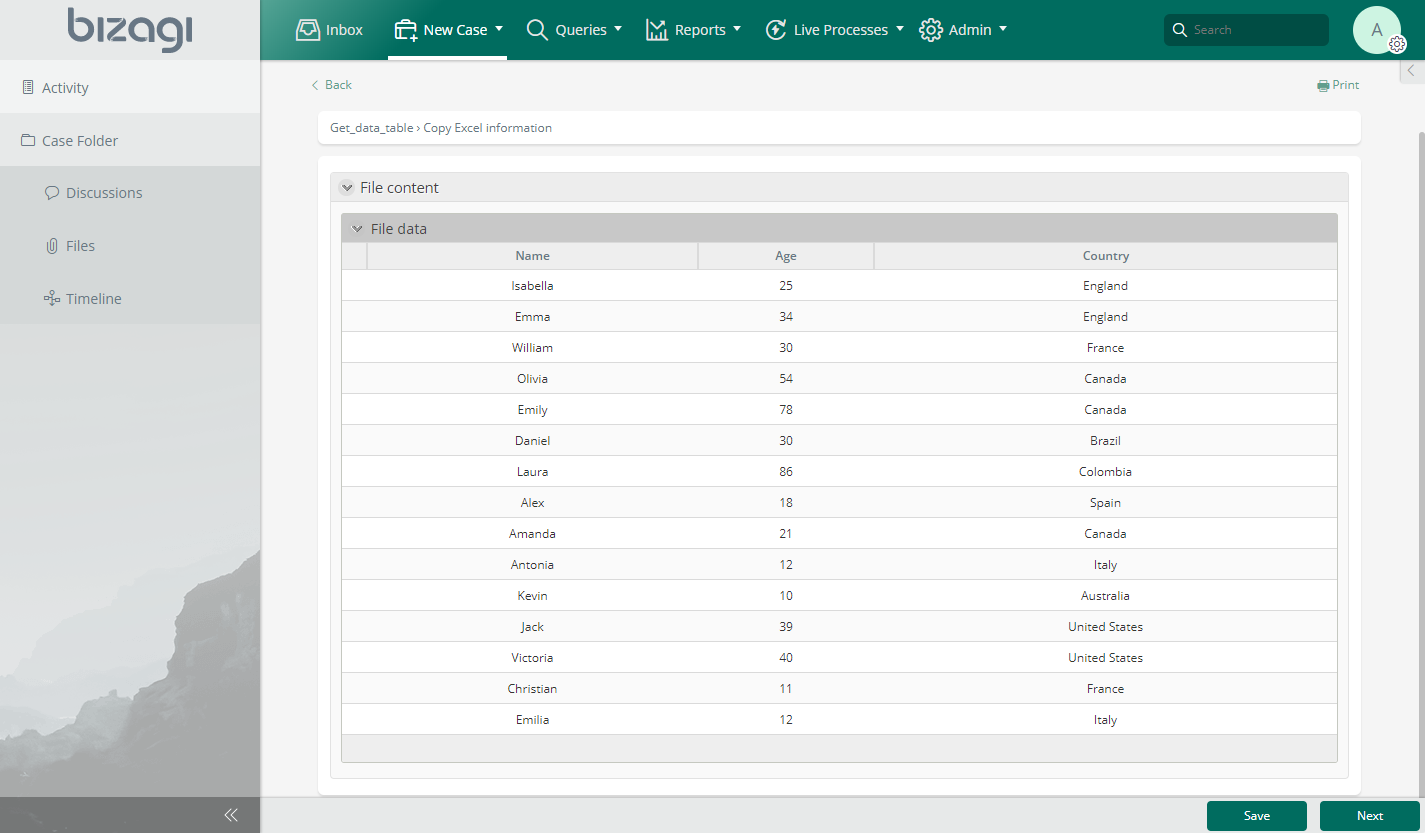
Run the project and go to the Work portal. Check that the
collection values match to file content.

getEffectiveDuration(ICAPIWorkItem, DateTime, DateTime)
Syntax
CHelper.getEffectiveDuration(ICAPIWorkItem Me, DateTime Start, DateTime End)Declaration
public static double getEffectiveDuration(ICAPIWorkItem Me, DateTime Start, DateTime End)Parameters
| Type | Name | Description |
|---|---|---|
| ICAPIWorkItem | Me | This parameter is fixed |
| System.DateTime | Start | Start date |
| System.DateTime | End | End date |
Returns
| Type | Description |
|---|---|
| System.Double | Difference between two dates |
Examples
Subtract Dates (difference between dates)
The following example illustrates how to find the difference between two dates: in days, years, hours, or minutes. The function used in this example will return the time difference considering only working days.
The number of business days in a vacation request will be calculated using the vacation's leave and return dates.
1. On the fourth step of the Bizagi Process Wizard, select Activity Actions.
Select the Task where this action will be performed, and create an Expression On Save of the Activity.

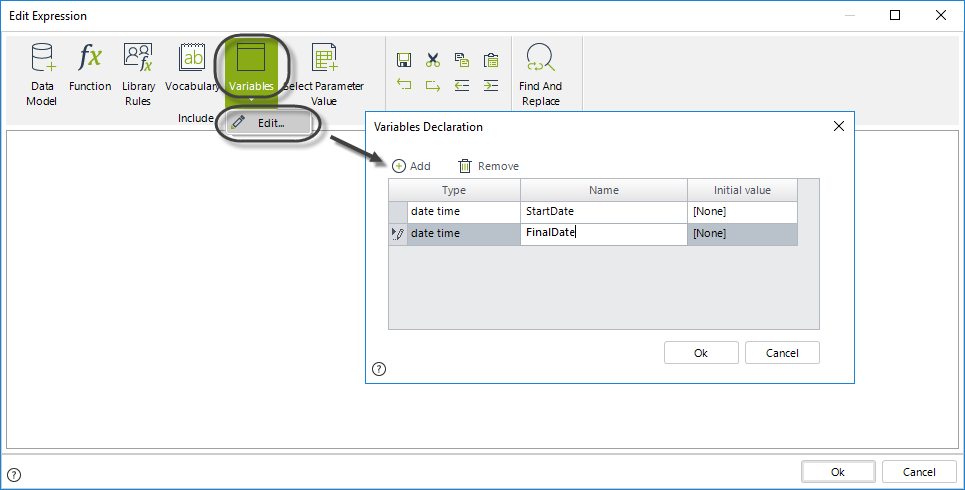
2. Declare as variables the Start and Final dates of the vacation requested by clicking Variables and selecting Edit.
3. Initialize the variables with the values of the corresponding attributes.

4. The date difference will be stored in an attribute of the data model called NumberofBusinessDaysReq. Use the Data Model option to select the attribute.
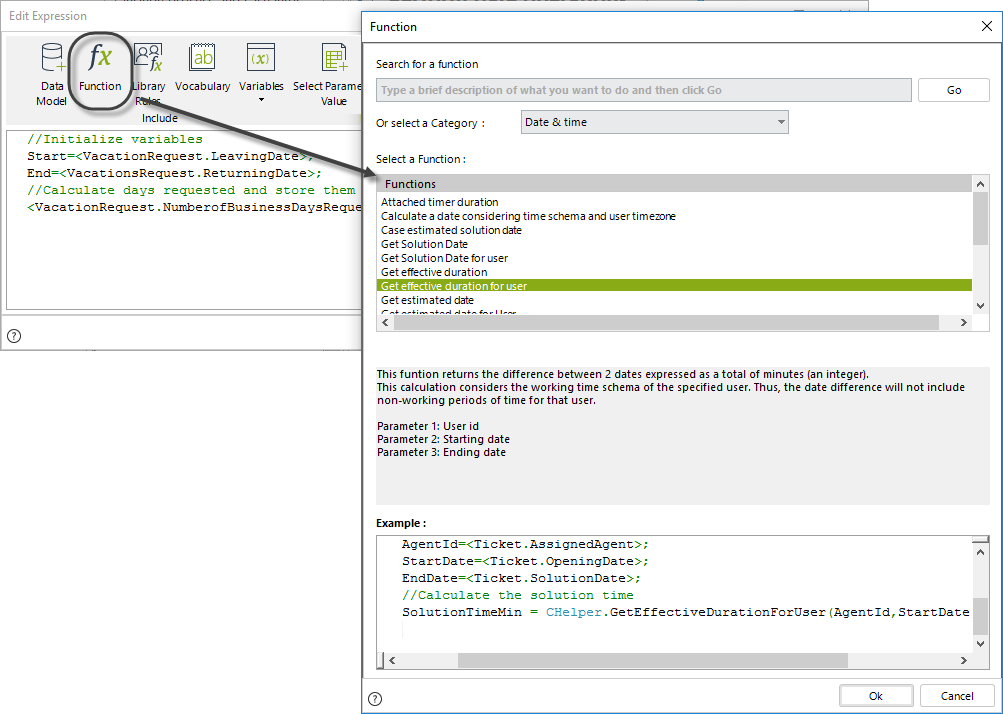
5. Call the GetEffectiveDuration function to calculate the date difference. The function is found in the Date & Time Category.
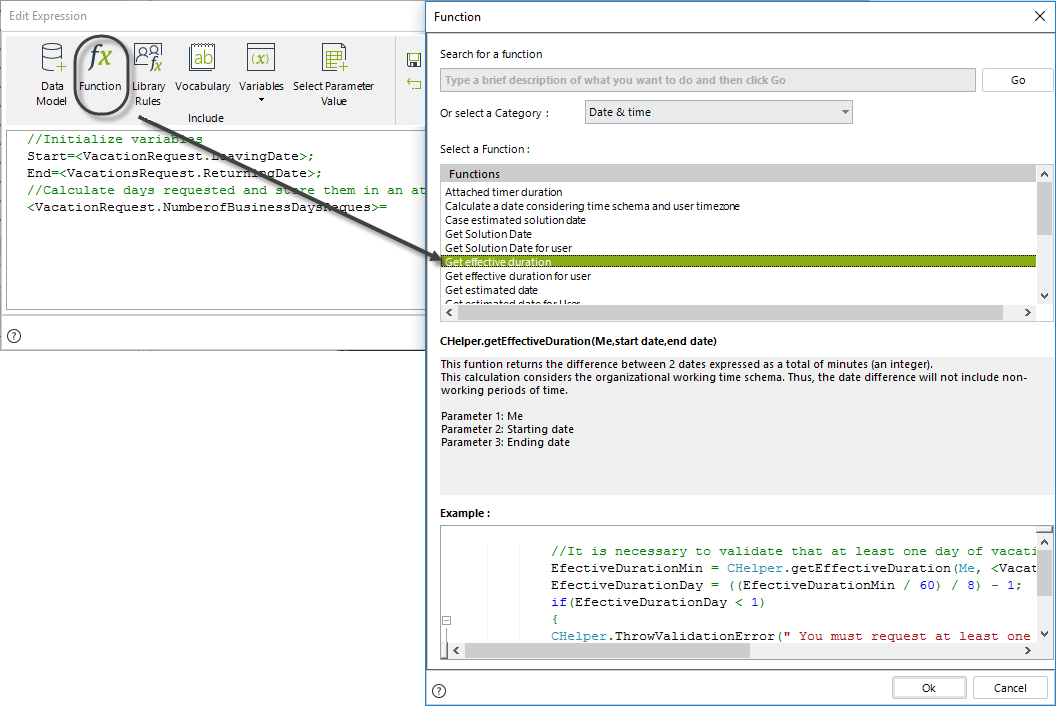
The parameters of this function are a Start date and an End date.
In this case, these dates are the StartDate and FinalDate variables declared above.
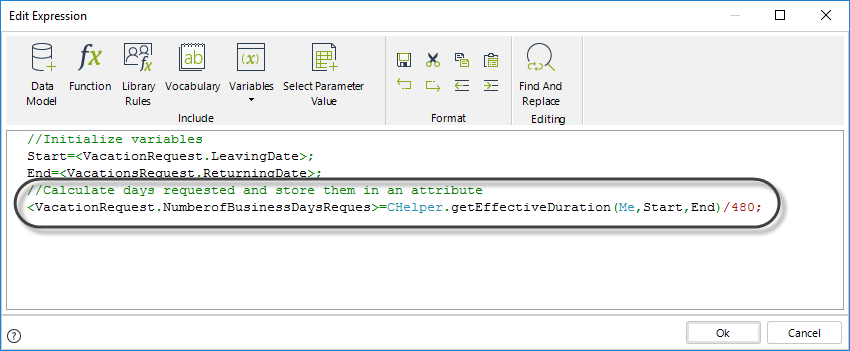
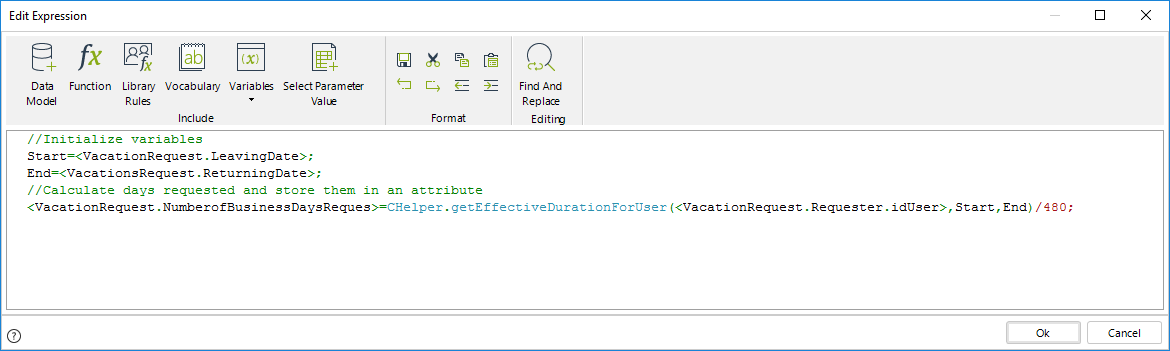
//Initialize variables
Start=<VacationRequest.LeavingDate>;
End=<VacationsRequest.ReturningDate>;
//Calculate days requested and store them in an attribute
<VacationRequest.NumberofBusinessDaysReques>=CHelper.getEffectiveDuration(Me,Start,End)/480;
Note that the result of the expression above is divided by '480'.
The function returns the difference in minutes; therefore, the result must be converted to days. By default, the working time schema has 8 hour working days (60 min per hour * 8 hours = 480 min). Since our result is needed in days, we must divide by '480'. For a duration in minutes, the division is unnecessary.

|
This calculation is done considering the
organizational working time schema. This means that the date difference (from the Start date to End date) will exclude non-working time. |
|---|
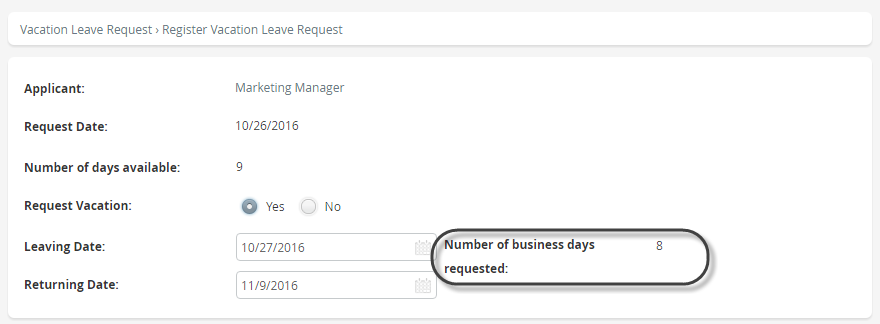
Once the expression performs the calculation, it can be evidenced in the Number of business days requested control.
getEffectiveDurationForUser(Int32, DateTime, DateTime)
Syntax
CHelper.getEffectiveDurationForUser(int idUser, DateTime Start, DateTime End)Declaration
public static double getEffectiveDurationForUser(int idUser, DateTime Start, DateTime End)Parameters
| Type | Name | Description |
|---|---|---|
| System.Int32 | idUser | User id |
| System.DateTime | Start | Start date |
| System.DateTime | End | End date |
Returns
| Type | Description |
|---|---|
| System.Double |
Difference between two dates taking into account the Working Time Schema of the user filtered by id |
Examples
Subtract Dates based on the Working time schema of a User
The following example illustrates how to find the difference between two dates taking into account the working time schema of a specified user: in days, years, hours, or minutes. The function used in this example will return the time difference considering only working days for the specified user.
The number of business days in a vacation request will be calculated using the vacation's leave and return dates.
1. On the fourth step of the Bizagi Process Wizard, select Activity Actions.
Select the Task where this action will be performed, and create an Expression On Save of the Activity.

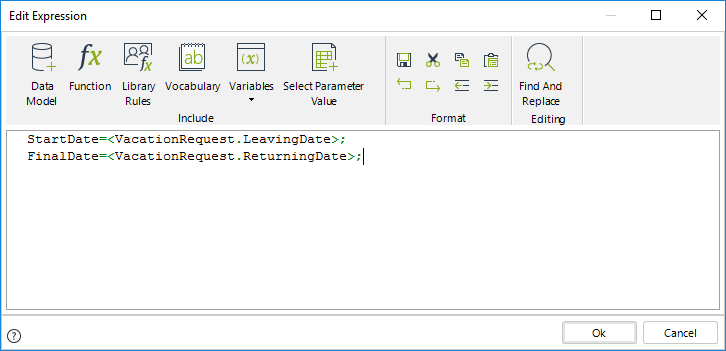
2. Declare as variables the StartDate and FinalDate of the vacation requested by clicking Variables and selecting New.

3. Initialize the variables with the values of the corresponding attributes.
4. The date difference will be stored in an attribute of the data model called NumberofBusinessDaysReq. Use the Data Model option to select the attribute.
5. Call the GetEffectiveDurationForUser function to calculate the date difference. The function is found in the Date & Time Category.
The parameters of this function are: id of the User, Start date, and End date.
In this case, the user is the vacation requester. The StartDate and FinalDate are the variables declared above.
//Initialize variables
Start=<VacationRequest.LeavingDate>;
End=<VacationsRequest.ReturningDate>;

//Calculate days requested and store them in an attribute
<VacationRequest.NumberofBusinessDaysReques>=CHelper.getEffectiveDurationForUser(<VacationRequest.Requester.idUser>,Start,End)/480;
Note that the result of the expression above is divided by '480'.
The function returns the difference in minutes; therefore, the result must be converted to days. By default, the working time schema has 8 hour working days (60 min per hour * 8 hours = 480 min). Since our result is needed in days, we must divide by '480'. For a duration in minutes, the division is unnecessary.
|
|
This calculation is done considering the working time schema of the specified user. This means that the date difference (from the Start date to End date) will exclude non-working time for that user. |
|---|

Once the expression performs the calculation, it can be evidenced in the Number of business days requested control.

getEntityAttrib(String, String, String)
Syntax
CHelper.getEntityAttrib(string Entity, string ValueToReturn, string filter)Declaration
public static object getEntityAttrib(string Entity, string ValueToReturn, string filter)Parameters
| Type | Name | Description |
|---|---|---|
| System.String | Entity | Name of the entity |
| System.String | ValueToReturn | Name of the attribute |
| System.String | filter |
Filter expression (refer to the second example for an alternate syntax) |
Returns
| Type | Description |
|---|---|
| System.Object |
Attribute value from an entity not related to the data model |
Examples
Get a value from an Entity not related to the Data Model
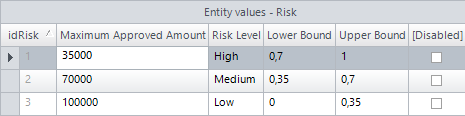
Suppose in a Credit Request process, the maximum amount that can be requested is based on a risk assessment. When an Analyst enters a calculated risk score in the Payment Capacity Task and click Save, the upper limit approval amount must be displayed.
The estimates of risk are stored in a Parameter Entity where each range has a corresponding maximum amount as follows:
Since the Parameter Entity Risk is not directly related to the Data Model, we need to use a function that searches with given criteria and returns a value.
We will use the getEntityAttrib function. This function can be found in the DataNavigation category.
It will pass the risk score entered by the Analyst, determine the range set, and return the maximum amount that can be requested.
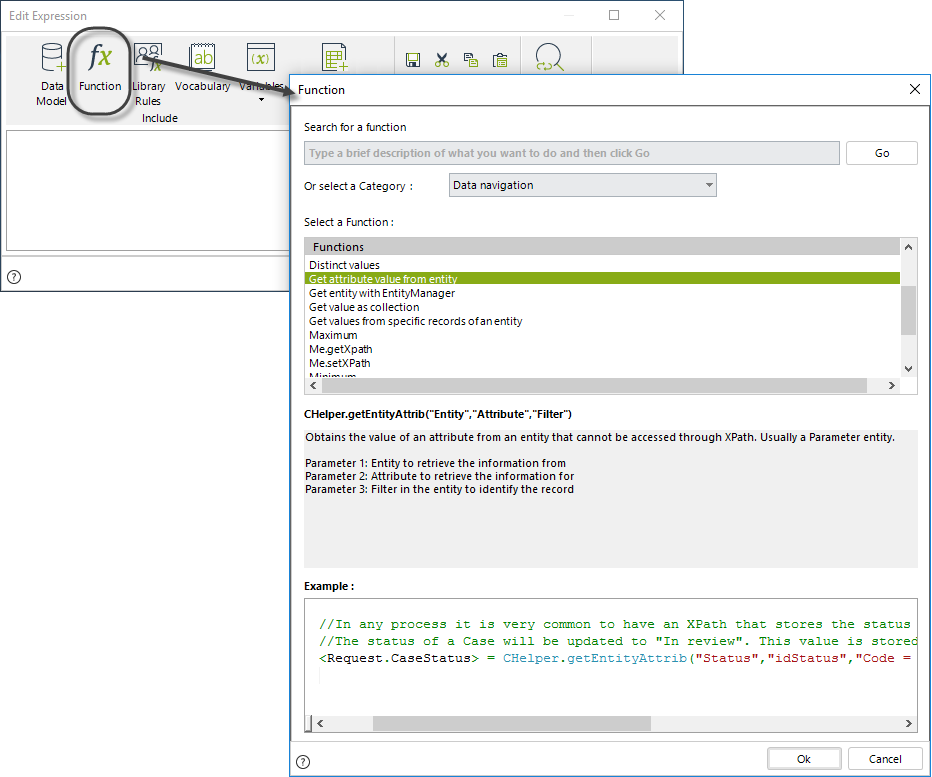
The syntax of the function is:
CHelper.getEntityAttrib("Entity","ValueToReturn","filter") The entity will be the Parameter Entity Risk.
The value to return will be the Maximum Approved Amount.
The filter will be the range of the risk entered.
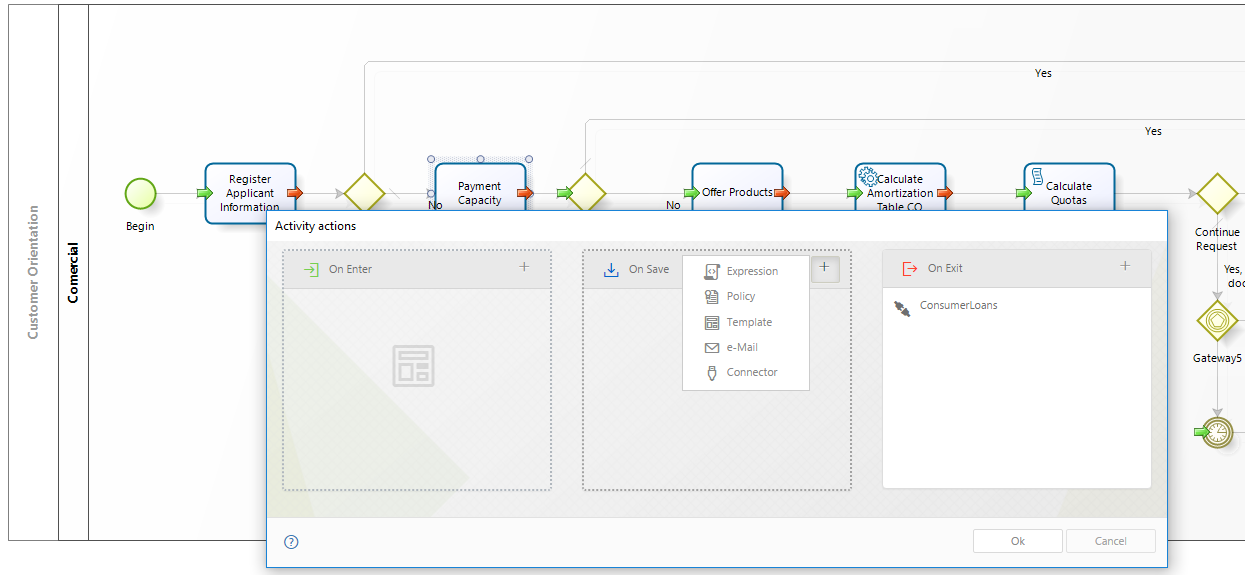
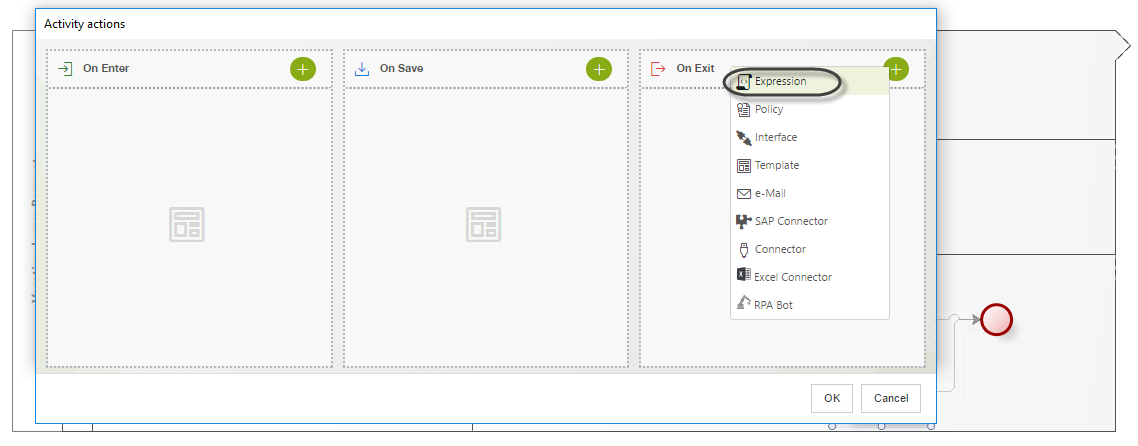
To perform this calculation, go to the fourth step of the Bizagi Process Wizard and select Activity Actions.
Click the Task where the upper limit approval amount must be displayed and create an On Save Expression.
The risk score entered by the Analyst is stored in the attribute Risk.
The maximum amount will be assigned to the attribute MaximumAmount.

The expression would be as follows:
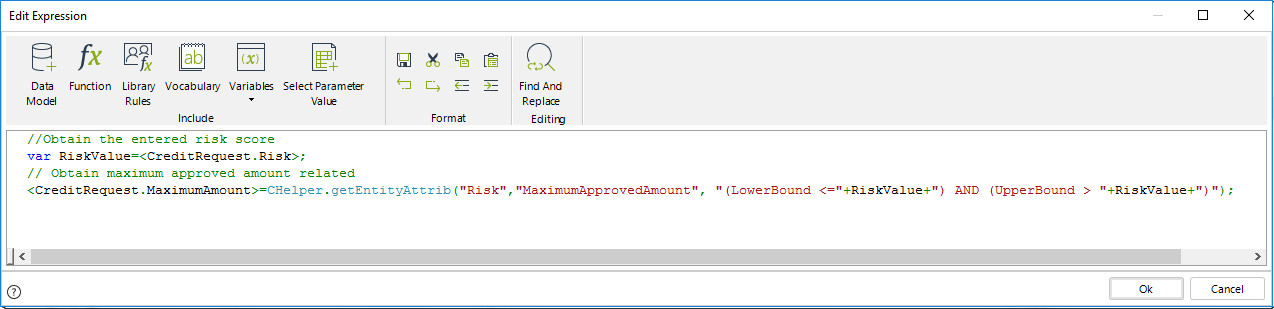
//Obtain the entered risk score
var RiskValue=<CreditRequest.Risk>;
// Obtain maximum approved amount related
<CreditRequest.MaximumAmount>=CHelper.getEntityAttrib("Risk","MaximumApprovedAmount",
"(LowerBound <="+RiskValue+") AND (UpperBound > "+RiskValue+")");
Click OK to save the changes.
When the Analyst enters a risk score and clicks Save, the corresponding maximum amount is displayed.


Example 2: Using a filter parameter
The following expressions are equivalent for setting a filter using the entity’s Id:
//Getting a single attribute using a surrogate key name
<RequestForSupplies.BillNumber> =
CHelper.getEntityAttrib("RequestForSupplies","OrderTotal","idRequestForSupplies=156")
//Getting a single attribute using an id
<RequestForSupplies.BillNumber> =
CHelper.getEntityAttrib("RequestForSupplies","OrderTotal","Id = 157")getEntityAttrib(String, String, String, FilterParameters)
Syntax
CHelper.getEntityAttrib(string Entity, string ValueToReturn, string filter, FilterParameters parameters)Declaration
public static object getEntityAttrib(string Entity, string ValueToReturn, string filter, FilterParameters parameters)Parameters
| Type | Name | Description |
|---|---|---|
| System.String | Entity | Name of the entity |
| System.String | ValueToReturn | Name of the attribute |
| System.String | filter |
Filter with @paramName as wildcard for parameter values.
|
| FilterParameters | parameters | Filter parameters |
Returns
| Type | Description |
|---|---|
| System.Object |
Attribute value from an entity not related to the data model |
Following the previous function behavior, setting an additional argument(FilterParameters) lets you specify an expression for filtering results
Examples
Using a filter expression by setting an id or a surrogate column key
You can use an alternate syntax for the filter expression.
The following expressions are equivalent for setting a filter as the third argument:
/*Using an expression with id for setting a variable with a constant */

var status =
CHelper.getEntityAttrib("RequestForSupplies","OrderTotal","idRequestForSupplies=@solid",parameters)
/*Using an expression with surrogate key for setting a variable with a constant */
var status =
CHelper.getEntityAttrib("RequestForSupplies","OrderTotal","Id = @solid",,parameters)getEstimatedDate(ICAPIWorkItem, DateTime, Int32)
Syntax
CHelper.getEstimatedDate(ICAPIWorkItem Me, DateTime dtFromDate, int iDuration)Declaration
public static DateTime getEstimatedDate(ICAPIWorkItem Me, DateTime dtFromDate, int iDuration)Parameters
| Type | Name | Description |
|---|---|---|
| ICAPIWorkItem | Me | This parameter is fixed |
| System.DateTime | dtFromDate | Initial date |
| System.Int32 | iDuration | Period |
Returns
| Type | Description |
|---|---|
| System.DateTime |
Estimated date taking into account the Working Time Schema |
Examples
Calculate a date based on the Working Time Schema
Suppose you need to calculate a date based on a given date plus a time. This can be done considering the OrganizationalWorking time schema so that the addition excludes non-working time.
The last activity in a Vacation Request process must be completed within a maximum time frame of five business days after the employee has returned from his/her vacations.
We will use the getEstimatedDate function, that returns a date, given an initial date (stored in the dtFromDate variable), a time range (five days stored in the iDuration variable), and considers the Working Time Schema. The duration of this function must always be returned in minutes.
1. In the fourth step of the Bizagi Process Wizard, select Activity Actions. Click the Task where this action will be performed and create an Expression.
2. Declare two date time type variables:
- ReturningDate: Stores the date on which the employee will return from his/her vacations.
- FixedDate: Stores the derived completion due date and will be used to set the Task Duration.
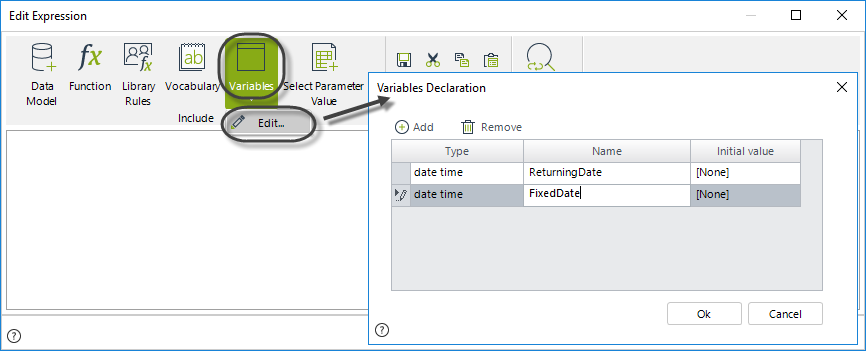
3. The Task duration will be calculated based on the attribute ReturningDate of the Data Model. The attribute's value is stored in the ReturningDate variable.
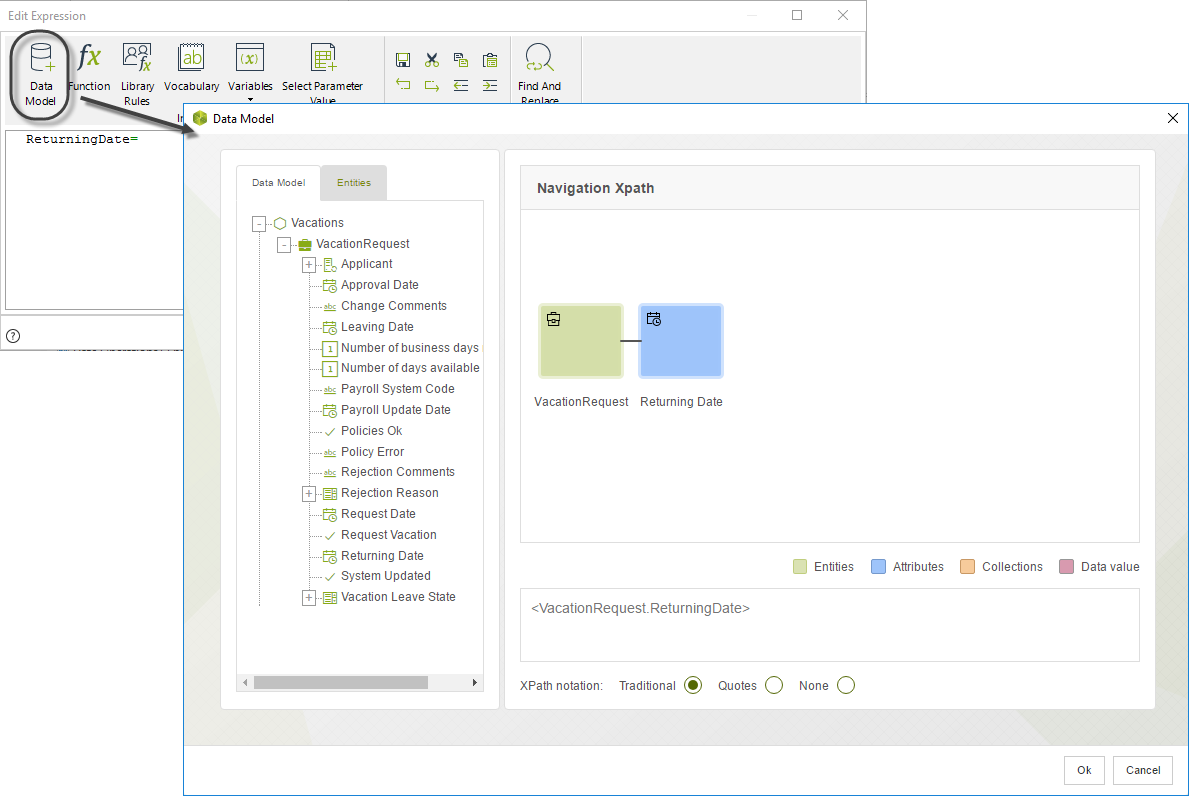
4. The task due date will be set to five days after the returning date. The five days will be added to the obtained date value stored in the variable, ReturningDate.
The result will be assigned to the FixedDate variable.
5. To calculate the new date, use the getEstimatedDate function which can be found in the Date & Time function category.
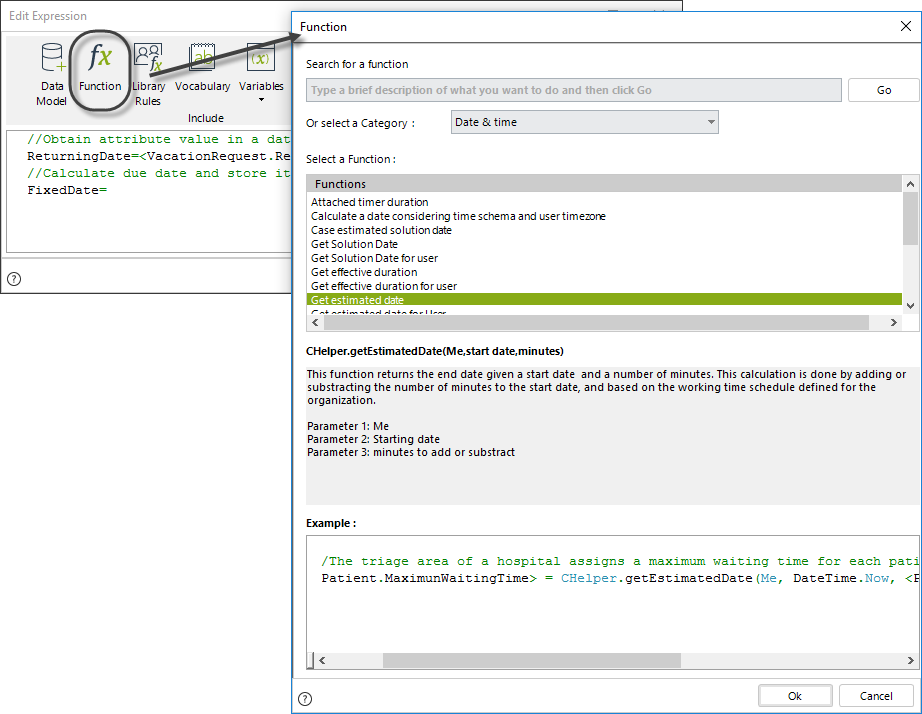
The syntax for the function is:
CHelper.getEstimatedDate(Me,dtFromDate,iDuration)|
|
This function does not consider the holidays configured for the organization. If your Business requirement needs to include them, you can use the getSolutionDate function. Both functions share the same attributes and the syntax for the function is: CHelper.getSolutionDate(Me,dtFromDate,iDuration) |
|---|
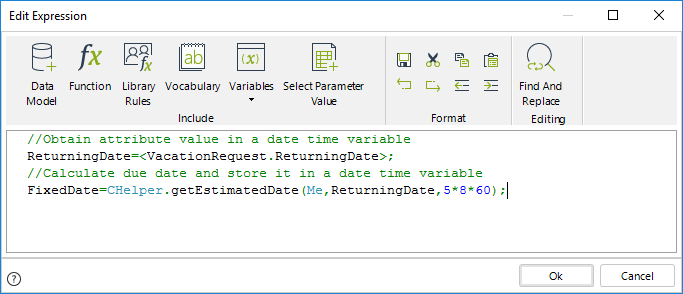
Note that the expression above converts days into minutes.
The conversion is needed as the iDuration parameter expects the duration in minutes. By default, the Working time schema has 8 hour working days. The total minutes in five days are calculated using the formula: 60 minutes in an hour multiplied by 8 hours in a day, then multiplied by 5 days (i.e., 5860)
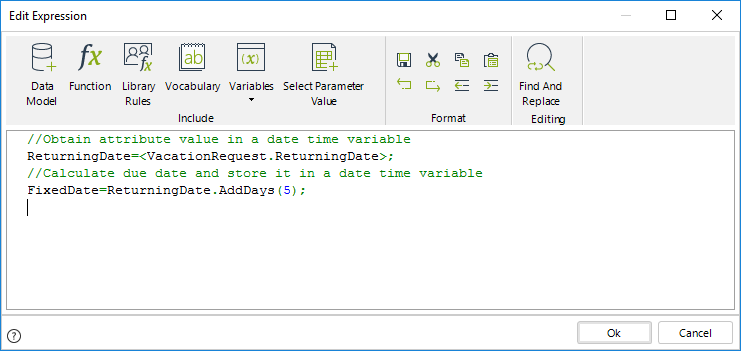
Finally, assign the task duration.
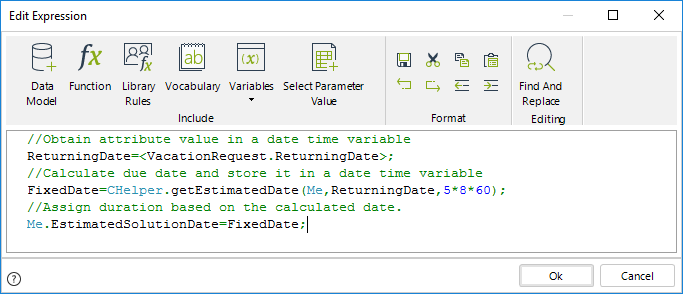
//Obtain attribute value in a date time variable
ReturningDate=<VacationRequest.ReturningDate>;

//Calculate due date and store it in a date time variable
// if you need to include the organizations's holidays use:

// FixedDate=CHelper.getSolutionDate(Me,ReturningDate,5*8*60);
FixedDate=CHelper.getEstimatedDate(Me,ReturningDate,5*8*60);

//Assign duration based on the calculated date.
Me.EstimatedSolutionDate=FixedDate;
Click OK to save the changes.
View SourcegetEstimatedDateForUser(Int32, DateTime, Int32)
This method returns the end date given a start date and a number of minutes. This calculation is done by adding or subtracting the number of minutes to the start date parameter and based on the working schedule defined for a specific user.
This function uses three parameters:
•idUser: Id of the user for which the working time schema is evaluated.
•dtFromDate: Date to add or subtract the given number of minutes.
•iDuration: The number of minutes to add or subtract to the Start date.
|
|
This function does not consider the holidays configured for the specific user. If your Business requirement needs to include them, you can use the getSolutionDateForUser function. Both functions share the same attributes and the syntax for the function is: |
|---|
Syntax
CHelper.getEstimatedDateForUser(int idUser, DateTime dtFromDate, int iDuration)Declaration
public static DateTime getEstimatedDateForUser(int idUser, DateTime dtFromDate, int iDuration)Parameters
| Type | Name | Description |
|---|---|---|
| System.Int32 | idUser | User Id |
| System.DateTime | dtFromDate | Initial date |
| System.Int32 | iDuration | Period |
Returns
| Type | Description |
|---|---|
| System.DateTime |
Estimated date taking into account the Working Time Schema of the user filtered by Id |
Examples
Calculate a date based on a given user's Working Time Schema
Suppose you need to calculate the Solution date in an internal Claims & Complaints Management process, the user assigned to solve the issue has six days to send an answer according to his/her working time schema. The requester and the assigned user could have two different Working Time Schemas because the company has two divisions in two different countries, and each user could belong to a different one.
To know the Answer Date, you can use the CHelper.getEstimatedDateForUser function.
Create an expression at the On Exit of the Receive Request Task; the new expression will be last because the Assigned User is set in previous expressions.
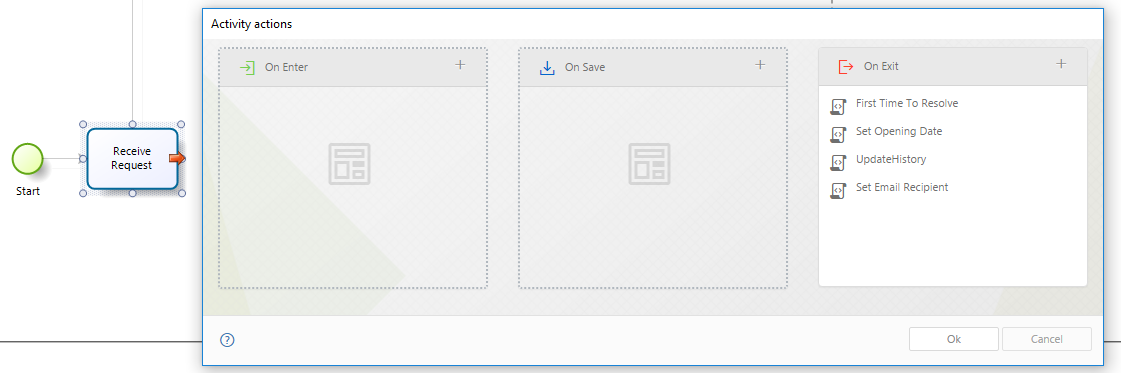
Use the getEstimatedDateForUser function and use as input parameters the Assigned User's Id, the Opening Date and the six days represented in minutes (type 6860). Add the result to the corresponding attribute in your Data model.
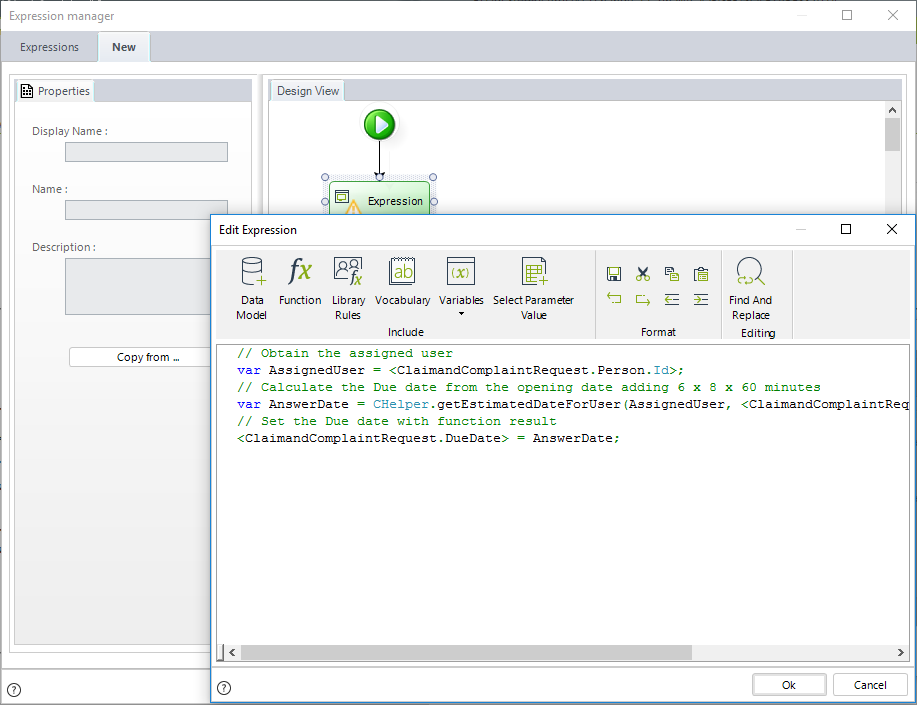
// Obtain the assigned user
var AssignedUser = <ClaimandComplaintRequest.Person.Id>;

// Calculate the Due date from the opening date adding 6 x 8 x 60 minutes
// if you need to include the user's holidays use:
// var AnswerDate = CHelper.getSolutionDateForUser(AssignedUser, <ClaimandComplaintRequest.OpeningDate>, 6*8*60);

var AnswerDate = CHelper.getEstimatedDateForUser(AssignedUser,<ClaimandComplaintRequest.OpeningDate>, 6*8*60);

// Set the Due date with function result
<ClaimandComplaintRequest.DueDate> = AnswerDate;getEstimatedDateFromUserDateTime(Int32, Int32)
This method returns a date based on a defined period and the Working Time Schema of a specific user.
It starts calculating the date from the moment the rule where the method is called is executed.
Syntax
CHelper.getEstimatedDateFromUserDateTime(int UserId, int iDuration)Declaration
public static DateTime getEstimatedDateFromUserDateTime(int UserId, int iDuration)Parameters
| Type | Name | Description |
|---|---|---|
| System.Int32 | UserId | User Id |
| System.Int32 | iDuration | Period |
Returns
| Type | Description |
|---|---|
| System.DateTime |
Date taking into account the Working Time Schema of the user filtered by Id |
Examples
Set timer duration considering the Working time schema and the user´s timezone
The Agility Corp manages the customer´s claims and complaints using Bizagi. The company has established that a customer service agent can spend a maximum of 4 hours to respond to a claim or a complaint. Agents work in with different shifts, so the due date of the resolution of a task must be set considering the company's working time schema and the agent's timezone.
Bizagi uses a method called Me.EstimatedSolutionDate, that calculates the due date of an activity. However, we will use it, considering the timezone of the user.
1. In the fourth step of the Bizagi Process Wizard (Business Rules), select Activity Actions.
Click on the task for which the duration will be set and create an On Enter Expression.
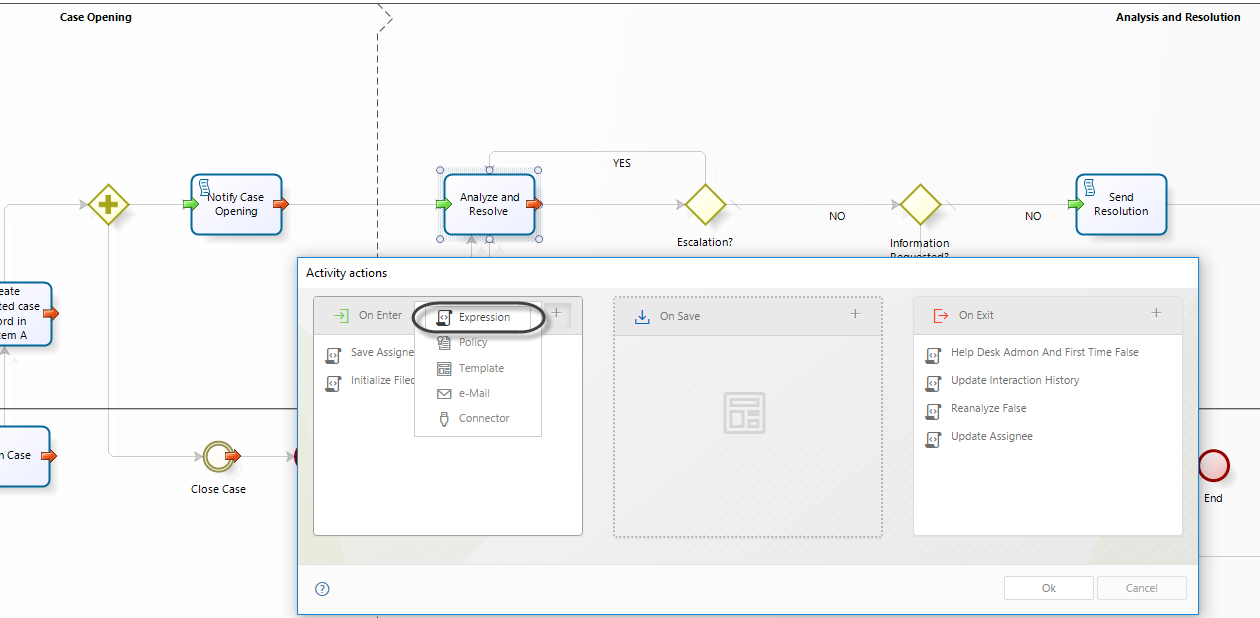
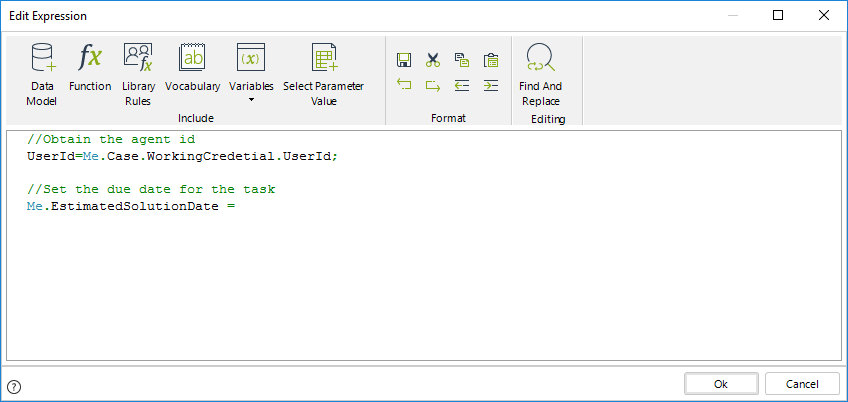
2. Create an expression.
First, we must obtain the agent's id using the function User id of the current user.
3. To set the duration to the task, use the function Case estimated solution date in the Date & Time Category
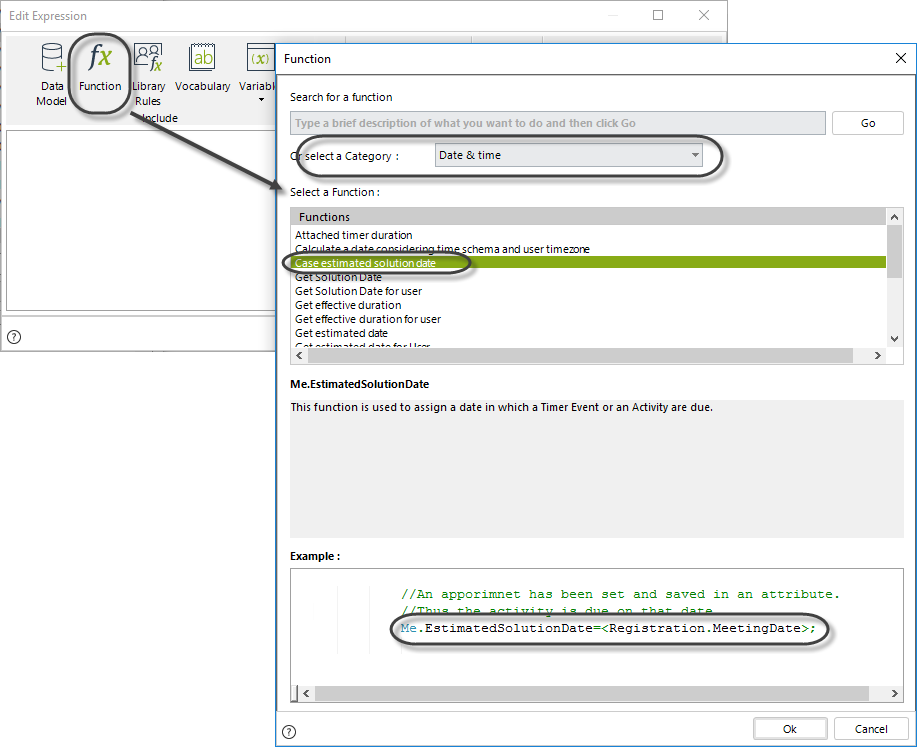
4. Use the function Calculate a date considering the time schema and user timezone to obtain the due date, considering the Working time schema and the agent's timezone.
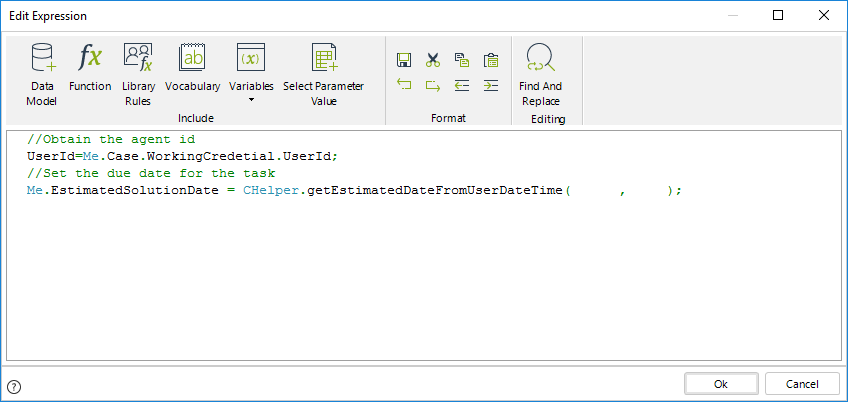
The syntax for the function is:
CHelper.getEstimatedDateFromUserDateTime(UserId,iDuration)Include the parameters of the function. The first parameter is the id of the agent user that we previously obtained, and the second parameter is the time in minutes the agent has to complete the task.
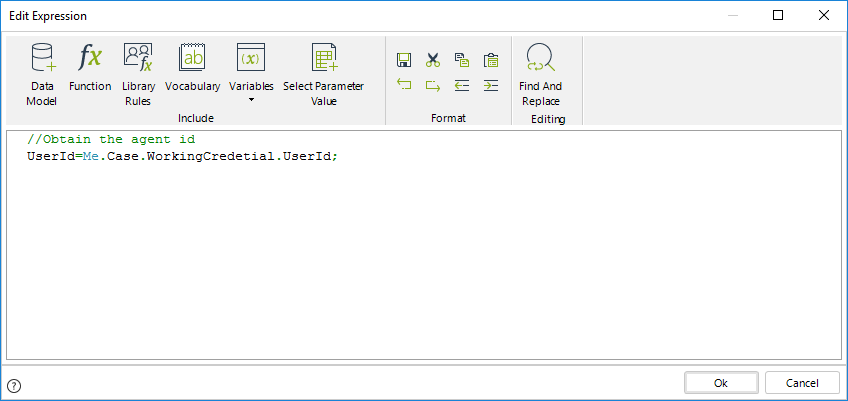
The expression code is as follows:
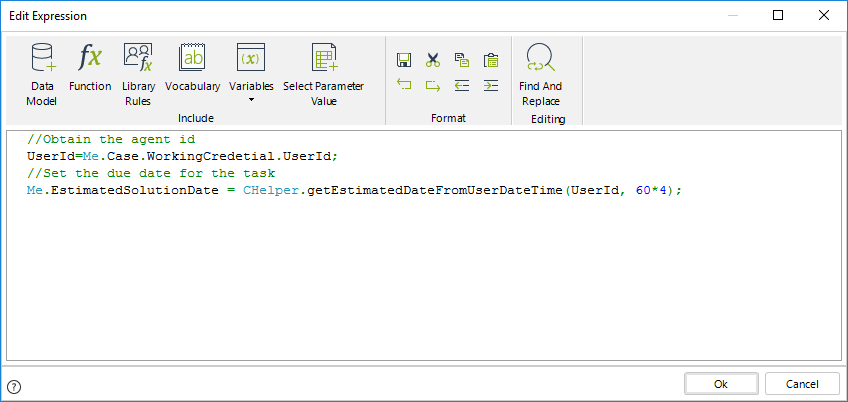
Note that the expression above converts days into minutes.
The conversion is needed as the iDuration parameter expects the duration in minutes. The total minutes in 4 hours is calculated using the formula: 60 minutes in an hour multiplied by 4 hours (i.e., 60*4)
//Obtain the agent id
UserId=Me.Case.WorkingCredetial.UserId;

//Set the due date for the task
Me.EstimatedSolutionDate = CHelper.getEstimatedDateFromUserDateTime(UserId, 60*4);GetLocalizedValue(String, String, Long)
Returns the localized value of a specific attribute from an entity using the current user's language. If the searched value is not localized, it returns the default value, as stored in the entity.
Declaration
public static object GetLocalizedValue(string entityName, string attribName, long surrogateKeyValue)Parameters
| Type | Name | Description |
|---|---|---|
| System.String | entityName |
Name of the entity where the attribute is stored. |
| System.String | attribName |
Name of the attribute with the localized value |
| System.Int32 | surrogateKeyValue |
Id of the record corresponding to the value to be consulted |
Returns
| Type | Description |
|---|---|
| Object |
Returns the value of a localized entity attribute using the current user's language |
Examples
Using a variable for getting the localized value for a string attribute defined in the OfficeSupplyRequest entity
CHelper.GetLocalizedValue("OfficeSupplyRequest", "Deliveryaddress",1);
//Returns the localized value (e.g 1234 Bizagi street)GetNextSeqValueStr(String)
Syntax
CHelper.GetNextSeqValueStr(string SequenceName)Declaration
public static int GetNextSeqValueStr(string SequenceName)Parameters
| Type | Name | Description |
|---|---|---|
| System.String | SequenceName | Name of the sequence to request |
Returns
| Type | Description |
|---|---|
| System.Int32 | Next value of the sequence filtered by name |
Examples
Using a Sequence to save consecutive numbers in Attributes
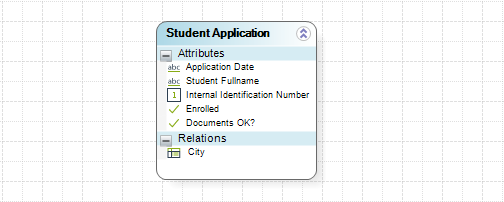
Suppose you have a Students Enrollment Process where the Administrative Department of a University registers and enrolls students. Once the student has been enrolled, a consecutive number is generated to identify him/her within the university. This unique number will appear in the student identification card.
This is the Data Model of the Process
To create a Sequence, follow the next steps:
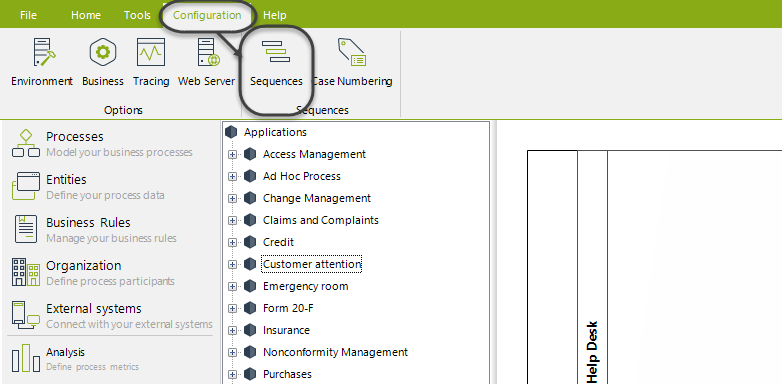
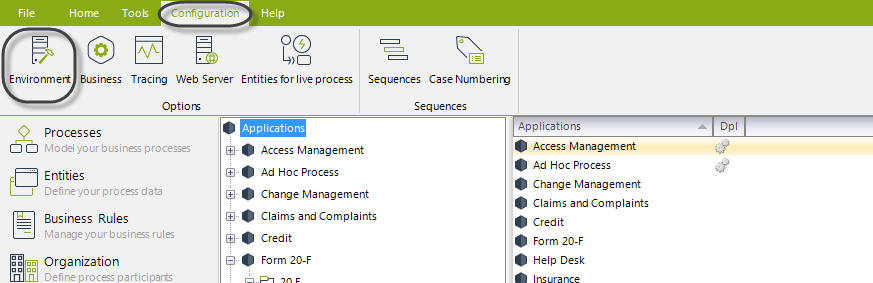
1. Go to the Expert View open the Configuration tab and click Sequences.
2. In the new window, click Add to include a new Sequence
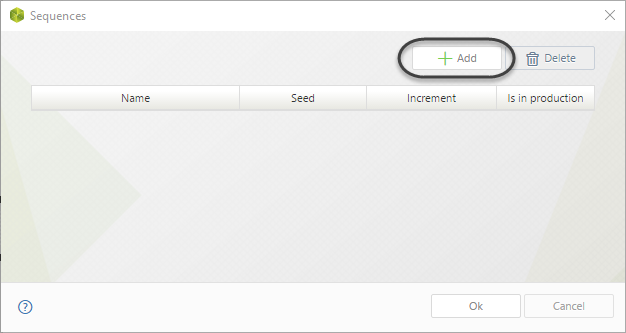
The first field, Id, will be valued automatically by Bizagi.
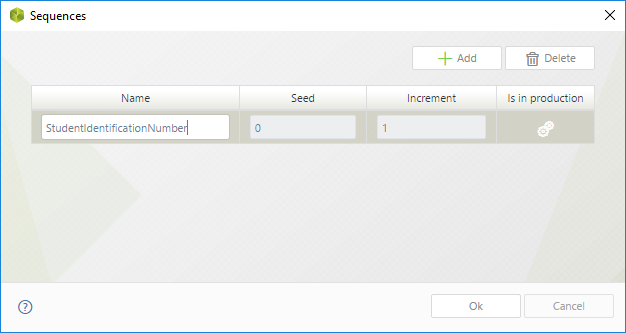
Give the sequence a descriptive name. The name must not contain special characters such as spaces, accent marks, or symbols.
Specify a value for the Seed that corresponds to the initial value of the sequence. It must be a numeric value.
Set the Increment value as the amount to increase the Seed by. It must be a numeric value.
For our example, the initial value is 0 (Seed), and it will be incremented by 1 (Increment) each time a student enrolls.
Click OK to save the changes.
3. On the fourth step of the Bizagi Process Wizard, select Activity Actions.
Click on the Task where the Sequence will be assigned to the attribute and create an Expression.
4. Create the expression to set the identification number.
We will assign the sequence value to the Internal Identification Number attribute. Use the Get next sequence value function, which can be found in the Miscellaneous Function category to retrieve the next sequential value.
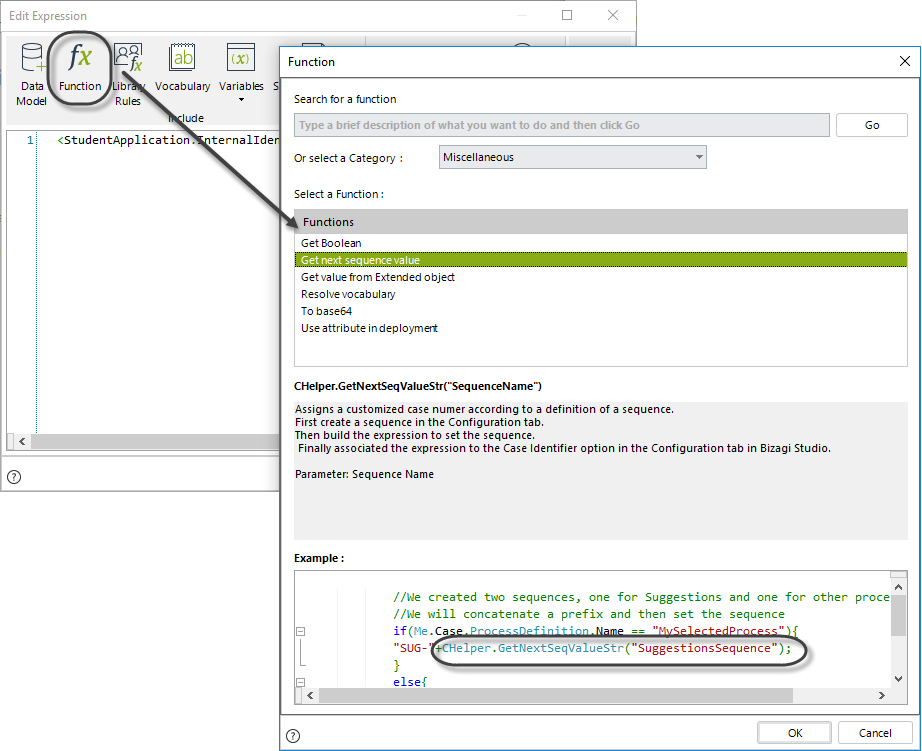
The expression would be as follow:
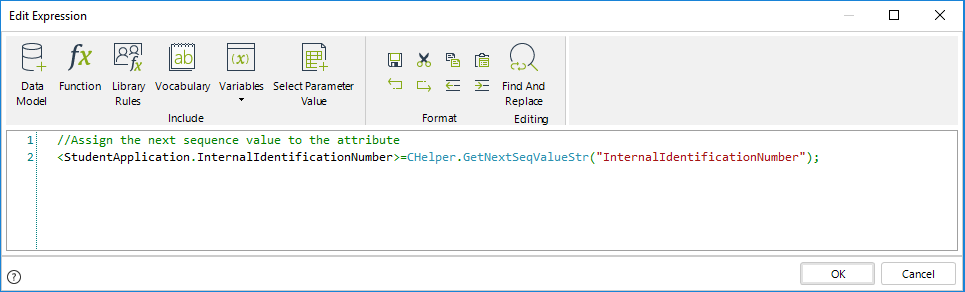
//Assign the next sequence value to the attribute
<StudentApplication.InternalIdentificationNumber>=CHelper.GetNextSeqValueStr("InternalIdentificationNumber");
Using a Sequence to Customize Case Numbers
By default, Bizagi assigns a unique Case Number to each instance of a Process with an internal sequence that avoids duplicity and conflicts. You might want to customize these identifiers for all or some of your Processes in which case Bizagi allows you to define your Case Numbers setting a customized sequence and using prefixes and suffixes.
To learn more about how to customize case numbers using sequences, refer to CustomizeCase numbers.
View SourceGetOffsetForLocation(Int32)
Returns the difference in minutes between a location's time zone and the server time (UTC+0).
Declaration
public static object GetOffsetForLocation(int idLocation)Parameters
| Type | Name | Description |
|---|---|---|
| System.Int32 | idLocation | The ID of the location whose time zone is used in the calculation. |
Returns
| Type | Description |
|---|---|
| System.Object | The time difference, in minutes, between the specified time zone and UTC+0. |
Remarks
If the location does not have a defined time zone, Bizagi checks whether the Organization has one. If not, the time zone defined for the app is used.
Examples
Consider the following scenario: An employee needs to submit a travel request for a business trip to a different time zone. Accurately handling time differences is essential for scheduling meetings and ensuring clear communication. In this case, the employee includes the destination information in the request. The system then calculates the time zone offset for the destination using the CHelper.GetOffsetForLocation function—an important step for coordinating with contacts in the destination time zone.
// Use CHelper to get the time zone offset for location ID 1
var GetOffsetForLocation1 = CHelper.GetOffsetForLocation(1);
// Log the calculated offset value
CHelper.trace("TestOffset", "GetOffsetForLocation1 = " + GetOffsetForLocation1);
// Store this value in a process attribute if needed
var timeZoneOffsetAttribute = GetOffsetForLocation1;
GetOffsetForOrganization(Int32)
Returns the difference in minutes between an organization's time zone and the server time (UTC+0).
Declaration
public static object GetOffsetForOrganization(int idOrg)Parameters
| Type | Name | Description |
|---|---|---|
| System.Int32 | idOrg | The ID of the organization whose time zone is used in the calculation. |
Returns
| Type | Description |
|---|---|
| System.Object | The time difference, in minutes, between the organization's time zone and UTC+0. |
Remarks
If the organization does not have an associated time zone, the app's configured time zone is used instead.
Examples
Consider the following scenario: An employee needs to submit a travel request for a business trip to another time zone. Accurately handling time differences is crucial for scheduling meetings and ensuring smooth communication. In this example, the employee submits a request that includes details about visiting another branch of the organization. The system uses the CHelper.GetOffsetForOrganization function to calculate the destination’s time zone offset—an important step for coordinating with local teams and planning meetings.
// Use CHelper to get the time zone offset for organization ID 1
var OffsetForOrganization1 = CHelper.GetOffsetForOrganization(1);
// Log the calculated offset value
CHelper.trace("TestOffset", "OffsetForOrganization1 = " + OffsetForOrganization1);
// Store this value in a process attribute if needed
var orgTimeZoneOffsetAttribute = OffsetForOrganization1;
GetOffsetForUser(Int32)
Returns the difference in minutes between a specific user's defined time zone and the server time (UTC+0).
Declaration
public static object GetOffsetForUser(int userId)Parameters
| Type | Name | Description |
|---|---|---|
| System.Int32 | userId | The ID of the user whose time zone is used in the calculation. |
Returns
| Type | Description |
|---|---|
| System.Object | The time difference, in minutes, between the user's time zone and UTC+0. |
Remarks
If the user does not have a defined time zone, Bizagi checks whether their associated Location has one. If not, it then checks the Organization. If none of these levels have a configured time zone, the app's default time zone is used.
Examples
Consider the following scenario: An employee needs to submit a travel request for a business trip to a different time zone. Accurately managing time zone differences is essential to ensure meetings and communications are properly scheduled. In this example, the employee submits a request, and the system calculates the time zone offset for the specific user using the CHelper.GetOffsetForUser function. This helps personalize schedules and supports effective coordination with team members across various time zones.
// Use CHelper to get the time zone offset for user ID 1
var GetOffsetForUser1 = CHelper.GetOffsetForUser(1);
// Log the calculated offset value
CHelper.trace("TestOffset", "GetOffsetForUser1 = " + GetOffsetForUser1);
// Store this value in a process attribute if needed
var userTimeZoneOffsetAttribute = GetOffsetForUser1;
GetOffsetForWorkingTimeZone()
Returns the difference in minutes between the time zone defined in the WorkingTimeZone key and the server time (UTC+0).
Declaration
public static object GetOffsetForWorkingTimeZone()Returns
| Type | Description |
|---|---|
| System.Object | The time difference, in minutes, between the defined working time zone and UTC+0. |
Remarks
If the organization does not have a time zone specified in the WorkingTimeZone key, the function defaults to returning the UTC+0 time.
Examples
Consider the following scenario: An employee needs to submit a travel request for a business trip to a different time zone. Managing time differences is essential to ensure that meetings and communications are scheduled appropriately. In this case, the system calculates the time zone offset using the organization's standard working time zone by calling the CHelper.GetOffsetForWorkingTimeZone function. This ensures that events are aligned with the organization's operational hours.
// Use CHelper to get the time zone offset for the organization's working time zone
var OffsetForWorkingTimeZone = CHelper.GetOffsetForWorkingTimeZone();
// Log the calculated offset value
CHelper.trace("TestOffset", "GetOffsetForWorkingTimeZone = " + OffsetForWorkingTimeZone);
// Store this value in a process attribute if needed
var workingTimeZoneOffsetAttribute = OffsetForWorkingTimeZone;
getParameterValue(String)
Syntax
CHelper.getParameterValue(string parameterName)Declaration
public static string getParameterValue(string parameterName)Parameters
| Type | Name | Description |
|---|---|---|
| System.String | parameterName | Name of the parameter to request |
Returns
| Type | Description |
|---|---|
| System.String | Parameter value |
Examples
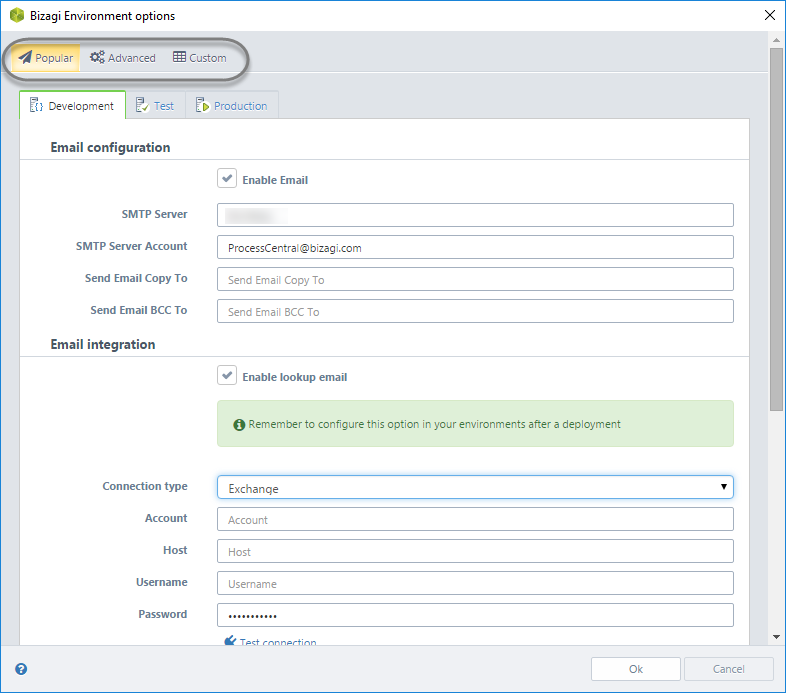
The Environment Configuration determines how the email sending, scheduler, uploads, and logging options are configured. This option is found in the Configuration Tab in Bizagi Studio's Standard Menu.
The Environment Configuration has three main options:
- Popular
- Advanced
- Custom
Custom
From this option, you can add, edit, and delete the different project parameters for each environment (Development, Test, Production).
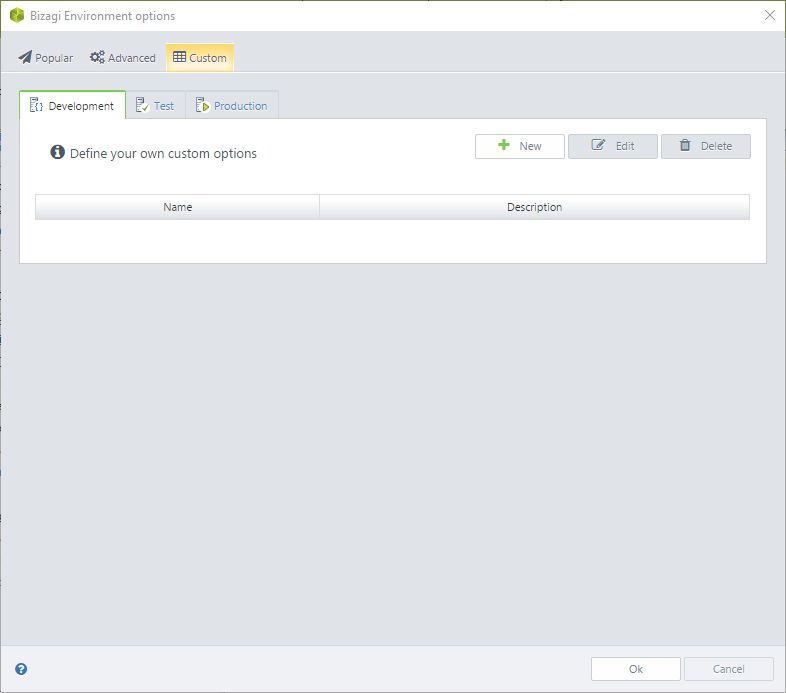
•To add new parameters, click the plus sign ( ). A new window appears. Define the name, value, and
description for the parameter.
). A new window appears. Define the name, value, and
description for the parameter.
•The edit button will display the same window, but with the information of the selected parameter.
•Selecting a parameter and clicking the trashcan icon (![]() ) will remove the parameter.
) will remove the parameter.
Custom parameters can then be used in a Scripting Expression in the following way:
CHelper.getParameterValue("PARAMETER_NAME");If you create a custom parameter named LOGOSPATH, you can use it in an Expression in the following way:
var tmp = CHelper.getParameterValue("LOGOSPATH");|
|
In case you want to set a different address for the User Portal, the web.config file of the Work Portal needs to be modified (more specifically, the value associated with the SERVER_NAME key). Please take into account that it is not recommended to change the configuration values directly in the Web.Config file unless it is strictly necessary. Instead, use the Environment Configuration functionality whenever possible. |
|---|

Custom Parameters in Production
To guarantee the correct performance of all environments, once deployed, Custom Parameters will not be available to edit or delete.
View SourcegetParentProcessId(Int32, String)
This function returns the parent's Id for a case without context.
Syntax
CHelper.getParentProcessId(int caseId, string wfclassName)Where caseId is the child process's Id and wfClassName is the parent's WfClassName.
Declaration
public static int getParentProcessId(int caseId, string wfclassName)Parameters
| Type | Name | Description |
|---|---|---|
| System.Int32 | caseId | Case Id |
| System.String | wfclassName | Parent's WfClassName |
Returns
| Type | Description |
|---|---|
| System.Int32 | Parent's Id |
GetPersonasForUser(Int32)
Obtain all users given a Persona
The following function allows you to obtain the Persona object given a user, and navigate it using XPath.
Syntax
CHelper.GetPersonasForUser(int userId)Declaration
public static ArrayList GetPersonasForUser(int userId)Parameters
| Type | Name | Description |
|---|---|---|
| System.Int32 | userId | Integer with the user Id to evaluate |
Returns
| Type | Description |
|---|---|
| System.Collections.ArrayList | public static ArrayList GetPersonasForUser(int userId) |
Examples
var Doc = CHelper.GetPersonasForUser(Me.Case.WorkingCredential.UserId);
<Triage.Attendingdoctor> = Doc;
<var specialty = Doc.getXPath("specialty");
GetPersonasForUser(Int32, String)
Get all Personas for a specified User, or the specified Personas
The following function allows you to obtain the Persona object given a user, and navigate it using XPath.
Syntax
CHelper.GetPersonasForUser(int userId)Declaration
public static IBaseEntity GetPersonasForUser(int userId, string namePer)Parameters
| Type | Name | Description |
|---|---|---|
| System.Int32 | userId | Integer with the user Id to evaluate |
| System.String | namePer | String with the name of the required Persona |
Returns
| Type | Description |
|---|---|
| IBaseEntity | Obtains all the Personas of a given user |
Examples
In an Emergency room we need to allocate the Doctor who attended an emergency to the next task
var Doc = CHelper.GetPersonasForUser(Me.Case.WorkingCredential.UserId, "Doctor");
<Triage.Attendingdoctor> = Doc;
<var specialty = Doc.getXPath("specialty");
getSiblingProcessesId(ICAPIWorkItem, String)
Obtain the Ids of sibling Processes from the current Sub-Process' Parent Process.
You can obtain the identifiers of the sibling Processes (Sub-Processes with the same parent Process) of a specific Process by using the getSiblingProcessesId function.
This function returns a list with the Sub-Processes’ identifiers of the current case, which belong to the class of Process (workflow) specified.
Syntax
CHelper.getSiblingProcessesId(ICAPIWorkItem Me, string WfClassName)Declaration
public static ArrayList getSiblingProcessesId(ICAPIWorkItem Me, string WfClassName)Parameters
| Type | Name | Description |
|---|---|---|
| ICAPIWorkItem | Me | This parameter is fixed |
| System.String | WfClassName | Identifier of the process (workflow class) |
Returns
| Type | Description |
|---|---|
| System.Collections.ArrayList | list of Sub-Processes’ identifiers |
Examples
A Police Department decided to automate the Homicide cases handling Process in Bizagi. In the first Activity of the Process, all the information of the homicide is entered. A list of suspects is also created to perform the corresponding investigations.
The Suspect Investigation Sub-Process is opened for each suspect. As soon as one of the suspects is found responsible for the homicide, the other investigations must be canceled, and the Process continues to generate the arrest warrant and proceed with the capture.
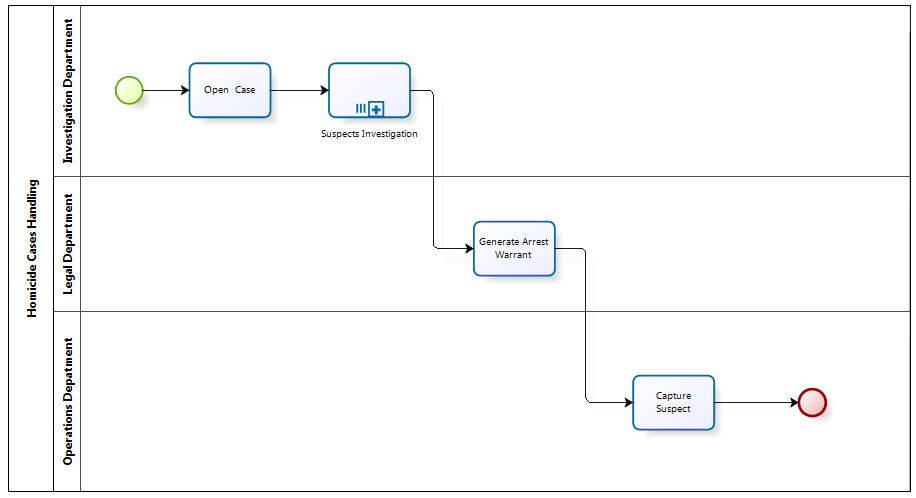
A Divergence Gateway is used to evaluate if a suspect was found responsible when the investigation finishes. If so, an expression is executed to cancel the other investigations; otherwise, the Sub-Process finishes, and the unsolved crime becomes a "cold case".

Follow the next steps to create the expression that cancels the remaining investigations.
1. Go to the fourth step of the Bizagi Process Wizard (Business Rules) and select Activity Actions.
Select the Cancel Active Investigations Task within the Suspect Investigations Sub-Process and create an On Enter Expression.

2. Add an Expression module. Obtain the list of sibling Sub-Processes (other investigations) and save it in a variable using the getSiblingsProcessesId function found in the Current case information category.
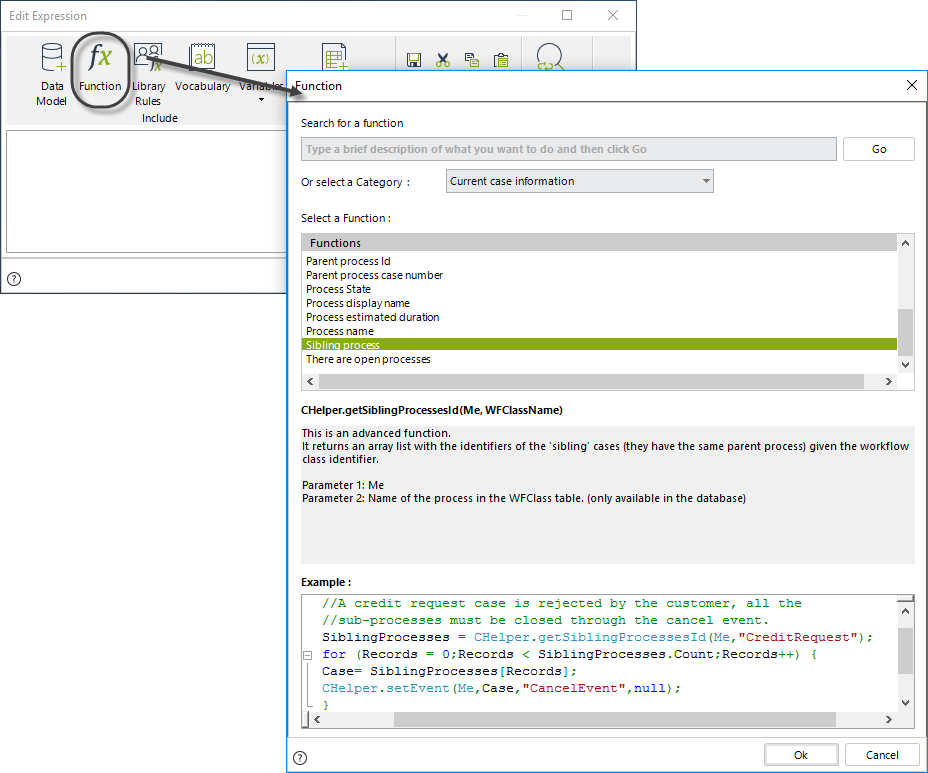
The parameter of this function is the identifier of the process (workflow class). To obtain this parameter, follow the steps described on How to obtain wfClassName.
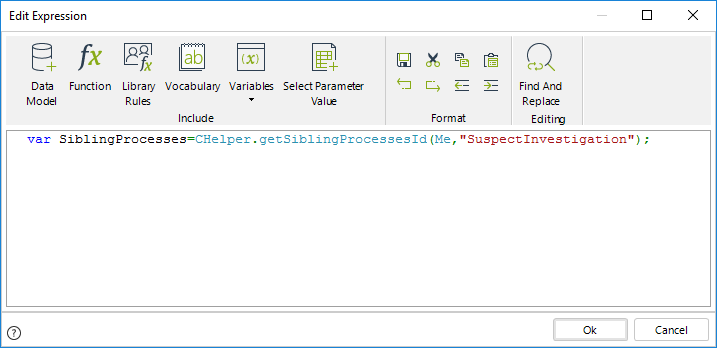
3. Include a FOR operator to go through the list of Sub-Processes.
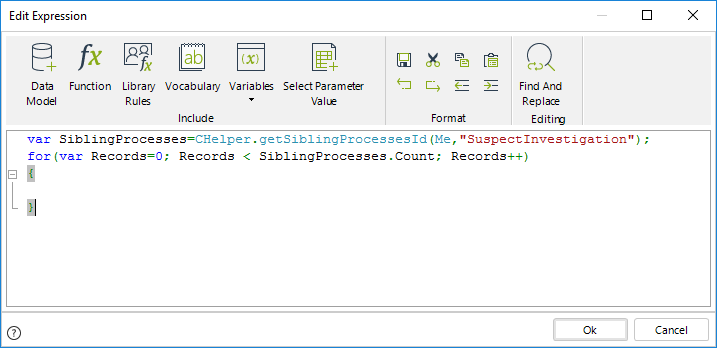
4. Use the CHelper.AbortProcess function to cancel the other processes. This function receives four parameters:
•The first parameter is the sentence Me.
•The second parameter is the id of the case to be aborted. In this case, we obtain the Id of each Sub-Process to be aborted.
•The third parameter is a number:
oType 1 if only the process is to be aborted. (This is the case of the present example)
oType 2 If the process and its parent process are to be aborted
oType 3 if only the parent process is to be aborted, NOT the process itself.
•The fourth parameter is the abort reason, a brief description of why the case is being aborted.
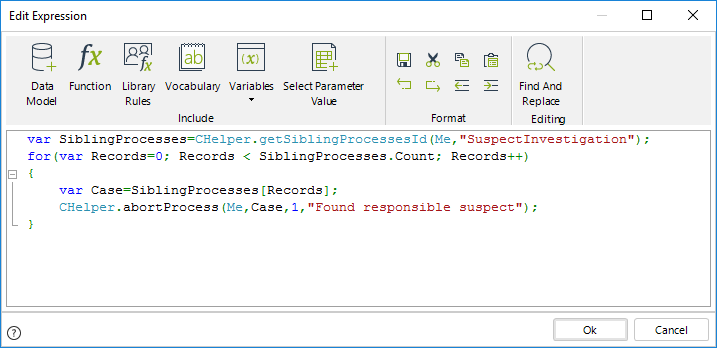
//Obtain the Siblings Processes id´s
var SiblingProcesses=CHelper.getSiblingProcessesId(Me,"SuspectInvestigation");

//Go through the list
for(var Records=0; Records < SiblingProcesses.Count; Records++)
{
//Obtain Sibling Process id
var Case=SiblingProcesses[Records];

//Abort Sibling Process
CHelper.abortProcess(Me,Case,1,"Found responsible suspect");
}
Finally save the expression.
View SourcegetSolutionDate(ICAPIWorkItem, DateTime, Int32)
Calculates a date based on the Working Time Schema, including the holidays configured for the organization.
Syntax
CHelper.getSolutionDate(ICAPIWorkItem Me, DateTime dtFromDate, int iDuration)Declaration
public static DateTime getSolutionDate(ICAPIWorkItem Me, DateTime dtFromDate, int iDuration)Parameters
| Type | Name | Description |
|---|---|---|
| ICAPIWorkItem | Me | This parameter is fixed |
| System.DateTime | dtFromDate | Initial date |
| System.Int32 | iDuration | Period |
Returns
| Type | Description |
|---|---|
| System.DateTime |
Estimated date taking into account the Working Time Schema including holidays |
getSolutionDateForUser(Int32, DateTime, Int32)
Calculates a date based on a given user's Working Time, including the holidays configured for the organization.
Syntax
CHelper.getSolutionDateForUser(int idUser, DateTime dtFromDate, int iDuration)Declaration
public static DateTime getSolutionDateForUser(int idUser, DateTime dtFromDate, int iDuration)Parameters
| Type | Name | Description |
|---|---|---|
| System.Int32 | idUser | User Id |
| System.DateTime | dtFromDate | Initial date |
| System.Int32 | iDuration | Period |
Returns
| Type | Description |
|---|---|
| System.DateTime |
Estimated date taking into account the Working Time Schema including holidays of the user filtered by Id |
GetStringExtended(String, String, Object)
Validations are customized error messages displayed in the Work Portal, informing the end user that data is missing or an error occurred in an activity. Validation messages are usually defined in On Exit Actions or Table Validations.
•If validation is thrown when the end user clicks Next in an activity, the process will halt, and the customized message appears.
•If validation is thrown when trying to save a new record of a table, then the new record will not be saved, and the message appears instead.
You must configure the validations using either the ThrowValidationAlert or ThrowValidationError function.
The only difference between them is how the error message is displayed.
Syntax
CHelper.GetStringExtended(string ExtendedObjectName, string Defaultvalue, object Culture)Declaration
public static string GetStringExtended(string ExtendedObjectName, string Defaultvalue, object Culture)Parameters
| Type | Name | Description |
|---|---|---|
| System.String | ExtendedObjectName | Extended resource name |
| System.String | Defaultvalue |
Default message (shown if the resource is not localized in the specified language) |
| System.Object | Culture | Language culture name |
Returns
| Type | Description |
|---|---|
| System.String | Validation message in the required language |
Examples
In some cases, validation messages might need to be localized to meet languages of users to which they are displayed.
This can be done by using Extended Resources.
Suppose the validation message of the Vacation Request must be displayed in the language defined for the requester user. To do this, follow the steps below:
1. From the Expert view, create an Extended Resource and define localization for the desired languages.
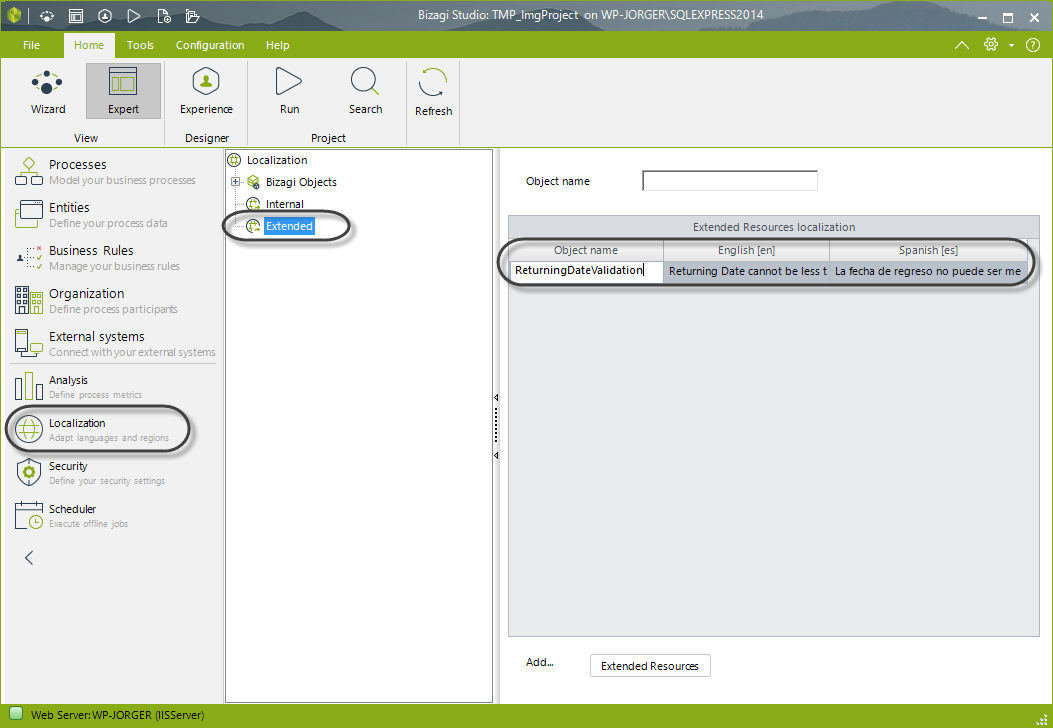
2. Go to the fourth step of the Bizagi Process Wizard and create an expression On Exit of the Register Vacation Request Task.
In an expression element, define the condition required to show the validation message.
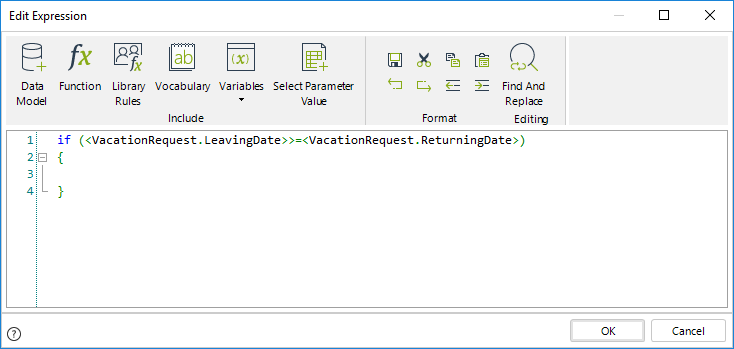
3. Use the Me.Case.WorkingCredential.UserProperties method to obtain the language of the requester user.
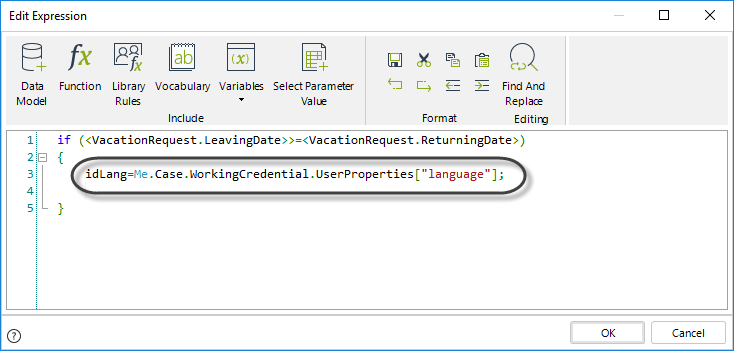
4. Use the CHelper.GetAttrib function to obtain the Culture name of the user´s language.
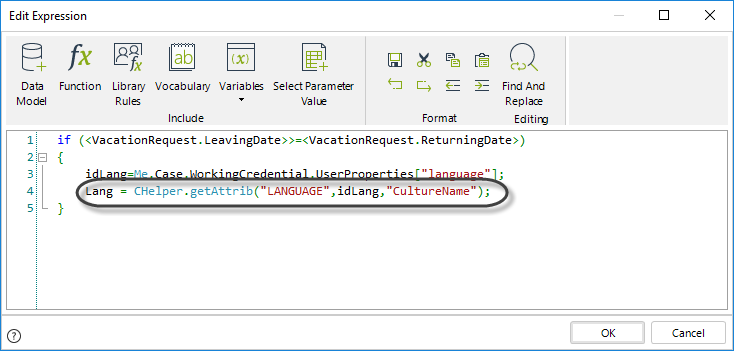
5. Use the CHelper.GetStringExtended function to obtain the validation message in the required language.
This function uses three parameters:
•Parameter 1: Name of the extended resource.
•Parameter 2: Default message (Shown if the resource is not localized in the specified language).
•Parameter 3: Language Culture Name.
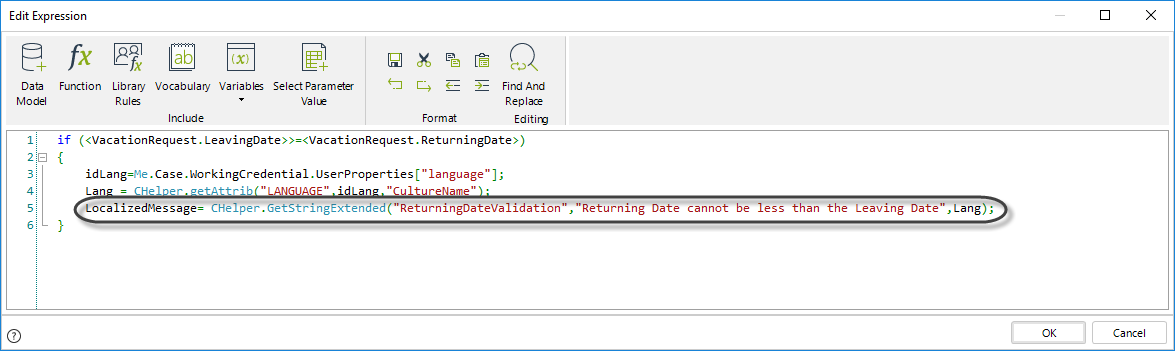
6. Finally, use the CHelper.ThrowValidationError function to show the validation message.

if (<VacationRequest.LeavingDate>>=<VacationRequest.ReturningDate>)
{
 //Obtain the user language
 idLang=Me.Case.WorkingCredential.UserProperties["language"];

 //Obtain the user language name
 Lang = CHelper.getAttrib("LANGUAGE",idLang,"CultureName");

 //Obtain the localized message
 LocalizedMessage= CHelper.GetStringExtended("ReturningDateValidation","Returning Date cannot be less than the Leaving Date",Lang);

 //Display the localized message
 CHelper.ThrowValidationError(LocalizedMessage);
}getSubProcessesId(ICAPIWorkItem)
Obtain the Id of the child process (Sub-Process) in a parent process
You can obtain the identifier of a child process by using the getSubProcessesId function.
This function returns a list with the Sub-Processes' identifiers of all the related cases.

|
This function returns all of the Sub-Processes for the specific case. If your need is to obtain a specific Sub-Processes' identifiers, you can use the function with the WfClassName parameter: |
|---|
Syntax
CHelper.getSubProcessesId(ICAPIWorkItem Me)Declaration
public static ArrayList getSubProcessesId(ICAPIWorkItem Me)Parameters
| Type | Name | Description |
|---|---|---|
| ICAPIWorkItem | Me | This parameter is fixed |
Returns
| Type | Description |
|---|---|
| System.Collections.ArrayList | Identifier of all child processes |
Examples
Imagine a Project Administration Process. The necessary activities to complete the project are planned in the Plan Activities Task.
The Perform Activities Sub-Process is launched by each activity planned. Simultaneously a task is enabled for the Project Manager to monitor the progress of each activity.
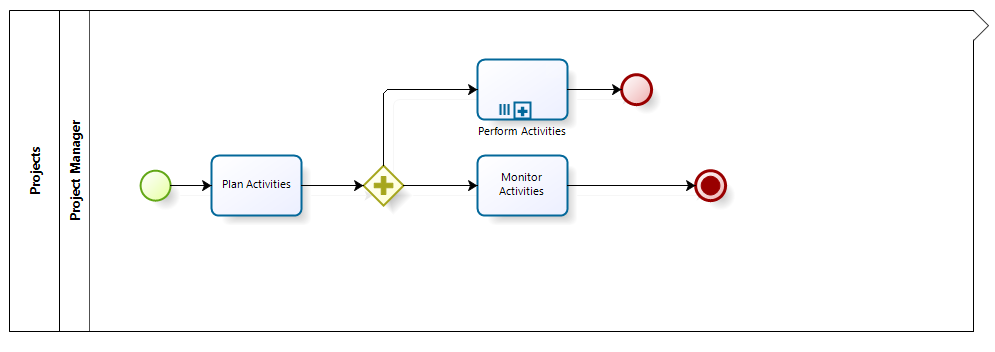
The cases related to each instance of the Perform Activities Sub-Process have a private security level (please refer to Case Security); that is, only people who have performed a task within the Sub-Process have access to the case information. However, the development of each activity of the Project must be monitored by an auditor, so he/she must have access as well.
To grant access to the auditor, it is necessary to create an expression. This expression will obtain the identifiers of each instance of the Sub-Process to grant the auditor access to each of them. Follow the next steps to create the expression:
1. Go to the fourth step of the Bizagi Process Wizard (Business Rules) and select Activity Actions.
Select the Monitor Activities Task and create an On Enter Expression. This will execute the expression at the same time the instances of the Sub-Process are created.
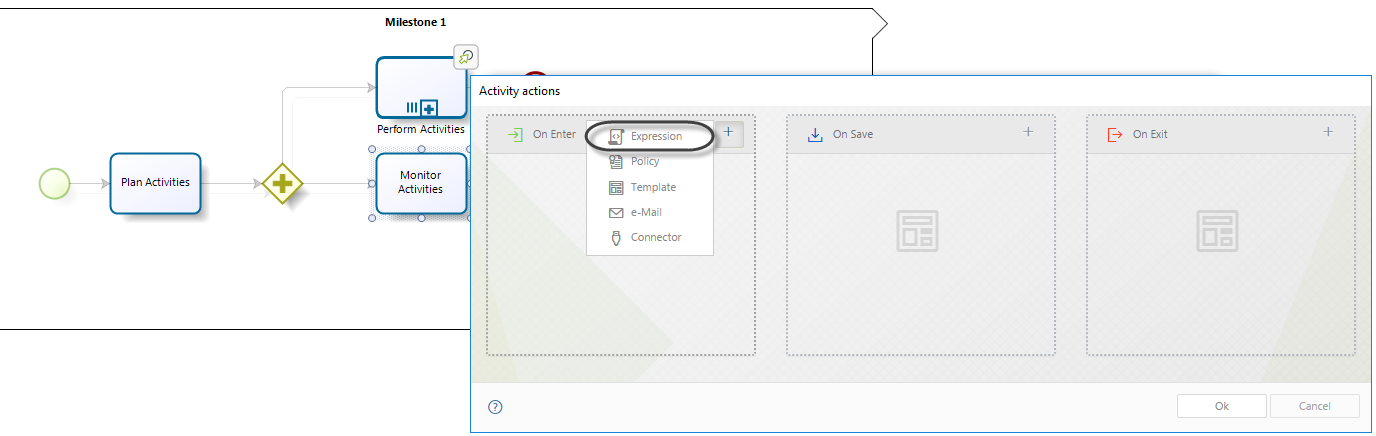
2. Create an Expression module. Obtain the list of associated Sub-Processes into a variable by using the getSubProcessesid function found in the Currentcase information category.
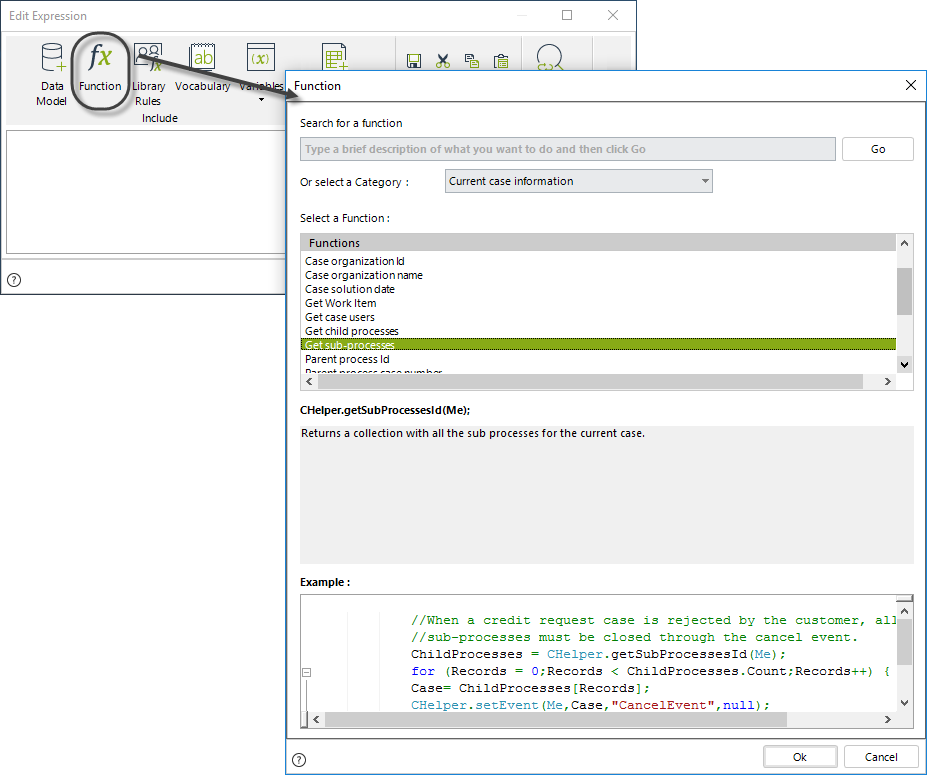
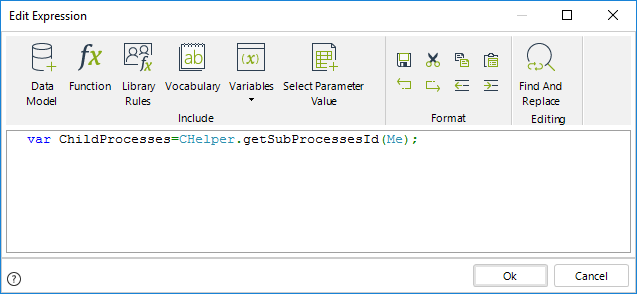
3. Obtain the UserId of the auditor. Use the CHelper.GetUsersforRole to retrieve a list of user Ids with a specified Role. As only one person has the Auditor Role, we can extract the auditor Id from the zero position of the list.
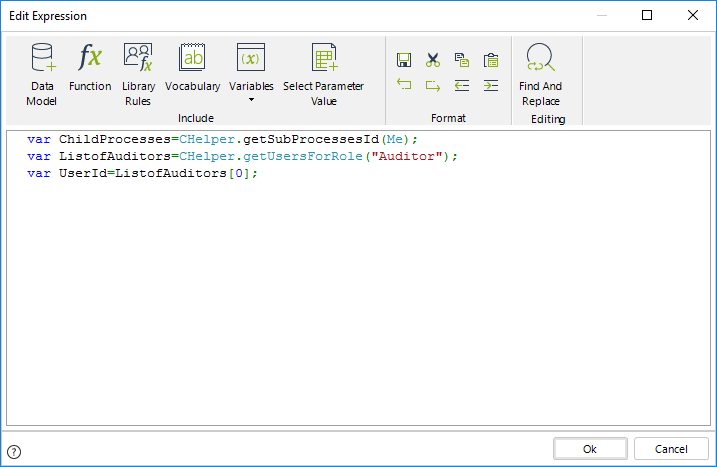
4. Include a FOR operator to go through the list of Sub-Processes.
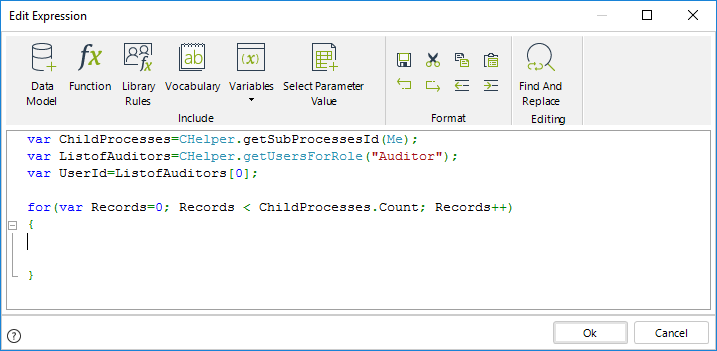
5. Obtain the id of each Sub-Process and use it as the first parameter of the CHelper.GrantCaseAccess function. The second parameter of this function will always be the UserId of the auditor. This will grant the auditor access to the information of each Sub-Process.
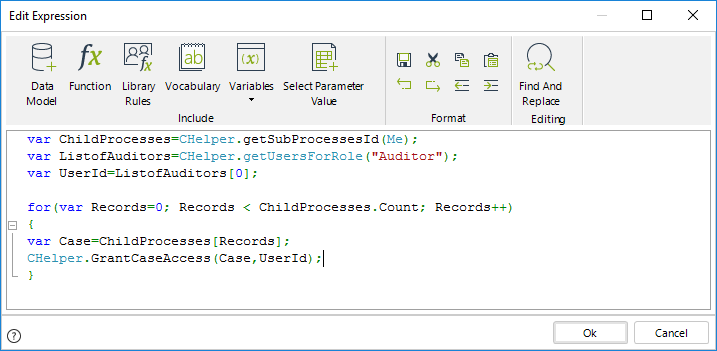
var ChildProcesses=CHelper.getSubProcessesId(Me);
var ListofAuditors=CHelper.getUsersForRole("Auditor");
var UserId=ListofAuditors[0];

for(var Records=0; Records < ChildProcesses.Count; Records++)
{
 var Case=ChildProcesses[Records];
 CHelper.GrantCaseAccess(Case,UserId);
}
Finally save the expression.
View SourcegetSubProcessesId(ICAPIWorkItem, String)
Obtain the Id of the child process (Sub-Process) in a parent process filtered by WfClassName
The function requires the WfClassName parameter to filter the sub-processes.
The syntax of the function is:
Syntax
CHelper.getSubProcessesId(ICAPIWorkItem Me, string WfClassName)Declaration
public static ArrayList getSubProcessesId(ICAPIWorkItem Me, string WfClassName)Parameters
| Type | Name | Description |
|---|---|---|
| ICAPIWorkItem | Me | This parameter is fixed |
| System.String | WfClassName | Parent's WfClassName |
Returns
| Type | Description |
|---|---|
| System.Collections.ArrayList |
Identifier of all child processes related to the process filtered by the wfClassName parameter |
getUsersForPosition(Object)
Syntax
CHelper.getUsersForPosition(object posName)Declaration
public static ArrayList getUsersForPosition(object posName)Parameters
| Type | Name | Description |
|---|---|---|
| System.Object | posName | Position |
Returns
| Type | Description |
|---|---|
| System.Collections.ArrayList |
List of the users who hold a specific Position within the organization |
Examples
Get users with a specific Position
Suppose in a Help Desk Process the support person who receives a Ticket must assign it to one of the available technicians. The case references a collection called Available Technicians that contains the users who hold a Support Technician Position.
To fill the collection we need to obtain the qualified technicians from the WFUser Entity, based on their Positions.
The GetUsersForPosition function will return all users that match the position provided in the parameter of the invocation, which is received as a String.

1. Go to the fourth step of the Bizagi Process Wizard (Business Rules) and select Activity Actions.
Click the first Task of the Process and create an On Enter Expression.
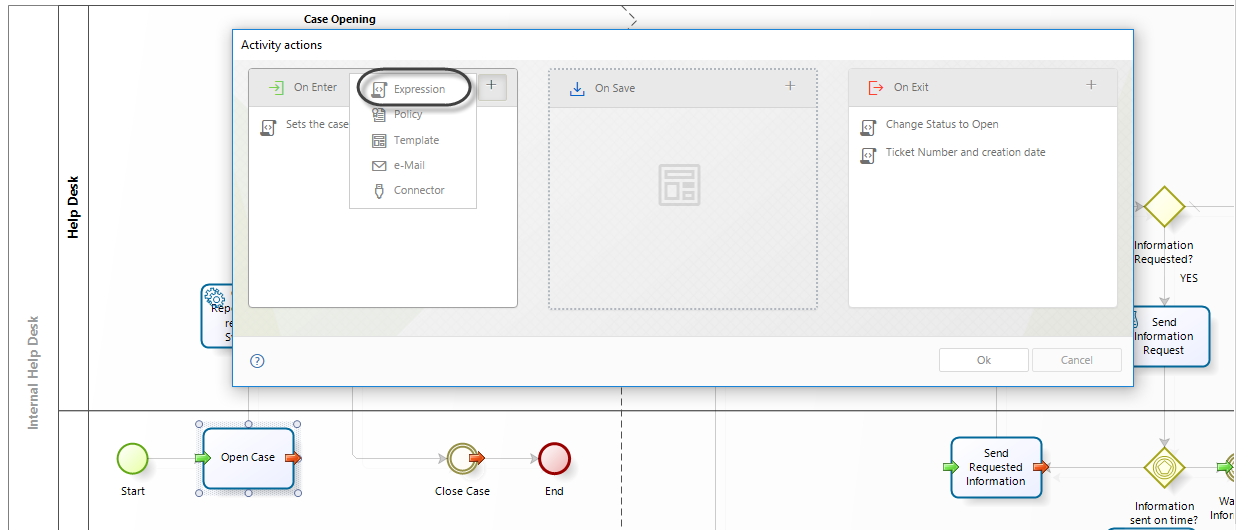
2. In the main expression, create two Expression modules and one For module as shown below.
In the first Expression module, declare the variables and obtain the list of users with the specified position.
Use the For module to iterate over each record of the list.
In the final Expression module, include each record in the AvailableTechnitians collection.
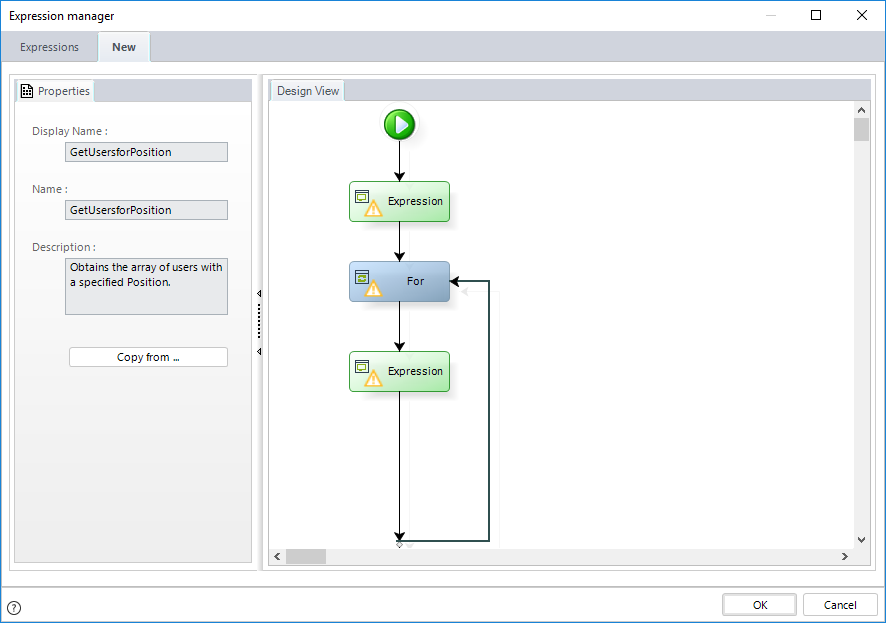
3. In the first Expression module, declare the following variables.
•UsersArray: stores the list of the users that belong to the specified Position.
•IterationIndex: is the counter for the FOR cycle.
•TempIdUser: temporally stores a specific record of the user list.
•newRow: creates the new record in the relationship where the users will be included.
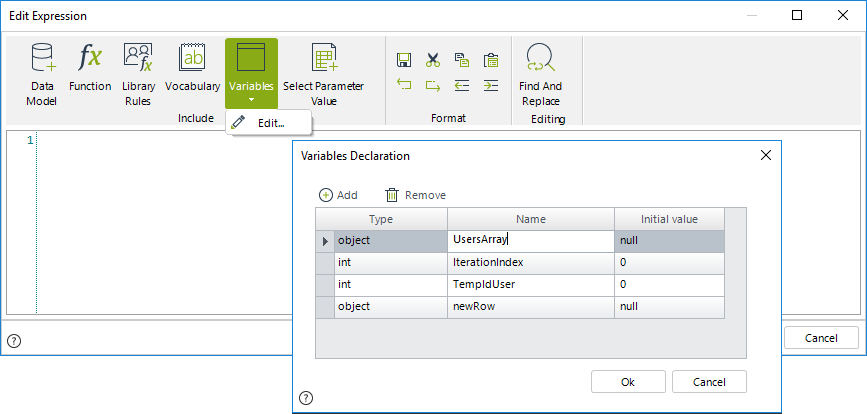
4. Obtain the list of users with the desired Position using the Get users in Position Function found in the Users category.
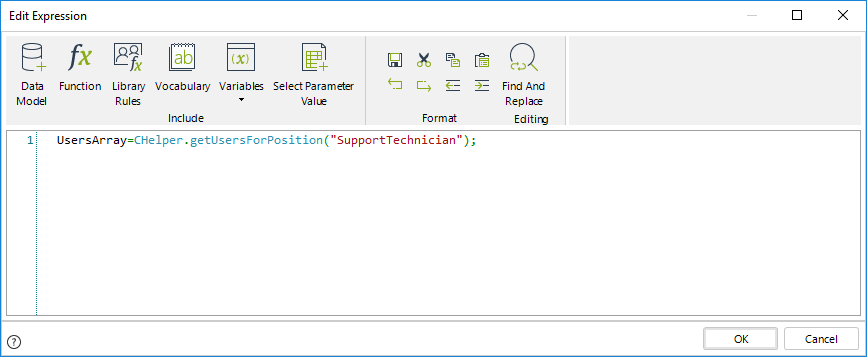
//Obtain the list of users with the specific position and store it in the variable
UsersArray=CHelper.getUsersForPosition("SupportTechnician");

|
This function returns all the users with the Position regardless of whether they are active or not. If you wish to get only the active users, we recommend using the following function with the parameter filterActive as true. For example: |
|---|
5. Iterate the list using the For module. The cycle starts at zero (0) and ends at the last index of the list.
The sentence UsersArray.Count will return the total number of users found (i.e., counts all elements in the array)
Then, the loop will be executed as long as the index of the collection is less than the total number of array elements.

6. Include the following code in the second Expression module to obtain the user's identifier.
Then, create a new row in the Available Technicians collection.
Value the Technician ID in the new row created.

//Obtain the user identifier of the current iterated record in the array
TempIdUser=UsersArray[IterationIndex];

//Add a new record to the AvailableTechnicians collection
newRow=Me.newCollectionItem("Ticket.AvailableTechnicians");

//Set the column Technician to the userid obtained previously
newRow.setXPath("Technician",TempIdUser);
Once filled, the collection will display in the Work Portal as follows:
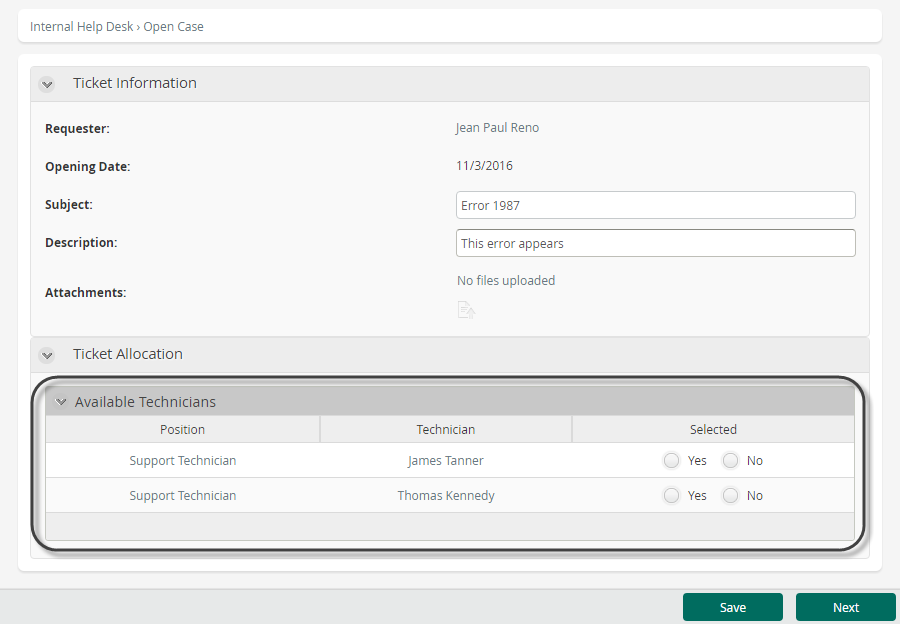
getUsersForPosition(String, Boolean)
This function returns all the users with the Position checking if they are active or not.
If you wish to get only the active users, use this function with the parameter filterActive as true.
Syntax
CHelper.getUsersForPosition(string posName, bool filterActive)Declaration
public static ArrayList getUsersForPosition(string posName, bool filterActive)Parameters
| Type | Name | Description |
|---|---|---|
| System.String | posName | Position |
| System.Boolean | filterActive | Filter |
Returns
| Type | Description |
|---|---|
| System.Collections.ArrayList |
List of the active users who hold a specific Position within the organization, if the "filterActive" parameter is true |
Examples
CHelper.getUsersForPosition("Technician", true);getUsersForRole(Object)
Syntax
CHelper.getUsersForRole(object roleName)Declaration
public static ArrayList getUsersForRole(object roleName)Parameters
| Type | Name | Description |
|---|---|---|
| System.Object | roleName | Role |
Returns
| Type | Description |
|---|---|
| System.Collections.ArrayList |
List of the users who hold a specific Role within the organization |
Examples
Get users with a specific Role
Suppose in a Help Desk Process the support person who receives a Ticket must assign it to one of the available technicians. The case references a collection called Available Technicians that contains the users who hold a Role of IT Technician.
To fill the collection, we need to obtain the qualified technicians from the WFUser Entity, based on their Role.
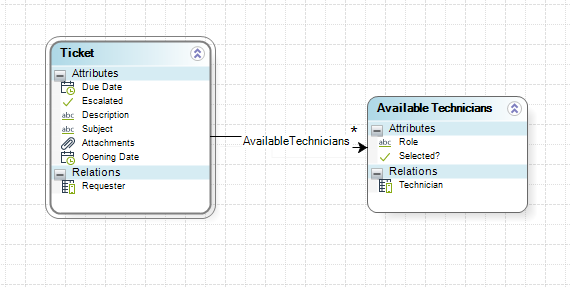
1. Go to the fourth step of the Bizagi Process Wizard (Business Rules) and select Activity Actions.
Click the first Task of the Process and create an On Enter Expression.

2. In the main expression, create two Expression modules and one For module as shown below.
In the first Expression module, declare the variables and obtain the list of users with the specified Role.
Use the For module to iterate over each record of the list.
In the final Expression module, include each record in the AvailableTechnitians collection.
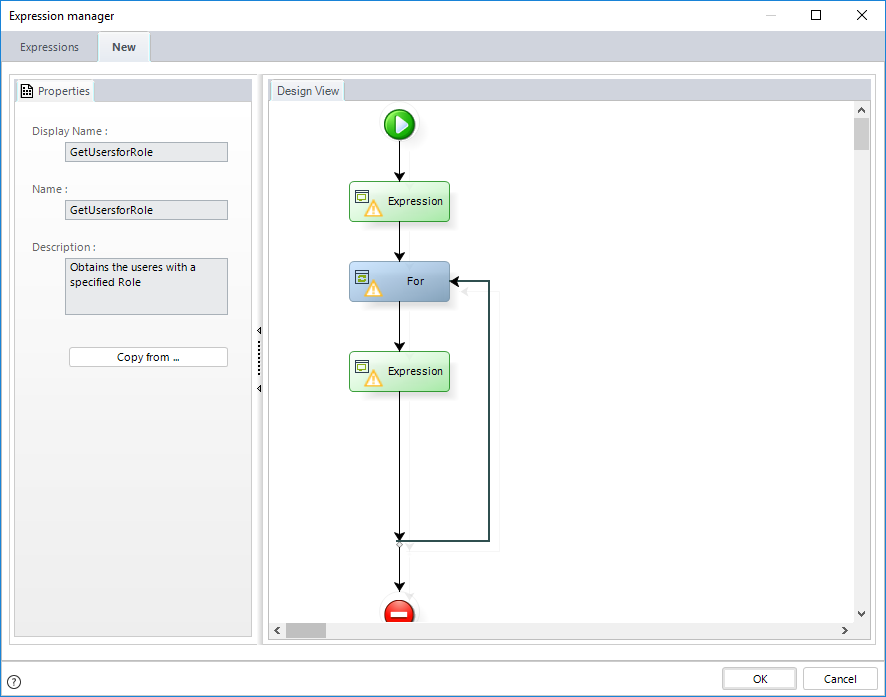
3. In the first Expression module declare the following variables.
•UsersArray: stores the list of the users that belong to the specified Role.
•IterationIndex: is the counter for the FOR cycle.
•TempIdUser: temporally stores a specific record of the user list.
•newRow: creates the new record in the relationship where the users will be included.

4. Obtain the list of users with the desired Role using the Get users in Role Function found in the Users category.
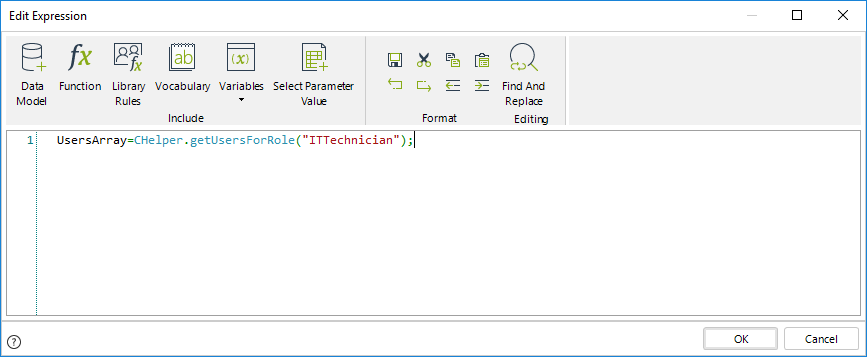
//Obtain the list of users with the specified Role and store the collection in the variable
UsersArray=CHelper.getUsersForRole("ITTechnician");

|
This function returns all the users with the specific Role regardless of whether they are active or not. If you wish to get only the active users, we recommend using the following function with the parameter filterActive as true. |
|---|
5. Iterate the list using the For module. The cycle starts at zero (0) and ends at the last index of the list.
The sentence UsersArray.Count will return the total number of users found.
Then, the loop will be executed as long as the Index of the collection is less than the total number of users in the list.
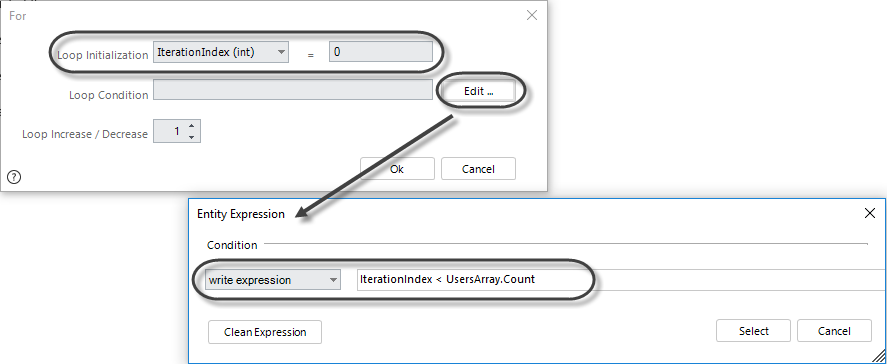
6. Include the following code in the second Expression module to obtain the user's identifier.
Then, create a new row in the Available Technicians collection.
Set the Technician id in the new row created.

//Obtain the user identifier of the current iterated record in the array
TempIdUser=UsersArray[IterationIndex];

//Add a new record to the AvailableTechnicians collection
newRow=Me.newCollectionItem("Ticket.AvailableTechnicians");

//Value the column Technician with the userid obtained previously
newRow.setXPath("Technician",TempIdUser");
Click OK to save the changes.
Once filled, the collection will display in the Work Portal as follows:
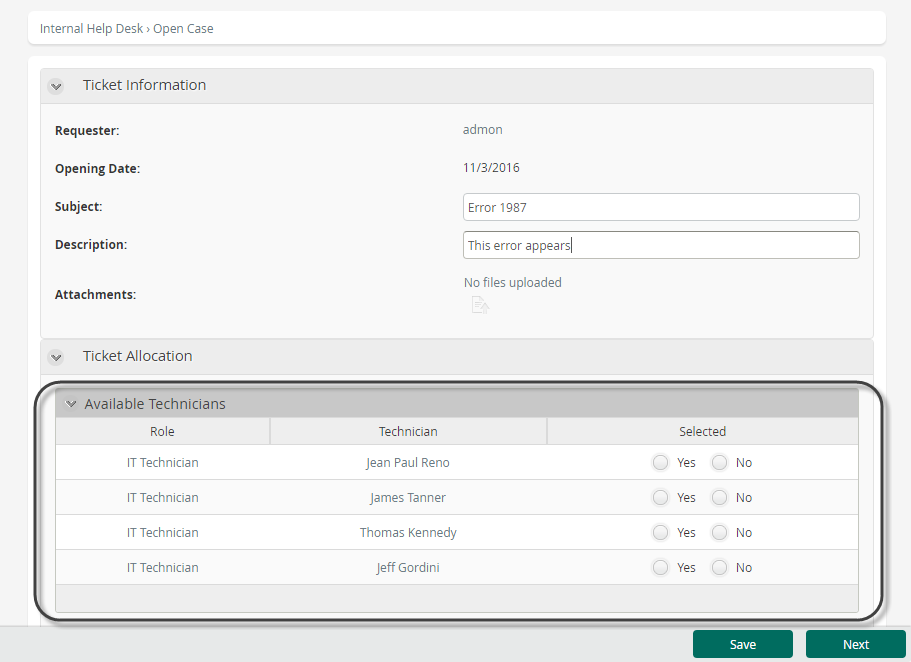
getUsersForRole(String, Boolean)
This function returns all the users with the specific Role checking if they are active or not.
If you wish to get only the active users, use this function with the parameter filterActive as true.
Syntax
CHelper.getUsersForRole(string roleName, bool filterActive)Declaration
public static ArrayList getUsersForRole(string roleName, bool filterActive)Parameters
| Type | Name | Description |
|---|---|---|
| System.String | roleName | Role |
| System.Boolean | filterActive | Filter |
Returns
| Type | Description |
|---|---|
| System.Collections.ArrayList |
List of the active users who hold a specific Role within the organization, if the "filterActive" parameter is true |
getUsersForSkill(Object)
Syntax
CHelper.getUsersForSkill(object skillName)Declaration
public static ArrayList getUsersForSkill(object skillName)Parameters
| Type | Name | Description |
|---|---|---|
| System.Object | skillName | Skill |
Returns
| Type | Description |
|---|---|
| System.Collections.ArrayList |
List of the users who have a specific Skill within the organization |
Examples
Get users with a specified Skill
Suppose in a Help Desk process the support person who receives a Ticket must assign it to one of the available technicians. The case references a collection called Available Technicians that contains the users who have a IT and Networks Knowledge skill.
To fill that collection, we need to obtain the qualified technicians from the WFUser Entity, based on their Skills.

1. Go to the fourth step of the Bizagi Process Wizard (Business Rules) and select Activity Actions.
Click the first Task of the Process and create an On Enter Expression.

2. In the main expression, create two Expression modules and one For module as shown below.
In the first Expression, declare the variables and obtain the list of users with the specified Skill.
Use the For module to iterate over each record of the list.
In the final Expression module, include each record in the AvailableTechnitians collection.

3. In the first Expression module, declare the following variables.
•UsersArray: stores the list of the users that belong to the specified Skill.
•IterationIndex: it is the counter for the FOR cycle.
•TempIdUser: temporally stores a specific record of the user list.
•newRow: creates the new record in the relationship where the users will be included.

4. Obtain the list of users with the desired Skill using the Get users in Skill Function found in the Users category
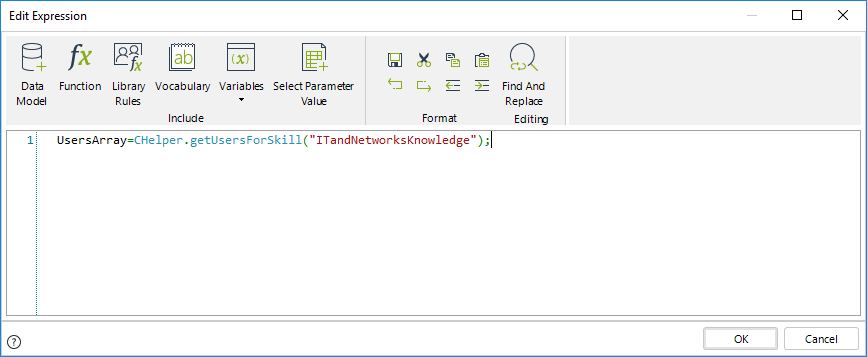
//Obtain the list of users with the desired Skill and store it in the variable
UsersArray=CHelper.getUsersForSkill("ITandNetworksKnowledge");

|
This function returns all the users with the Skill regardless of whether they are active or not. If you wish to get only the active users, we recommend using the following function with the parameter filterActive as true. |
|---|
5. Iterate the list using the For module. The cycle starts at zero (0) and ends at the last index of the list.
The sentence UsersArray.Count will return the total number of users found.
Then, the loop will be executed as long as the Index of the collection is less than the total number of users found.

6. Include the following code in the second Expression module to obtain the user's identifier.
Then, create a new row in the Available Technicians collection.
Define the value of the Technician id in the new row created.
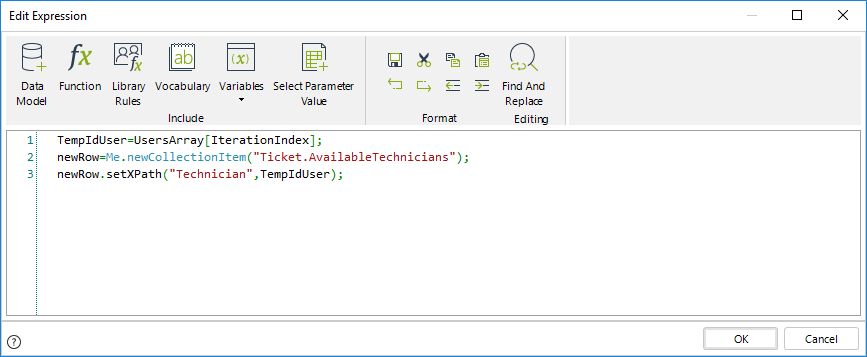
//Obtain the user identifier of the current iterated record in the array
TempIdUser=UsersArray[IterationIndex];

//Add a new record to the AvailableTechnicians collection
newRow=Me.newCollectionItem("Ticket.AvailableTechnicians");

//Value the column Technician with user obtained previously
newRow.setXPath("Technician",TempIdUser);
Once filled, the AvailableTechnicians collection will display in the Work Portal as follows:
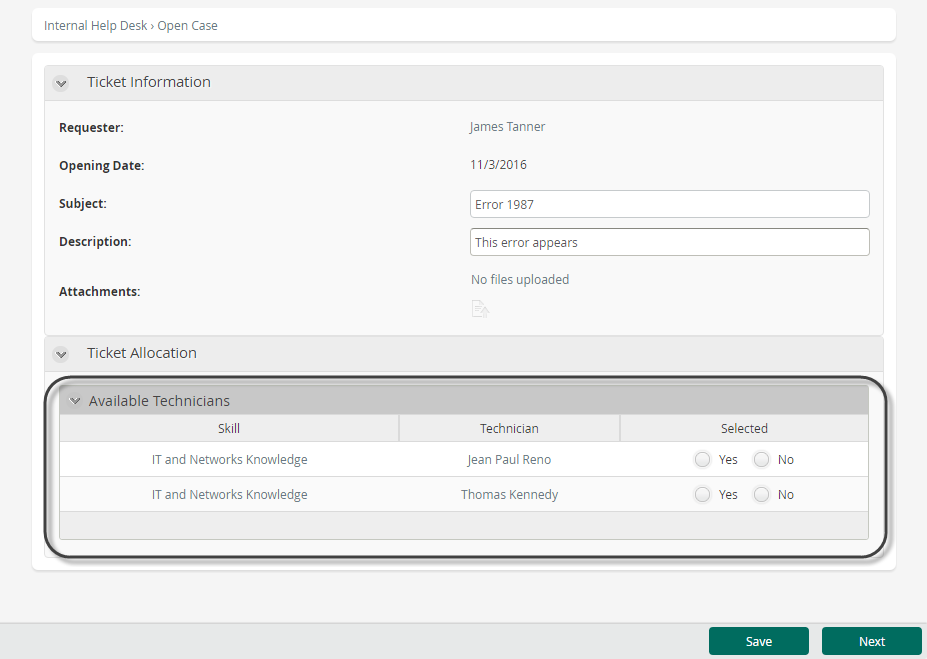
getUsersForSkill(String, Boolean)
This function returns all the users with the Skill checking if they are active or not.
If you wish to get only the active users, use this function with the parameter filterActive as true.
Syntax
CHelper.getUsersForSkill(string skillName, bool filterActive)Declaration
public static ArrayList getUsersForSkill(string skillName, bool filterActive)Parameters
| Type | Name | Description |
|---|---|---|
| System.String | skillName | Skill |
| System.Boolean | filterActive | Filter |
Returns
| Type | Description |
|---|---|
| System.Collections.ArrayList |
List of the active users who have a specific Skill within the organization, if the "filterActive" parameter is true |
GetUsersForPersona(String)
Obtain all users given a Persona
The following function allows you to obtain all the users related to a Persona object. This returns an array that can be navigated.
Syntax
CHelper.GetUsersForPersona(string PersonaName)Declaration
public static ArrayList GetUsersForPersona(string PersonaName)Parameters
| Type | Name | Description |
|---|---|---|
| System.String | PersonaName |
String with the name of the required Persona |
Returns
| Type | Description |
|---|---|
| System.Collections.ArrayList | Returns an array of Persona objects for the given Persona entity name |
Examples
In an emergency room, we need to obtain a list of all the users that are Doctors and save their names.
var allDoctors = CHelper.GetUsersForPersona("Doctor");
var listName="";

for(var i=0; i< allDoctors.Count;i++)
{
 var fullName = allDoctors[i].getXPath("associatedUser.fullName");
 listName=fullName+listName;
}GetValueAsCollection(Object)
Syntax
CHelper.GetValueAsCollection(object Collection)Declaration
public static BizagiArrayList GetValueAsCollection(object Collection)Parameters
| Type | Name | Description |
|---|---|---|
| System.Object | Collection | XPath to the collection to be obtained |
Returns
| Type | Description |
|---|---|
| BizagiArrayList |
ArrayList with the data of the required collection |
Examples
Get values from a Collection
Suppose in a Purchase Request process you have a collection of Products in which each product has a unit price and a quantity. The requirement is to obtain the total cost of the products in the order.
We need to iterate over the Product's collection returned by an XPath query. For each product, we will obtain the total price and add it to a total purchase cost.
To iterate over the collection, we need to store the XPath query in a variable and call the GetValueAsCollection function passing the query variable as a parameter. Once the value has been converted to an array list, you can go through the values of the collection by iterating with a FOR function.
|
|
You can perform this example using the Iterate Over XPath function. This example is for illustration purposes. |
|---|

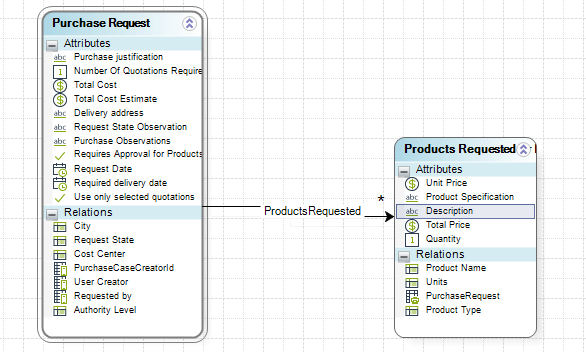
The function GetValueAsCollection can be found in the Data Navigation category.
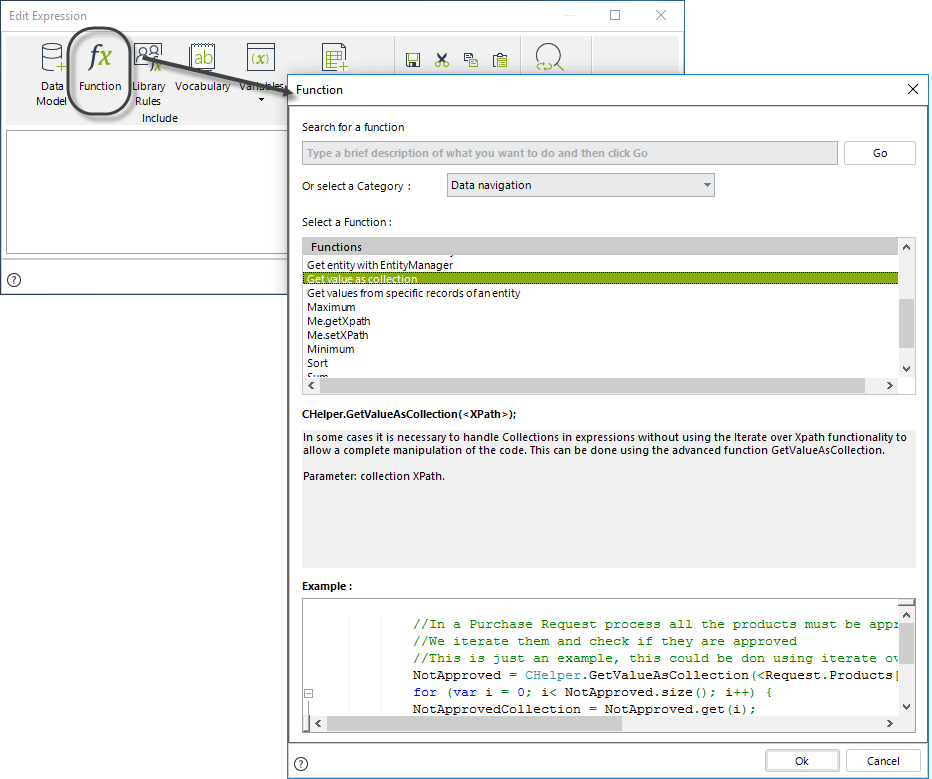
The syntax of the function is:
CHelper.GetValueAsCollection("Collection")The parameter of this function is the XPath to the collection to be obtained. In this case, it will be the collection XPath Products Requested.
Create an expression On Save of the Task where the calculation will be performed.

Add an expression and type the next code:

//Get the collection XPath in the variable Collection
var Collection=<PurchaseRequest.ProductsRequested>;
//Convert the Collection object to a collection to be iterated
var Array=CHelper.GetValueAsCollection(Collection);
//Initialize Variable to store the Total Cost
var Total=0

//Iterate the collection to go through each record and obtain each product price

for (var I=0; I < Array.size(); I++)
{

//Obtain each element and for each one the price and quantity

var Element= Array.get(I);
var ElementPrice=Element.getXPath("UnitPrice") ;
var ElementQuantity=Element.getXPath("Quantity");

//Accumulate the product price in a Total Cost variable
Total=Total+(ElementPrice*ElementQuantity);
}

//Assign Total Cost to the attribute to be displayed
<PurchaseRequest.TotalCost>=Total;
This is how the collection displays in the Work Portal
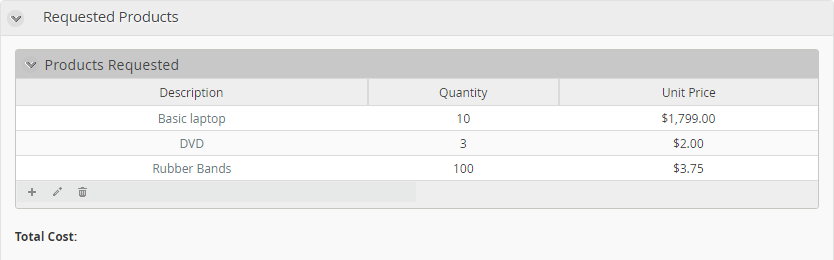
Once the expression is executed, the Total Cost is shown.
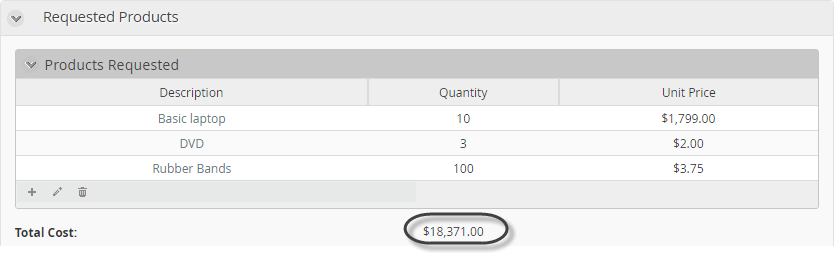
getXSD(String, String)
The XML Helper object is part of Bizagi's business rules API, and it provides data access for your processes when working with XML-structured information, as described at XML Helper object.
This section illustrates an example of how to use one of the methods featured by this object, the getEntitiesAsString method, which is oriented to querying information in entities without having XPath navigation.
This entails that such method's use is optimal when working with Parameter type entities.
Syntax
CHelper.getXSD(string entityName, string xsdName)Declaration
public static string getXSD(string entityName, string xsdName)Parameters
| Type | Name | Description |
|---|---|---|
| System.String | entityName |
Name of the entity to get a predefined schema from |
| System.String | xsdName | Schema name |
Returns
| Type | Description |
|---|---|
| System.String |
The predefined schema for any entity, as configured in Bizagi Studio |
Examples
In the following sample process, assume we have a Parameter entity called Vendor. The entity has the following records, and we would want to fetch only those being VendorType = 1.
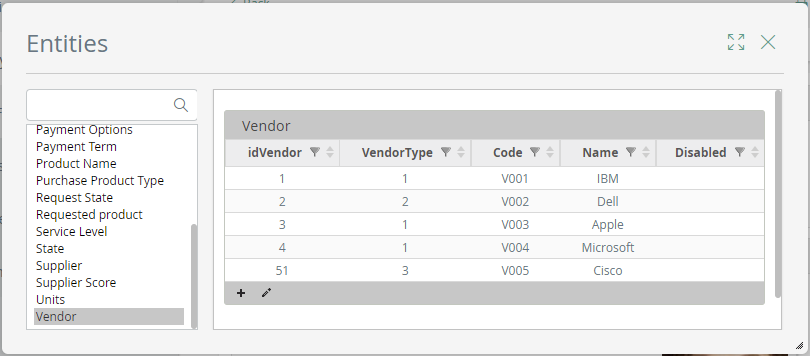
This means exactly fetching: IBM, Apple, and Microsoft.
Therefore and to obtain these records in an XML-compliant structure (instead of an array with objects), you may rely on the CEntityXmlHelper.getEntitiesAsString method and obtain a string with such information within.
Do this inside of an expression box, in a Bizagi business rule:
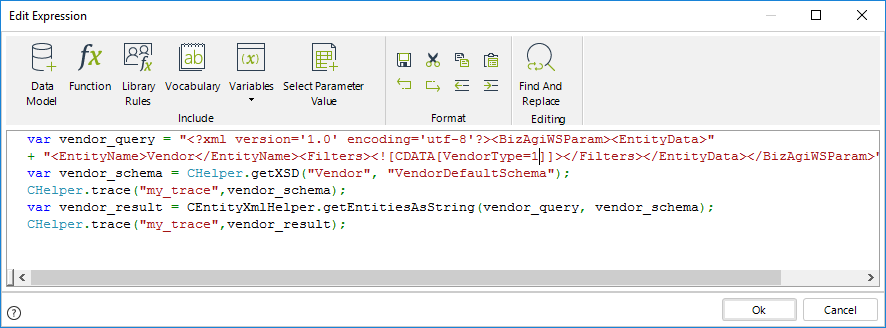
The overall expression shown in the image above is coded with the following:
var vendor_query = "<?xml version='1.0' encoding='utf-8'?><BizAgiWSParam><EntityData>" +
"<EntityName>Vendor</EntityName><Filters>VendorType=1</Filters></EntityData></BizAgiWSParam>";
var vendor_schema = CHelper.getXSD("Vendor", "VendorDefaultSchema");
CHelper.trace("my_trace",vendor_schema);
var vendor_result = CEntityXmlHelper.getEntitiesAsString(vendor_query, vendor_schema);
CHelper.trace("my_trace",vendor_result);
Consider that the CEntityXmlHelper.getEntitiesAsString method receives 2 strings:
-
The first one named vendor_query in the example above, which is an XML-structured definition of the records you want to retrieve from Bizagi's data model.
This definition specifies the name of the Entity hosting those records (
Vendor ), and any filtering specification(VendorType=1 ) that ensures you get only those records you want to fetch.The expected structure of this XML is the same one used for the getEntitiesAsString SOAP web method (when using Bizagi's web services API).
For more information about this expected structure and filtering options(for example, filter information in a string VType='A'), refer to Get Entities.
-
The second one named vendor_schema in the example above, which is an XSD definition in a string, defining the fields you want to get for those applicable records.
How to use an XSD schema is described in the section below.
Similarly, the CEntityXmlHelper.getEntitiesAsString method will return an XML-structured string with the information of applicable records, as presented below for this specific example:
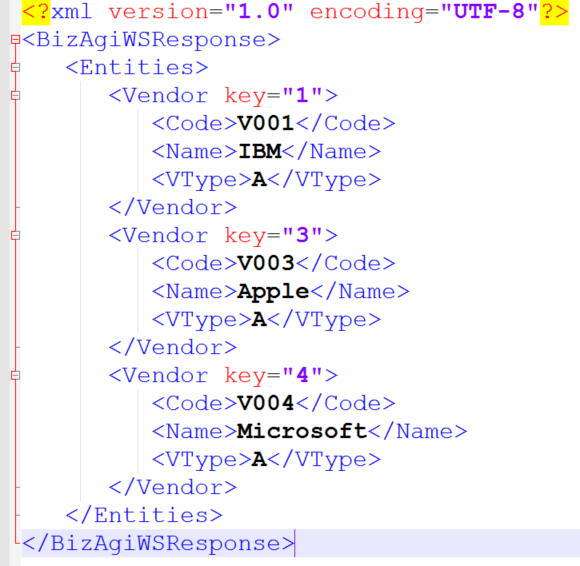
The sample response, as shown above, is:
<?xml version="1.0" encoding="UTF-8"?>
<BizAgiWSResponse>
  <Entities>
      <Vendor key="1">
          <Code>V001</Code>
          <Name>IBM</Name>
          <VType>A</VType>
      </Vendor>
      <Vendor key="3">
          <Code>V003</Code>
          <Name>Apple</Name>
          <VType>A</VType>
      </Vendor>
      <Vendor key="4">
          <Code>V004</Code>
          <Name>Microsoft</Name>
          <VType>A</VType>
      </Vendor>
  </Entities>
</BizAgiWSResponse>
CHelper.trace() and CHelper.getXSD()
Notice in the example above, that though two other methods are being used optionally (both CHelper.trace andCHelper.getXSD) these will often can be used together with CEntityXmlHelper.getEntitiesAsString for other purposes:
•CHelper.trace: Allows you to print out custom traces of values and responses in the execution of the rules.
The image below shows what the sample expression prints out:
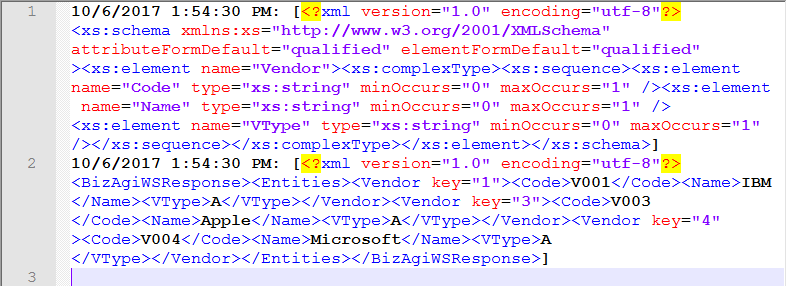
For more information about the use of this tracing option, refer to Validating business rules.
•CHelper.getXSD: Allows you to obtain a predefined schema for any entity, as configured in Bizagi Studio.
The image below shows the registered schema for the Vendor entity, explicitly named as VendorDefaultSchema (as referenced in the sample expression):

For more information about predefining schemas, refer to Bizagi's data model XML schemas.
View SourcegetXSL(String, String)
The XML Helper object is part of Bizagi's business rules API, and it provides data access for your processes when working with XML-structured information, as described at XML Helper object.
This section illustrates an example on how to use one of the methods featured by this object, the transformXmlAsString method, which is oriented to applying an XSL transformation file directly to the information you have either obtained from Bizagi's data model or information you will update into Bizagi's data model.
Syntax
CHelper.getXSL(string entityName, string xsdName)Declaration
public static string getXSL(string entityName, string xsdName)Parameters
| Type | Name | Description |
|---|---|---|
| System.String | entityName |
Name of the entity to get a predefined transformation file from |
| System.String | xsdName | Transformation file name |
Returns
| Type | Description |
|---|---|
| System.String |
The predefined transformation file that you registered for any entity, as configured in Bizagi Studio |
Examples
In the following sample process, assume we have a Parameter entity called Vendor. The entity has the following records:
When wanting to fetch these records while formatting under a different structure than the default XML presented by Bizagi, you may rely on a transformation file and do this by using the CEntityXmlHelper.transformXmlAsString method.
To work with transformation files, you should create a definition of an XSD schema having the expected XML structure for a given entity.
Create a schema definition in Bizagi Studio, and similarly register in that same option, the given XLS transformation file created for that entity:
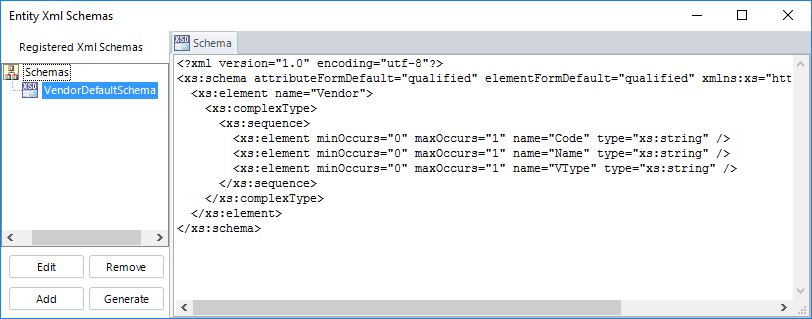
For more information about predefining schemas, refer to Bizagi's data model XML schemas.
Now, for this entity's schema and for this example, we will use the following transformation file:
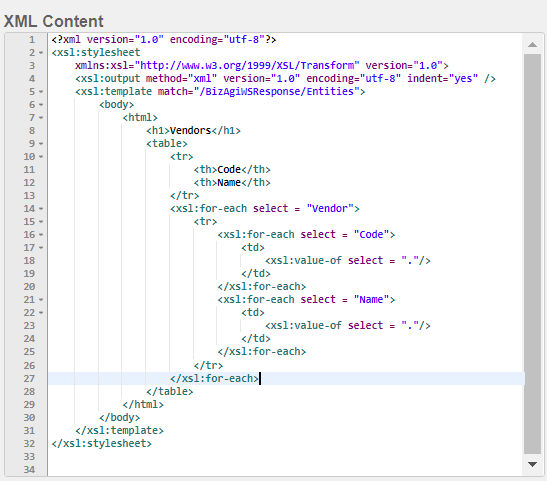
Which exactly contains:
<?xml version="1.0" encoding="utf-8"?>
<xsl:stylesheet xmlns:xsl="http://www.w3.org/1999/XSL/Transform" version="1.0">
  <xsl:output method="xml" version="1.0" encoding="utf-8" indent="yes" />
  <xsl:template match="/BizAgiWSResponse/Entities">
    <body>
      <html>
        <h1>Vendors</h1>
        <table>
          <tr>
            <th>Code</th>
            <th>Name</th>
          </tr>
          <xsl:for-each select = "Vendor">
            <tr>
              <xsl:for-each select = "Code">
                <td>
                  <xsl:value-of select = "."/>
                </td>
              </xsl:for-each>
              <xsl:for-each select = "Name">
                <td>
                  <xsl:value-of select = "."/>
                </td>
              </xsl:for-each>
            </tr>
          </xsl:for-each>
        </table>
      </html>
    </body>
  </xsl:template>
</xsl:stylesheet>
Therefore and to easily manage the transformation in Bizagi, create it as a .xsl file, so that you register and upload it through the same Bizagi Studio options:
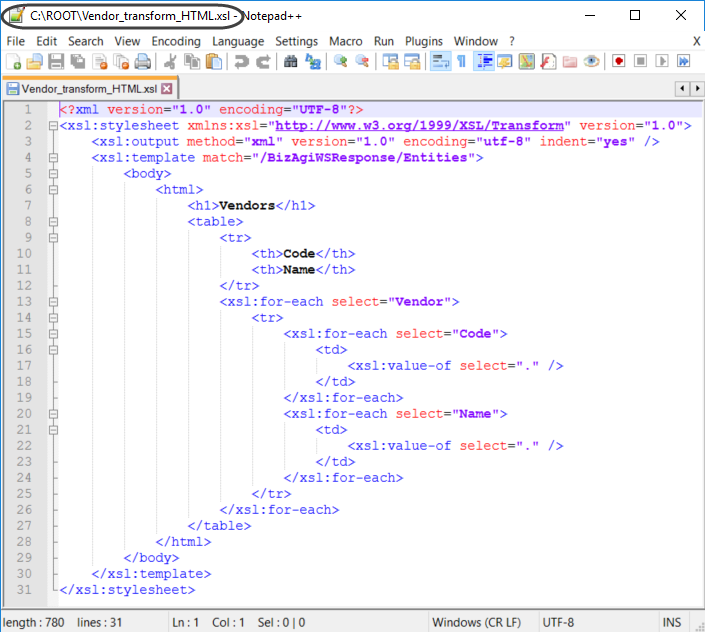
Click on Add to register the transformation and input details (most importantly consider the Name you give it so that you can reference it from business rules):
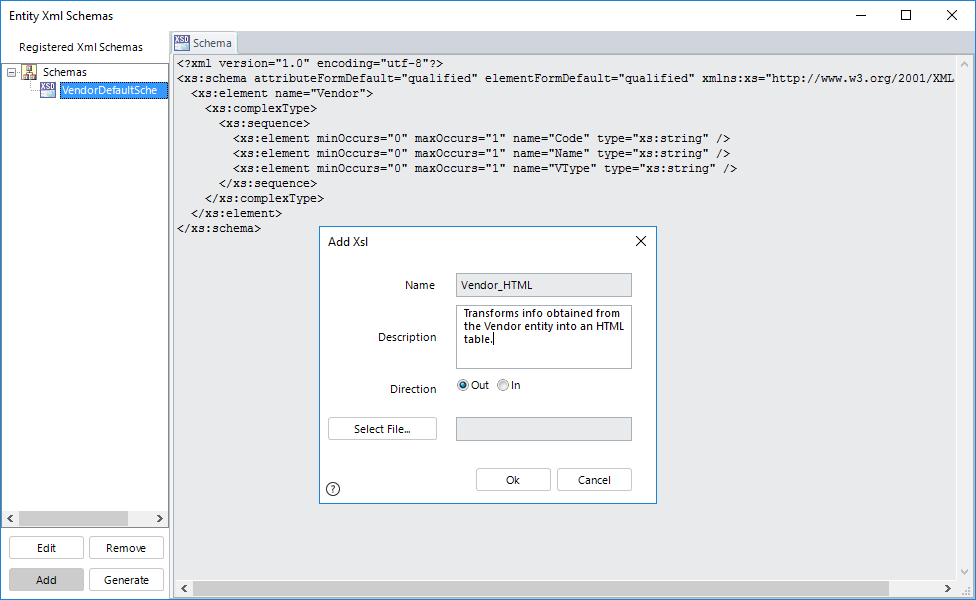
Browse the transformation file by clicking on Select file.. and locating the file:
Once uploaded, click OK. You may verify that the transformation file is listed.
Now in order to handle information in XML-based use the CEntityXmlHelper.transformXmlAsString method inside of an expression box, in a Bizagi business rule:
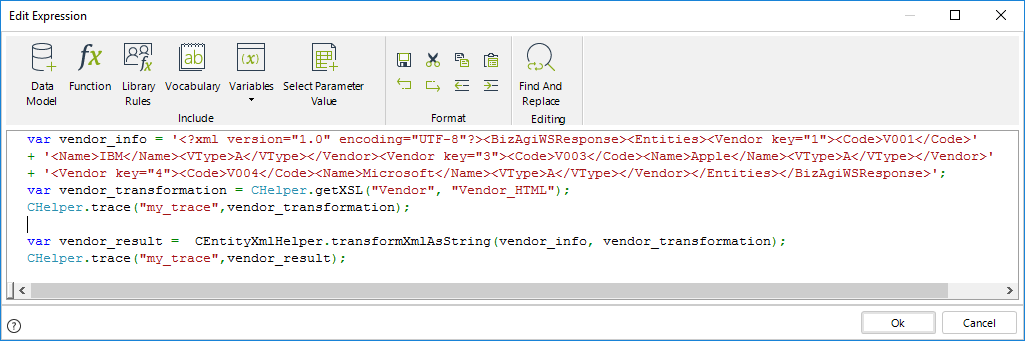
The overall expression shown in the image above is coded with the following:
var vendor_info = '<?xml version="1.0" encoding="UTF-8"?><BizAgiWSResponse><Entities><Vendor key="1"><Code>V001</Code>' +
'<Name>IBM</Name><VType>A</VType></Vendor><Vendor key="3"><Code>V003</Code><Name>Apple</Name><VType>A</VType></Vendor>' +
'<Vendor key="4"><Code>V004</Code><Name>Microsoft</Name><VType>A</VType></Vendor></Entities></BizAgiWSResponse>';
var vendor_transformation = CHelper.getXSL("Vendor", "Vendor_HTML");
CHelper.trace("my_trace",vendor_transformation);

var vendor_result = CEntityXmlHelper.transformXmlAsString(vendor_info, vendor_transformation);
CHelper.trace("my_trace",vendor_result);
Notice that the incoming records from the Vendor entity are hard-coded for this example (vendor_info) but that information complies to what invoking the CEntityXmlHelper.getEntitiesAsString method fetches.
For more information about the getEntitiesAsString method, refer to Querying XML-based information in entities.
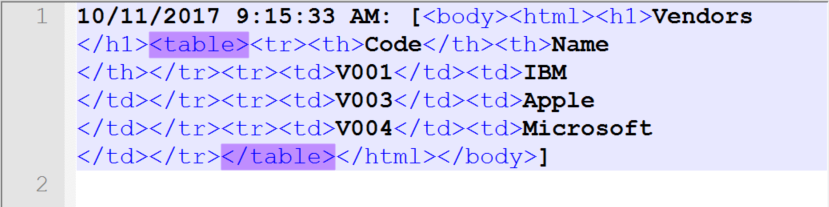
CHelper.trace() and CHelper.getXSL()
Notice in the example above, that though two other methods are being used optionally (both CHelper.trace andCHelper.getXSL) these will often can be used together with CEntityXmlHelper.transformXmlAsString for other purposes:
•CHelper.trace: Allows you to print out custom traces of values and responses in the execution of the rules.
The image below shows what the sample expression prints out:
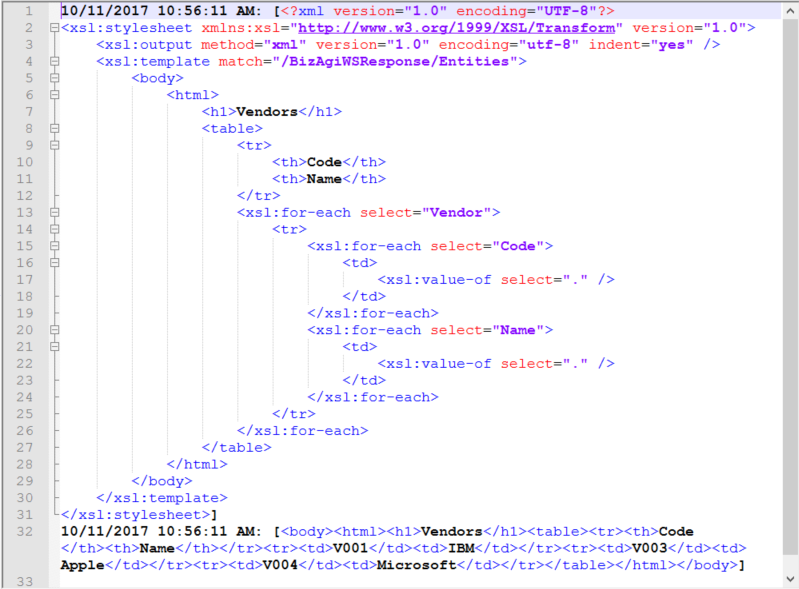
For more information about the use of this tracing option, refer to Validating business rules.
•CHelper.getXSL: Allows you to obtain a predefined transformation file that you registered for any entity, as configured in Bizagi Studio.
The image below shows the registered transformation file for the Vendor entity, explicitly named as Vendor_HTML (as referenced in the sample expression):
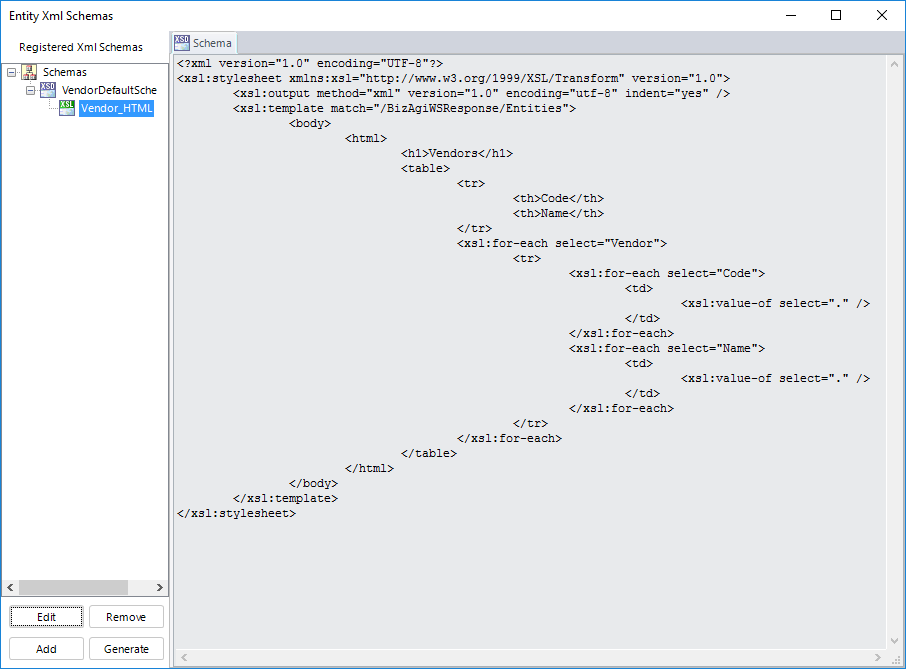
For more information about predefining schemas and transformations, refer to Bizagi's data model XML schemas.
View SourceGrantCaseAccess(Int32, Int32)
Overview
You can dynamically restrict access to specific cases or assign privileged users through Bizagi expressions (business rules executed during the process).
This section describes how to grant access to specific users by relying on the Case security feature.
To get case identifiers, we recommend these functions:
•Me.Case.Id returns the case ID for the current case.
•CHelper.getSiblingProcessesId (Me, iWfClassId): returns an array of Sub-Processes case IDs, that are all created from the current Sub-Process’ parent Process.
•CHelper.getSubProcessesId (Me): returns an array of case’s IDs, that are all Sub-Processes of the current parent Process.
Syntax
CHelper.GrantCaseAccess(int idCase, int idUser)Declaration
public static void GrantCaseAccess(int idCase, int idUser)Parameters
| Type | Name | Description |
|---|---|---|
| System.Int32 | idCase | Case id |
| System.Int32 | idUser | User id |
Examples
Example of Case security using expressions
In a Purchase Request Process, the information needs to be restricted so that only the creator and the supervisor can access the information. Based on the previous explanation, all users assigned during the case will have access.
The user creator, by definition, will automatically be added to the list of privileged users. However, the user’s supervisor must be added using an expression, so he/she can have access to the case from the beginning. To achieve this, you must set the process to have Private case security. Then add an expression to include the user´s supervisor as a privileged user.
1. From the Expert View access the Process properties by right-clicking the current version.
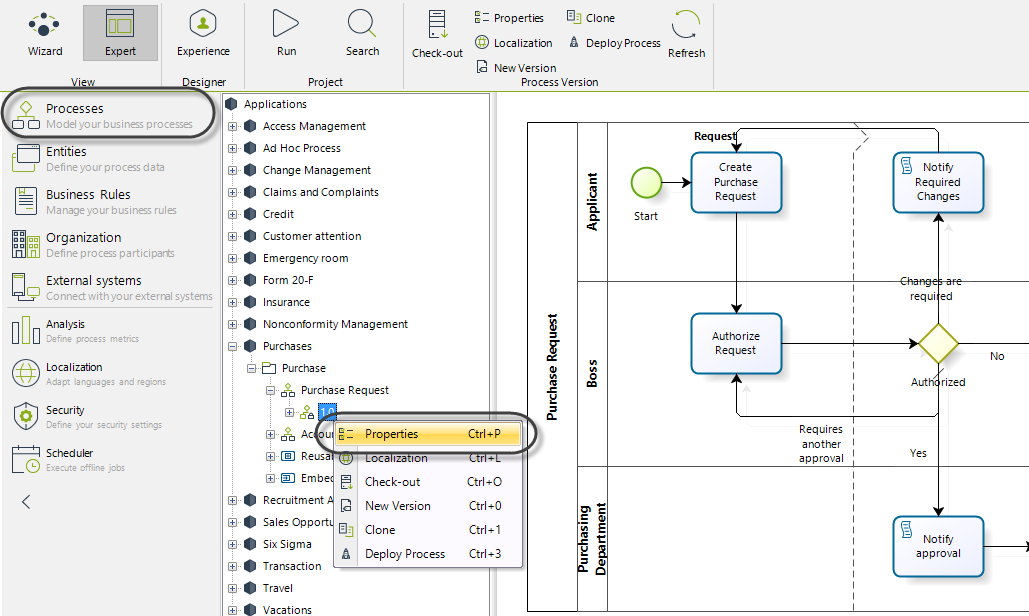
2. Select Private at the case security to restrict the access to the cases' information for all users except those regarded as privileged users. Then click OK.
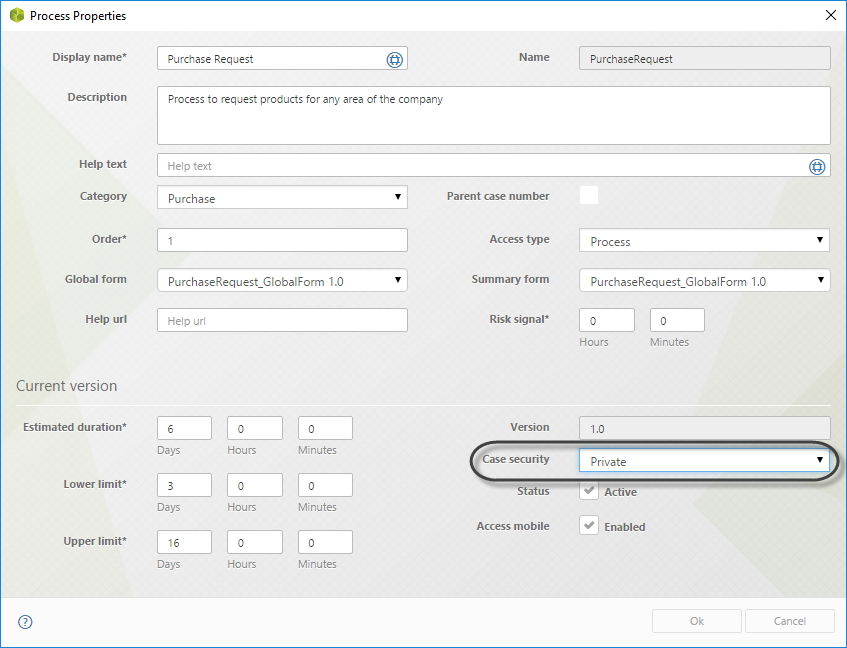
3. In step four of the Process Wizard, go to Activity Actions to create an expression. Select the action to be On enter. The rule should add the creator's supervisor to the list of privileged users.
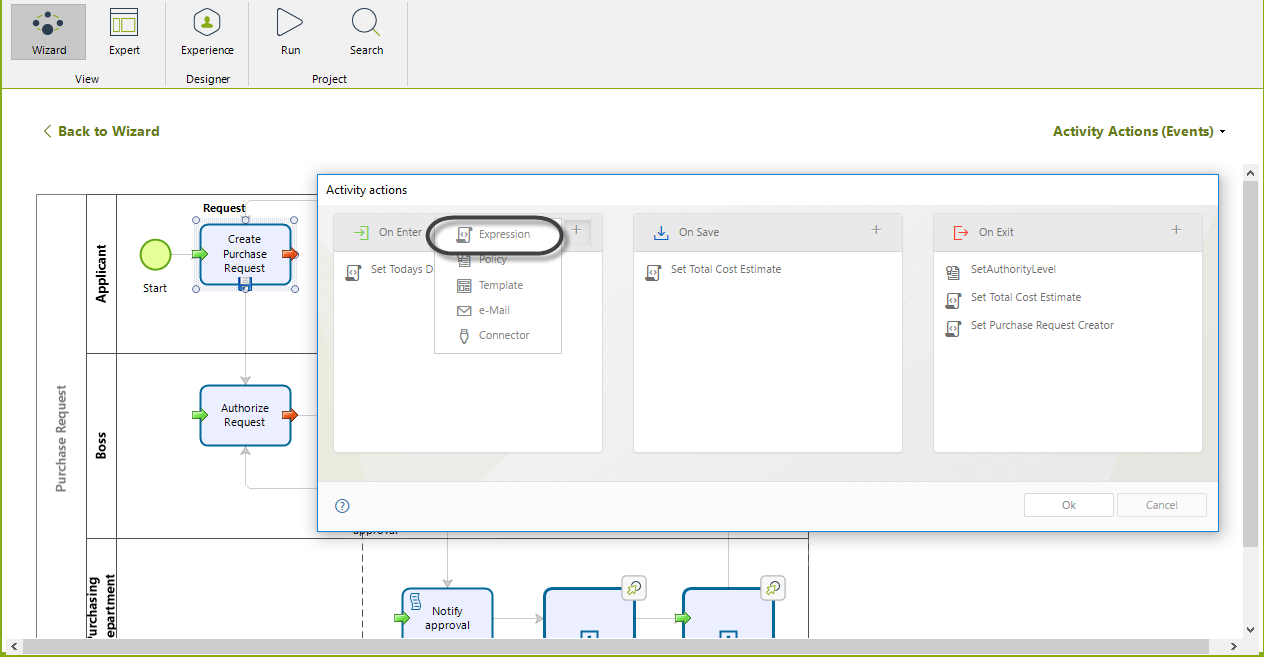
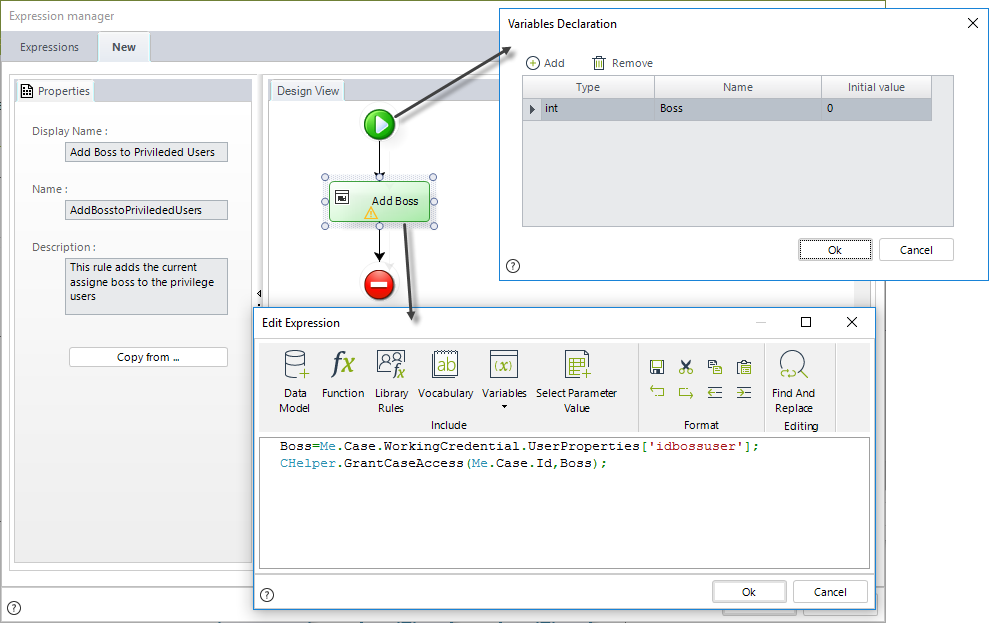
//Obtain the direct supervisor
Boss=Me.Case.WorkingCredential.UserProperties['idbossuser'];

//Grant Access to the supervisor
CHelper.GrantCaseAccess(Me.Case.Id,Boss);
Now let us test if the expression works. Suppose we have three users:
•CreatorUser: It is the user who created the case.
•Boss: The supervisor of the CreatorUser.
•RestrictedUser: The user that must be disallowed access.
Log in with the CreatorUser and create a new Purchase Request case.
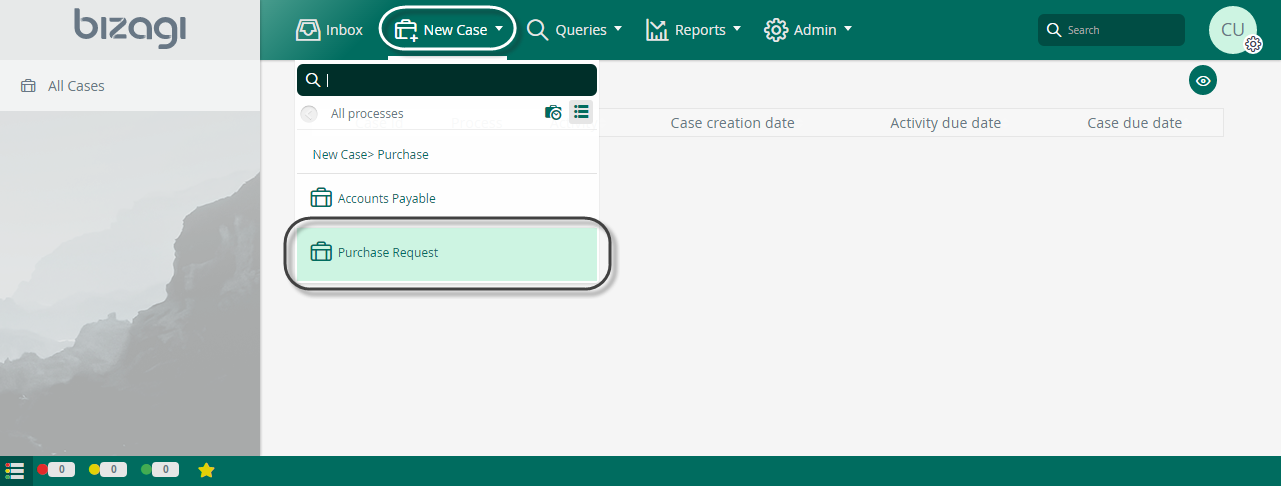
The CreatorUser is automatically included as a privileged user, so they can consult the cases at any time. Enter the case number in the search field. For this example, it will be 1905.
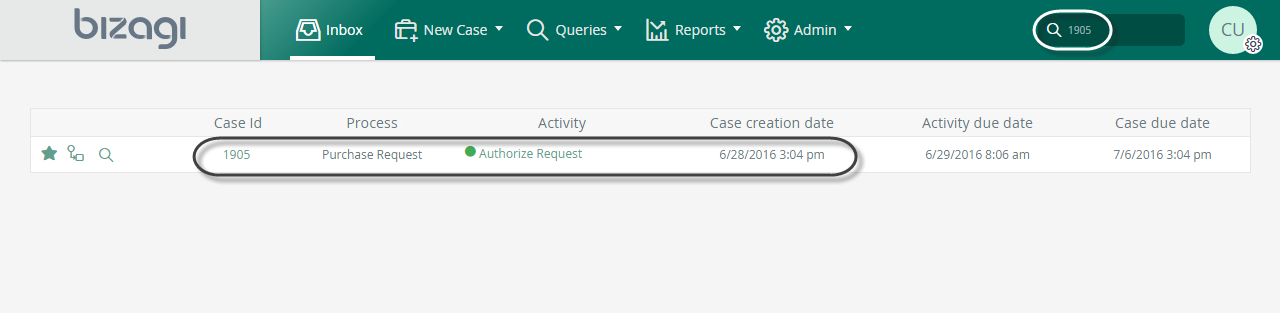
If you click Case Number, you see the case information.
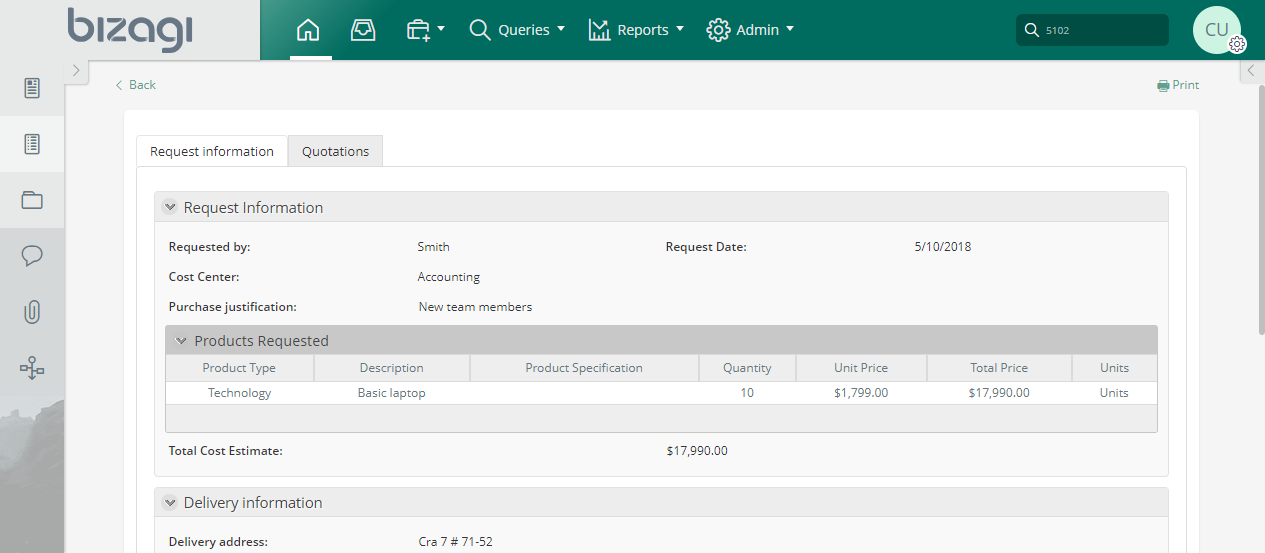
Similarly, the Boss user, who previously was granted access as the Creator's supervisor, has access rights.

If logged in as a RestrictedUSer user, you are not able to access the case. It would appear as if the case didn't exist.

Expression to add a Privileged user
In a Purchase Request Process we need to restrict the information to only allow privileged users to access the case (creator and assignees). Additionally we wish to include the Commercial Vice President, who has no assignment in such cases, as a privileged user. Therefore the user must be added using an expression. To do this, we store the Commercial Vice President position in a parametric table to easily access and administer the user's ID when call for. This parameter table is associated with the Purchase Request Process.

In step four of the Process Wizard, select the Activity Actions to create an expression On Enter of the Activity.
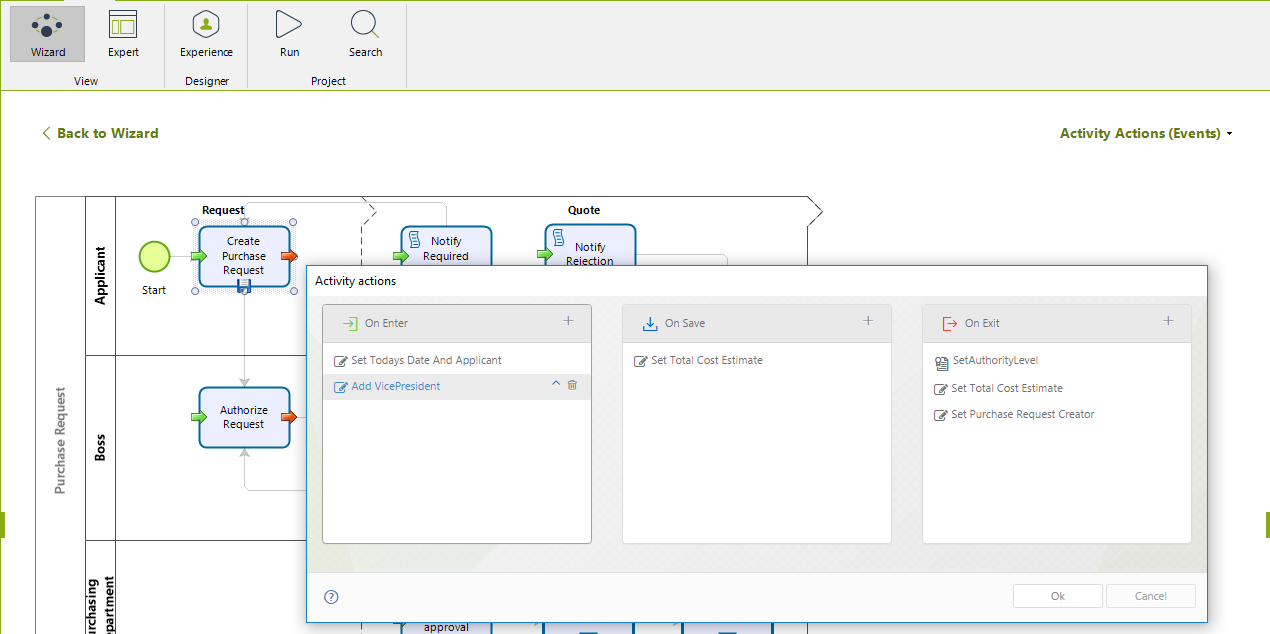 .
.
The expression adds the Vice President to the list of privileged users. The Vice president's ID is located in the parametric table previously created and assigned to a variable. This variable, in turn, is passed to the function call that grants the access.
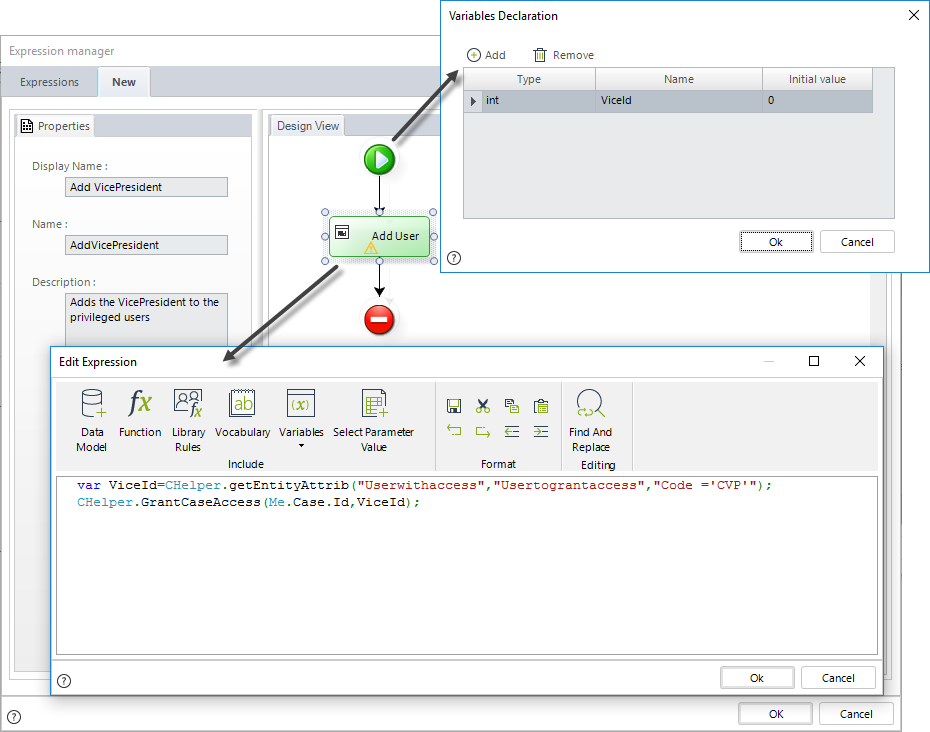
//Obtain VicePresident User
var ViceId=CHelper.getEntityAttrib("Userwithaccess","Usertograntaccess","Code ='CVP'");

//Grant access to VicePresident
CHelper.GrantCaseAccess(Me.Case.Id,ViceId);GrantCaseAccessToUsers(Int32, ArrayList)
Grants case access to users in the list
Declaration
public static void GrantCaseAccessToUsers(int idCase, ArrayList users)Parameters
| Type | Name | Description |
|---|---|---|
| System.Int32 | idCase | Case id |
| System.Collections.ArrayList | users | Users list |
Examples
Expression to add multiple Privileged users
In a Purchase Request Process we need to restrict the information to only allow privileged users to access the case (creator and assignees). Additionally we wish to include the Commercial Vice President and the President, who both has no assignment in such case, as privileged users. Therefore the users must be added using an expression. To do this, we store both users, Commercial Vice President and President, in a parametric table to easily access and administer the user's ID when calls for. This parameter table is associated with the Purchase Request Process.
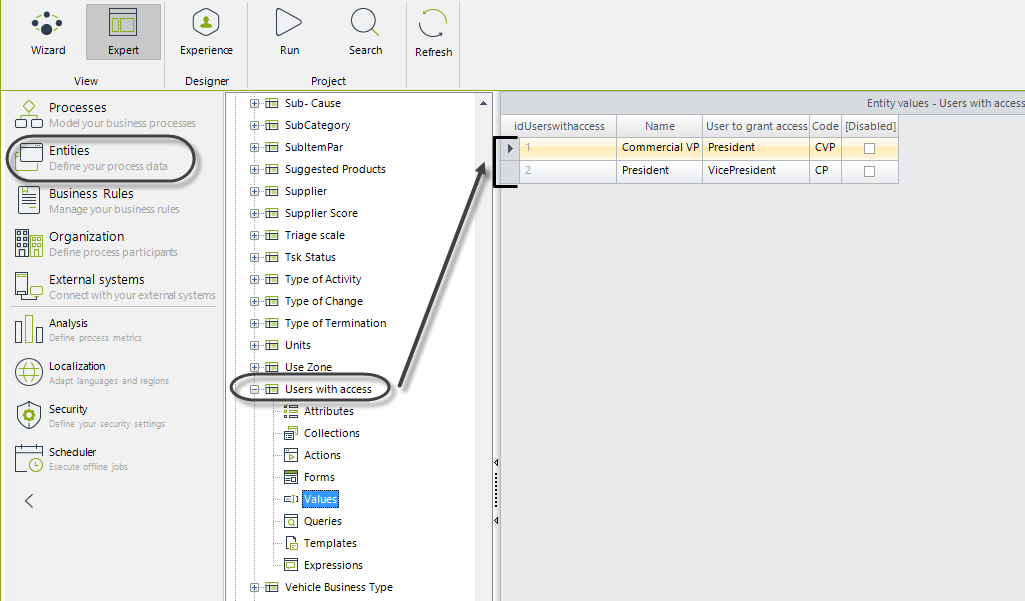
In step four of the Process Wizard, select Activity Actions to create an expression On Enter of the activity.

The following expression adds all users found in the parametric table, that is the President and Vice President. The user ID of each record found in the parametric table is stored in an array. This array is passed to the function call to add the privileged users.
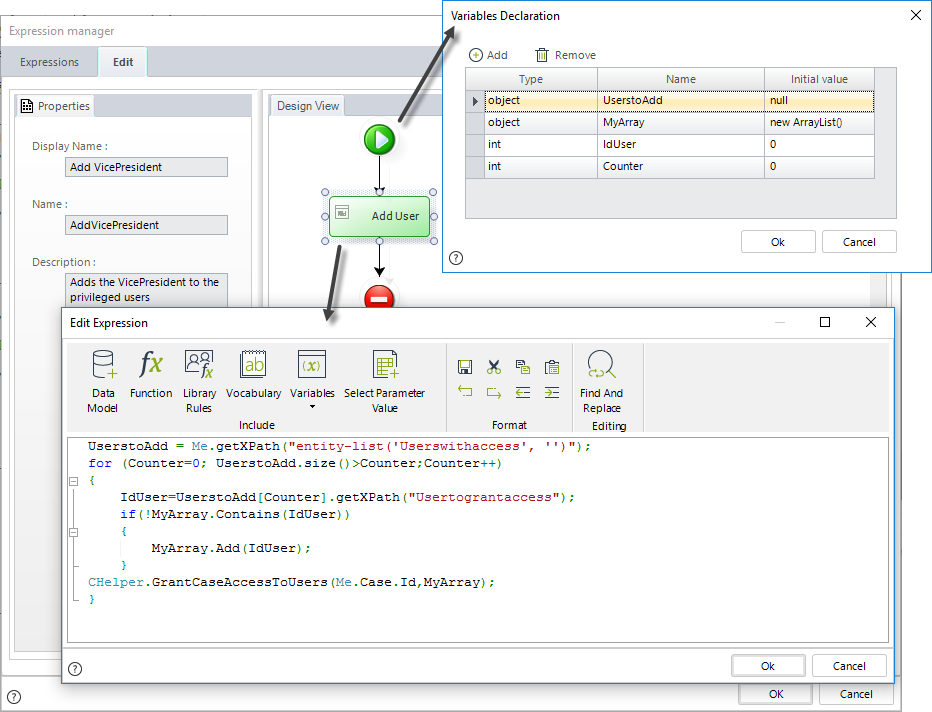
//Obtain list of all users in the 'Users with access' table
UserstoAdd = Me.getXPath("entity-list('Userswithaccess', '')");

//Go through the list
for (Counter=0; UserstoAdd.size()>Counter;Counter++)
{
IdUser=UserstoAdd[Counter].getXPath("Usertograntaccess");

//Validate there are no duplicities
if(!MyArray.Contains(IdUser))
{
  //Store users
  MyArray.Add(IdUser);
}

//Grant Access to users
CHelper.GrantCaseAccessToUsers(Me.Case.Id,MyArray);
}IsEmpty(Object)
Syntax
CHelper.IsEmpty(object Variable)Declaration
public static bool IsEmpty(object Variable)Parameters
| Type | Name | Description |
|---|---|---|
| System.Object | Variable | Object to validate |
Returns
| Type | Description |
|---|---|
| System.Boolean |
True if the object specified as a parameter is empty; otherwise, returns false. |
Examples
Validate if an attribute or variable is empty
In a Purchase Request process, if a request is rejected, a notification is sent to the requester. The message included in the notification depends on the rejection comments. If no rejection comments were entered, it means the request was approved. Otherwise, the request was rejected, and the rejection comments are included in the message.
To validate if rejection comments were entered, you can use the CHelper.IsEmpty function. This function returns true if the object specified as a parameter (Variable) is empty; otherwise, the method returns false.
The syntax of the function is:
CHelper.IsEmpty(Variable) ;Create an expression as an on exit action of the Authorize Request activity.

Use the CHelper.IsEmpty function to evaluate if rejection comments were entered. Define the message to be sent accordingly.
if CHelper.IsEmpty(<PurchaseRequest.RejectionComments>)
{
 <PurchaseRequest.Message>="Your request has been approved"
}
else
{
 <PurchaseRequest.Message>="Your request has been rejected. The reasons are:" + <PurchaseRequest.RejectionComments>;
}IsNull(Object)
Syntax
CHelper.IsNull(object Variable)Declaration
public static bool IsNull(object Variable)Parameters
| Type | Name | Description |
|---|---|---|
| System.Object | Variable | Object to validate |
Returns
| Type | Description |
|---|---|
| System.Boolean |
True if the object specified as a parameter is null; otherwise, returns false. |
Examples
Validate if an attribute or variable is null (CHelper.IsNull)
In a Purchase Request process, if a request is rejected, a notification is sent to the requester. The message included in the notification depends on the rejection comments. If no rejection comments were entered, it means the request was approved. Otherwise, the request was rejected, and the rejection comments are included in the message.
To validate if rejection comments were entered, you can use the CHelper.IsNull function. This function returns true if the object specified as a parameter (Variable) is null; otherwise, the method returns false.
The syntax of the function is:
CHelper.IsNull(Variable) ;Create an expression as an on exit action of the Authorize purchase activity.
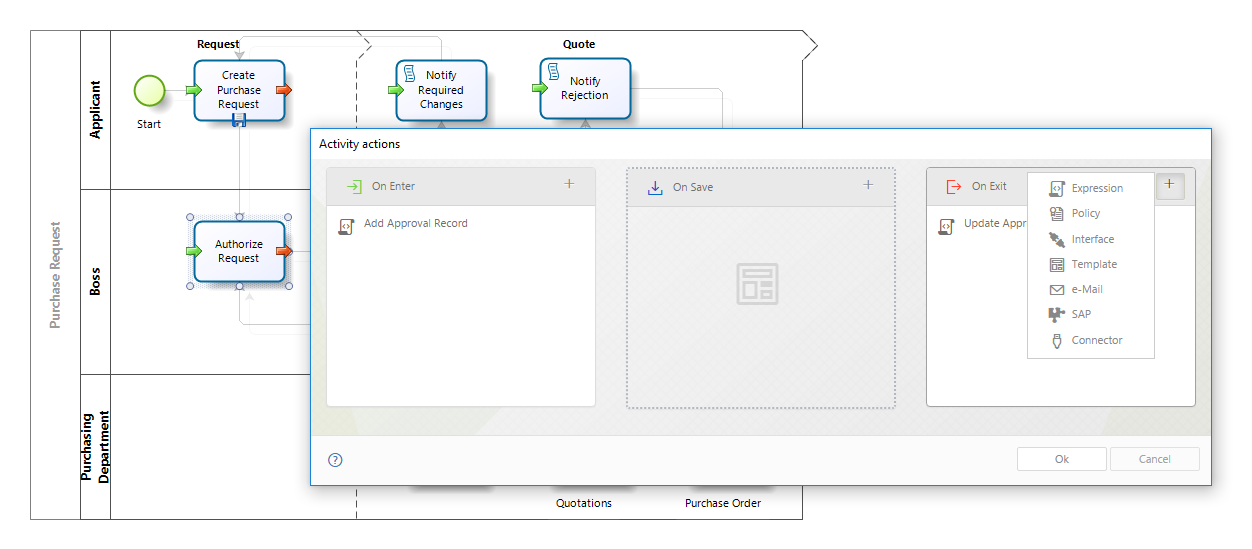
Use the CHelper.IsNull function to evaluate if rejection comments were entered. Define the message to be sent accordingly.
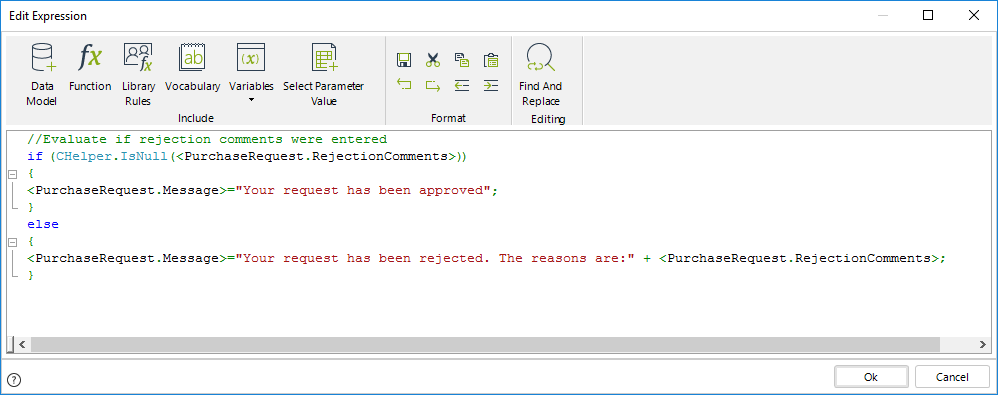
//Evaluate if rejection comments were entered
if (CHelper.IsNull(<PurchaseRequest.RejectionComments>))
{
 <PurchaseRequest.Message>="Your request has been approved"
}
else
{
 <PurchaseRequest.Message>="Your request has been rejected. The reasons are:" + <PurchaseRequest.RejectionComments>;
}

|
•DO NOT USE the following statements: <idRequest.ValueToCompare>==null or <idRequest.ValueToCompare>!=null •You can also use the BAIsBlank function: BAIsBlank(<Request.ValueToCompare>) |
|---|
IsWorkingDay(ICAPIWorkItem, DateTime)
Syntax
CHelper.IsWorkingDay(ICAPIWorkItem Me, DateTime Date)Declaration
public static bool IsWorkingDay(ICAPIWorkItem Me, DateTime Date)Parameters
| Type | Name | Description |
|---|---|---|
| ICAPIWorkItem | Me | This parameter is fixed |
| System.DateTime | Date | Date to validate |
Returns
| Type | Description |
|---|---|
| System.Boolean |
True if a Date is a Working day; otherwise, returns false. |
Examples
Verify if a Date is a Working day
Suppose we wish to verify that the returning date in a trip is a working day. If it is not a working day, a warning message must be displayed. Otherwise, the application can continue with the next activity.
1. On the fourth step of the Bizagi Process Wizard, select Activity Actions.
Click the Task where this action will be performed and create an Expression.

2. In an expression module, use an If condition. Evaluate if the returning date is a working date by using the IsWorkingDayfunction which can be found in the Date & Time function category.
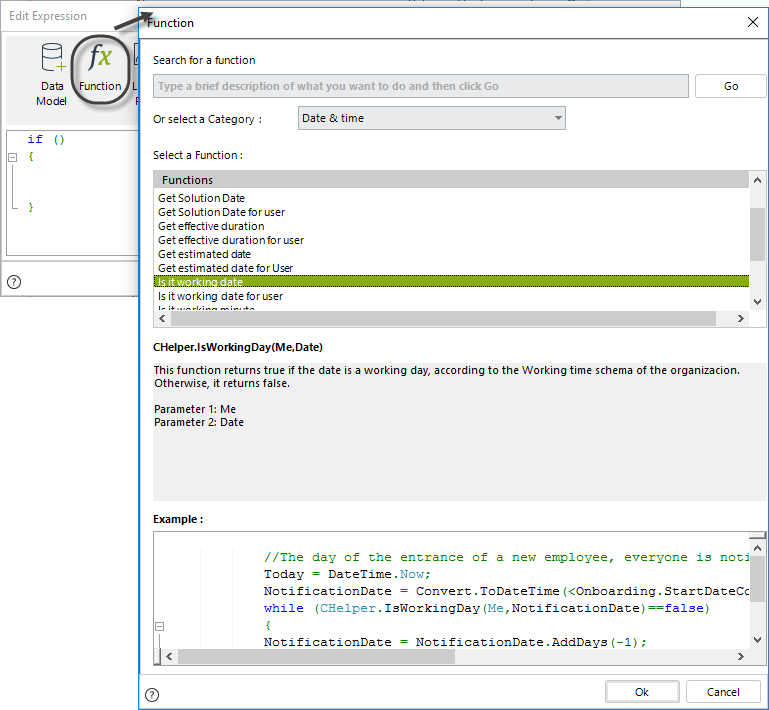
Use as input parameter the returning date (ReturningDate) of the model.
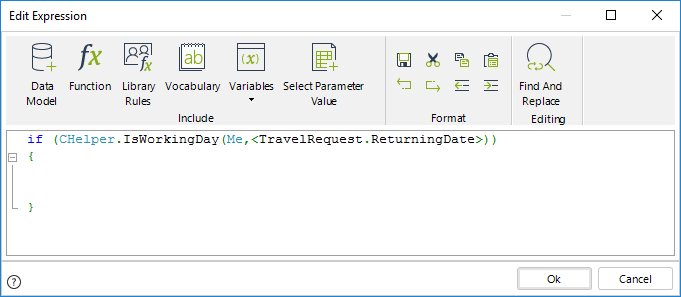
The IsWorkingDay function will return True if the returning date is a working day; otherwise, it will return False.

//Evaluate if the date is non-working
if (CHelper.IsWorkingDay(Me,<TravelRequest.ReturningDate>)==false)
{
 CHelper.ThrowValidationError("Returning day is non working.");
}
Click OK to save the changes.
View SourceIsWorkingDayForUser(Int32, DateTime)
Syntax
CHelper.IsWorkingDayForUser(int idUser, DateTime Date)Declaration
public static bool IsWorkingDayForUser(int idUser, DateTime Date)Parameters
| Type | Name | Description |
|---|---|---|
| System.Int32 | idUser | User id |
| System.DateTime | Date | Date to validate |
Returns
| Type | Description |
|---|---|
| System.Boolean |
True if a date is a working day for a specific user; otherwise, returns false. |
Examples
Verify if a Date is a Working day for a specific user
In a Travel Request process, you can start a case in the Register Travel Request Task. You must enter the Departure Date. If the departure day is a not working day for the user, a validation must appear showing this situation. Otherwise, the application can continue with the next activity.
To know if the Departure Date is a working day for the user, you can use the CHelper.IsWorkingDayForUser function. This method returns true if a specific day is a working day according to the user's working schedule. Otherwise, it returns false.
This function uses two parameters:
•idUser: Id of the user for which the working day is evaluated.
•dtDate: Date to evaluate.
The correct syntax is:
CHelper.IsWorkingDayForUser(idUser,dtDate)Create an expression at the On Exit of the Register Travel Request Task.
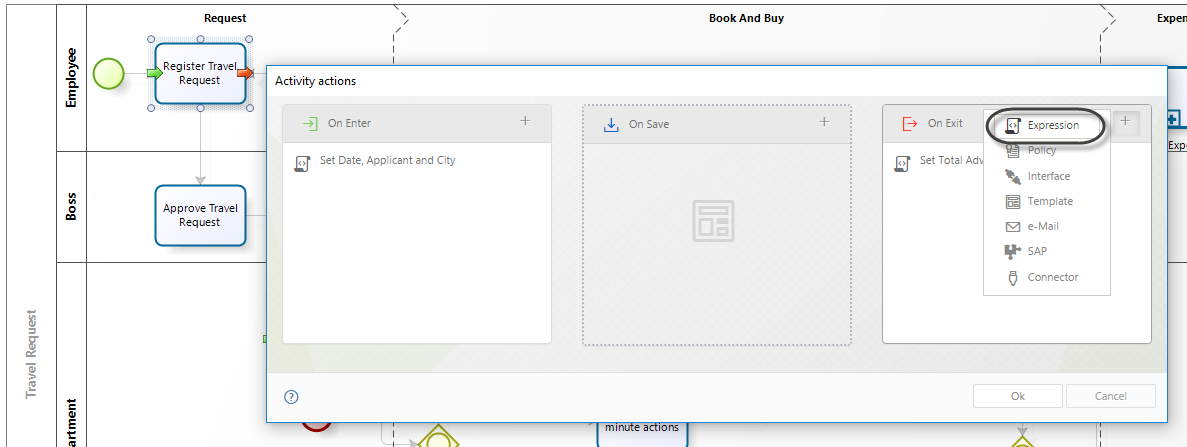
Use the IsWorkingDayForUser function and use as input parameter the Departure Date of the case and the Id of the Case creator.
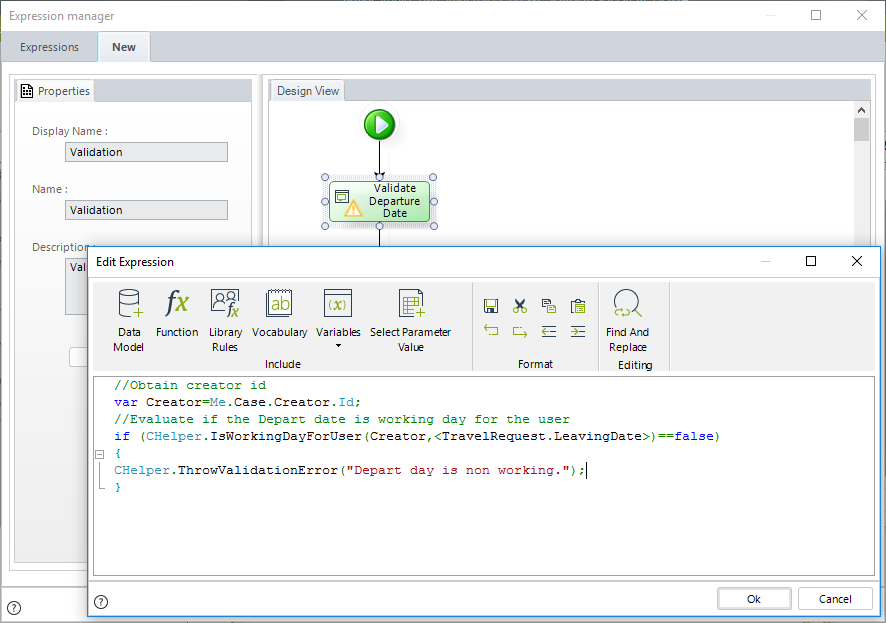
//Obtain creator id
var Creator=Me.Case.Creator.Id;

//Evaluate if the Depart date is working day for the user
if (CHelper.IsWorkingDayForUser(Creator,<TravelRequest.LeavingDate>)==false)
{
CHelper.ThrowValidationError("Depart day is non working.");
}IsWorkingMinute(ICAPIWorkItem, DateTime)
Syntax
CHelper.IsWorkingMinute(ICAPIWorkItem Me, DateTime Date)Declaration
public static bool IsWorkingMinute(ICAPIWorkItem Me, DateTime Date)Parameters
| Type | Name | Description |
|---|---|---|
| ICAPIWorkItem | Me | This parameter is fixed |
| System.DateTime | Date | Date to validate |
Returns
| Type | Description |
|---|---|
| System.Boolean |
True if a specific date falls under the organization's working time schema; otherwise, returns false. |
Examples
Verify if a date is a Working hour
Suppose you have a Process in which there is the need to set a meeting ( date and a specific hour).
You wish to validate if the date selected by the boss is a working hour for the user case creator in his/her working time schema.
To know if the Meeting hour is a working hour, you can use the CHelper.IsWorkingMinute function. This method returns true if a specific date falls under the organization's working time schema. Otherwise, it returns false.
This function uses two parameters:
•Me
•dtDate: Date to evaluate. It considers the calendar day as well as the time defined for it (hour of the day).
The syntax of the function is:
CHelper.IsWorkingMinute(Me,dtDate)Create an expression at the On Exit of the Task where the meeting is scheduled.
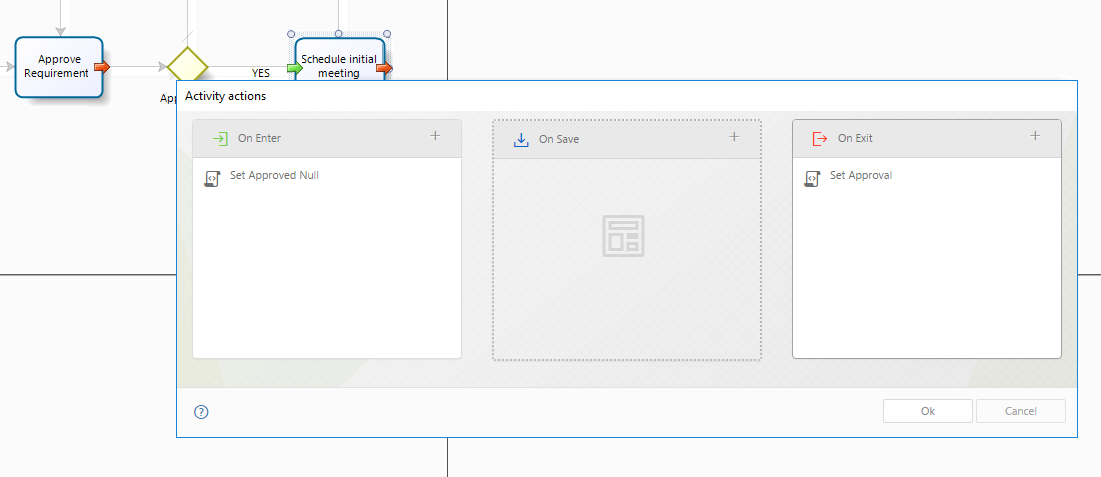
Use the IsWorkingMinute function and use as an input parameter the Meeting Date. Also, use validation to notify the end user that the selected date is not a valid option (if that is the case).
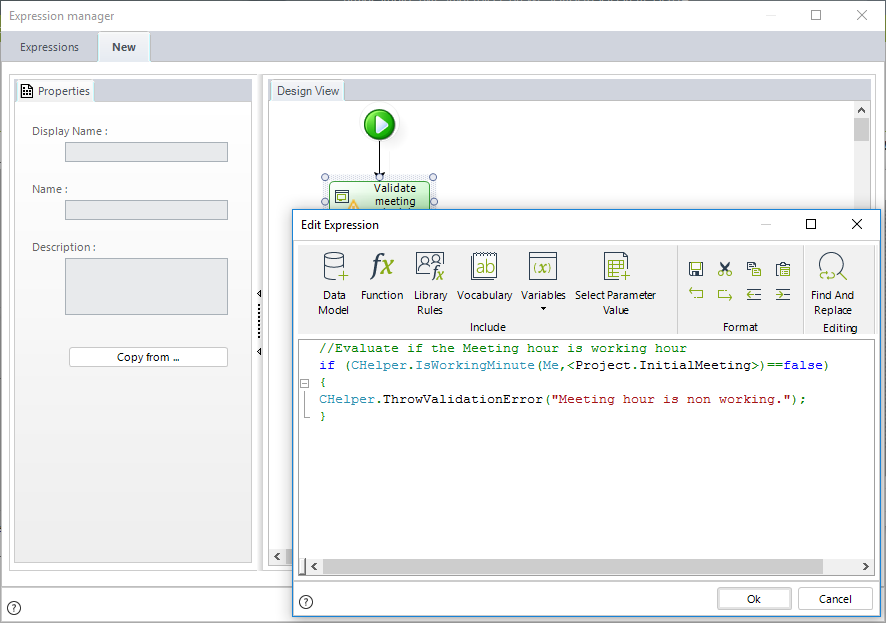
//Evaluate if the Meeting hour is working hour
if (CHelper.IsWorkingMinute(Me,<Project.InitialMeeting>)==false)
{
 CHelper.ThrowValidationError("Meeting hour is non working.");
}IsWorkingMinuteForUser(Int32, DateTime)
Syntax
CHelper.IsWorkingMinuteForUser(int idUser, DateTime Date)Declaration
public static bool IsWorkingMinuteForUser(int idUser, DateTime Date)Parameters
| Type | Name | Description |
|---|---|---|
| System.Int32 | idUser | User id |
| System.DateTime | Date | Date to validate |
Returns
| Type | Description |
|---|---|
| System.Boolean |
True if a specific date falls under the given user's working time schema; otherwise, returns false. |
Examples
Verify if a date is a Working hour for a specific user
Suppose you have a Process in which the user's boss needs to set a meeting with the user case creator (a date and a specific hour).
You wish to validate if the date selected by the boss is a working hour for the user case creator in our organization's working time schema.
To know if the Meeting hour is a working hour, you can use the CHelper.IsWorkingMinuteForUser function. This method returns true if a specific date falls under the given user's working time schema. Otherwise, it returns false.
This function uses two parameters:
•idUser: Id of the user for which the working minute is evaluated.
•dtDate: Date to evaluate. It considers the calendar day as well as the time defined for it (hour of the day).
The syntax of the function is:
CHelper.IsWorkingMinuteForUser(idUser,dtDate)Create an expression at the On Exit of the Task where the meeting is scheduled.
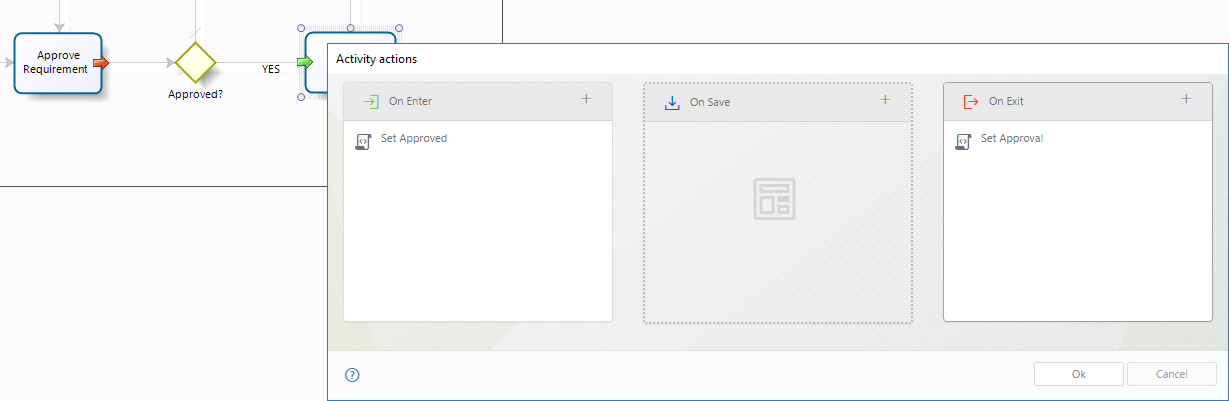
Use the IsWorkingMinuteForUser function and use as input parameters the Case User creator and the Meeting Date. Also, use validation to notify the end user that the selected date is not a valid option (if that is the case).
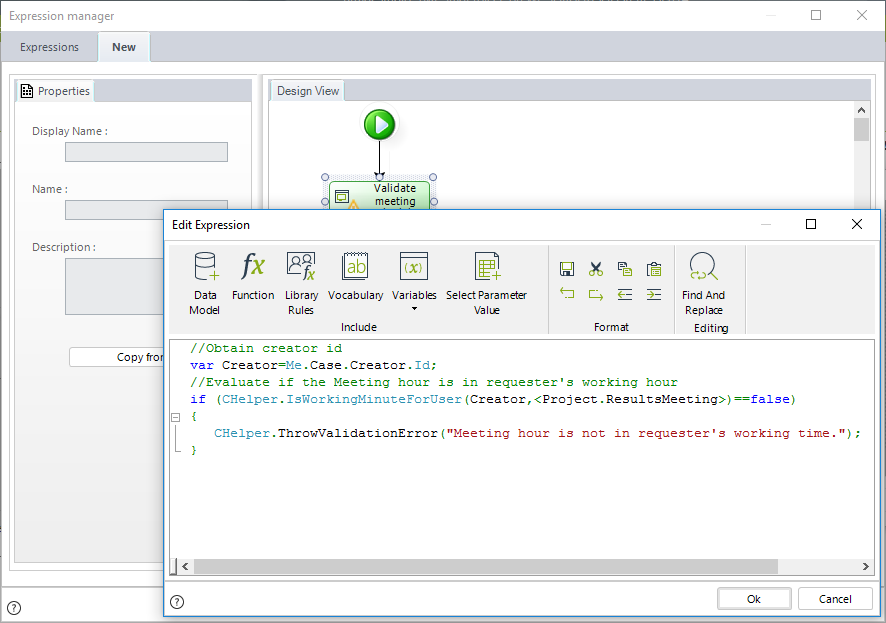
//Obtain creator id
var Creator=Me.Case.Creator.Id;

//Evaluate if the Meeting hour is in requester's working hour
if (CHelper.IsWorkingMinuteForUser(Creator,<Project.ResultsMeeting>)==false)
{
 CHelper.ThrowValidationError("Meeting hour is not in requester's working time.");
}LoadAssig(ArrayList, CAPIWorkItem)
Overview
Sometimes, business requirements demand that the same user is assigned to several tasks, which occur in parallel in a process. For this specific business requirement, Bizagi offers functions which will return the assigned user's ID, which matches the given criteria. Keep in mind that these functions do not directly assign the task; this would have to be done manually by relying on the use of these functions, as described below.
To get the next assigned user by load, use this method.
Syntax
CHelper.LoadAssig(ArrayList AssigneeList, CAPIWorkItem Me)Declaration
public static int LoadAssig(ArrayList AssigneeList, CAPIWorkItem Me = null)Parameters
| Type | Name | Description |
|---|---|---|
| System.Collections.ArrayList | AssigneeList | List of users to select the assignee |
| CAPIWorkItem | Me | This parameter is fixed |
Returns
| Type | Description |
|---|---|
| System.Int32 |
Id of the next user available for assignation by load |
Examples
Suppose that for our organization's Travel Request process, we need the same Administrative Assistant that registers the bookings to manage the travel advance. This is because that person will know which are the traveler's hotel privileges, its location, and meals included to calculate the best amount for the advance.
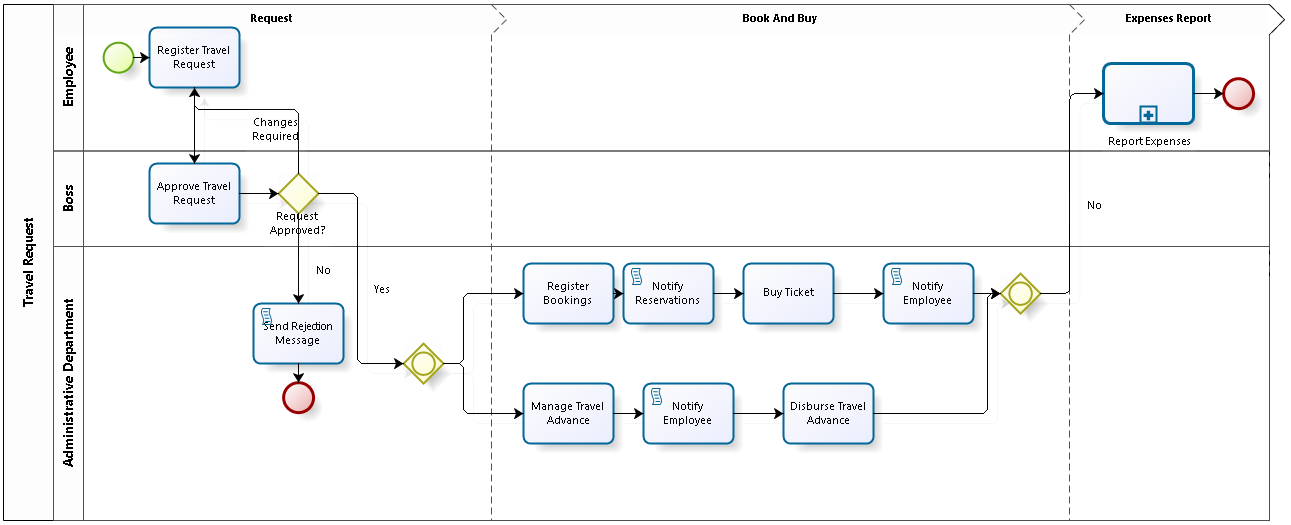
To select a user by load, use the following expression:

The expression shown above is as follows:
var userList = CHelper.getUsersForRole("AdministrativeAssistant");

var idAssignedUser = CHelper.LoadAssig(userList, Me);

<TravelRequest.idAdministrationAssistant> = idAssignedUser;
Finally, when configuring performers make sure that the selected user is assigned the activities by using this setup:
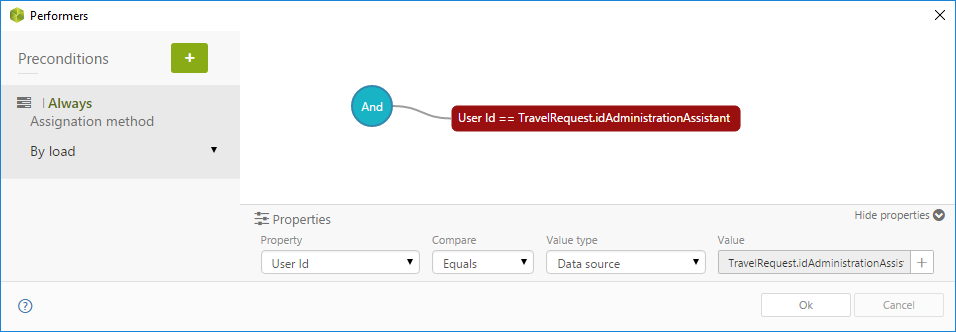
NewCase(Int32, String)
Creating a new case defining the creator user
To create a new case defining the case creator user, use this function with the following syntax.
Syntax
CHelper.NewCase(int idUser, string WFClassName)Declaration
public static CEntity NewCase(int idUser, string WFClassName)Parameters
| Type | Name | Description |
|---|---|---|
| System.Int32 | idUser | Id of the user to be set as case creator |
| System.String | WFClassName |
Name of the Workflow to be created. To obtain this parameter, refer to How to obtain wfClassName. |
Returns
| Type | Description |
|---|---|
| CEntity | An entity with the new case data |
Examples
In a Help Desk process, an agent receives and analyzes a support ticket in the Analyze and resolve task. In some situations, a change in technological resources might be required to solve it. Therefore, a new case of the Change management process should be created at the end of the ticket analysis. The current Help Desk agent must be defined as the case creator of that case.
To create a new case of the Change management process from the Help Desk Process using an expression, follow the steps below:
1. Go to the fourth step of the Bizagi Process Wizard and select Activity Actions.
Click the Analyze and resolve task and create an Expression as an On exit action.
2. Add an expression module. Evaluate if a new case of Change management must be created.

3. Obtain the user id of the current Help Desk Agent using the Me.Case.WorkingCredential.UserId function.
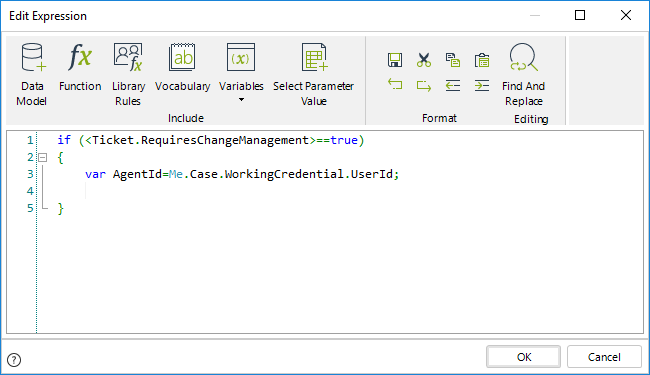
4. Use the CHelper.NewCase function to create the new case.
This function is found under the Process category of functions.
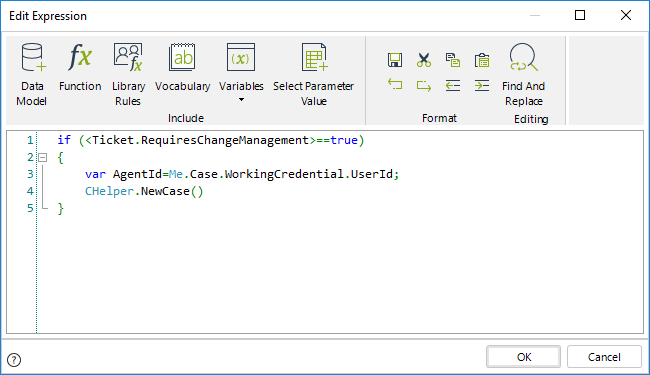
5. Use the id of the Help Desk Agent as the first parameter of the function.
For the second parameter, assume that the Class Name of the Change Management process is equal to ChangeManagement.
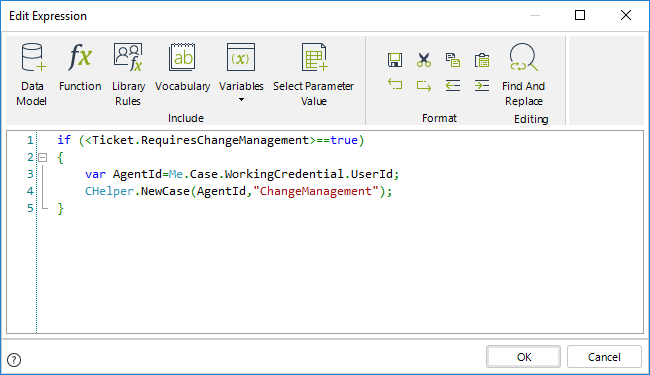
if (<Ticket.RequiresChangeManagement>==true)
{
 var AgentId=Me.Case.WorkingCredential.UserId;
 CHelper.NewCase(AgentId,"ChangeManagement");
}NewCase(String)
Creating a new case with business information
This function creates a new case based on the information provided in the input parameter (string XML). In the input parameter, it is possible to include data about the creator and business information for the case.
This function also returns a string with information about the state of the case like errors during the creation, activities, events, and other information.
To create a new case defining specific business information use this function.
Syntax
CHelper.NewCase(string XML)The parameter of this function is an XML containing the business information. This XML must follow the next structure:
<BizAgiWSParam> //start the xml

  <domain>domain</domain> //domain of the user that will create the case

  <userName>User</userName> //user that will create the case

  <Cases>
    <Case>
      <Process>ChangeManagement</Process> //process name

      <Entities> //start of the business information

        <ProcessEntity> //name of the process entity

          <Attribute>AttributeValue</Attribute> //business information

        </ProcessEntity>
      </Entities>
    </Case>
  </Cases>
</BizAgiWSParam>//close the xml
Declaration
public static string NewCase(string XML)Parameters
| Type | Name | Description |
|---|---|---|
| System.String | XML | Required information to create the new case |
Returns
| Type | Description |
|---|---|
| System.String | An entity with the new case data |
Examples
In a Help Desk process, an agent receives and analyzes a support ticket in the Analyze and resolve task. In some situations, a change in technological resources might be required to solve it. Therefore, a new case of the Change management process should be created at the end of the ticket analysis. The current Help Desk agent must be defined as the case creator of that case, and the number of the ticket associated with the Change Management process must be the current Ticket number.
To create a new case of the Change management process from the Help Desk Process using an expression, follow the steps below:
1. Go to the fourth step of the Bizagi Process Wizard and select Activity Actions.
Click the Analyze and resolve task and create an Expression as an On exit action.
2. Add an expression module. Evaluate if a new case of Change management must be created.
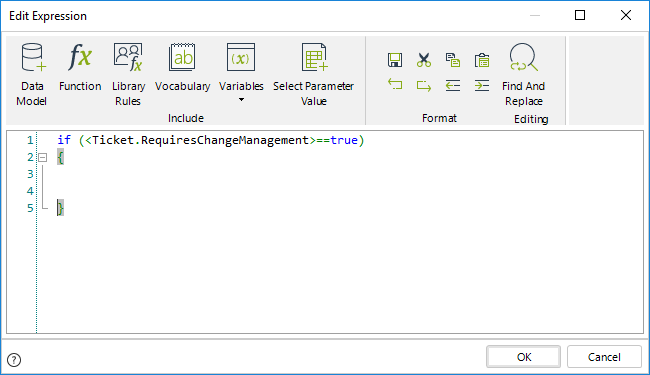
3. Build a string following an XML structure. Note how the business information is entered.
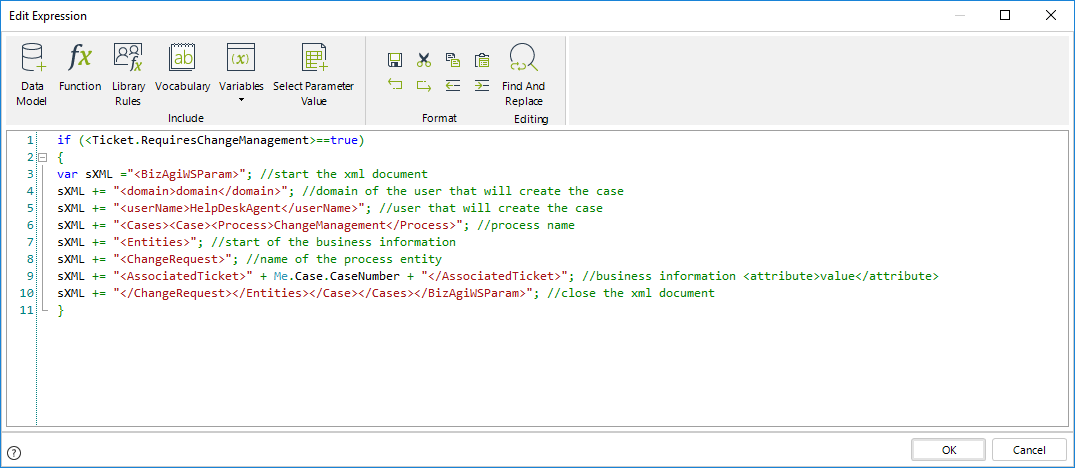
4. Use the CHelper.NewCase function and use the XML string as a parameter to create the new case.
This function is found under the Process category of functions.
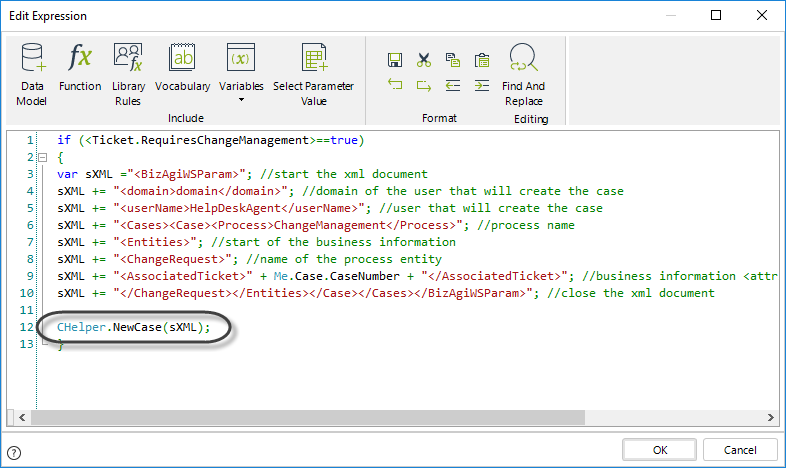
if (<Ticket.RequiresChangeManagement>==true)
{
var sXML ="<BizAgiWSParam>"; //start the xml document
sXML += "<domain>domain</domain>"; //domain of the user that will create the case
sXML += "<userName>HelpDeskAgent</userName>"; //user that will create the case
sXML += "<Cases><Case><Process>ChangeManagement</Process>"; //process name
sXML += "<Entities>"; //start of the business information
sXML += "<ChangeRequest>"; //name of the process entity
sXML += "<AssociatedTicket>" + Me.Case.CaseNumber + "</AssociatedTicket>"; //business information <attribute>value</attribute>
sXML += "</ChangeRequest></Entities></Case></Cases></BizAgiWSParam>"; //close the xml document
CHelper.NewCase(sXML)
}PerformActivity(String)
The PerformActivity function is used to execute an activity. It is the equivalent of pressing the NEXT button, but it can be used remotely (from another case o activity) and providing information related to the activity.
The main parameters of this function are the XML in a string. This XML must contain the following information:
•Domain
•User name
•Task Id
•Id Case, to perform the action.
•Work item id
•Entities, with the information intended to be inserted into the task.
Thus, the XML structure shown below must be provided:
<BizAgiWSParam>
<domain>domain</domain>
<userName>user</userName>
<ActivityData>
 <taskId>taskId</taskId>
 <idCase>"+casenumber+"</idCase>
 <idWorkItem>"+WorkItemId+"</idWorkItem>
</ActivityData>
<Entities>
  <XPath XPath=\"+entityXpath+"> value </XPath>
</Entities>
</BizAgiWSParam>
The PerformActivity function is found in the Process category.

Syntax
CHelper.PerformActivity(string XML_ActivityInfo)Declaration
public static string PerformActivity(string XML_ActivityInfo)Parameters
| Type | Name | Description |
|---|---|---|
| System.String | XML_ActivityInfo | Information of the activity to execute |
Returns
| Type | Description |
|---|---|
| System.String | Information about the executed activity |
Examples
In a Client information update process, if the client does not have beneficiaries, the process must continue without registering them in parallel.
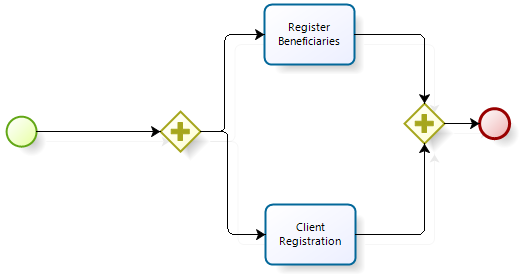
We want to continue with the process flow specifying that the client has no beneficiaries; thus, the check mark control in Register Beneficiaries must be set as false.
To configure the activity when exiting, create a new expression closing the event Client Registration.
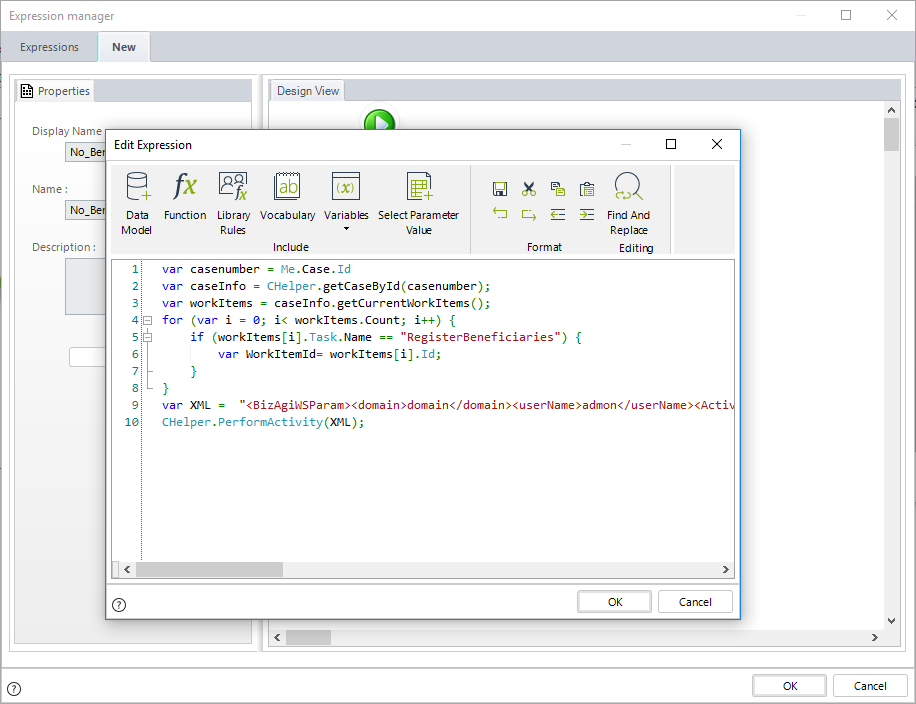
The Activity Name is RegisterBeneficiaries.
You can verify the name in the Activity properties of the Task by going to the first step of the Process Wizard.
var casenumber = Me.Case.Id
var caseInfo = CHelper.getCaseById(casenumber);
var workItems = caseInfo.getCurrentWorkItems();
for (var i = 0; i< workItems.Count; i++)
{
if (workItems[i].Task.Name == "RegisterBeneficiaries")
{
var WorkItemId= workItems[i].Id;
}
}
var XML = "<BizAgiWSParam>
<domain>domain</domain>
<userName>admon</userName>
<ActivityData>
<taskId>79</taskId>
<idCase>"+casenumber+"</idCase>
<idWorkItem>"+WorkItemId+"</idWorkItem>
</ActivityData>
<Entities>
 <XPath XPath=\"SuscriptionProcess.Beneficiaries.hasBeneficiaries\">false</XPath>
</Entities>
</BizAgiWSParam>"
CHelper.PerformActivity(XML)
Save the expression. When you select NEXT in the activity Client Registration, The activity Register Beneficiaries will continue its flow and the attribute hasBeneficiaries is now false.
View SourceRaiseCancelEndEvent(String)
Overview
When you have a transactional Sub-Process, it is possible for it to have a Cancel End Event. Bizagi allows you to raise cancel end events from Business Rules.
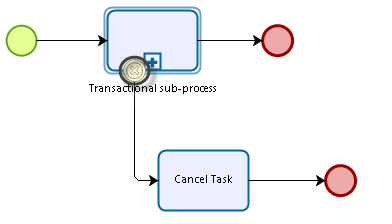
To raise the cancel end event, use the following function. It will interrupt the transactional Sub-Process and deviate the typical path towards the cancel path. This function will add the RaiseCancelEndEvent log file in the project folder.
The following attributes are needed:
•message: A tag to identify the cancellation in the log file.
Syntax
CHelper.RaiseCancelEndEvent(string message)Declaration
public static void RaiseCancelEndEvent(string message)Parameters
| Type | Name | Description |
|---|---|---|
| System.String | message |
Tag to identify the cancellation in the log file |
Examples
Consider the following process for an online retailer.
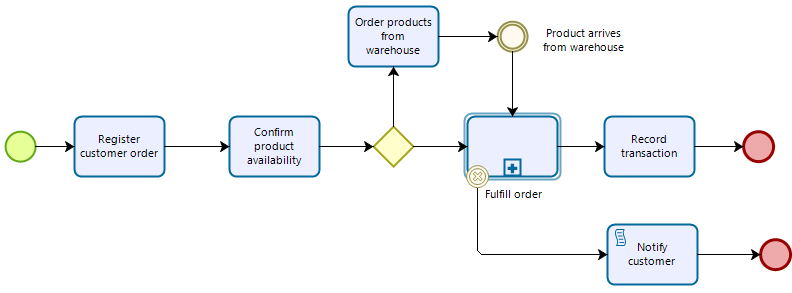
The Fulfill Order transactional Sub-Process is as follows:

If the credit card is not valid, a Cancel End Event will be raised. To do so, we are going to set the function into an "On Exit" activity action.

Then, if the credit card is not valid, the path of the process will follow the cancellation path.
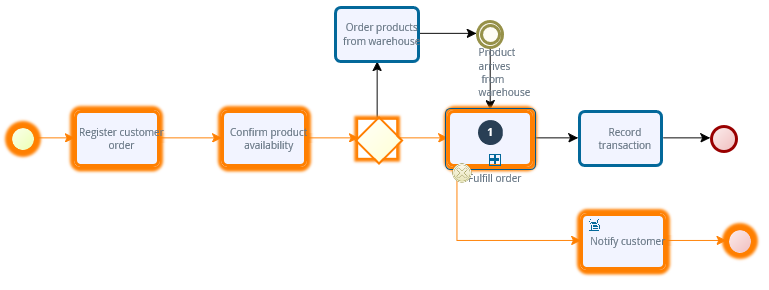
When the cancellation is raised, a log file will be created within the project folder, showing the cancellation details.
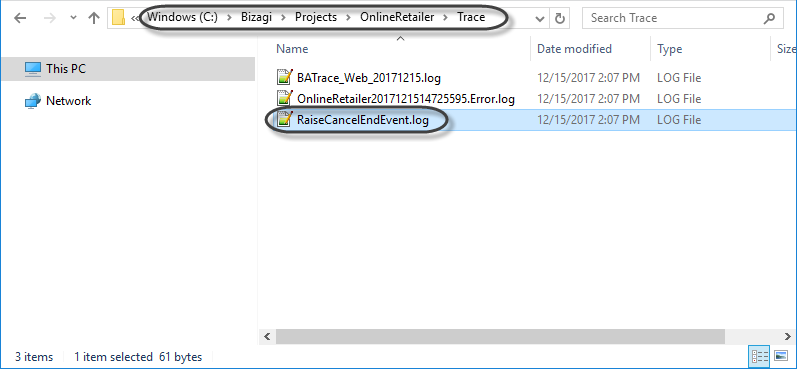
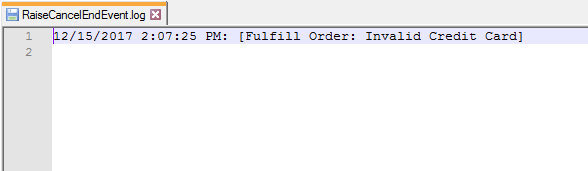
RaiseCancelIntermediateEvent(String)
Syntax
CHelper.RaiseCancelIntermediateEvent(string message)Declaration
public static void RaiseCancelIntermediateEvent(string message)Parameters
| Type | Name | Description |
|---|---|---|
| System.String | message |
Tag to identify the cancellation in the log file |
Examples
To illustrate how to configure Transactional Sub-Processes, we will use the following diagram:
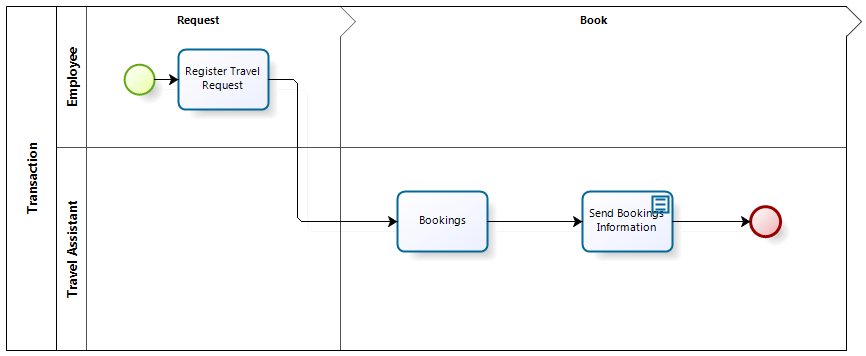
The diagram refers to a Travel Request Process.
A Travel Request Process includes the necessary Activities to receive and handle travel requests made by the employees of a company. We will transform the Bookings Task to a Transactional Sub-Process, taking into account situations that need special treatment.
To configure a Transactional Sub-Process, follow the next steps:
1. Go to step 1 (Model Process) of the Process Wizard and click Edit Process.
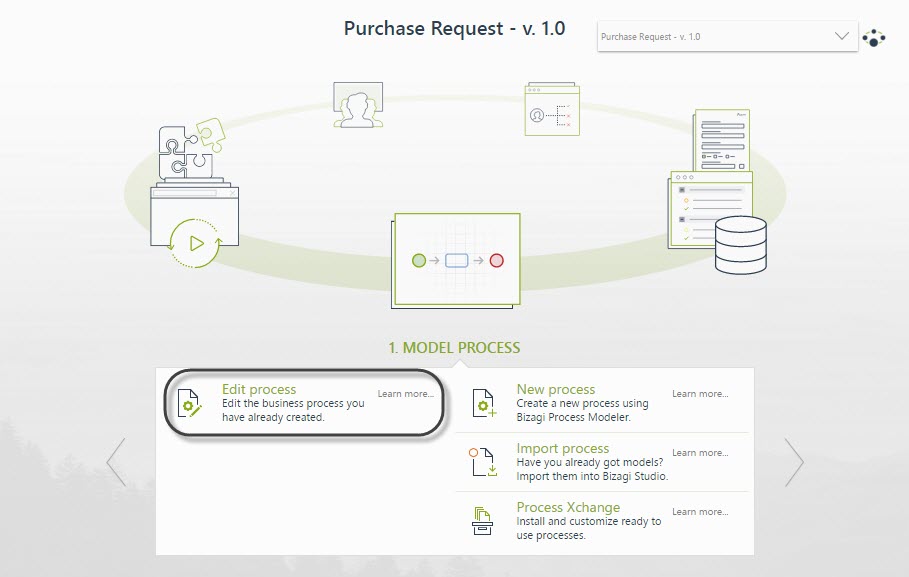
2. Right-click the task you wish to convert to Transactional Sub-Proces. In this case, the Bookings task, and select the option Transform to Sub-Process.
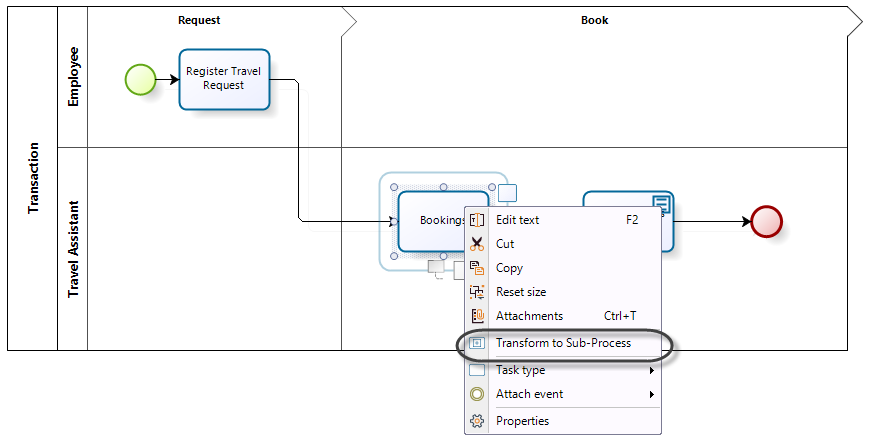
3. The Sub-Process Wizard will launch and show the Sub-Process types. Select the Embedded option. In the new window, you must select the Transactional checkbox control.

4. The properties window will display the following controls:
![]()
|
Controls |
Description |
|---|---|
| Transactional Check-box | Sets the Sub-Process as Transactional. |
| Processes | Displays the existing processes list and sets the selected one as the Sub-Process |
| Add button | Allows the user to create a new process |
| Process version | Displays the selected process versions list. If a new process is created, the selected version will be the 1.0 |
| Diagram | Displays a preview of the process model selected. If a new process is selected, the Diagram will remain empty. |
| Status Bar | Presents the Sub-Process status configuration horizontally. |
To define the Sub-Process, you can either select an existing process or create a new one from the Properties tab:
•To set an existing Process as Transactional:
Tick the Transactional Checkbox control, click the Process and Process version drop-down list controls, and select the desired options. Then click the Finalize button.
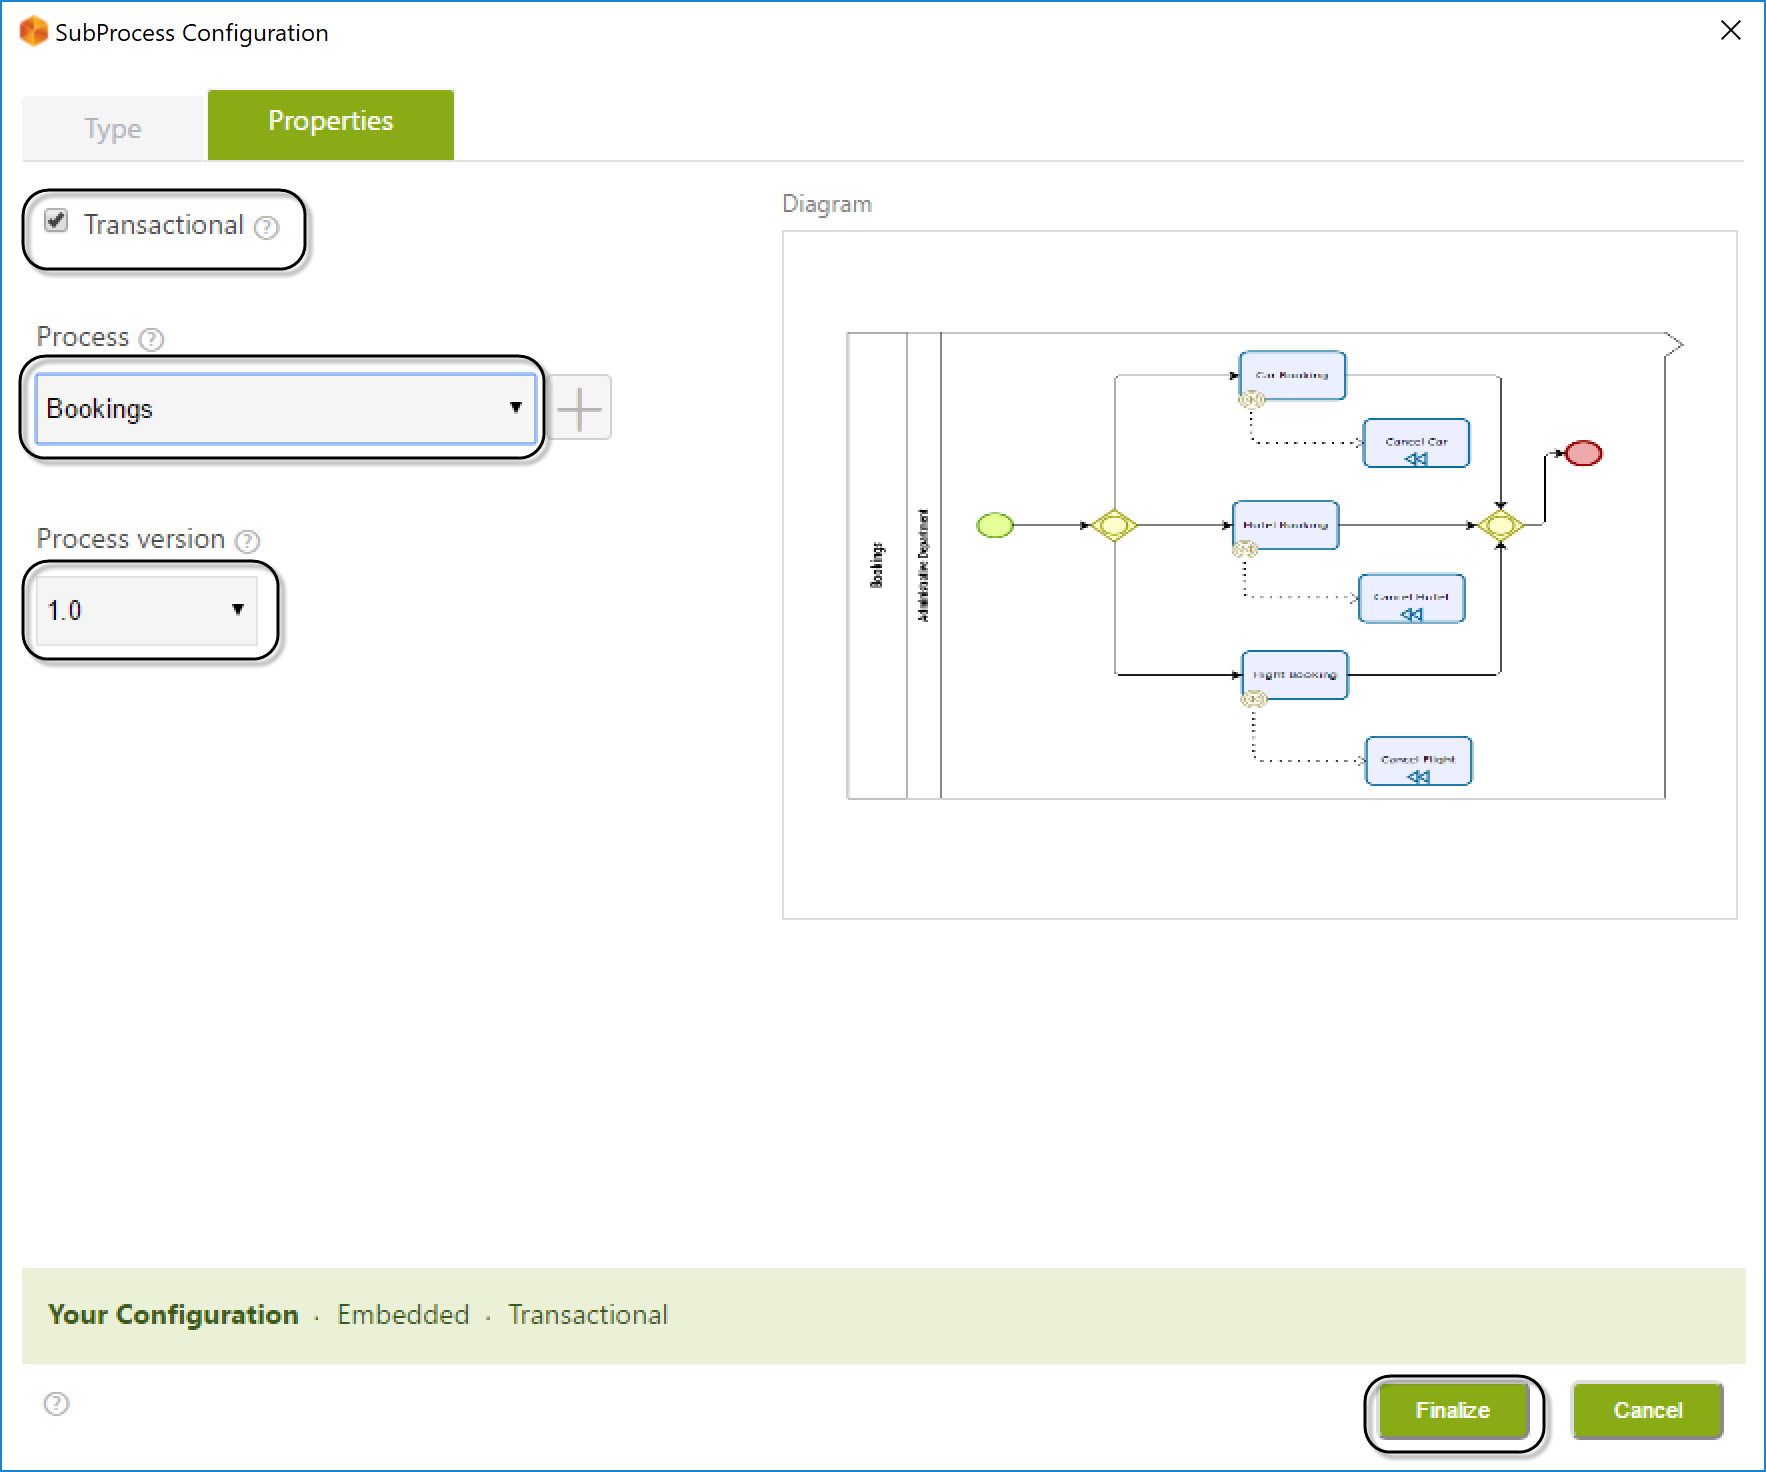
•To create a new Transactional Sub-Process:
1. Tick the Transactional Check-box control and click the Add button.
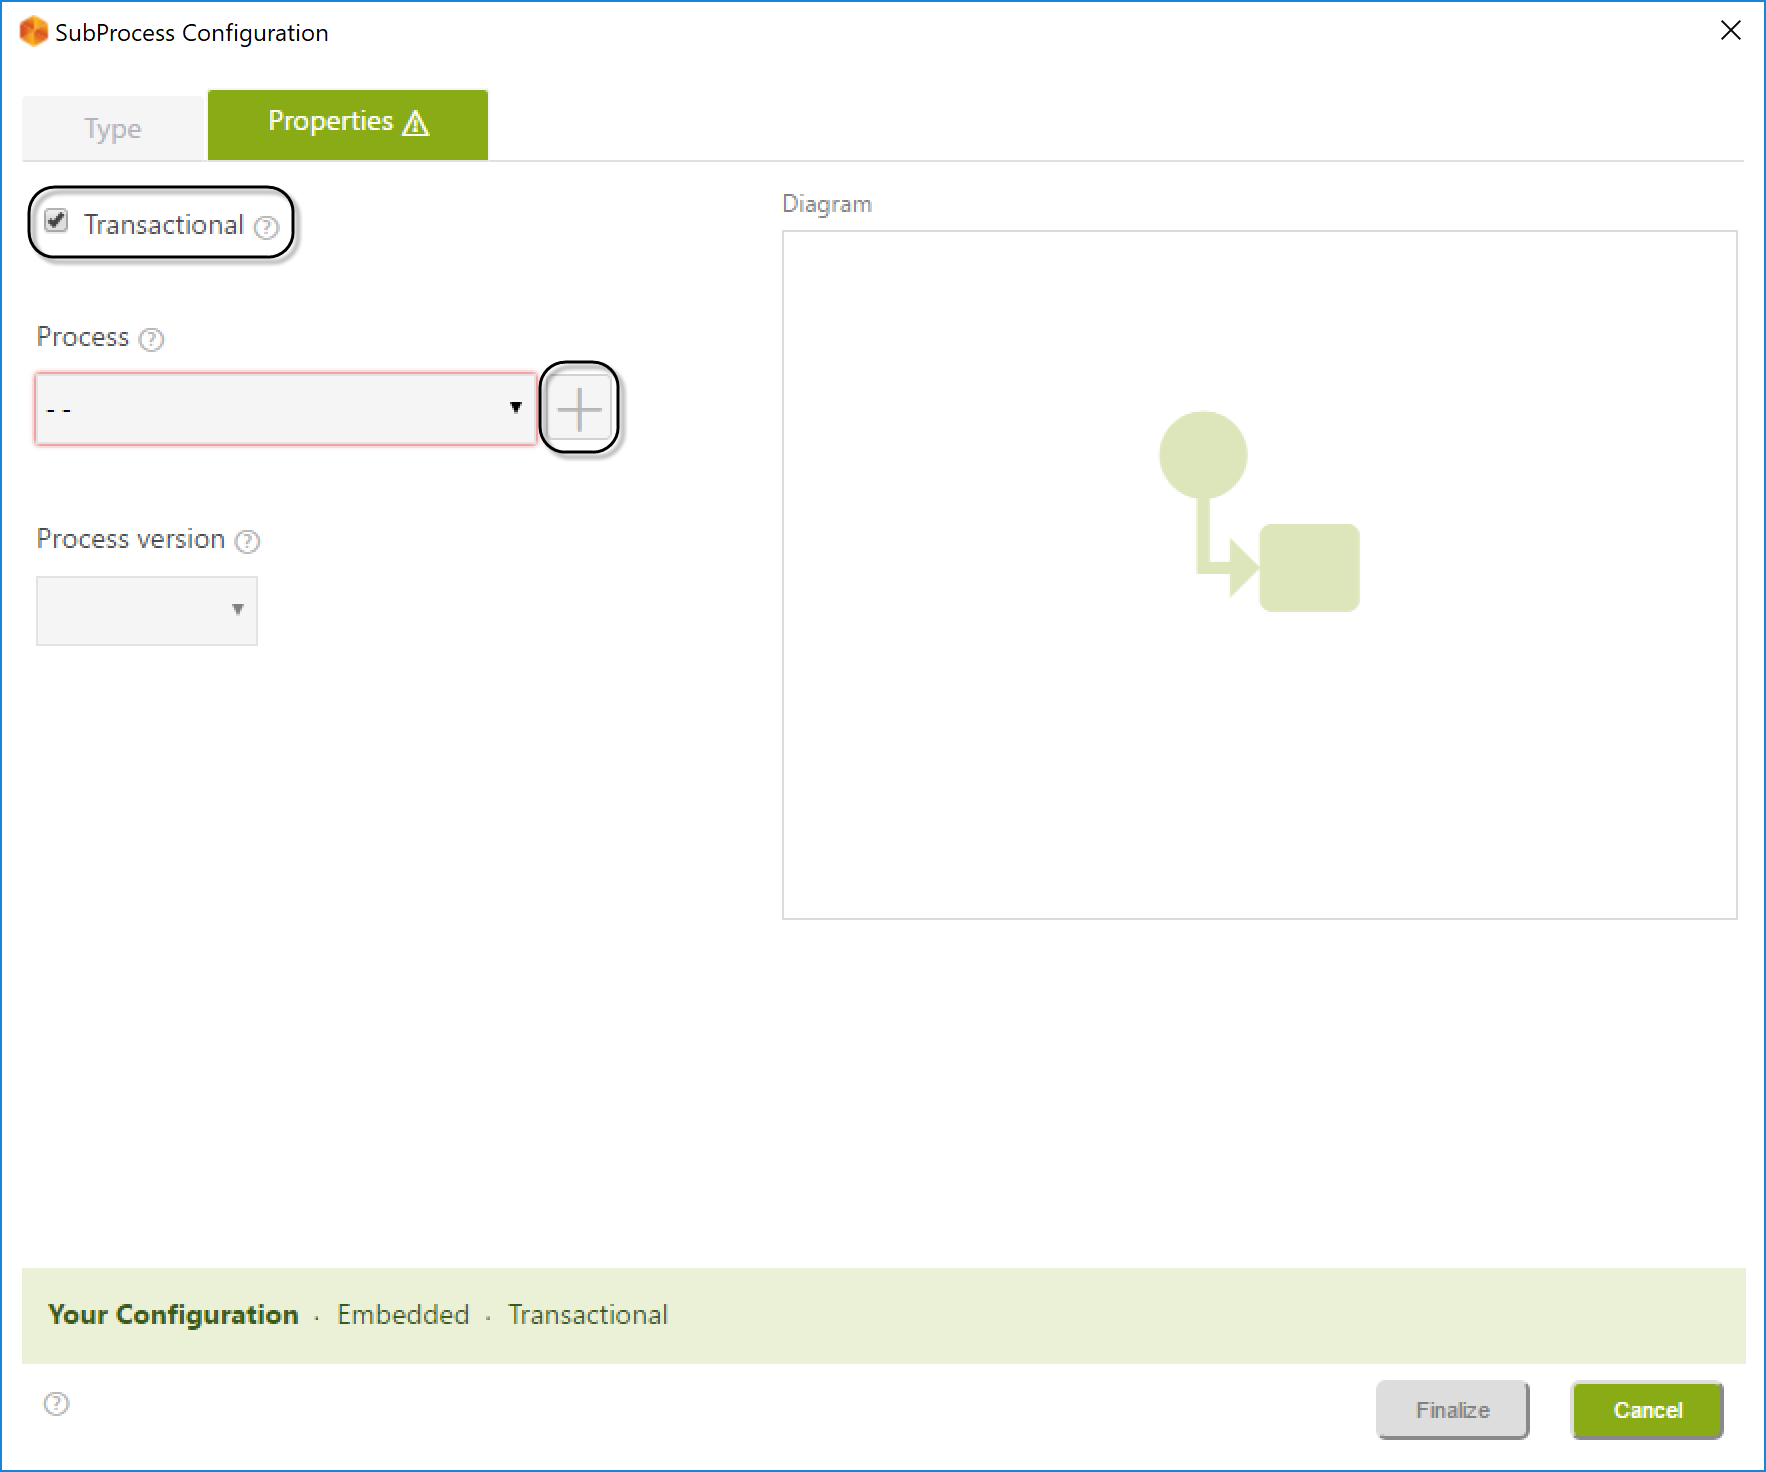
2. Type the name of the new Process.
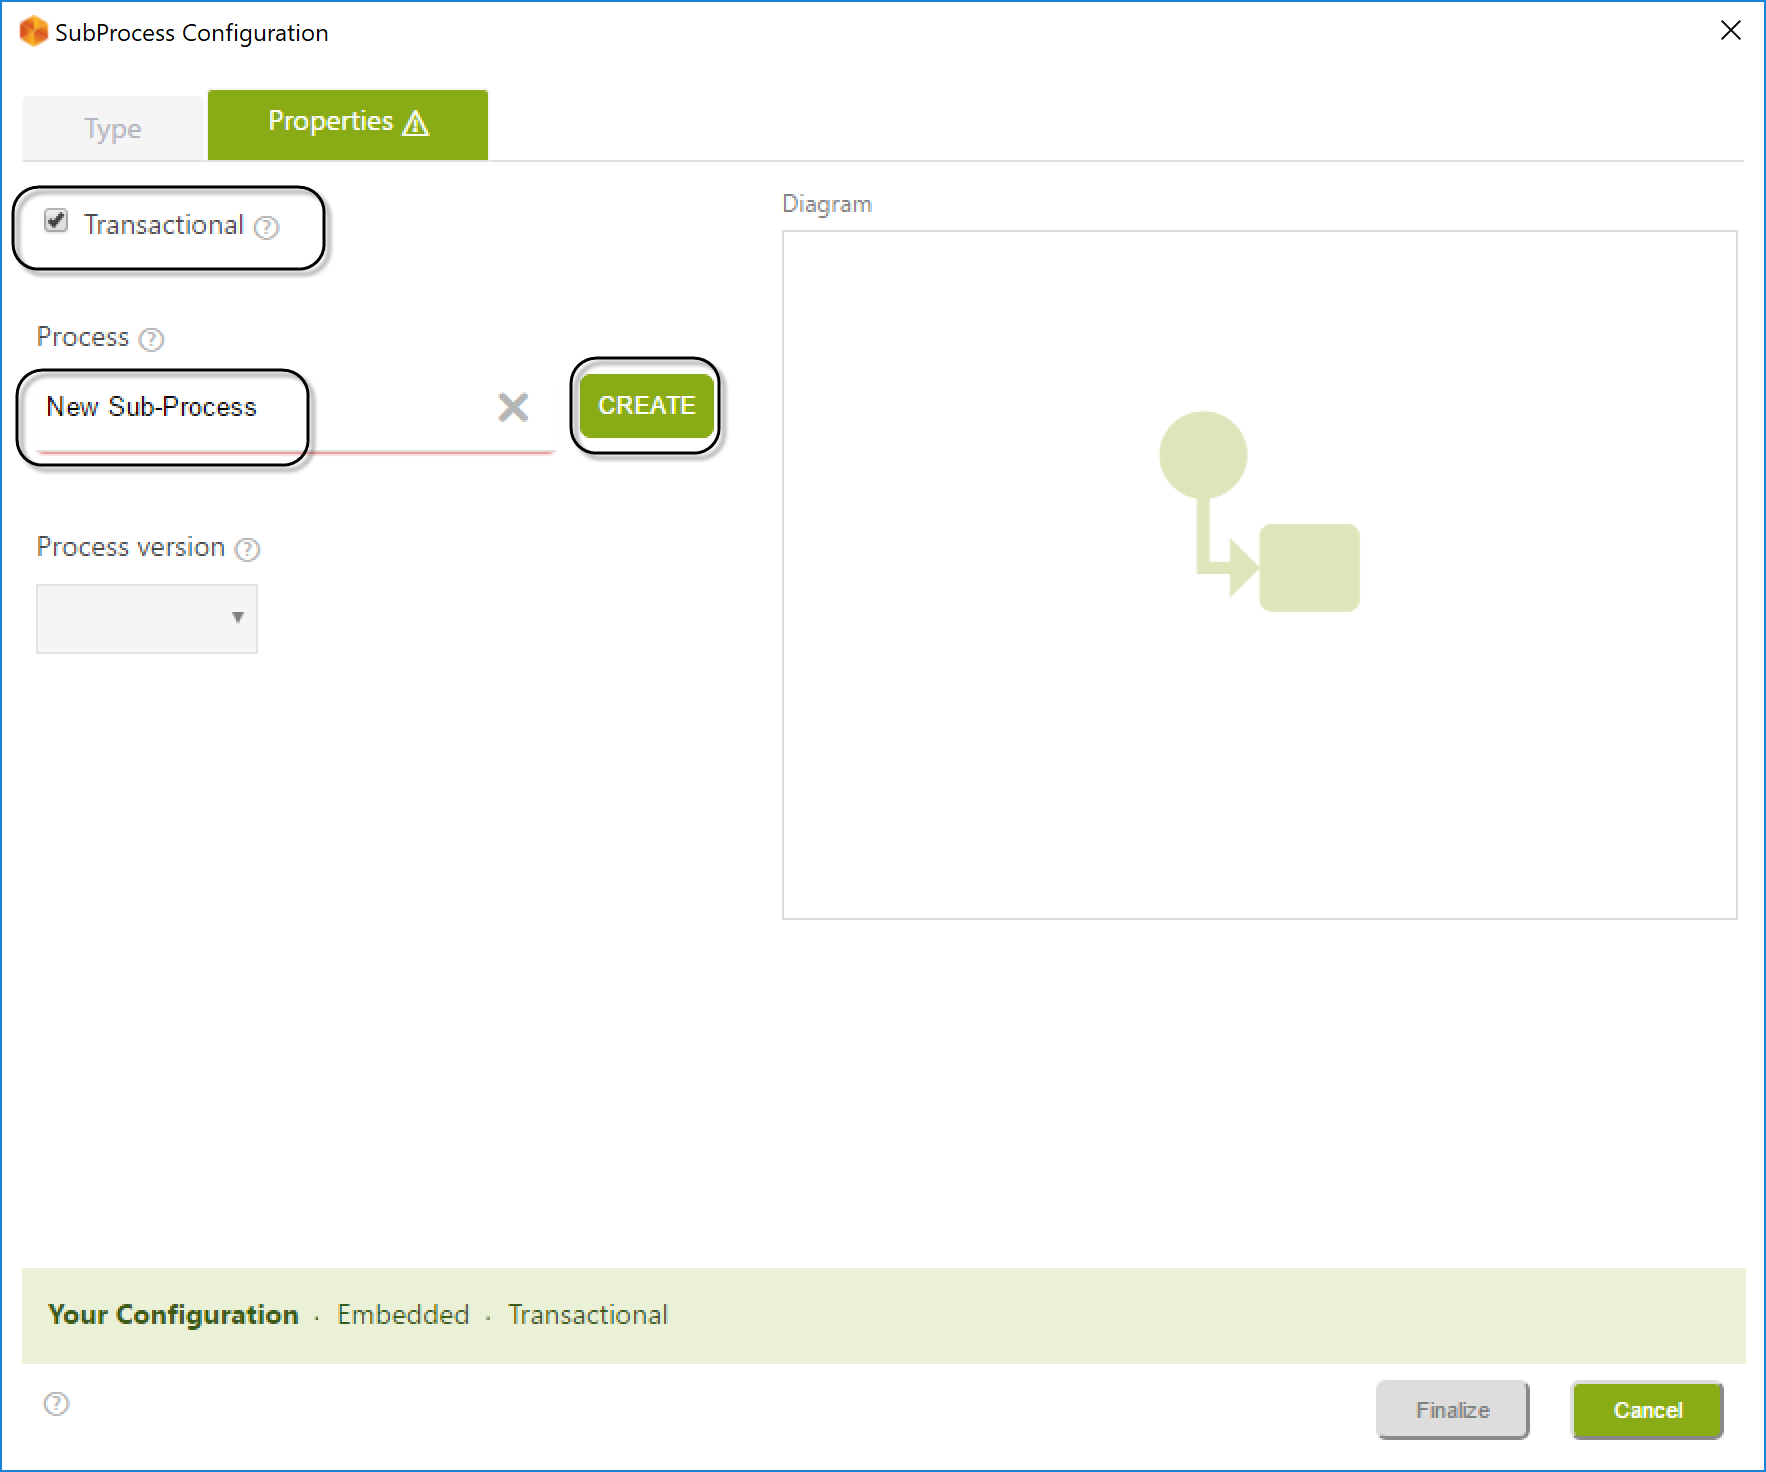
3. The created Process will be listed on the Process drop-down list, select it, and click Finalize.

4. Once the Sub-Process is created, you can immediately edit it.
Right-click the new Sub-Process (Bookings) and select the option Edit Sub-Process.
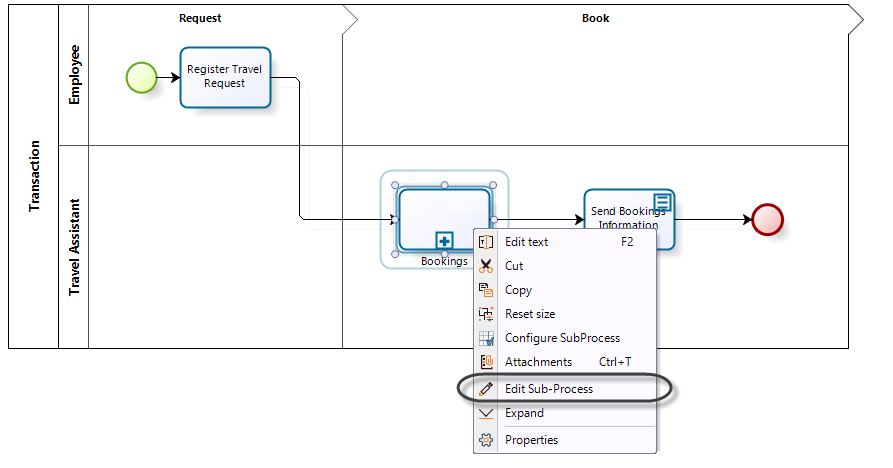
5. The window will display the Sub-Process diagram.
When you create a process for the first time, a pool containing one lane and one phase will display.
In the Bookings Sub-Process, the Administrative Department manages the car, hotel, and flight bookings simultaneously as requested by the employee. When the bookings are made, the Sub-Process ends. The Process flow is depicted in the following diagram.
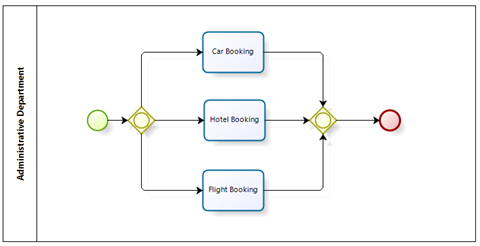
In this scenario, many situations can arise during process development.
For instance, the Administrative Department may successfully confirm the car and hotel booking. However, when attempting to book the flight, no airline has seat availability on the requested date for the specific destination. As the car and hotel have already been booked for the given date, these bookings need to be canceled, and the employee notified.
This business scenario can be modeled as follows:
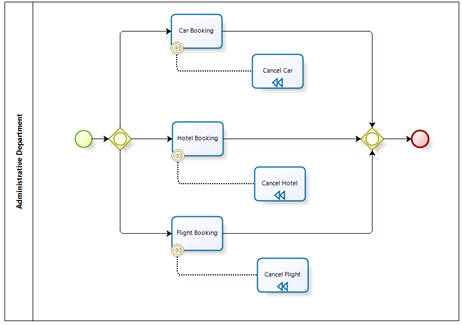
A Compensation Event is attached to the boundary of each booking Activity. This Event is used to activate a cancellation flow once it is triggered. In this case, the cancellation flow represents Activities that must be triggered manually by the user to resolve unexpected situations.
In the above scenario, the Compensation Events attached to the Car Booking and Hotel Booking Activities will be activated. In turn, the Cancel Car and Cancel Hotel Compensation Activities will be enabled, allowing the Administrative Department to handle the compensation for each of the effected Activities.
To associate a Compensation Event, right-click the Activity to be compensated, and select the option Attach Event. Choose the Compensate event.
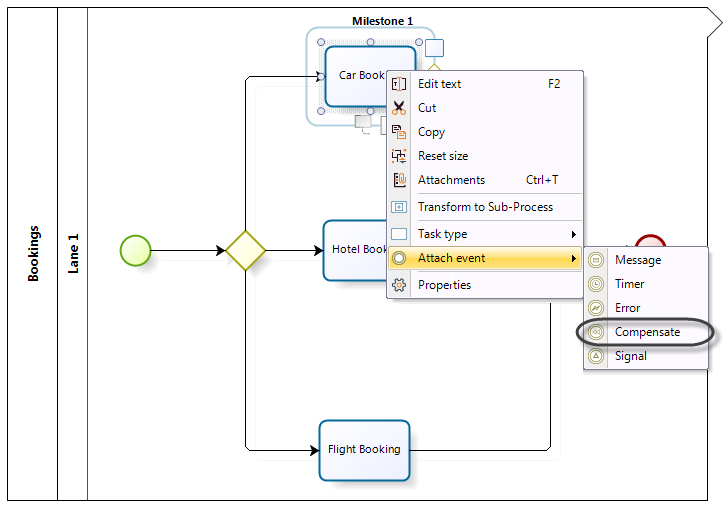
The associated Compensation Task is automatically created. Do the same for the remaining two Activities.
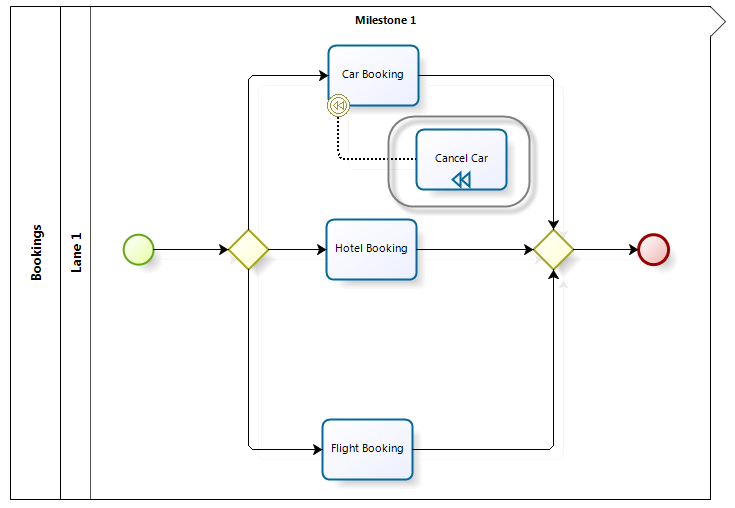
To raise the cancellation, we need to use an expression once the activity is finished (on exit) and deviate the typical path towards the cancellation path (shown below). This function will add a cancellation log file in the project folder. The expression should be created on the fourth step of the Process wizard.
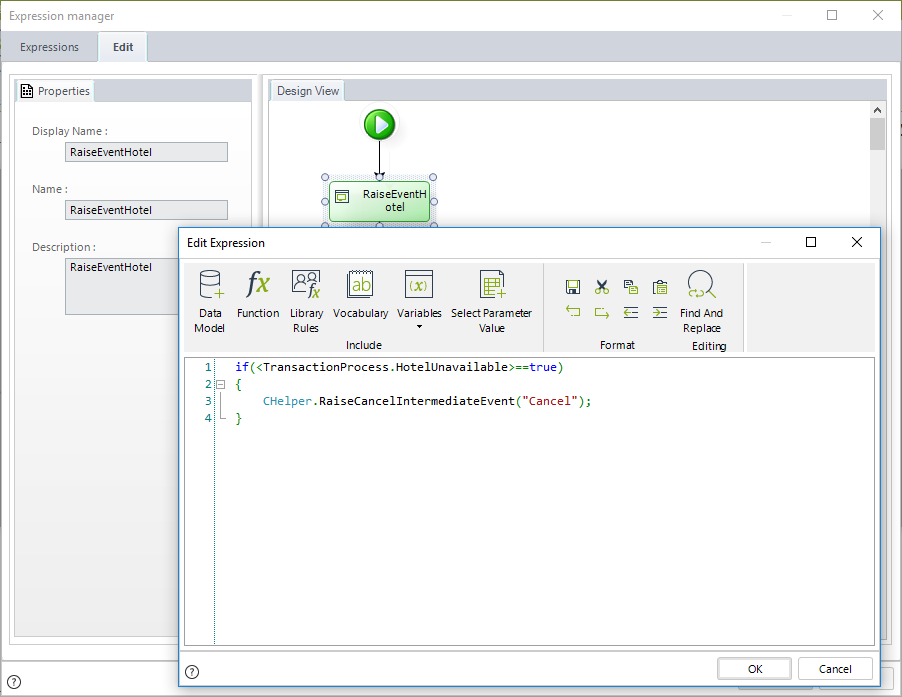
if(<TransactionProcess.HotelUnavailable>==true)
{
 CHelper.RaiseCancelIntermediateEvent("Cancel");
}
The expression needs the following function:
CHelper.RaiseCancelIntermediateEvent("String message")Where String message is a tag to identify the cancellation in the log file.
Next, model the cancellation flow for the parent Process.
If the Activities are compensated, the corresponding case token will not continue through the intended flow. As a result, the employee will not be notified of the two successful bookings as they were subsequently canceled. Taking this into account, we need to create a Cancel Event for the Transactional Sub-Process.
In the parent Process right-click the Bookings Sub-Process, select the option Attach Event. Choose the Cancel event.
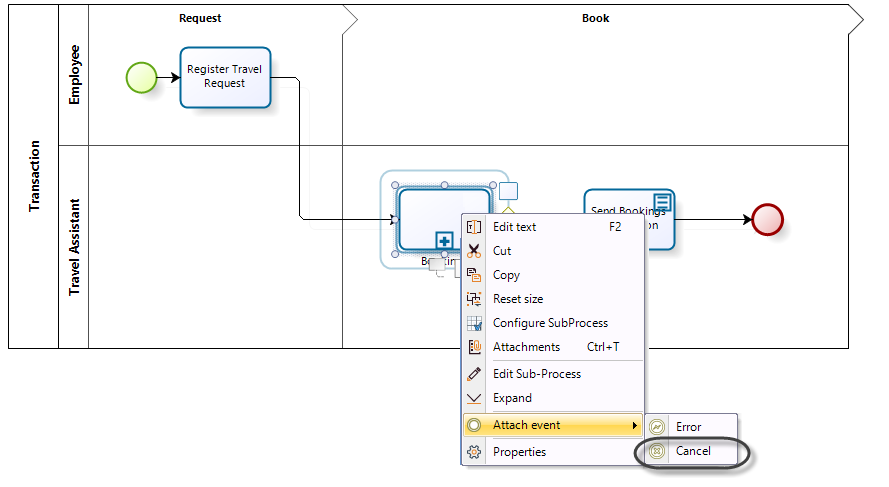
The cancellation flow will send a notification to the employee to inform him/her that the booking could not be made. For this reason, we add a Script task to the flow.

An End Event is used to terminate the Process.
The diagram still needs to allow for unexpected errors. An Error is raised when something unexpected happens, and there is no defined procedure in place to handle it.
We will convert the Flight booking Activity to an automatic task and add an interface to it. If during the execution of the Flight booking automatic task an error arises (connection error, etc.), the Sub-Process will terminate and trigger an exception flow in the main Process.
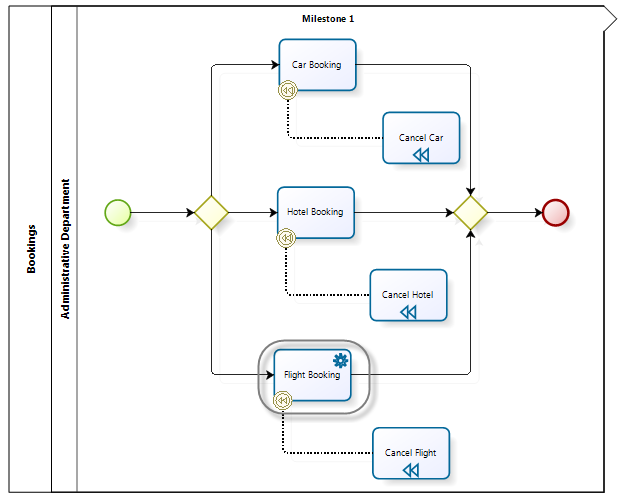
To raise the error, we need to use an expression once the activity is finished (on exit) and deviate the typical path towards the error path (shown below). This function will add an error log file in the project folder. The expression should be created on the fourth step of the Process wizard.
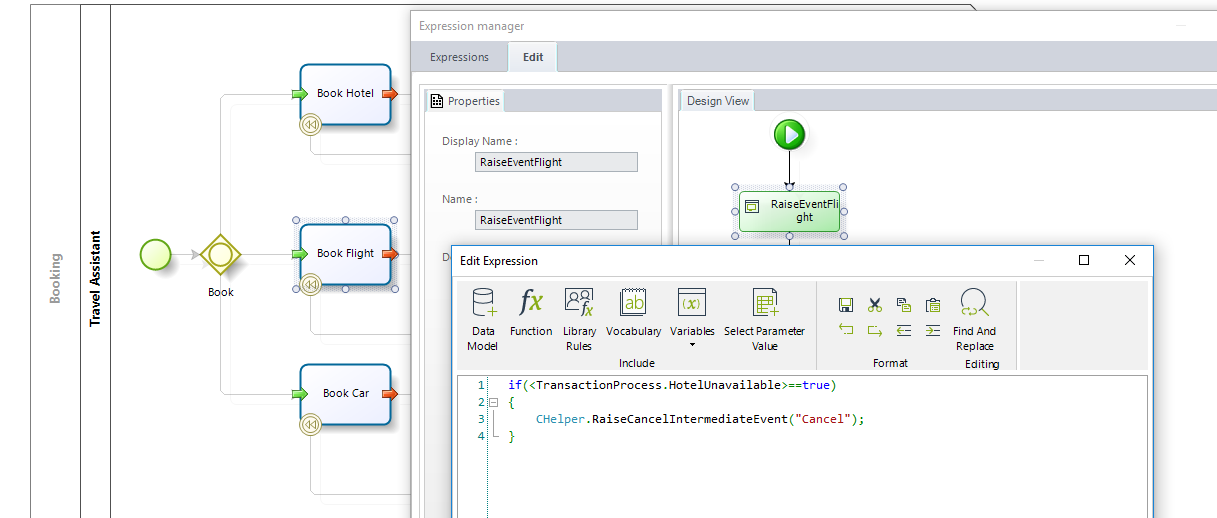
if(<TransactionProcess.Flight.RandomBoo>!= true)
{
 CHelper.RaiseErrorIntermediateEvent("Error");
}
The expression needs the following function:
CHelper.RaiseErrorIntermediateEvent("String message")Where String message is a tag to identify the error in the log file.
Finally, we include the exception flow in the parent Process to cater for the potential unexpected error in the Sub-Process.
To catch the error, an Error Event must be attached to the boundaries of the Bookings Sub-Process. Click on the Bookings Sub-Process, select the option Attach Event and then choose Error.
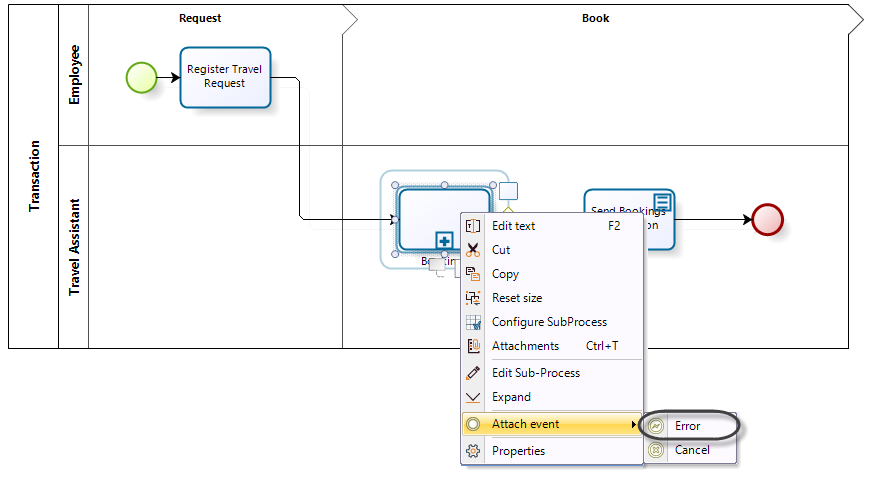
The exception flow will notify the assigned person, in the Administrative Department, of the error.
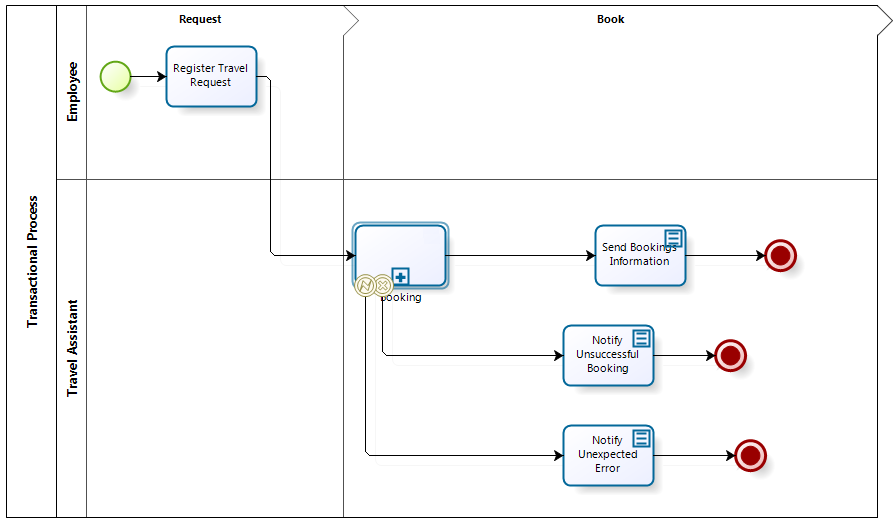
RaiseErrorEndEvent(String)
Overview
When you have a transactional Sub-Process, it is possible for it to have an Error End Event. Bizagi allows you to raise error end events from Business Rules.
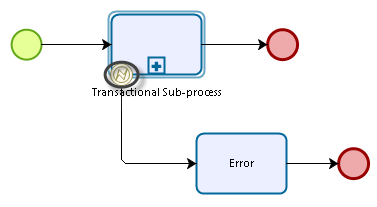
To raise the error end event, use the following function. It will interrupt the transactional Sub-Process and deviate the typical path towards the error path. This function will add the RaiseErrorEndEvent log file in the project folder.
The following attributes are needed:
•message: A tag to identify the error in the log file.
Syntax
CHelper.RaiseErrorEndEvent(string message)Declaration
public static void RaiseErrorEndEvent(string message)Parameters
| Type | Name | Description |
|---|---|---|
| System.String | message | Tag to identify the error in the log file |
Examples
Consider the following process for an online retailer.
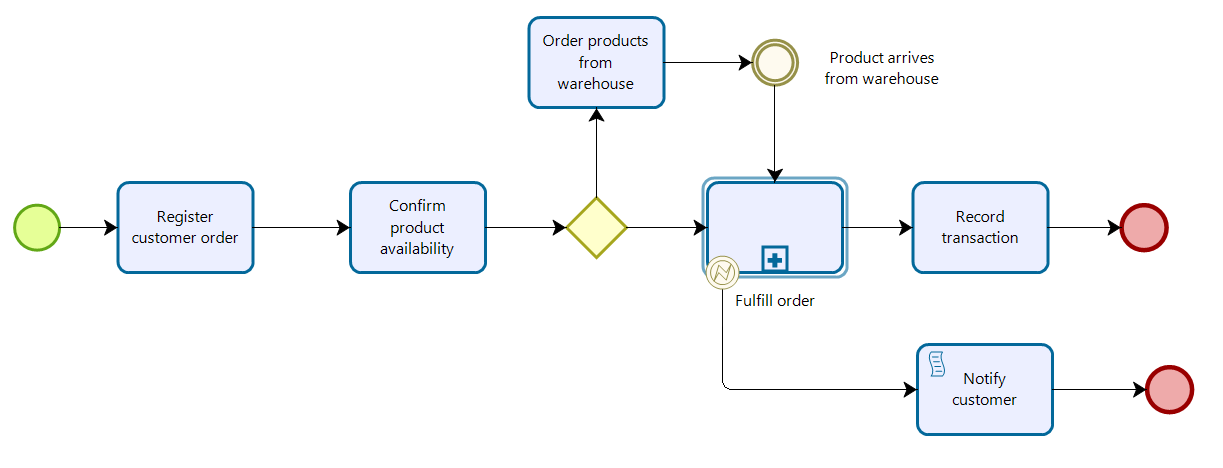
The Fulfill Order transactional Sub-Process is as follows:
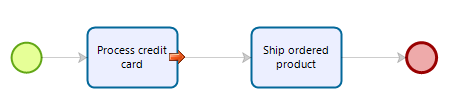
If the credit card is not valid, an Error End Event will be raised. To do so, we are going to set the function into an "On Exit" activity action.

Then, if the credit card is not valid, the path of the process will follow the error path.
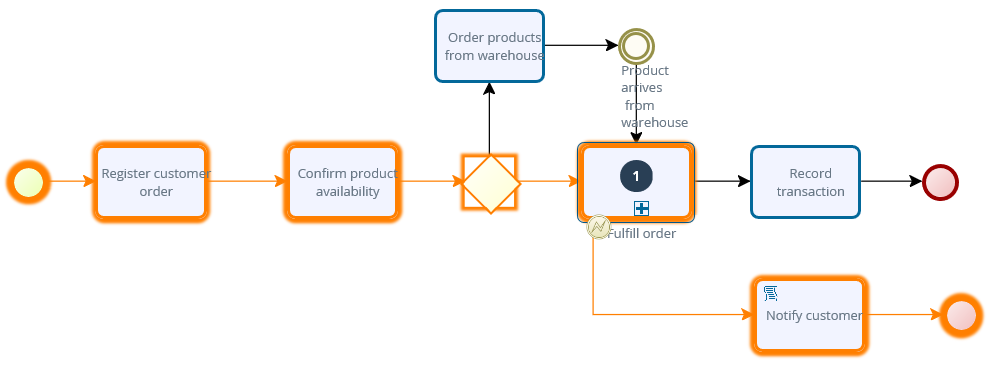
When the error is raised, a log file will be created within the project folder, showing the error details.
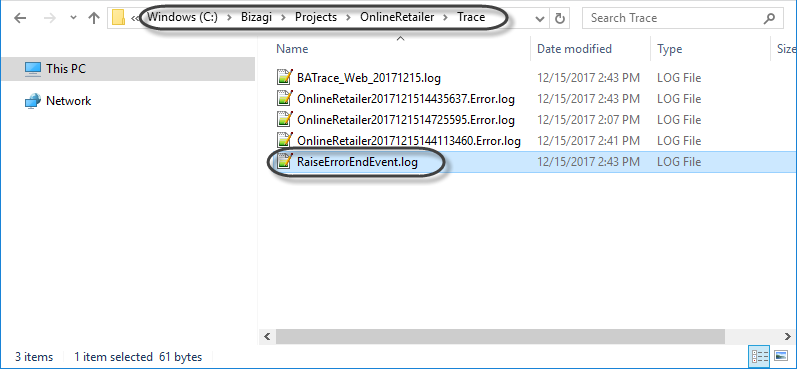
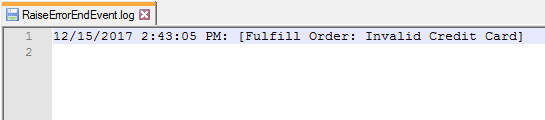
RaiseErrorIntermediateEvent(String)
Overview
You can interrupt an AUTOMATIC activity when an error is encountered, and manage the error following whatever path you consider. To interrupt an activity, you must attach an error event in the activity, and convert the activity to an automatic one.
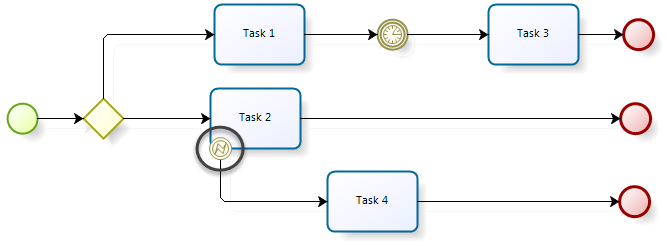
To raise the error, use the following function. It will interrupt the current activity and deviate the typical path towards the error path. This function will add an error log file in the project folder.
The following attributes are needed:
•message: A tag to identify the error in the log file.
Syntax
CHelper.RaiseErrorIntermediateEvent(string message)Declaration
public static void RaiseErrorIntermediateEvent(string message)Parameters
| Type | Name | Description |
|---|---|---|
| System.String | message | Tag to identify the error in the log file |
Examples
Consider the following process, where an error is raised if the request boolean is false.

Set the function into an "On Exit" expression in the activity you want to interrupt.
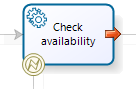

Then, the path of the process will follow the error's path. Thus, the data in the current activity will not be persisted in the database, and the On Exit rules will not be executed.
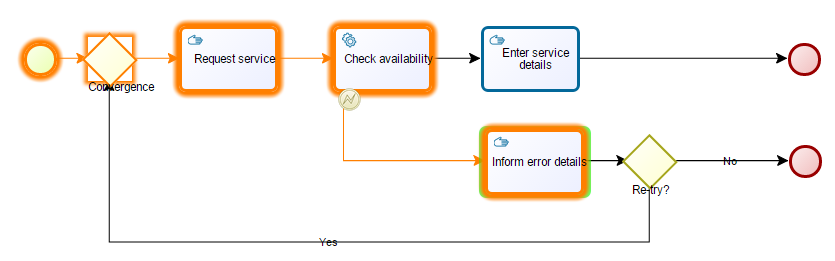
When the error is raised, a log file will be created within the project folder, showing the error details.


|
Consider the following: •External interfaces must be compensated adequately when these interfaces have been implemented within a Process, to perform modifications on data external to Bizagi through Web Services or component library. Activities that perform reversal for multiple cases must be avoided because the Activity does not know which Activities were completed successfully and which ones must be reversed. |
|---|
resolveVocabulary(ICAPIWorkItem, String)
Bizagi allows you to create Vocabularies or Sequences that can be configured for access from one or more processes or applications.
Vocabularies and Sequences can be invoked from within business rules by using a set of functions available in the Miscellaneous category.
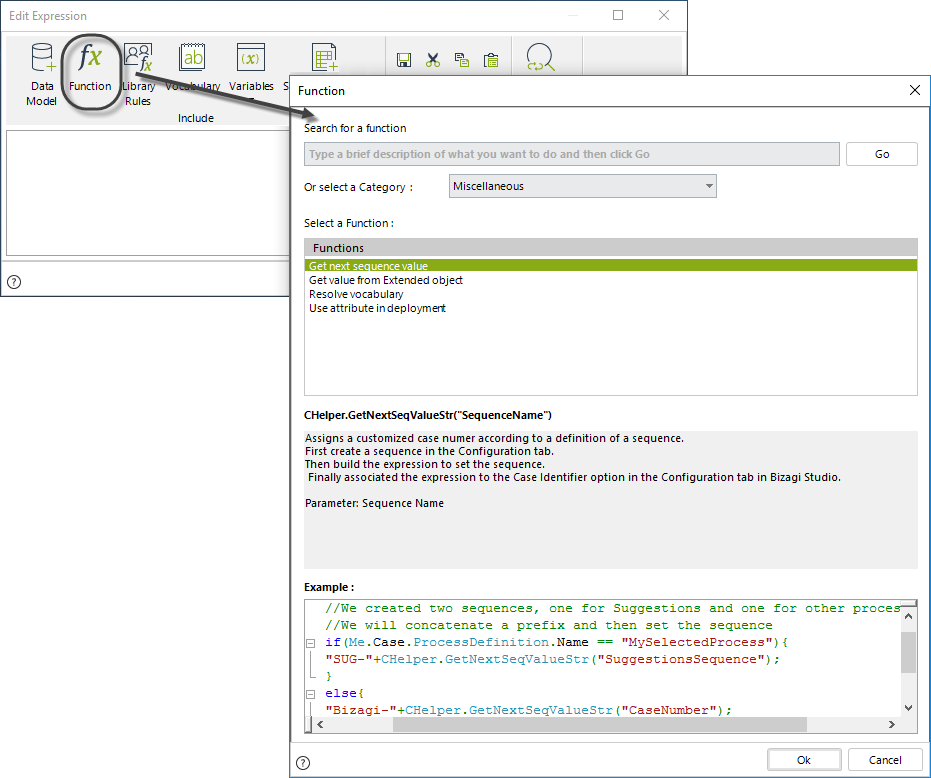
Obtain a Vocabulary definition
To obtain the value stored in a specific Vocabulary, use the resolveVocabulary function.
The syntax of this function is:
CHelper.resolveVocabulary(Me,"VocabularyName")
Syntax
CHelper.resolveVocabulary(ICAPIWorkItem Me, string VocabularyName)Declaration
public static object resolveVocabulary(ICAPIWorkItem Me, string VocabularyName)Parameters
| Type | Name | Description |
|---|---|---|
| ICAPIWorkItem | Me |
This parameter is fixed. When the parameter is null, the vocabulary will be searched for globally. |
| System.String | VocabularyName |
Returns
| Type | Description |
|---|---|
| System.Object | The value stored in a specific Vocabulary |
Examples
In a Claims and Complaints process, a case must be solved in a specified time. This time is established according to a Service Level Agreement or SLA, that is the maximum allowed time to resolve a case. The duration of the Resolve Task must be set based on the SLA, and it is used to collect statistics and analyze the process performance. As the SLA can change according to the Company´s policies, it is defined as a Constant Definition in a Vocabulary.
To set the Duration of the Resolve Task, create an expression On Enter of this Task.
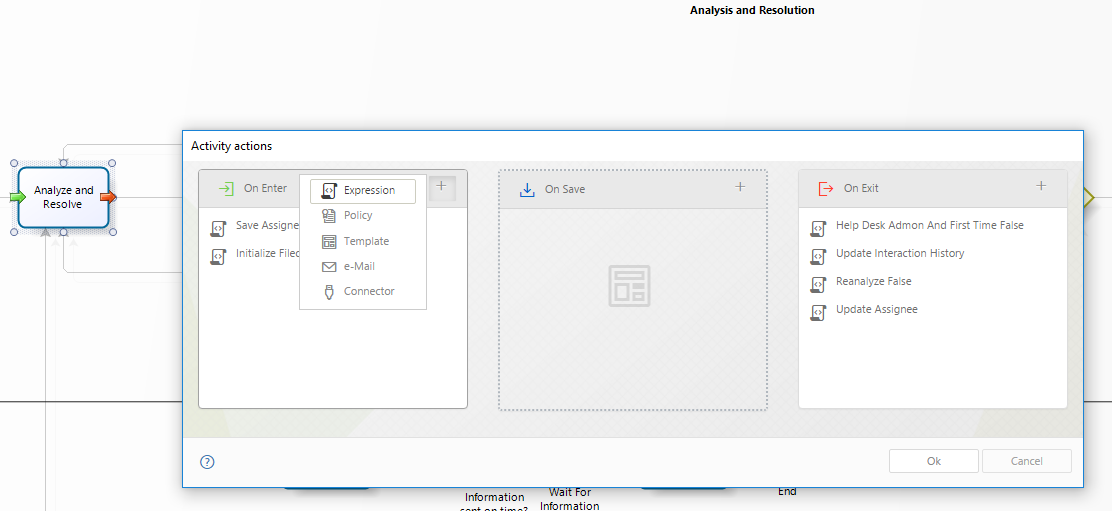
In an expression module, use the Me.Duration function to set the duration of the Task.
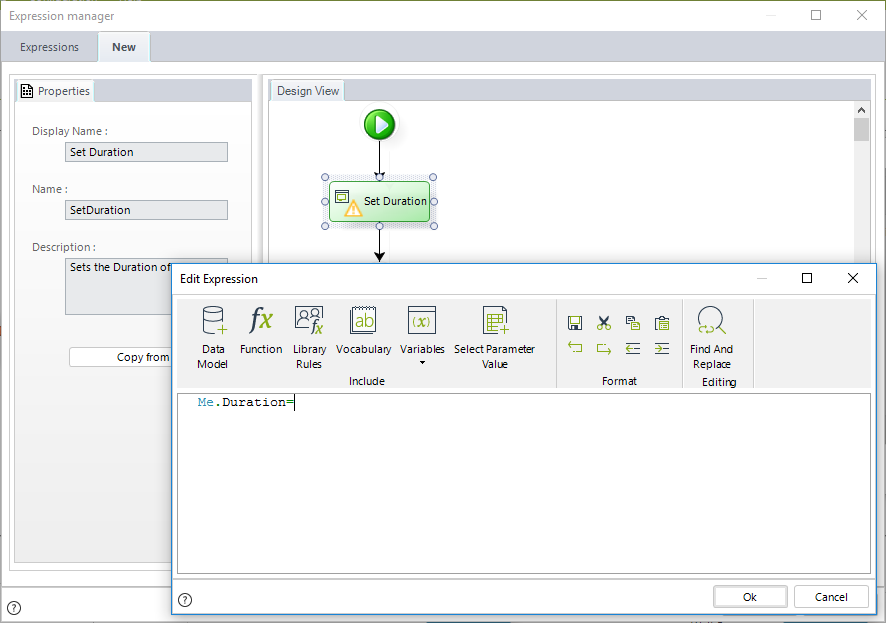
To assign a value to the Duration, call the resolveVocabulary function and pass as an input parameter the SLA definition. Just select this constant definition from the Process Vocabulary list, and the complete function will be automatically inserted.
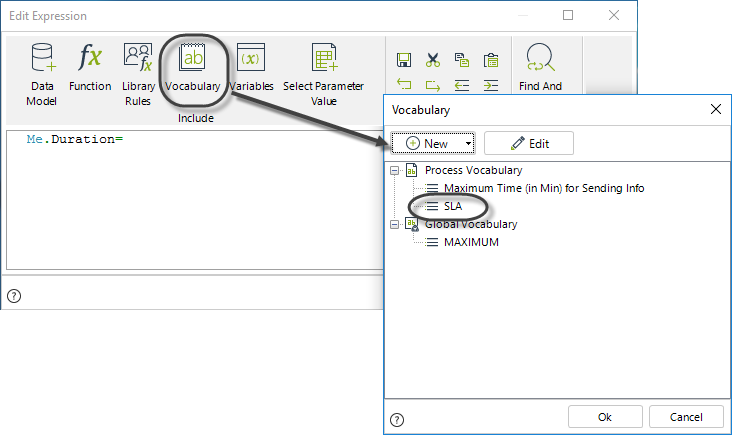
The next image shows the complete expression:
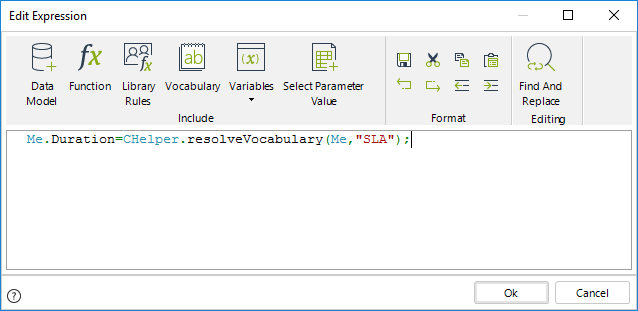
Me.Duration=CHelper.resolveVocabulary(Me,"SLA");Finally, click OK to save the changes.
View SourceResetSequenceValue(String)
Reset the seed value of a sequence
This function resets the seed value of a sequence to its initial value, taking the sequence name as input.
Syntax
CHelper.ResetSequenceValue(string sSequenceName);Declaration
public static object ResetSequenceValue(string sSequenceName)Parameters
| Type | Name | Description |
|---|---|---|
| System.String | sSequenceName | Name of the sequence to reset. |
Examples
Consider a business scenario where you use a sequence named CasesSequence for numbering cases created in a specific year.
For this purpose, you configure the case numbering with the prefix CO, the sequence CasesSequence (Seed value: 001, Increment: 1), and a suffix representing the last two digits of the case’s creation year.
For example, the first case of 2025 will be named CO-001-25, the second CO-002-25, and so on.
At the start of a new year, you must reset CasesSequence to its Seed value. This can be done as follows:
CHelper.ResetSequenceValue("CasesSequence");After execution, CasesSequence resets to 001 and can be reused for numbering 2026 cases (e.g., CO-001-26).
When resetting sequences, it is crucial to use the sequence with both a prefix and a suffix. Using the sequence alone, or with only a prefix or suffix, can lead to conflicts. For example, if you use only a prefix (CO) or only a suffix (25), resetting the sequence may result in duplicate case names like CO-001 or 001-25, which might already exist. Always combine the sequence with a prefix and suffix to ensure unique case numbering.
RevokeCaseAccess(Int32, Int32)
Overview
You can dynamically restrict access to specific cases or assign privileged users through Bizagi expressions (business rules executed during the process).
This section describes how to revoke access to specific users by relying on the Case security feature.
Syntax
CHelper.RevokeCaseAccess(int idCase, int idUser)Declaration
public static void RevokeCaseAccess(int idCase, int idUser)Parameters
| Type | Name | Description |
|---|---|---|
| System.Int32 | idCase | Case id |
| System.Int32 | idUser | User id |
Examples
Expression to remove a privileged user
In a Purchase Request Process of the example mentioned in Grant case access we need to exclude the Commercial Vice President as a privileged user, who has no assignment in such cases and who was granted at the beginning of the process. The Commercial Vice President needs to be excluded in the Quotations sub-process using an expression. As mentioned in the example of the previous article, we store the Commercial Vice President user in a parametric table to easily access and administer the user's ID when call for. This parameter table is associated with the Purchase Request Process
In step four of the Process Wizard, select the Activity Actions to create an expression On Enter of the Activity.
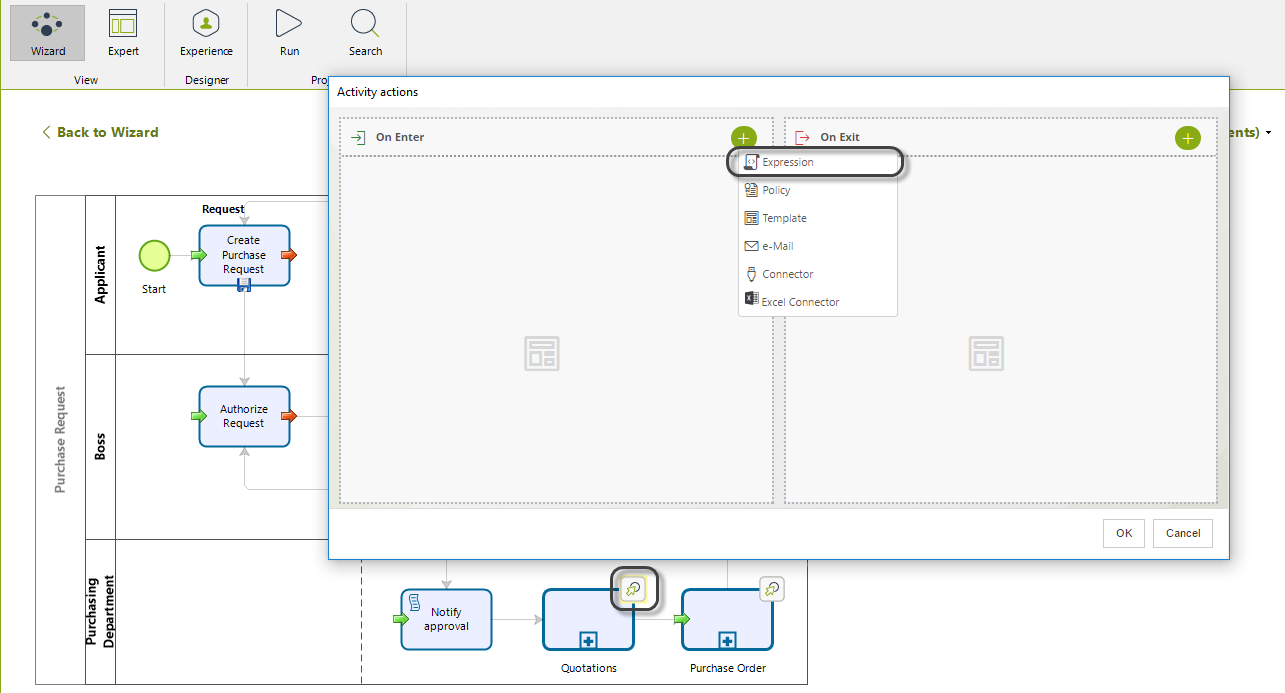 .
.
The expression removes the Vice President to the list of privileged users. The Vice president's ID is located in the parametric table previously created and assigned to a variable. This variable, in turn, is passed to the function call that revokes the access.
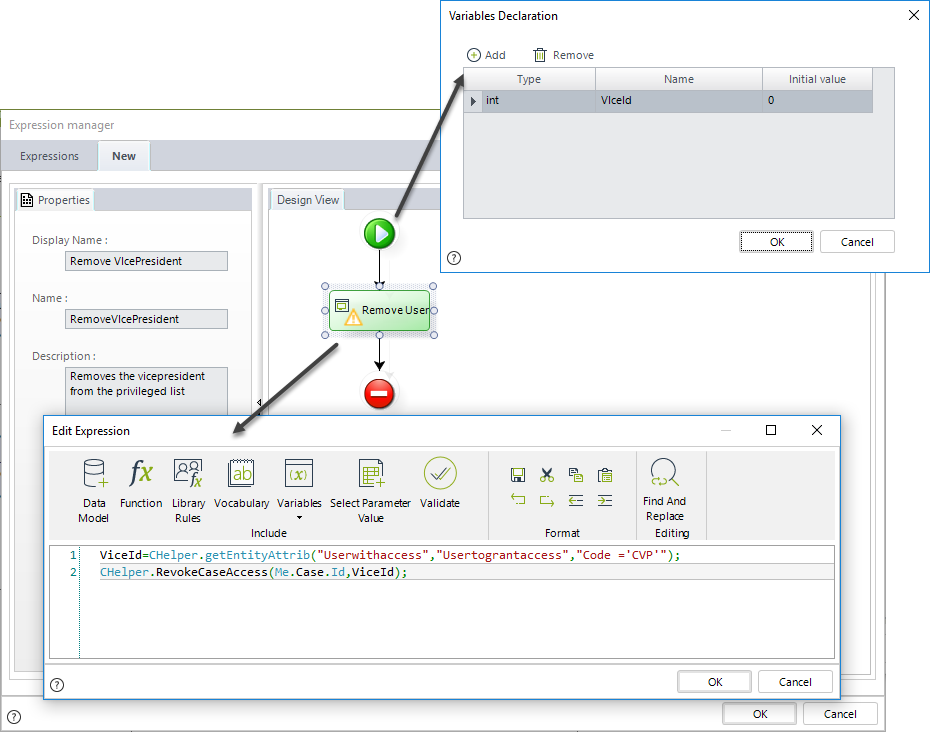
//Obtain VicePresident User
var ViceId=CHelper.getEntityAttrib("Userwithaccess","Usertograntaccess","Code ='CVP'");

//Revoke access to VicePresident
CHelper.RevokeCaseAccess(Me.Case.Id,ViceId);RevokeCaseAccessToUsers(Int32, Array)
This section describes how to revoke access to several users by relying on the Case security feature.
Syntax
CHelper.RevokeCaseAccessToUsers(int idCase, Array Users)Declaration
public static void RevokeCaseAccessToUsers(int idCase, Array Users)Parameters
| Type | Name | Description |
|---|---|---|
| System.Int32 | idCase | Case id |
| System.Array | Users | List of Users |
Examples
The following expression adds all users found in the parametric table, that is the President and Vice President. The user ID of each record found in the parametric table is stored in an array. This array is passed to the function call to add the privileged users.
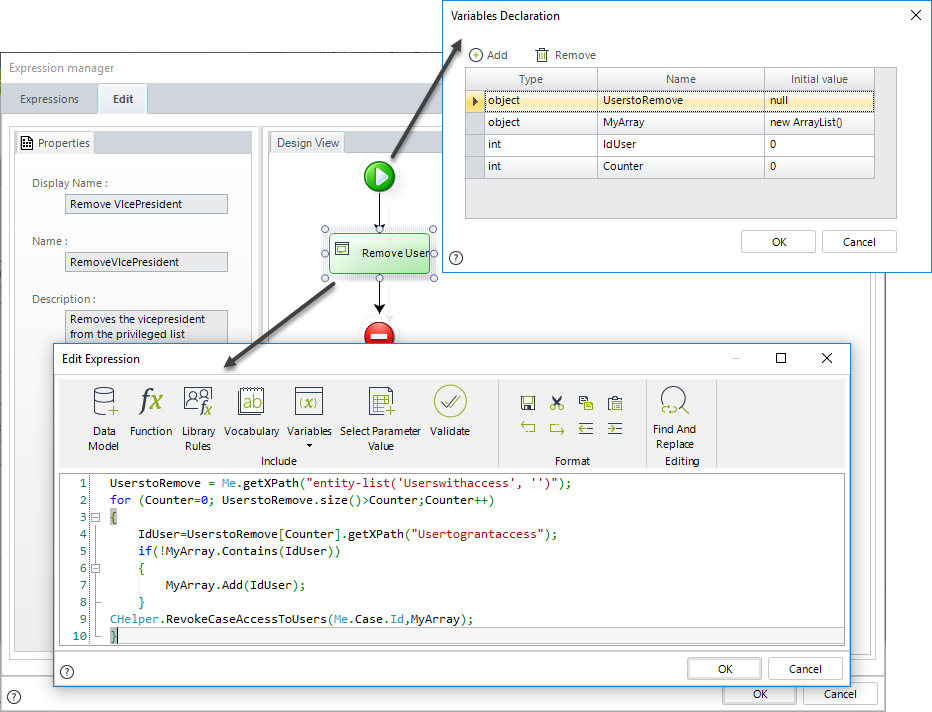
//Obtain list of all users in the 'Users with access' table
UserstoRemove = Me.getXPath("entity-list('Userswithaccess', '')");

//Go through the list
for (Counter=0; UserstoRemove.size()>Counter;Counter++)
{
IdUser=UserstoRemove[Counter].getXPath("Usertograntaccess");

//Validate there are no duplicities
if(!MyArray.Contains(IdUser))
{
  //Store users
  MyArray.Add(IdUser);
}

//Revoke Access to users
CHelper.RevokeCaseAccessToUsers(Me.Case.Id,MyArray);
}SecuentialAssig(ArrayList, CAPIWorkItem)
Overview
Sometimes, business requirements demand that the same user is assigned to several tasks, which occur in parallel in a process. For this specific business requirement, Bizagi offers functions which will return the assigned user's ID, which matches the given criteria. Keep in mind that these functions do not directly assign the task; this would have to be done manually by relying on the use of these functions, as described below.
To get the next assigned user by sequence, use thhis method.
The following attributes are needed:
•AssigneeList: list of users to select the assignee.
•Me: this parameter is fixed.
Syntax
CHelper.SecuentialAssig(ArrayList AssigneeList, CAPIWorkItem Me)Declaration
public static int SecuentialAssig(ArrayList AssigneeList, CAPIWorkItem Me)Parameters
| Type | Name | Description |
|---|---|---|
| System.Collections.ArrayList | AssigneeList | List of users to select the assignee |
| CAPIWorkItem | Me | This parameter is fixed |
Returns
| Type | Description |
|---|---|
| System.Int32 |
Id of the next user available for assignation by sequence |
Examples
Suppose that for our organization's Travel Request process, we need the same Administrative Assistant that registers the bookings to manage the travel advance. This is because that person will know which are the traveler's hotel privileges, its location, and meals included to calculate the best amount for the advance.
To select the user using a sequence, use the following expression:
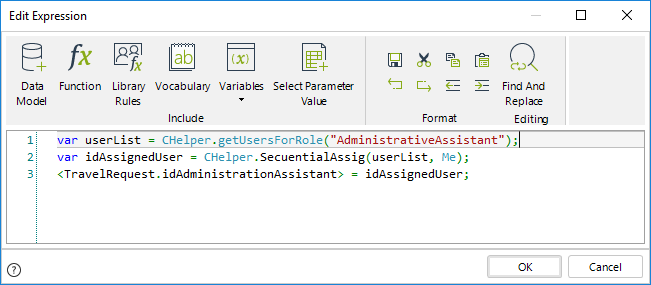
The expression shown above is as follows:
var userList = CHelper.getUsersForRole("AdministrativeAssistant");

var idAssignedUser = CHelper.SecuentialAssig(userList, Me);

<TravelRequest.idAdministrationAssistant> = idAssignedUser;
Finally, when configuring performers make sure that the selected user is assigned the activities by using this setup:
setAttrib(String, Object, String, Object)
This function assigns a value to a given attribute of a specific record in an entity.
Syntax
CHelper.setAttrib(string sEntityName, object oEntityKey, string sAttribName, object oAttribValue)Declaration
public static bool setAttrib(string sEntityName, object oEntityKey, string sAttribName, object oAttribValue)Parameters
| Type | Name | Description |
|---|---|---|
| System.String | sEntityName | Name of the entity |
| System.Object | oEntityKey | Id of the specific record within the entity |
| System.String | sAttribName | Name of the entity attribute |
| System.Object | oAttribValue | Value to set |
Returns
| Type | Description |
|---|---|
| System.Boolean | Execution confirmation |
Examples
Modify specific attributes values from specific records of an entity
A bank offers multiple credit products to its customers. Once a product is approved and delivered, a monthly follow-up is performed to evaluate if the customer has met the payments on time. In the case, the customer defaults on the payments, all his/her requests in progress are penalized and will require further analysis to be approved.
To identify a request as penalized, a Boolean attribute in the data model is used. This attribute must be updated for all the customer's requests in progress when he/she defaults on the payments.
To update this value, you can make use of the CHelper.setAttrib function.
Include an expression as an activity action.
First, obtain the list of in-progress cases of the customer that will be penalized.
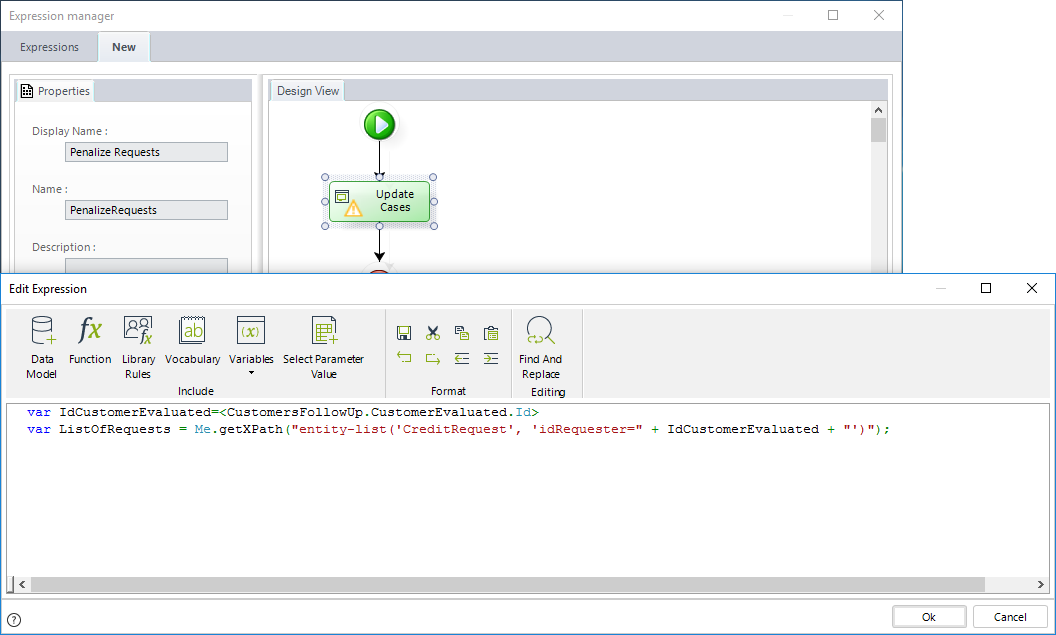
Then update the attribute that identifies is a request is penalized at each request. To do so, navigate the list of requests and use the CHelper.setAttrib function.
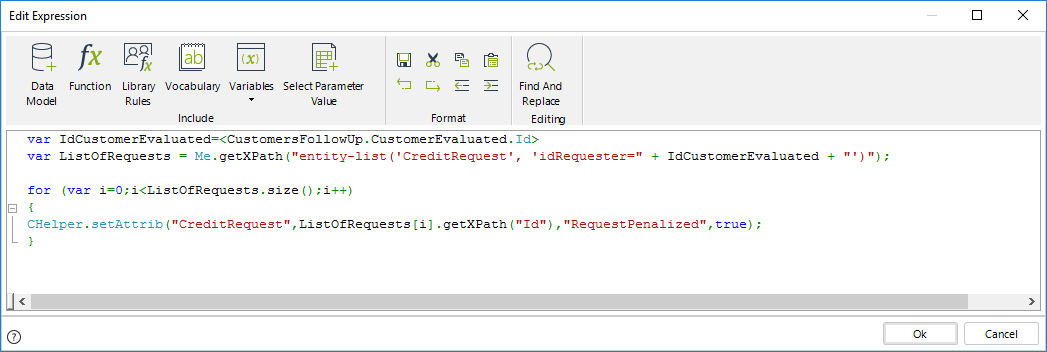
//Obtain the list of cases of the user evaluated
var IdCustomerEvaluated=<CustomersFollowUp.CustomerEvaluated.Id>
var ListOfRequests = Me.getXPath("entity-list('CreditRequest', 'idRequester=" +IdCustomerEvaluated + "')");

//Update each case
for (var i=0;i<ListOfRequests.size();i++)
{
 CHelper.setAttrib("CreditRequest",ListOfRequests[i].getXPath("Id"),"RequestPenalized",true);
}
Using the entity’s ID as a filter
You can pass a
surrogate key column name instead of an id.
Using this
notation, the for statement in the previous code snippet
can be written in terms of a selected value:
/*Update each case using 103 as the value in the list of requests*/

for (var i=0;i<ListOfRequests.size();i++)
{
 CHelper.setAttrib("CreditRequest",ListOfRequests[i].getXPath("idListOfRequests")-1,"RequestPenalized",103);
}setEvent(Object, Int32, Object, Hashtable)
The setEvent function is used to execute an available intermediate Event in Bizagi, which has no specific type defined.
For example, it can be used on an expression related to a button to execute an intermediate event in my process. The function can execute events in either the active process or an external process.
The main parameters of this function are:
•The Caseid: the identification number of the Case in which the Event will be triggered
•The Event Name: the name of the event to be executed
•The first and last parameters (Me and null) are fixed.

|
There is a method override that receives an XML as a parameter. |
|---|
The setEvent function is found in the Process category.
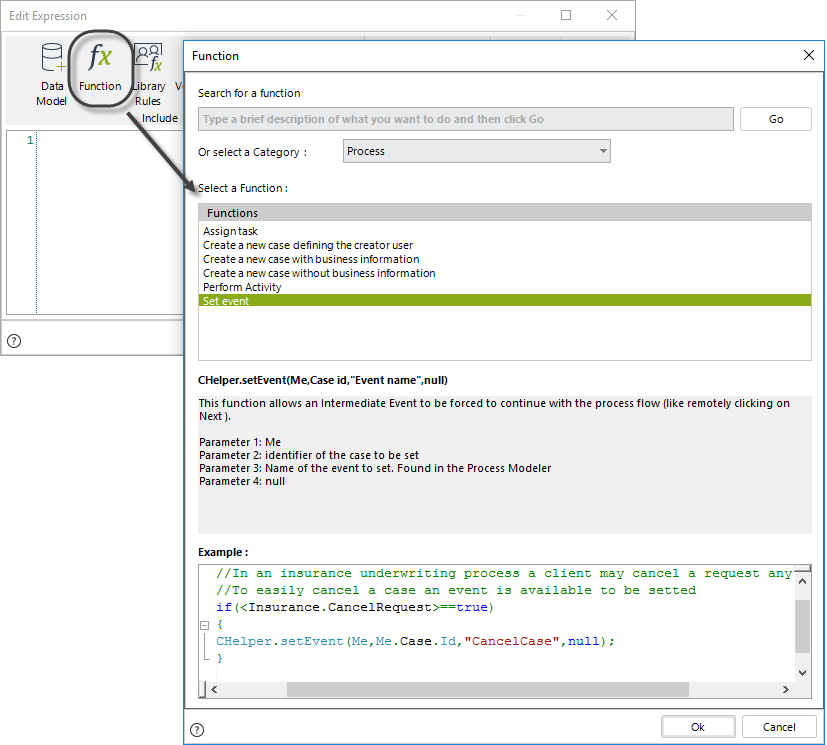
Syntax
CHelper.setEvent(object Me, int Caseid, object eventName, Hashtable obj)Declaration
public static CProcess setEvent(object Me, int Caseid, object eventName, Hashtable obj)Parameters
| Type | Name | Description |
|---|---|---|
| System.Object | Me | This parameter is fixed |
| System.Int32 | Caseid |
Id of the case where the Event will be triggered |
| System.Object | eventName | Name of the event to execute |
| System.Collections.Hashtable | obj | This parameter is fixed as null |
Returns
| Type | Description |
|---|---|
| CProcess | Object with the event information |
Examples
Let us take the Help Desk Process as an example. Once a case is created, an Event is enabled that allows the case to be closed at any time, as shown in the Process flow below.
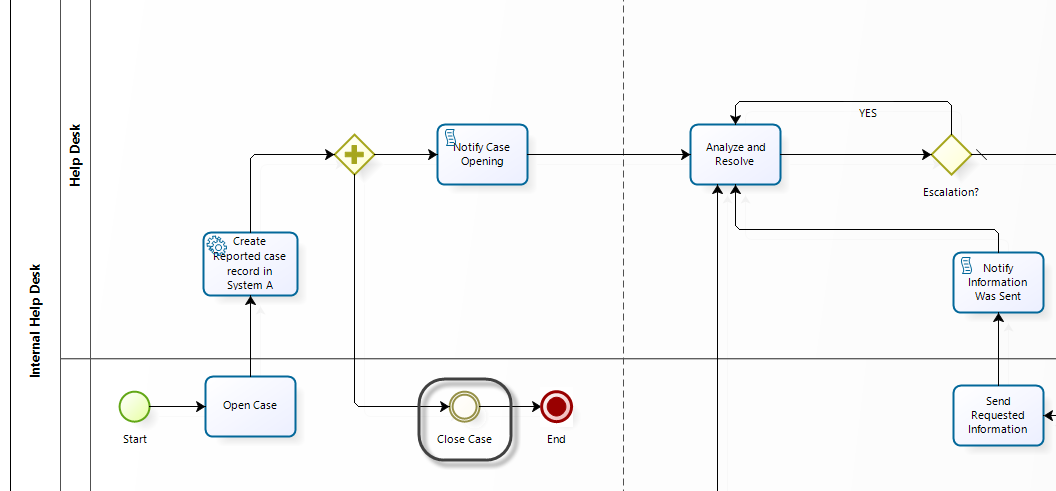
The Analyze and Resolve Task contains a button that will close the case automatically if clicked.
This button will call the Close Case Event. The Process flow will reach the End Event, and the case will be closed.
To configure the case closing Event, follow the next procedure:
1. Go to the form of the Analyze and Resolve Task, include a new button, and name it Close Case.
Create an action (from Actions and validations) when the button is clicked, then select execute rule in the Then block.
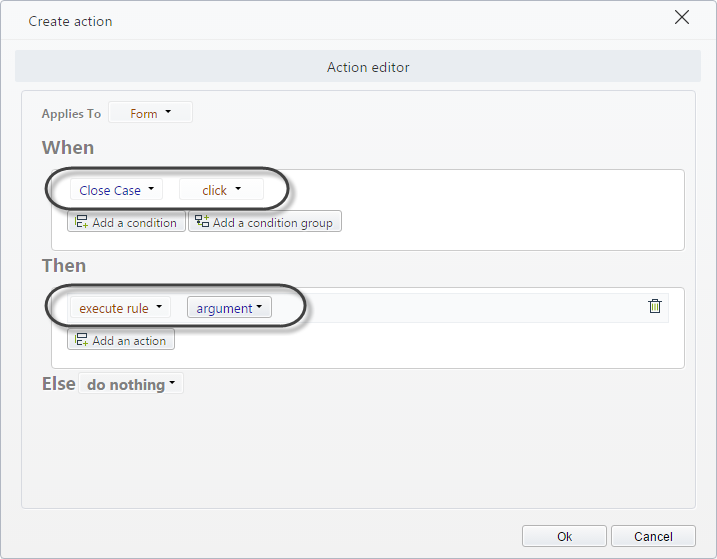
2. In the argument, click on New and then include an Expression module.
Select the setEvent function.
3. Value the parameters of the setEvent function.
The Caseid is obtained using the Me.Case.Id function which returns the ID of the current case.
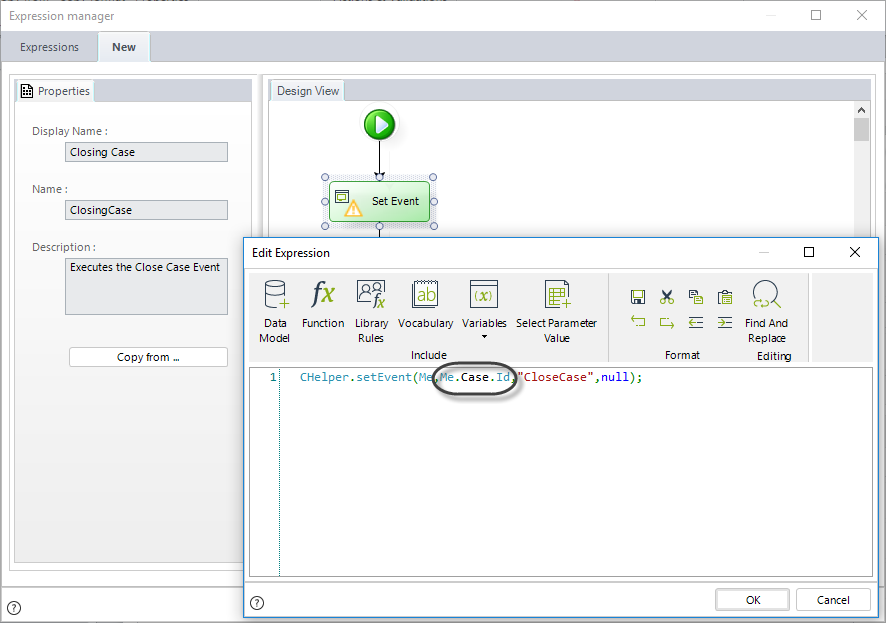
The Event Name is CloseCase.
You can verify the name in the Event properties of the Task by going to the first step of the Process Wizard.
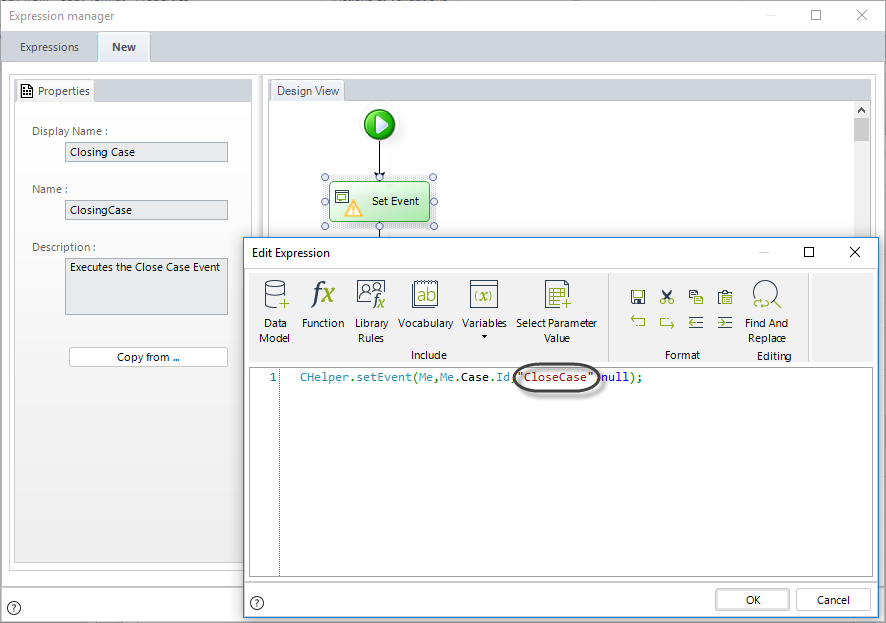
CHelper.setEvent(Me,Me.Case.Id,"CloseCase",null);Save the expression. When you click on the Close Case button from the Work Portal, the case will be closed.
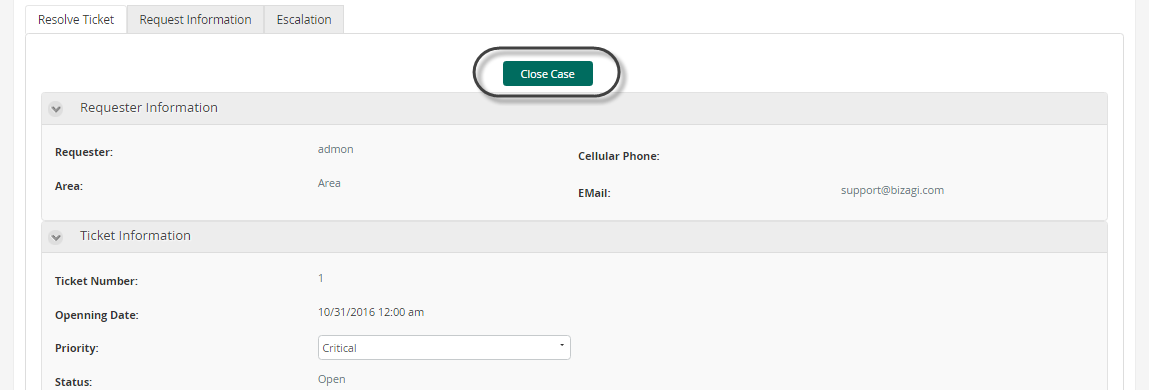
setEvent(String)
The setEvent function is used to execute an available intermediate Event in Bizagi, which has no specific type defined.
For example, it can be used on an expression related to a button to execute an intermediate event in my process. The function can execute events in either the active process or an external process.
The main parameters of this function are:
• XML: information of the event to trigger
The setEvent function is found in the Process category.
Syntax
CHelper.setEvent(string xml)Declaration
public static string setEvent(string xml)Parameters
| Type | Name | Description |
|---|---|---|
| System.String | xml | Information of the event to trigger |
Returns
| Type | Description |
|---|---|
| System.String | Event information |
Examples
Let us take theHelp Desk Process as example.Once a case is created, an Event is enabled that allows the case to be closed at any time, as shown in the Process flow below.
The Analyze and Resolve Task contains a button that will close the case automatically if clicked
This button will call the Close Case Event. The Process flow will reach the End Event and the case will be closed.
To configure the case closing Event, follow the next procedure:
1. Go to the form of the Analyze and Resolve Task, include a new button and name it Close Case.
Create an action (from Actions and validations) when the button is clicked, then select execute rule in the Then block.
2. In the argument, click on New and then include an Expression module.
Select the setEvent function.
3. Value the parameters of the setEvent function.
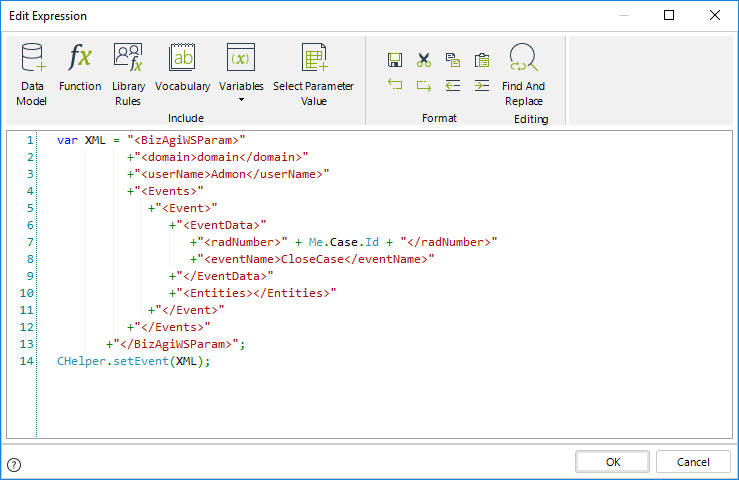
var XML = "<BizAgiWSParam>"
      +"<domain>domain</domain>"
      +"<userName>Admon</userName>"
      +"<Events>"
          +"<Event>"
            +"<EventData>"
                +"<radNumber>" + Me.Case.Id + "</radNumber>"
                +"<eventName>CloseCase</eventName>"
            +"</EventData>"
            +"<Entities></Entities>"
          +"</Event>"
      +"</Events>"
    +"</BizAgiWSParam>";
    CHelper.setEvent(XML);
Save the expression. When you click on the Close Case button from the Work Portal the case will be closed.
thereAreOpenProcesses(String)
Evaluate if there are open processes
You can evaluate if there are open processes related to a specific Process by using the thereAreOpenProcesses function.
This function returns true when cases are open for the specific case number (otherwise, it returns false).

|
You can also use the function with the WfClassName parameter: CHelper.thereAreOpenProcesses(caseNumber, wfclassName) |
|---|
Syntax
CHelper.thereAreOpenProcesses(string CaseNumber)Declaration
public static bool thereAreOpenProcesses(string CaseNumber)Parameters
| Type | Name | Description |
|---|---|---|
| System.String | CaseNumber | Case number |
Returns
| Type | Description |
|---|---|
| System.Boolean |
True when cases are open for the specific case number; otherwise, returns false. |
Examples
Imagine a Project Administration Process. The necessary activities to complete a project are planned in the Plan Activities Task.
The Perform Activities Sub-Process is launched by each activity planned. Simultaneously an activity is enabled for the Project Manager to monitor the progress of each activity.
If the Project Manager tries to close the Project when there are pending activities, that is, opened instances of the Perform Activity Sub-Process, a validation must be thrown to make sure all the activities are completed before closing the case.

To validate that all the activities have been finished we will use the thereAreOpenProcesses function.
1. Go to the fourth step of the Bizagi Process Wizard (Business Rules) and select Activity Actions.
Select the Monitor Activities Task and create an On Exit Expression.

2. Add an expression module. Evaluate if there are pending activities by using the thereAreOpenProcesses function found in the Current case information category. Set the Me.Case.CaseNumber function as a parameter.
3. When there are pending activities, the function thereAreOpenProcesses returns true. Then, a validation must be thrown. Include the message that will be displayed.
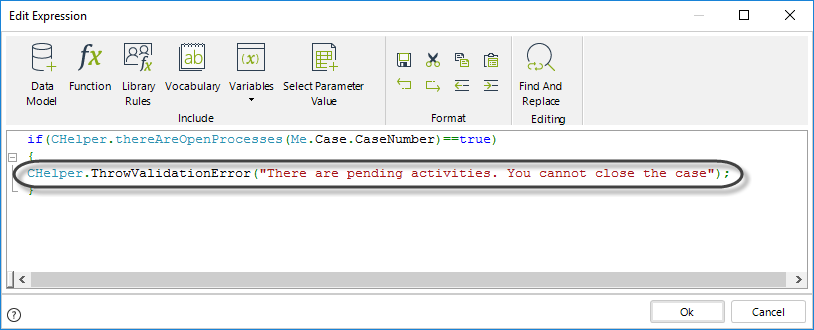
Finally, save the expression.
if(CHelper.thereAreOpenProcesses(Me.Case.CaseNumber)==true)
{
 CHelper.ThrowValidationError("There are pending activities. You cannot close the case");
}thereAreOpenProcesses(String, String)
Evaluate if there are open processes
You can evaluate if there are open processes related to a specific Process by using the thereAreOpenProcesses function.
This function returns true when cases are open for the specific case number and process WfClassName (otherwise, it returns false).
Syntax
CHelper.thereAreOpenProcesses(string caseNumber, string wfclassName)Declaration
public static bool thereAreOpenProcesses(string caseNumber, string wfclassName)Parameters
| Type | Name | Description |
|---|---|---|
| System.String | caseNumber | Case number |
| System.String | wfclassName | Process WfClassName |
Returns
| Type | Description |
|---|---|
| System.Boolean |
True when cases are open for the specific case number and process WfClassName; otherwise, returns false. |
ThrowValidationAlert(String)
Validations are customized error messages displayed in the Work Portal, informing the end user that data is missing or an error occurred in an activity. Validation messages are usually defined in On Exit Actions or Table Validations.
•If validation is thrown when the end user clicks Next in an activity, the process will halt, and the customized message appears.
•If a Validation is thrown when trying to save a new record of a table, then the new record will not be saved, and the message appears instead.
You must configure the validations using either the ThrowValidationAlert or ThrowValidationError function.
The only difference between them is how the error message is displayed. The syntax of the functions are:
CHelper.ThrowValidationError("Message")CHelper.ThrowValidationAlert("Message")The parameter of these functions is the error message that appears when the validation is thrown.
The function ThrowValidationAlert enables a message window to appear in the middle of the screen of the end user's Work Portal when the validation is thrown. This window remains on the screen until the end user decides to close it by clicking the quit button. It has a title and content. The title is not editable, and the content shows the customized message that you set in Bizagi Studio.
You can find both functions in the Data Validation category.
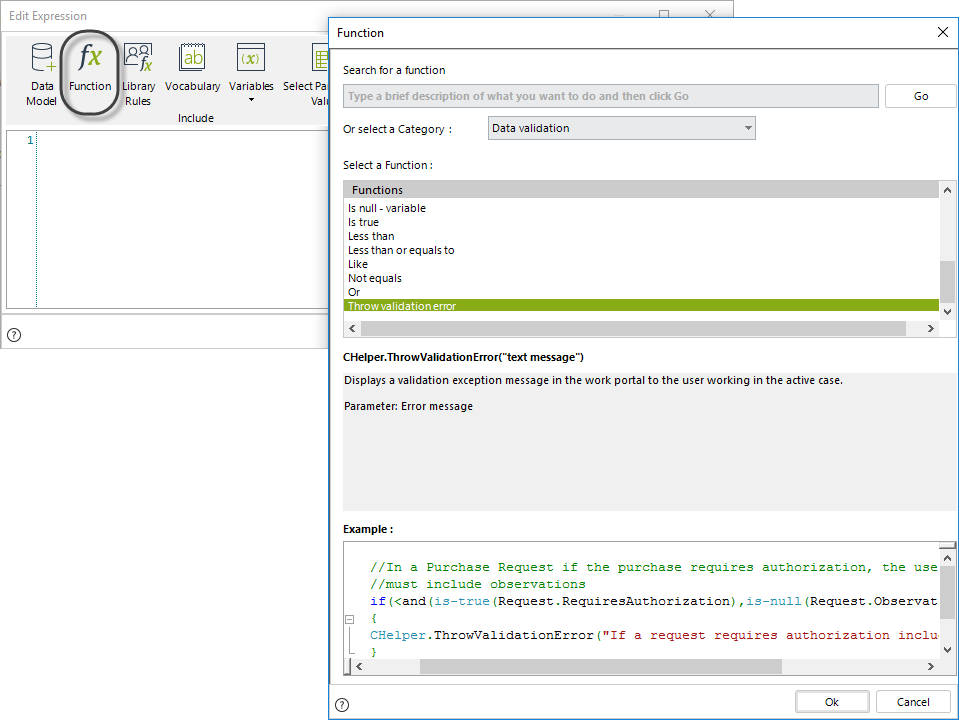
Syntax
CHelper.ThrowValidationAlert(string message)Declaration
public static void ThrowValidationAlert(string message)Parameters
| Type | Name | Description |
|---|---|---|
| System.String | message |
An error message that appears when the validation is thrown |
Examples
In a Travel Request Process, you have to validate that the Vacation's Returning date is higher than the Vacation’s Leaving date to be able to calculate the days of leave requested. If the dates do not comply with this condition, a validation message appears on the end user's Work Portal screen to inform of the erroneous date.
To show a validation message use the ThrowValidationAlert function.
1. Go to the fourth step of the Bizagi Process Wizard and create an expression On Exit of the Register Vacation Request Task.
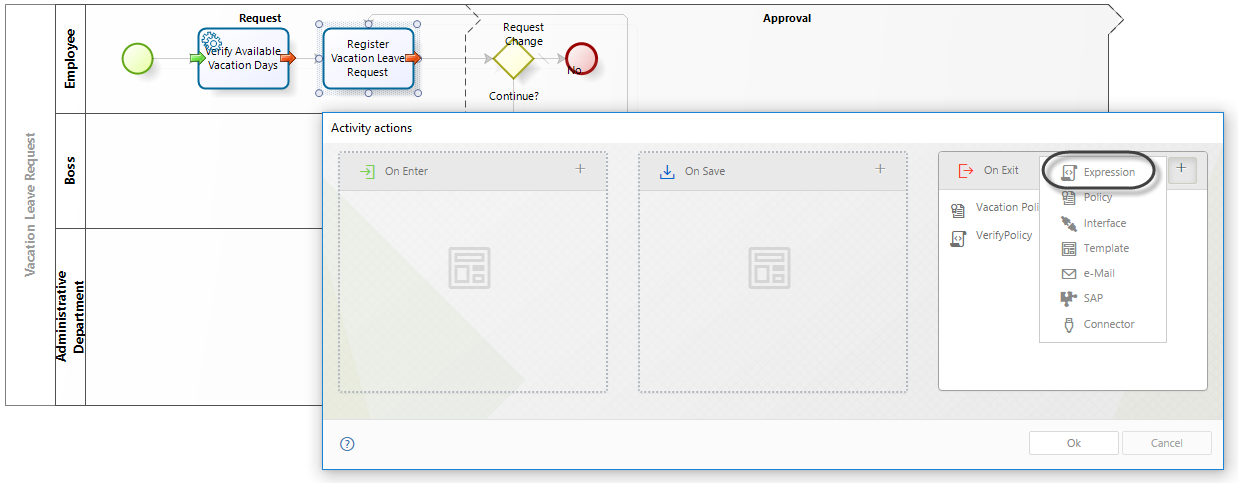
2. In an expression, compare the Leaving and Returning dates.
3. Type the error message that you want that the end user visualizes in his Work Portal screen: "Returning Date cannot be less than the Leaving Date".
Using the TrowValidationAlert function:
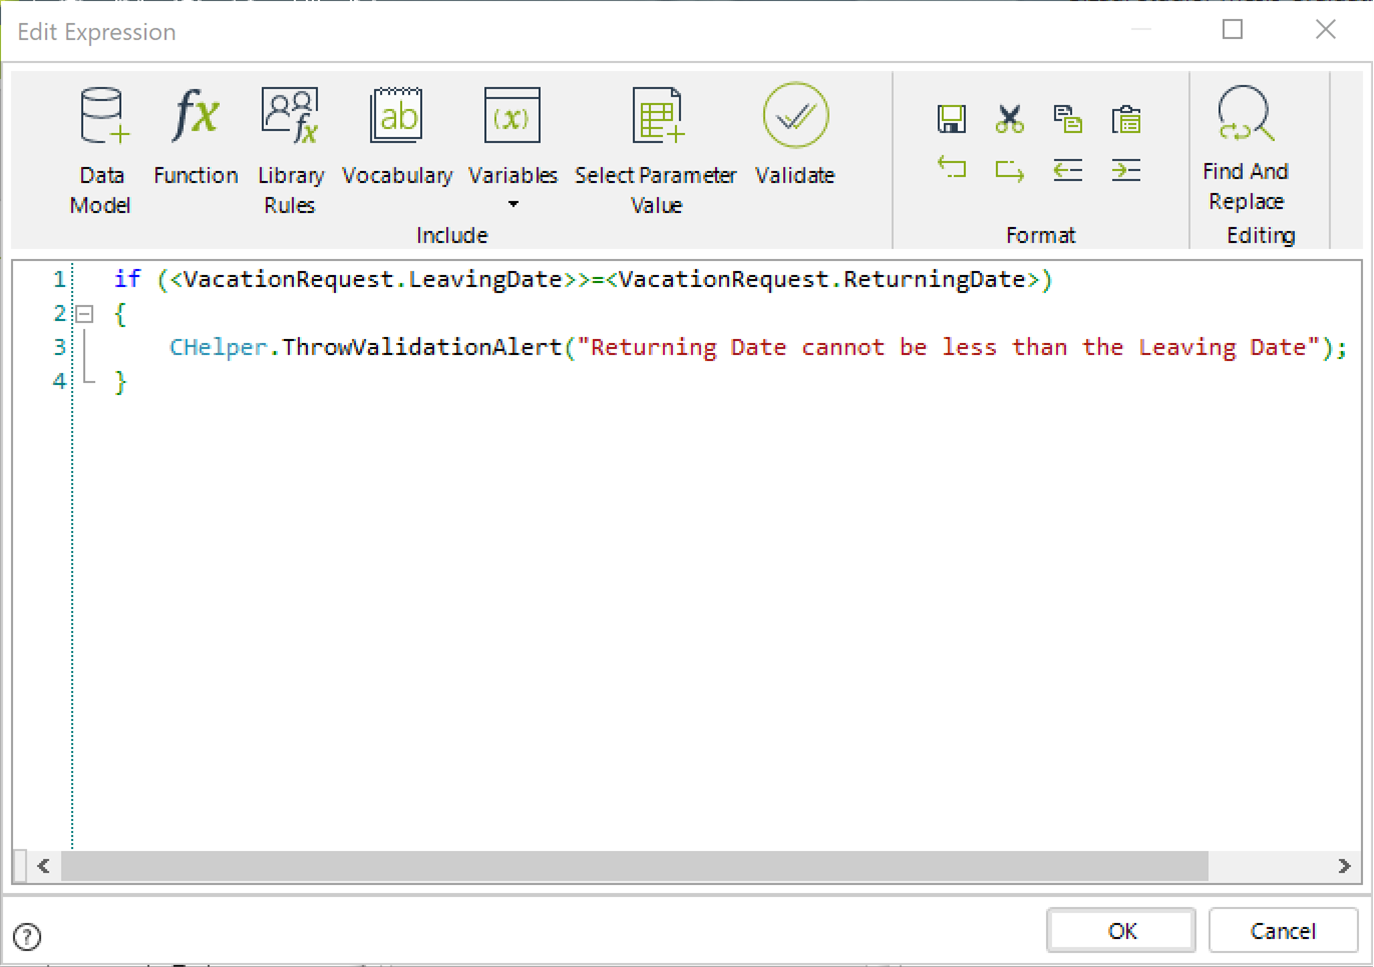
if (<VacationRequest.LeavingDate>>=<VacationRequest.ReturningDate>)
{
 CHelper.ThrowValidationAlert("Returning Date cannot be less than the Leaving Date");
}
4. Click OK to save the rule.
5. In the Work Portal, enter a date in the Leaving Date field that is greater than the Returning Date value.
The validation message will look like this:
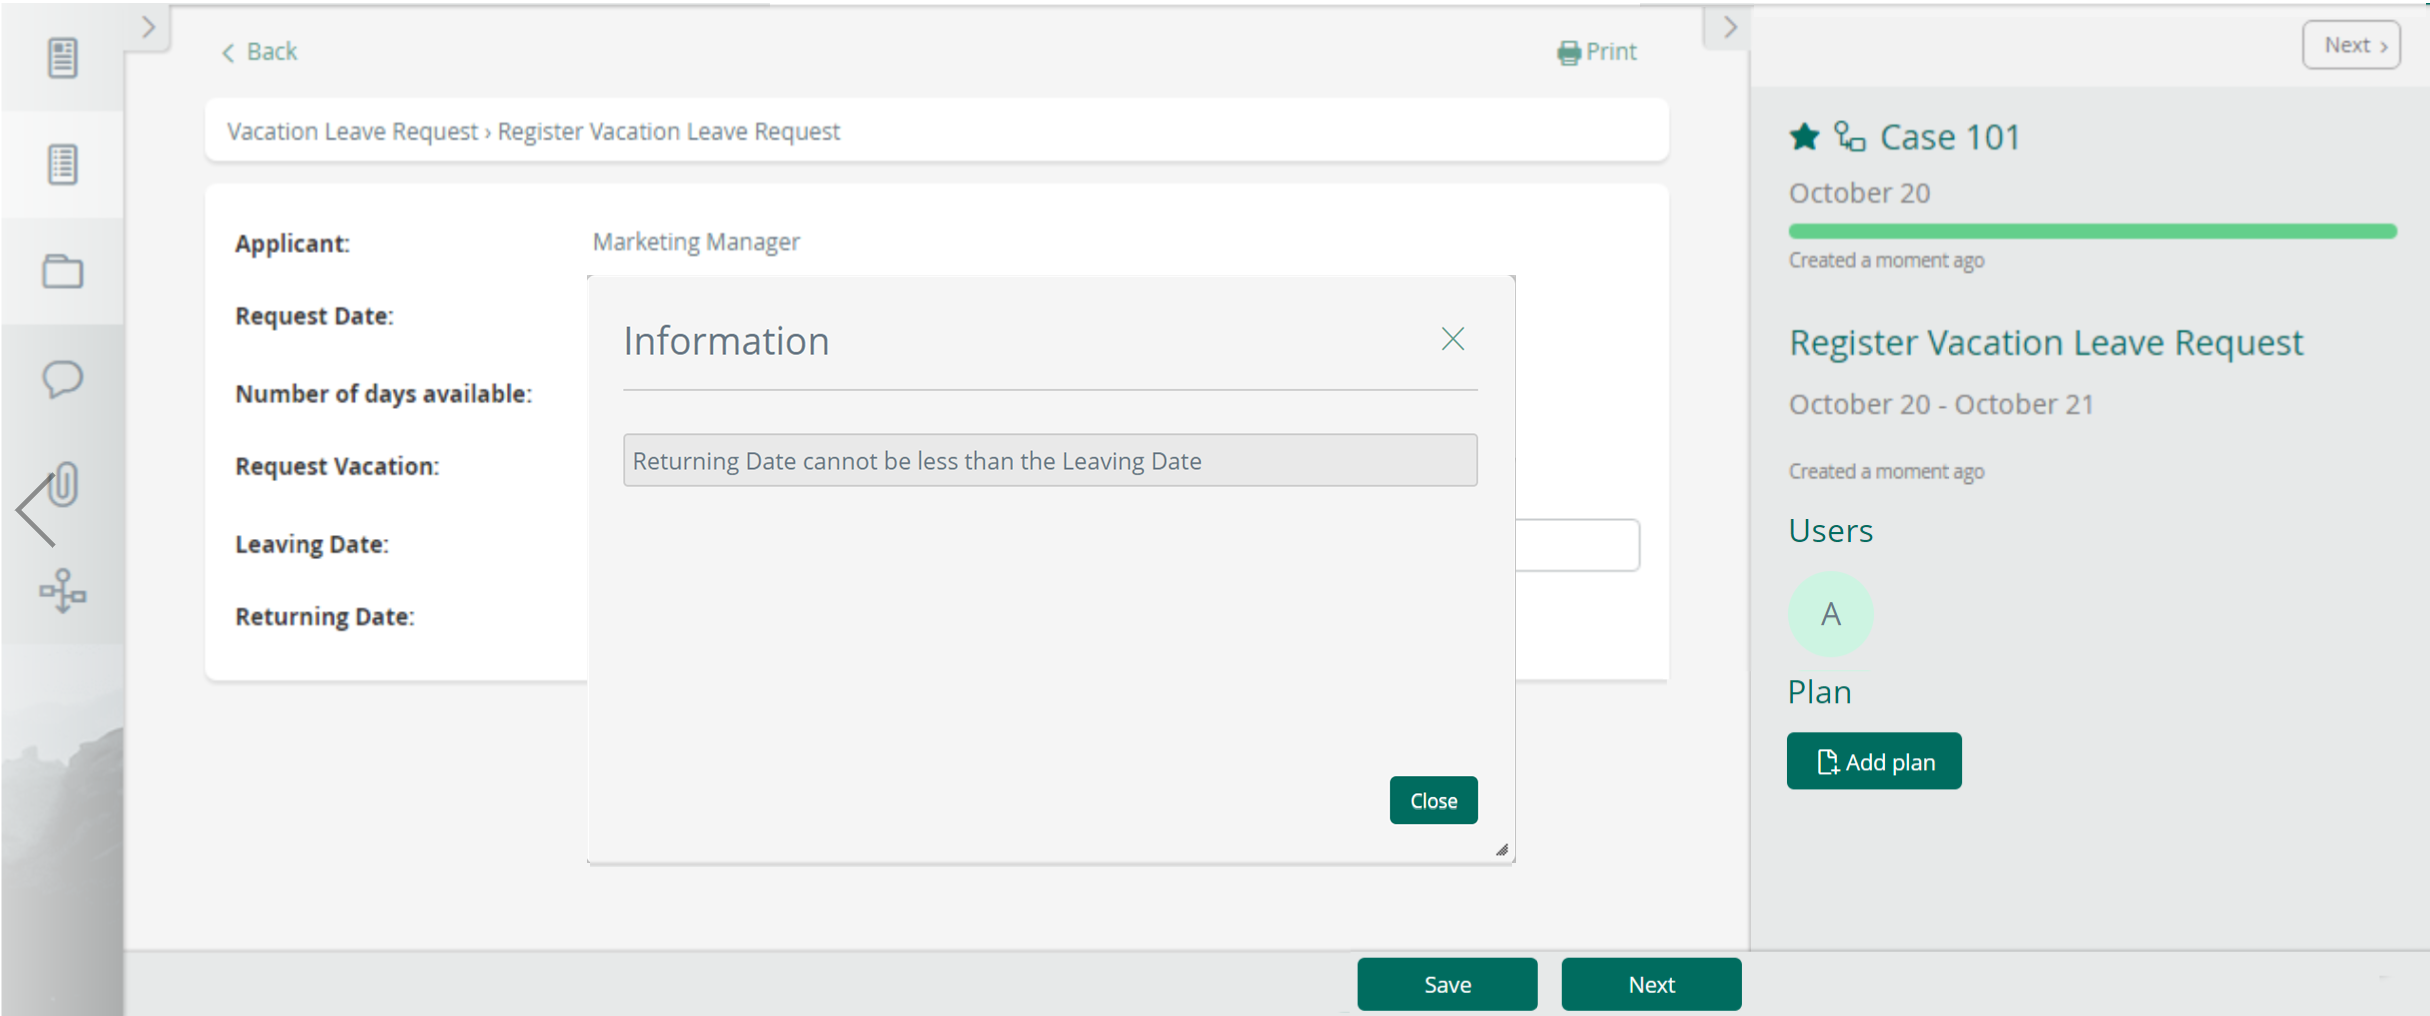
ThrowValidationError(String)
Validations are customized error messages displayed in the Work Portal, informing the end user that data is missing or an error occurred in an activity. Validation messages are usually defined in On Exit Actions or Table Validations.
•If validation is thrown when the end user clicks Next in an activity, the process will halt, and the customized message appears.
•If a Validation is thrown when trying to save a new record of a table, then the new record will not be saved, and the message appears instead.
You must configure the validations using either the ThrowValidationAlert or ThrowValidationError function.
The only difference between them is how the error message is displayed. The syntax of the functions are:
CHelper.ThrowValidationError("Message")CHelper.ThrowValidationAlert("Message")The parameter of these functions is the error message that appears when the validation is thrown.
The function ThrowValidationError sets a message which appears in the Work Portal on the right bottom of the end user's Work Portal screen when the validation is thrown. It automatically disappears after some seconds.
You can find both functions in the Data Validation category.
Syntax
CHelper.ThrowValidationError(string message)Declaration
public static void ThrowValidationError(string message)Parameters
| Type | Name | Description |
|---|---|---|
| System.String | message |
An error message that appears when the validation is thrown |
Examples
In a Travel Request Process, you have to validate that the Vacation's Returning date is higher than the Vacation’s Leaving date to be able to calculate the days of leave requested. If the dates do not comply with this condition, a validation message appears on the end user's Work Portal screen to inform of the erroneous date.
To show a validation message use the ThrowValidationError function.
1. Go to the fourth step of the Bizagi Process Wizard and create an expression On Exit of the Register Vacation Request Task.
2. In an expression, compare the Leaving and Returning dates.
3. Type the error message that you want that the end user visualizes in his Work Portal screen: "Returning Date cannot be less than the Leaving Date".

if (<VacationRequest.LeavingDate>>=<VacationRequest.ReturningDate>)
{
 CHelper.ThrowValidationError("Returning Date cannot be less than the Leaving Date");
}
4. Click OK to save the rule.
5. In the Work Portal, enter a date in the Leaving Date field that is greater than the Returning Date value.
The validation message will look like this:
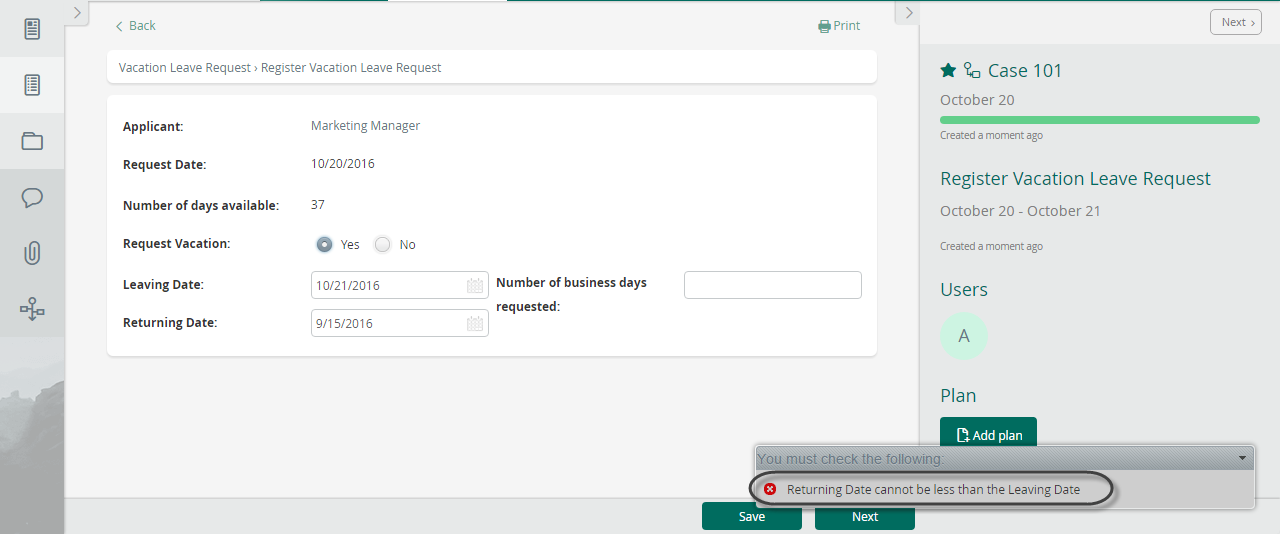
Display localized validations
In some cases, validation messages might need to be localized to meet languages of users to which they are displayed.
This can be done by using Extended Resources.
Suppose the validation message of the Vacation Request must be displayed in the language defined for the requester user. To do this, follow the steps below:
1. From the Expert view, create an Extended Resource and define localization for the desired languages.

2. Go to the fourth step of the Bizagi Process Wizard and create an expression On Exit of the Register Vacation Request Task.
In an expression element, define the condition required to show the validation message as in the previous example.

3. Use the Me.Case.WorkingCredential.UserProperties method to obtain the language of the requester user.

4. Use the CHelper.GetAttrib function to obtain the Culture name of the user´s language.

5. Use the CHelper.GetStringExtended function to obtain the validation message in the required language.
This function uses three parameters:
•Parameter 1: Name of the extended resource.
•Parameter 2: Default message (Shown if the resource is not localized in the specified language).
•Parameter 3: Language Culture Name.

6. Finally, use the CHelper.ThrowValidationError function to show the validation message.
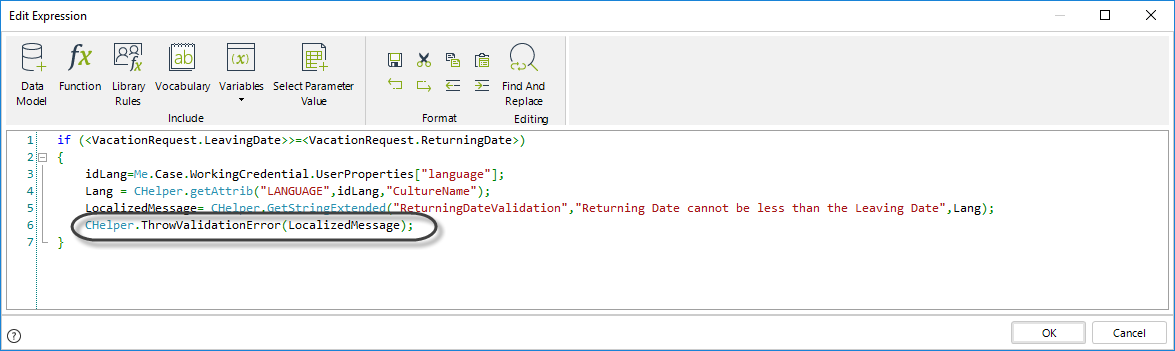
if (<VacationRequest.LeavingDate>>=<VacationRequest.ReturningDate>)
{
//Obtain the user language
idLang=Me.Case.WorkingCredential.UserProperties["language"];
//Obtain the user language name
Lang = CHelper.getAttrib("LANGUAGE",idLang,"CultureName");
//Obtain the localized message
LocalizedMessage= CHelper.GetStringExtended("ReturningDateValidation","Returning Date cannot be less than the Leaving Date",Lang);
//Display the localized message
CHelper.ThrowValidationError(LocalizedMessage);
}ToBase64(Byte[])
Overview
Bizagi offers a function to transform your files to base64. You might need this transformation when using services that handle file data or while using Bizagi's SOA layer.
To transform your data, use this function that returns a String with your data on base64.
The following attributes are needed:
•data: Your file data.
Syntax
CHelper.ToBase64(byte[] data)Declaration
public static string ToBase64(byte[] data)Parameters
| Type | Name | Description |
|---|---|---|
| System.Byte[] | data | File data |
Returns
| Type | Description |
|---|---|
| System.String | File data in base64 |
Examples
In the following sample process, assume we have a process entity called OfficeSupplyRequest.
Such process uses the following data model:
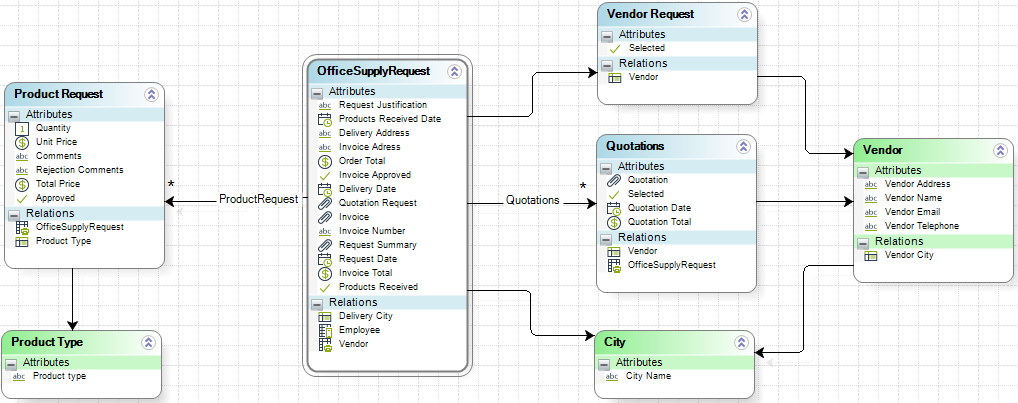
All the documents received are rounded up in the Request Summary attribute. This information must be sent to another system. To do so, we will transform this file to base64 and send the string as a web service input parameter, where then it will be decoded on the other system. Keep in mind that only one summary is allowed per case.
We are going to store the base64 data on the variable SummaryBase64 that we will later use as an input parameter for the service.
The expression would be as follows:

var summary = CHelper.GetValueAsCollection(<OfficeSupplyRequest.RequestSummary>);
var summaryData= summary.get(0).getXPath("Data");
SummaryBase64 = CHelper.ToBase64(summaryData);
The expression above obtains the array of files stored in the RequestSummary file-type attribute. Then it navigates through the array and obtains the data of the file to be transformed. Finally the data is converted to base64 and stored in the SummaryBase64 variable.
View SourceToInt(String)
Syntax
CHelper.ToInt(string sText)Declaration
public static int ToInt(string sText)Parameters
| Type | Name | Description |
|---|---|---|
| System.String | sText | String to convert |
Returns
| Type | Description |
|---|---|
| System.Int32 | Converted integer |
Examples
Convert a string to integer
Suppose that in a Loan Request process, the passport number of customers is stored as a string type attribute. This number is used as a parameter in a web service to consult credit blacklists. However, the exposed services receive an integer type parameter, so a type conversion is needed from string to integer.
To convert the passport number into a integer we use the CHelper.ToInt(sText) method:
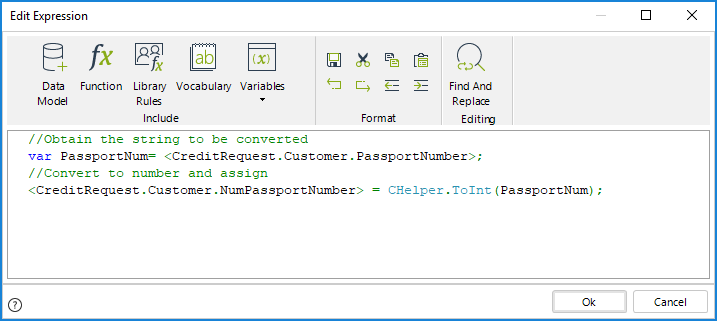
//Obtain the string to be converted
var PassportNum= <CreditRequest.Customer.PassportNumber>;

//Convert to number and assign
<CreditRequest.Customer.NumPassportNumber> = CHelper.ToInt(PassportNum);trace(String, String)
Overview
During the development stages of a project, or in the Production environment, there are situations where errors need to be traced or debugged.
Bizagi offers the possibility to trace errors in the Processes Workflows (to control and diagnose potential errors) so that administrators can ascertain if the business rules, validations, interfaces invocations, or the Process itself needs to be modified.
This is a powerful functionality for Business Rules, in particular, to aid in the understanding and detection of those behaviors that require adjustment.
To enable the debug and trace feature, please refer to Error and Control diagnostics.
Traces in Business Rules
For Business Rules, in addition to activating the corresponding trace option and levels, it is also necessary to include a trace command line in the Business Rule's code to define what exactly (the detail level) needs to trace.
This command line will record in a separate log (a .txt file), any customized information that the user wants to trace within the rule.
Traces are built using the trace function.
The parameters of this function are:
•File Name: The file name refers to the name of the .txt file where the traces will be stored.
•Object to be traced: The trace text identifies the trace object (attribute or variable) in the log file (.txt trace file). The object to be traced can be an attribute selected by a navigational XPath expression, a function, or a variable. The text in the quotes can be any text. It doesn't have to be the actual name of the attribute in the data model.
You can find this function in the Tracing category.
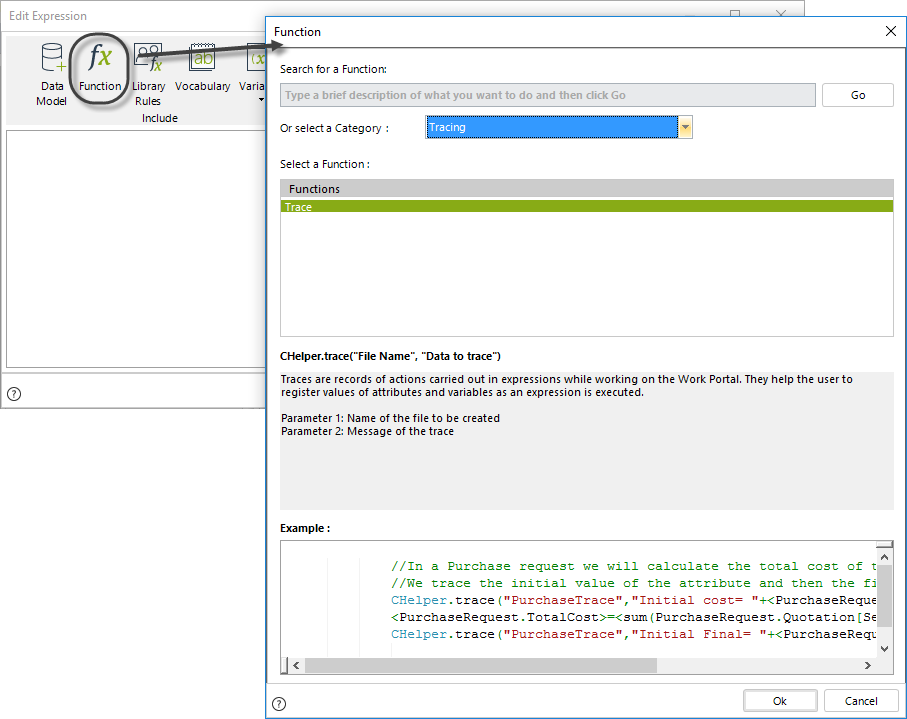
Syntax
CHelper.trace(string sFileName, string sText)Declaration
public static void trace(string sFileName, string sText)Parameters
| Type | Name | Description |
|---|---|---|
| System.String | sFileName |
Name of the .txt file where the traces will be stored |
| System.String | sText |
Information to trace. It can be an attribute selected by a navigational XPath expression, a function, or a variable. |
Examples
Suppose a Transportation and Logistics company has defined a process called Shipping Process, to manage and monitor international shipments. The first task of this Process allows the customers to calculate the cost of their shipments. The customer must provide the dimensions and weight of the package to be sent. The estimated cost of the shipment is automatically calculated based on its volumetric weight, real weight, and the cost per pound, which varies according to the destination country.
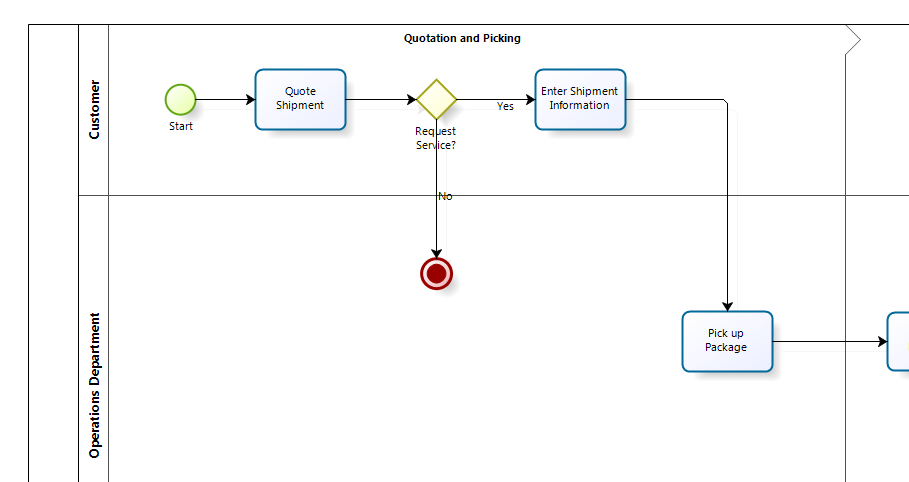
The volumetric weight reflects the density of a package. A less compact item generally occupies more volume of space, in comparison to its actual weight. The volumetric or dimensional weight is calculated and compared with the actual weight of the shipment to determine which is greater; the higher weight is used to calculate the shipment cost.
The volumetric weight is calculated by using a conversion factor ( to be comparable to the real weight) which we will assume is always the same and is equal to "4000", so the volumetric weight is obtained by using the following formula:
LengthWidthHeight/4000
You might want to verify every step of the cost calculation to make sure its correct execution.
To configure the Business Rule's traces follow the next steps:
1. Create an expression.
In this example, we will define an expression associated with a button in the Form of the Quote Shipment Task.
Add the Button and associate an Action.

2. Include the code shown in the image below in an Expression module.
Obtain from the RateTable Entity the Cost per Pound based on the destination country.
Then calculate the volumetric weight and compare it with the real weight to obtain the Higher weight.
Finally, obtain the total cost by multiplying the Cost per Pound by the Higher weight.
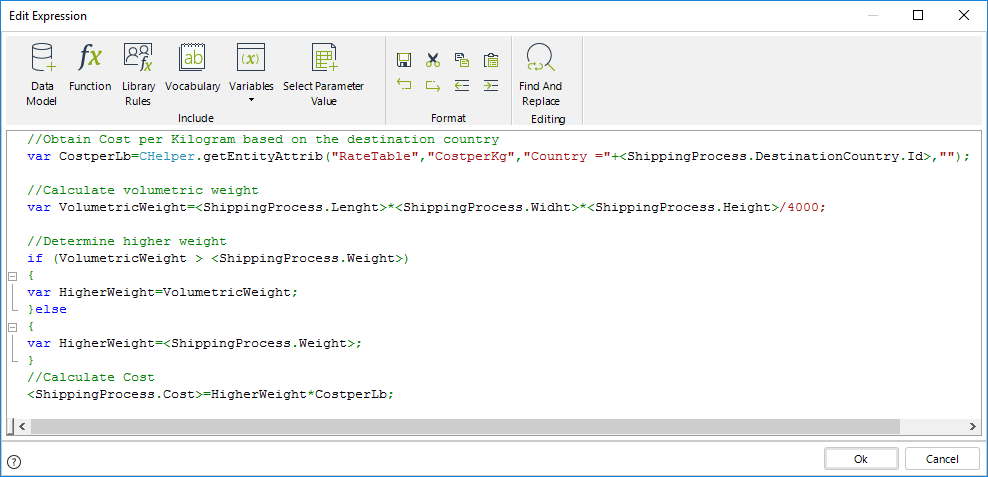
3. To include several traces use the Trace function found in the Trace category.
Define CostCalculation as the name of the file where the traces will be stored.
We will trace Cost per pound, the Volumetric Weight and the Real Weight, Higher Weight, and the Shipping Cost.
We will use variables and XPath expressions in the traces to make sure the values are retrieved correctly.
Traces using variables will be written as:
CHelper.trace("CostCalculation", "Volumetric Weight ="+VolumetricWeight);Traces using XPath expression will be written as:
CHelper.trace("CostCalculation", "Cost ="+<ShippingProcess.Costs>);Compound traces using both variables and XPath expressions will be:
CHelper.trace("CostCalculation","Cost per Pound to "+<ShippingProcess.DestinationCountry.Name>+" = "+CostperLb);Note that the plus sign (+) concatenates several items in the sentence.
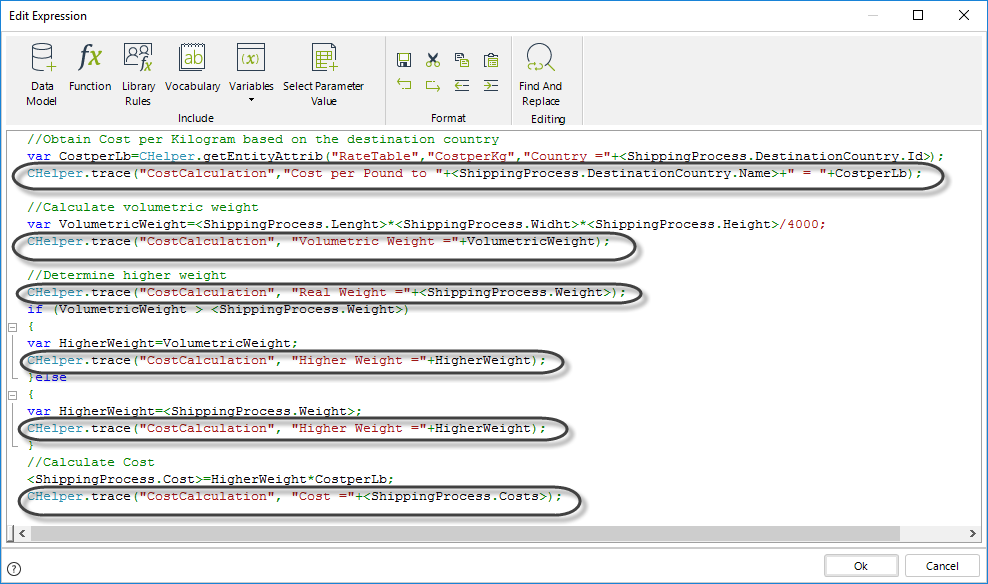
//Obtain Cost per Kilogram based on the destination country
var CostperLb=CHelper.getEntityAttrib("RateTable","CostperKg","Country ="+<ShippingProcess.DestinationCountry.Id>);
CHelper.trace("CostCalculation","Cost per Pound to "+<ShippingProcess.DestinationCountry.Name>+" = "+CostperLb);

//Calculate volumetric weight
var VolumetricWeight=<ShippingProcess.Lenght>*<ShippingProcess.Widht>*<ShippingProcess.Height>/4000;
CHelper.trace("CostCalculation", "Volumetric Weight ="+VolumetricWeight);

//Determine higher weight
CHelper.trace("CostCalculation", "Real Weight ="+<ShippingProcess.Weight>);
if (VolumetricWeight > <ShippingProcess.Weight>)
{
 var HigherWeight=VolumetricWeight;
 CHelper.trace("CostCalculation", "Higher Weight ="+HigherWeight);
}else
{
 var HigherWeight=<ShippingProcess.Weight>;
 CHelper.trace("CostCalculation", "Higher Weight ="+HigherWeight);
}

//Calculate Cost
<ShippingProcess.Cost>=HigherWeight*CostperLb;
CHelper.trace("CostCalculation", "Cost ="+<ShippingProcess.Costs>);
Save the expression.
4. Run the Process and type values in the required fields. Click the button to execute the expression.
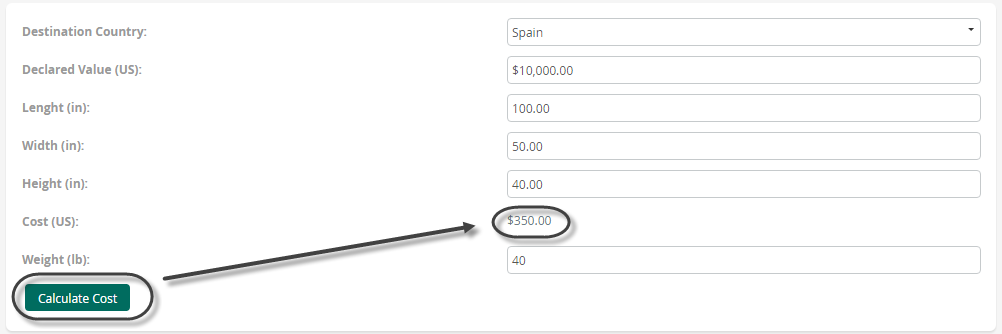
5. Go to the trace folder of the project and open the .txt file with the name you defined as a parameter in the CHelper.trace function
By default the path to the trace folder is
C:\Bizagi\Projects[project_name]\Trace</strong>
6. See how the traces are shown.
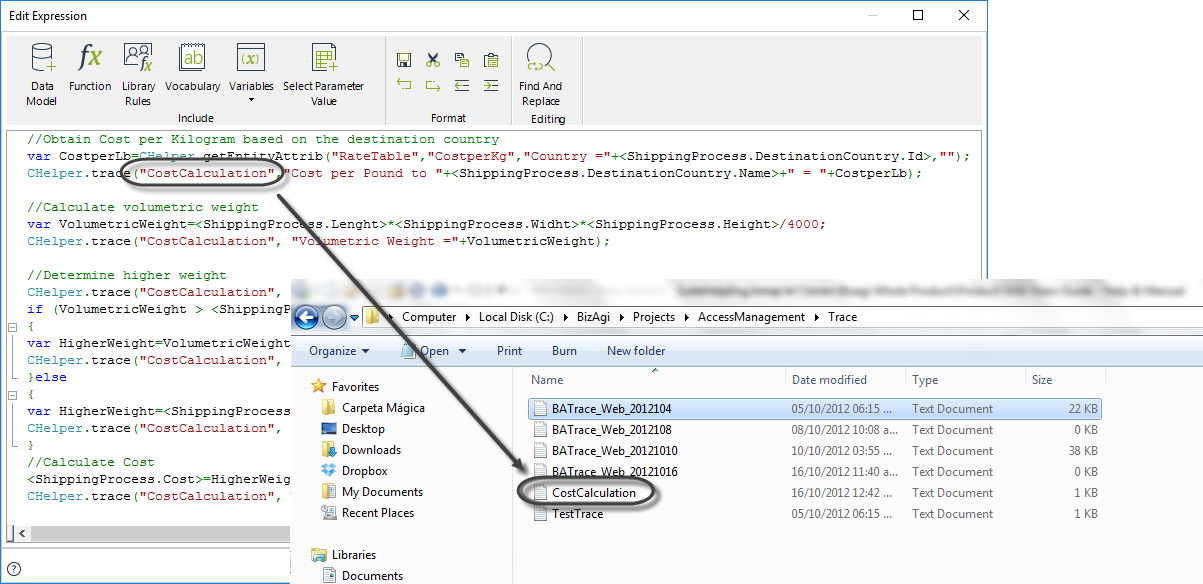
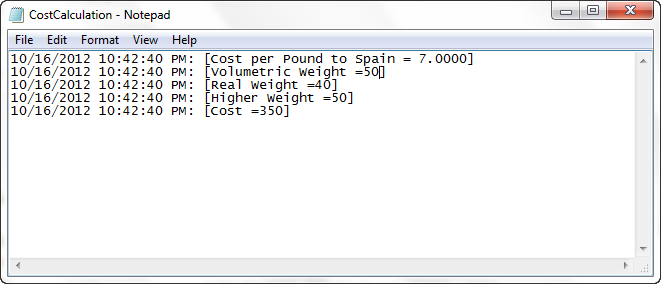
UpdateECMMetadata(ICAPIWorkItem, Hashtable, String)
Overview
By default, a document uploaded through the ECM control will allow users to edit this information manually.
However, and when using ECM integration, there are scenarios in which you may want to automatically map business information into a document to be stored at the ECM.
To update the metadata, use this function.
The following attributes are needed:
•Me: this parameter is fixed.
•data: metadata structure.
•XPath: corresponds to the data model's file attribute.
Syntax
CHelper.UpdateECMMetadata(ICAPIWorkItem Me, Hashtable data, string XPath)Declaration
public static void UpdateECMMetadata(ICAPIWorkItem Me, Hashtable data, string XPath)Parameters
| Type | Name | Description |
|---|---|---|
| ICAPIWorkItem | Me | This parameter is fixed |
| System.Collections.Hashtable | data | Metadata structure |
| System.String | XPath | Data model's file attribute |
Examples
The examples below illustrate the methods to use in a rule which automatically maps information into the uploaded document.
Upload File
In this example, we map information already contained in our case into the Title and Description metadata.
Our ECM file upload is set in MyProcessEntity.MyFileAttribute.
var XPath = "MyProcessEntity.MyFileAttribute"; //this XPath corresponds to the data model's file attribute
var metadataHash = new Hashtable(); //this creates a temporary structure to hold metadata

metadataHash.Add("Title", <MyProcessEntity.CustomerNameAttribute>);
metadataHash.Add("Description", <MyProcessEntity.SomeDescriptionAttribute>);
//do this to set each metadata field
var tmpFileAttribute = Me.getXPath(XPath); //this obtains all information in the file attribute
for(var i=0; i < tmpFileAttribute.size(); i++) //iteration is done, as this file could contain more than 1 document
{
var tmpFile = tmpFileAttribute.get(i); //this obtains the actual document
var idFileUpload = tmpFile.getXPath("id"); //this obtains the id for the actual document
var completeXpath = XPath + "[id=" + idFileUpload + "]";  //this builds the complete XPath to reference each document
CHelper.UpdateECMMetadata(Me, metadataHash, completeXpath); //method to map metadata
}
Files on a table
In this example, our rule is set outside of a table, but we will map metadata for all uploads inside of a table.
This means that we map Title and Description metadata (information already contained in our case), for an ECM file upload which is contained in MyProcessEntity.MyCollection.MyFileAttribute. (as a column of a table).
var XPath = "MyFileAttribute"; //this XPath corresponds to the data model's file attribute
var xPathContext = "MyProcessEntity.MyCollection"; //this XPath corresponds to the context of the actual table
var metadataHash = new Hashtable(); //this creates a temporary structure to hold metadata
metadataHash.Add("Title", <MyProcessEntity.CustomerNameAttribute>);
metadataHash.Add("Description", <MyProcessEntity.SomeDescriptionAttribute>);
var List = Me.getXPath(xPathContext); //this obtains the information in the table
var Array = CHelper.GetValueAsCollection(List);

for (var j=0; j < Array.size(); j++) //iteration is done for the records of that table
{
var tmpRecord = Array.get(j); //this obtains the actual record
var FileAttrib = tmpRecord.getXPath(XPath); //this obtains all information in the file attribute
var idRecord = tmpRecord.getXPath("id"); //this obtains the id for the actual record
for(var i=0; i < FileAttrib.size(); i++) //iteration is done, as this file could contain more than 1 document
{
var SubFile = FileAttrib.get(i);  //this obtains the actual document of that record
var idFileUpload = SubFile.getXPath("id");  //this obtains the id for the actual document
var completeXpath = xPathContext + "[id=" + idRecord + "]." + XPath + "[id=" + idFileUpload + "]"; //this builds the complete XPath to reference each document
CHelper.UpdateECMMetadata(Me, metadataHash, completeXpath); //method to map metadata
}
}usingXPath(String)
Bizagi's expression analyzer is very robust identifying all attributes, entities, etc., to send in deployment packages to the Testing and Production environments.
However, sometimes, attributes of the data model are not included in a deployment package, and when testing a deployed package in the Testing environment, the run-time fails because an attribute is not found.
This happens when such attribute is used exclusively within an expression and nowhere else, such as forms or allocations. Additionally, the expression where such attribute is used is built in a way that Bizagi is not able to detect it.
When building complex, dynamic expressions, we recommend using this function to force Bizagi to include attributes that are not included in a deployment.
The function receives two parameters:
•The entity where the attribute is saved
•The attribute to be forced in the deployment.
Both parameters must be typed within double quotation marks. DO NOT use variables as parameters.
The inclusion of the sentence in an expression does not affect the result of it. You can include it at the beginning or the end. We recommend including it at the beginning to identify easier.
Syntax
CHelper.usingXPath(string EntityName, string Xpath)Declaration
public static void usingXPath(string Xpath)Parameters
| Type | Name | Description |
|---|---|---|
| System.String | Xpath |
XPath of the attribute to be forced in the deployment |
Remarks
This method uses the context entity as a root entity.
usingXPath(String, String)
Bizagi's expression analyzer is very robust identifying all attributes, entities, etc., to send in deployment packages to the Testing and Production environments.
However, sometimes, attributes of the data model are not included in a deployment package, and when testing a deployed package in the Testing environment, the run-time fails because an attribute is not found.
This happens when such attribute is used exclusively within an expression and nowhere else, such as forms or allocations. Additionally, the expression where such attribute is used is built in a way that Bizagi is not able to detect it.
When building complex, dynamic expressions, we recommend using this function to force Bizagi to include attributes that are not included in a deployment.
The function receives two parameters:
•The entity where the attribute is saved
•The attribute to be forced in the deployment.
Both parameters must be typed within double quotation marks. DO NOT use variables as parameters.
The inclusion of the sentence in an expression does not affect the result of it. You can include it at the beginning or the end. We recommend including it at the beginning to identify easier.
Syntax
CHelper.usingXPath(string EntityName, string Xpath)Declaration
public static void usingXPath(string EntityName, string Xpath)Parameters
| Type | Name | Description |
|---|---|---|
| System.String | EntityName |
Name of the entity where the attribute is saved |
| System.String | Xpath |
XPath of the attribute to be forced in the deployment |
Remarks
This method uses the entity name parameter as a root entity.
Examples
When using variables as filters in GetEntity sentences to filter an entity, the attributes contained within the filter variable are not taken in a deployment package unless used in forms or allocations.
The following sentence displays how the attribute IsAdditional that is used exclusively in the expression is not taken in a deployment package. The sentence usingXPath must be used.
var parameters = new FilterParameters();
parameters.AddParameter("@IsAdditional", 1);
parameters.AddParameter("@cAmounttoPay", 0);
var Transactions = Me.getXPath("entity-list('Installment', 'IsAdditional = @IsAdditional AND cAmounttoPay > @cAmounttoPay')",parameters);
for(var i =0; i < Transactions.size(); i++)
{
var Transaction = Me.newCollectionItem("Transfer.Transactions")
Transaction.setXPath("Transaction",Transactions[i].getXPath("Id"));
}
CHelper.usingXPath("Installment", "IsAdditional");
The image below displays the error message received in the Work Portal when an attribute within an expression is not found in the project.

When creating an XPath as a string and saving it in a variable, Bizagi is not able to identify the attributes contained. If the attributes included in an XPath built as a string are not used in forms or allocations, they will not be taken in a deployment package.
The following sentence displays how the XPath sPath is built dynamically and saved in a variable as a string. The attribute IdUser used exclusively in this expression is not taken in a deployment. The sentence usingXPath must be used.
var parameters = new FilterParameters();
parameters.AddParameter("@sName", Me.Task.Name);
var idActivity=CHelper.getEntityAttrib("Activity","idActivity","sName=@sName",parameters);
parameters.AddParameter("@idactivity", idActivity);

var idValRole=CHelper.getEntityAttrib("ActivityConfigurat","idValidationRole","idactivity=@idactivity",parameters);
var sPath="Request.AllUsers[idValidationRole.id ="+idValRole+"].idUser";

Me.setXPath(sPath,Me.Case.WorkingCredential.UserId);

CHelper.usingXPath("AllUsers", "idUser");