Important notice
Due to a decision by Microsoft to discontinue support for the Form Recognizer API versions 2.0 and 2.1, the Form Recognizer connector in Bizagi is currently unavailable. Microsoft has confirmed that training custom models with these versions is no longer supported and recommends migrating to the Document Intelligence version v3.1 or v3.0 APIs, which offer enhanced model quality and capabilities.
The Bizagi team is actively working on updating the API version to restore functionality to the Form Recognizer connector. We apologize for any inconvenience this may cause and appreciate your understanding during this transition.
For more information on the changes and migration options, you can refer to the Microsoft Migration Guide.
Overview
This section describes the steps needed to create a Form Recognizer connector in Bizagi Studio.
Before you start
•Make sure that you have created in an active Azure subscription:
oA Storage account.
oA Form Recognizer cognitive service.
Bizagi has a Proxy configuration option available to connect with external services such as Form Recognizer connectors.
Steps
To create and use a Form Recognizer connector in Bizagi Studio, you need to follow these steps:
•Configure the connector with the information from your Azure resources (Form Recognizer cognitive service and Storage account).
•Train a Form Recognizer custom model from a connector action.
•Review and define the data extraction structure.
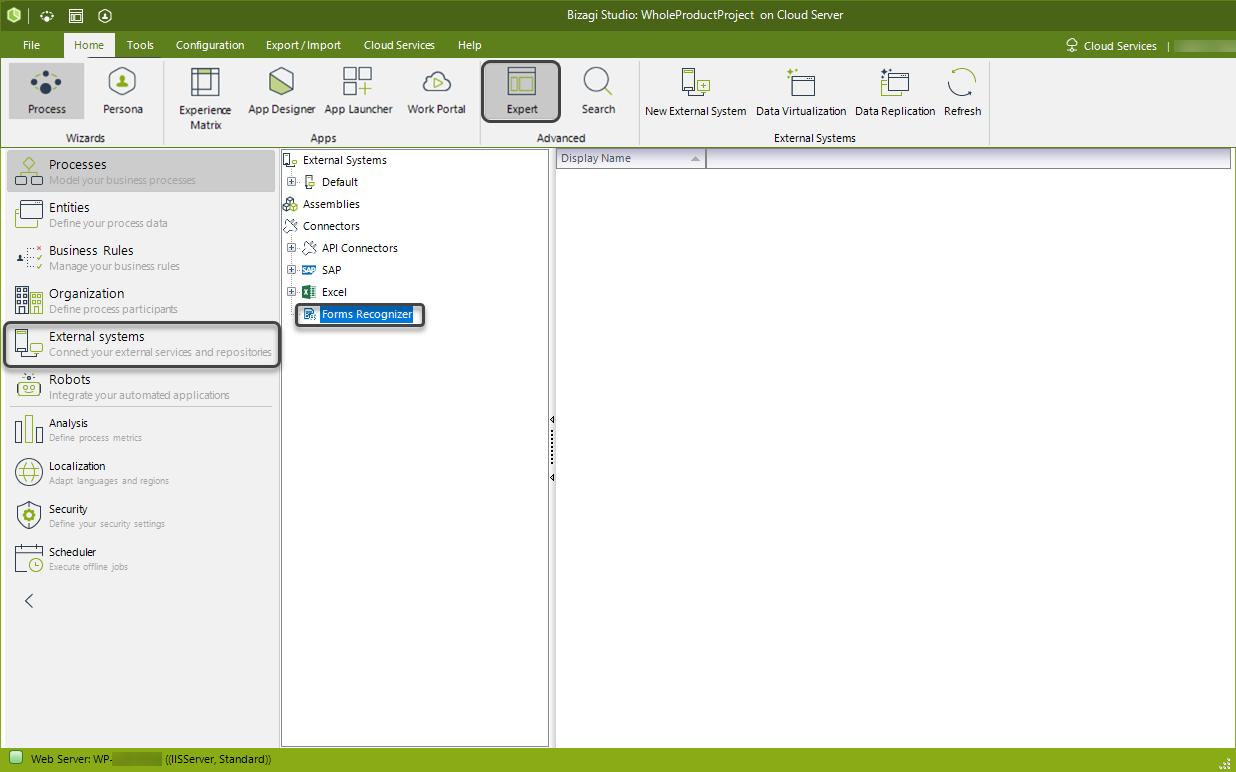
Once you have opened your Bizagi project in Bizagi Studio, change to the Expert view by clicking the button located in the top ribbon, and select External systems. In the Connectors list, look up for the Form Recognizer connector.
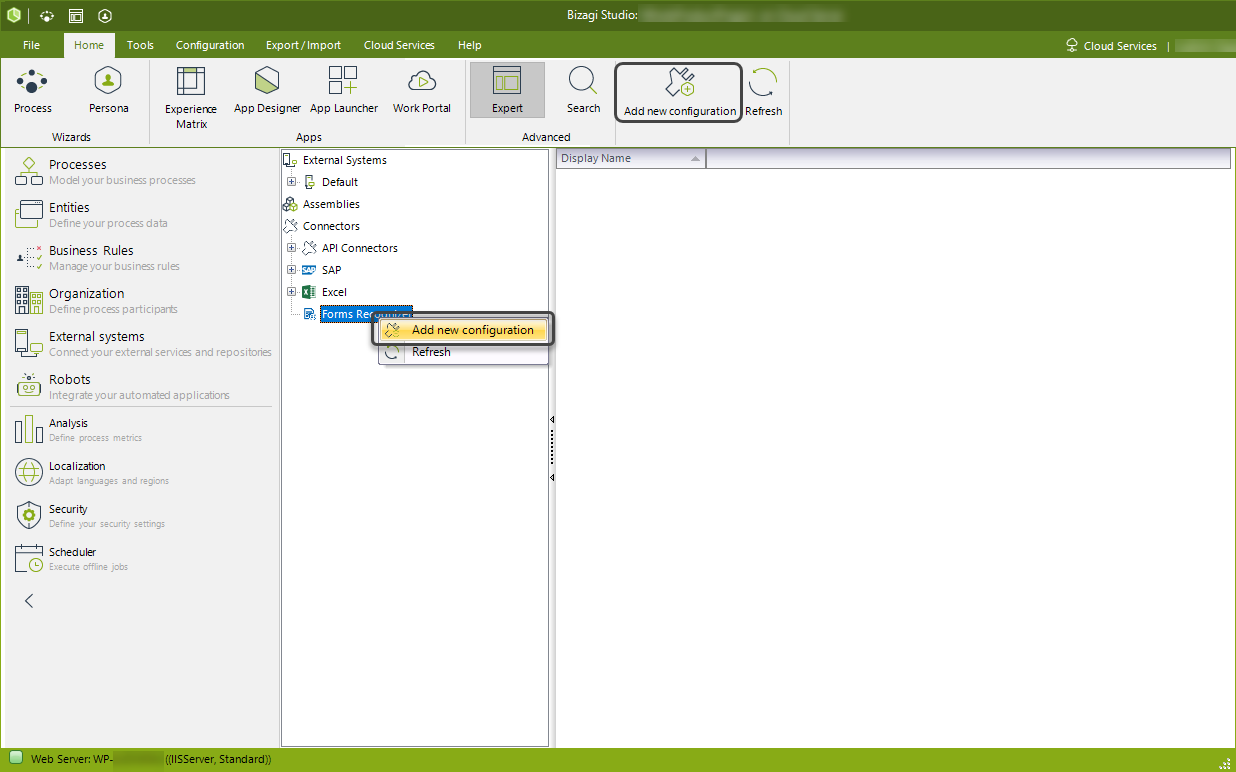
Right click the Form Recognizer node, and then click the Add new configuration option to open the connector configuration menu. You can also access this menu by clicking the same node, and then clicking the Add new configuration button located in the top ribbon.
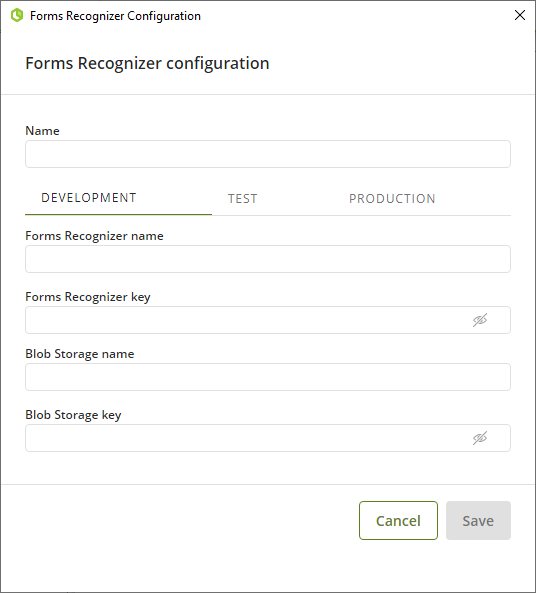
This menu allows you to configure the Form Recognizer connector in the different environments Bizagi Studio has (Development, Test and Production), and name this configuration for future consultation and modification from the Form Recognizer node.
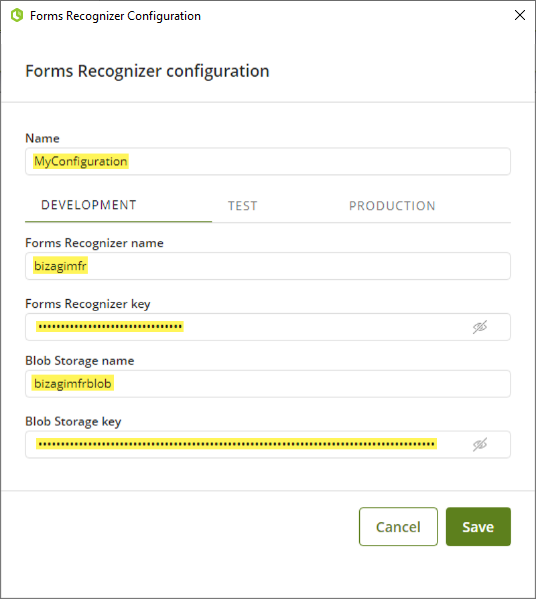
Once you have named your configuration, give a name also to the Form Recognizer Cognitive service (the Form Recognizer name field), and the Storage account (the Blob Storage name field). Likewise, configure the respective connection keys (the Form Recognizer key and Blob Storage key fields) with the information provided by these resources in your Azure subscription. For more information, refer to Finding the Azure resources' connection keys.
Train a Form Recognizer custom model
After you have configured the Form Recognizer connector, your configuration appears as a node (with the name you defined for it) inside the Form Recognizer list. Right click this node, and click the Add new action option to open the Form Recognizer custom model configuration wizard. You can also access this wizard by by clicking the same node, and then clicking the Add new action button located in the top ribbon.
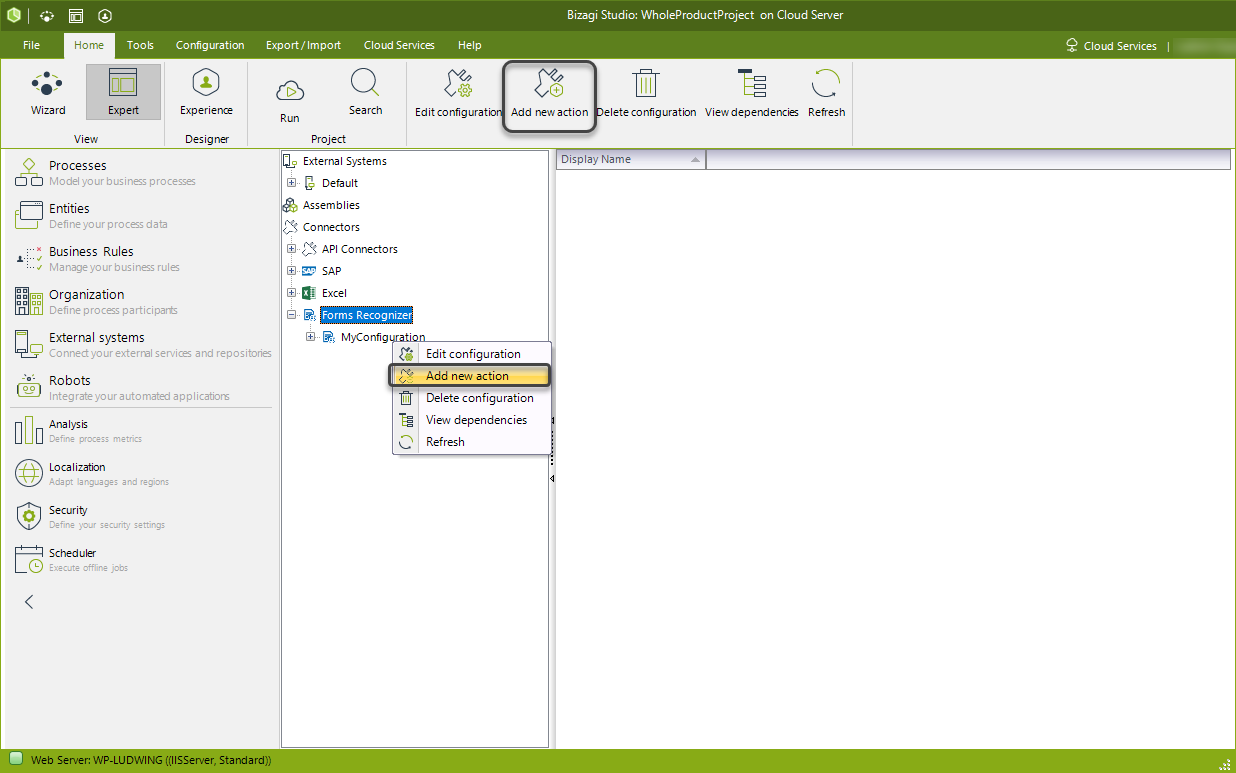
Notice that the custom model configuration wizard has 3 steps:
1. Setting a name for the model.
2. Uploading the files that are going to be analyzed to train the model.
3. Defining the data extraction structure.
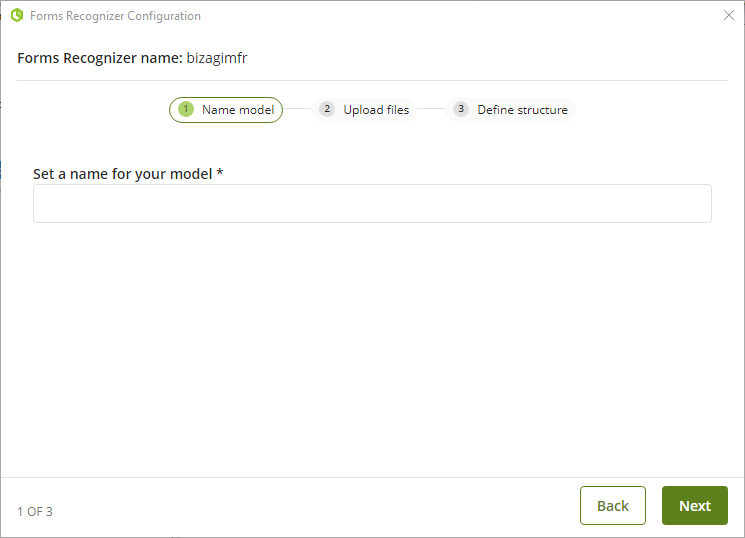
Start by giving a name to your custom model in the Set a name for your model* field. Once you have finished, click Next.

In the second step of the custom model configuration wizard, you must upload the files that serve as inputs to train and create your data extraction custom model. Before you select these files, bear in mind that the Form Recognizer service has a set of requirements for input documents.
Bizagi does not restrict the format of the files that can be uploaded, nor its characteristics. Thus, it is recommended that the files you select meet the requirements of the Form Recognizer service for the custom model to work correctly.
Recall also that Form Recognizer's custom models use machine learning to generate a data extraction structure. Hence, it is of utmost importance that the files you select are:
•Enough in number to train the model: the Forms Recognizer service suggests to use a minimum of 5 files; Bizagi recommends at least 6 to improve the model accuracy.
•Consistent between them: the files have the same structure or the same type (handprint documents, business cards, receipts, etc.).
As with the file format, Bizagi does not restrict the number of files you use to train the model, nor the consistency between them. You are responsible for training the model as adequately as possible. If you select high-quality input data, it will surely result in an accurate model and a high-caliber data extraction structure that fulfills your needs. If you decide to upload a file with an unsupported format, use less than 5 files to train the model, or combine types of files, you will probably get a faulty model and a poorly defined data extraction structure (or no structure at all).
Being aware of these requirements and recommendations, proceed to upload the model's training input files by clicking the Select files button.
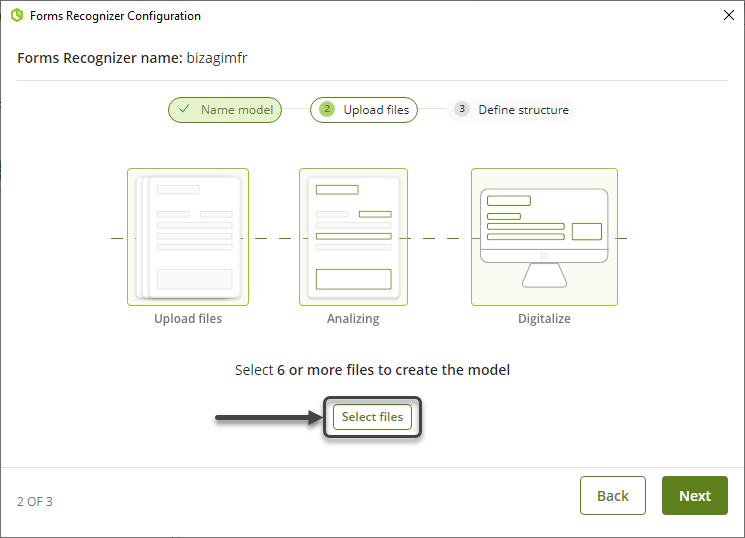
The File Explorer opens for you to select the input files. Search for the folder that has these files, choose the file format at the right bottom corner, and select at least 6 files that have the same structure or the same type.
|
Remember that you can improve the custom model's accuracy by uploading more than 6 files. 6 is the minimum number of files Bizagi suggests to train the model appropriately. |
In this example, the input files are handprint documents with a form structure and .tif as file format.
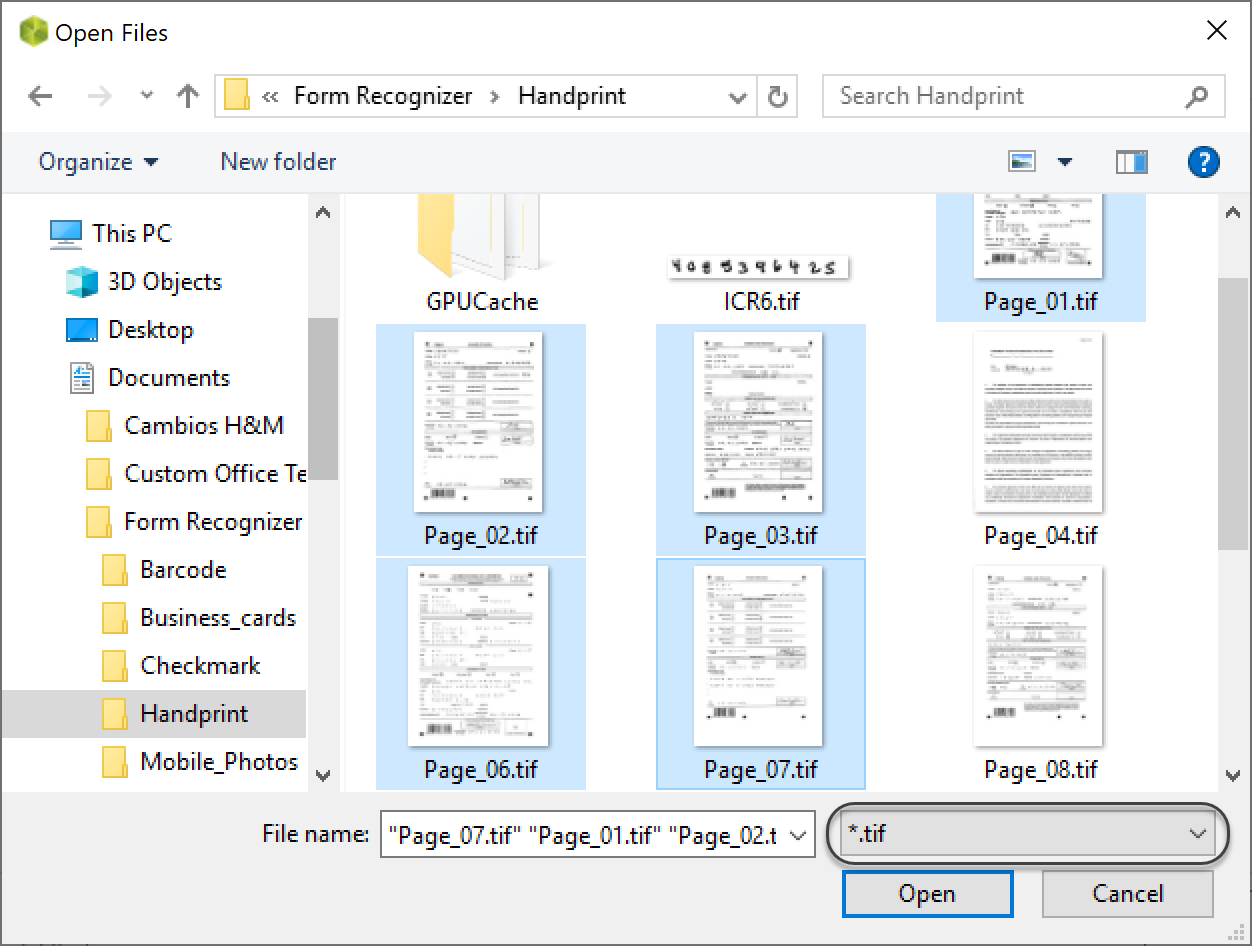
Once you have selected the desired files, click the Open button. You will return to the custom model configuration wizard, where Bizagi displays the selected files in a list, specifying the corresponding file extension for you to double-check that they adhere to the Form recognizer service requirements. If everything is okay, click the Next button.
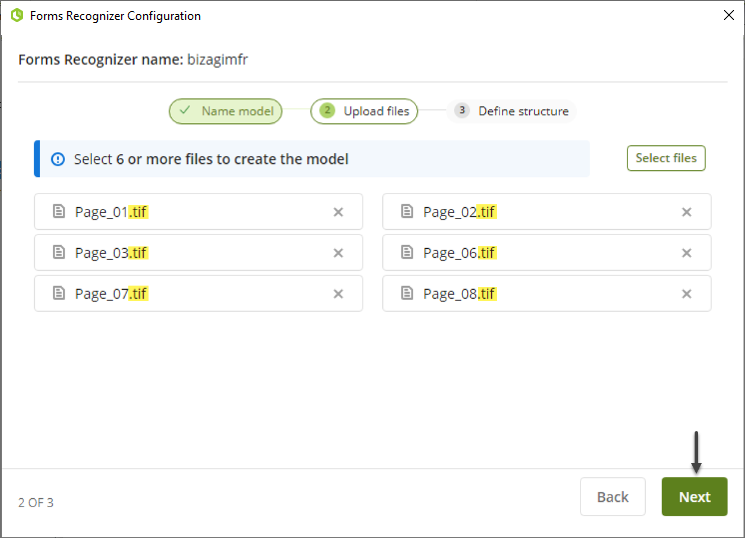
The Form Recognizer service analyzes the uploaded files to create the data extraction model. While this procedure is executed, Bizagi displays an Analyzing message on the screen.

After successful execution, Bizagi shows a confirmation message to let you know that the data extraction model has been created. Click the Next button to advance to the last step of the custom model configuration wizard: defining the data extraction structure.
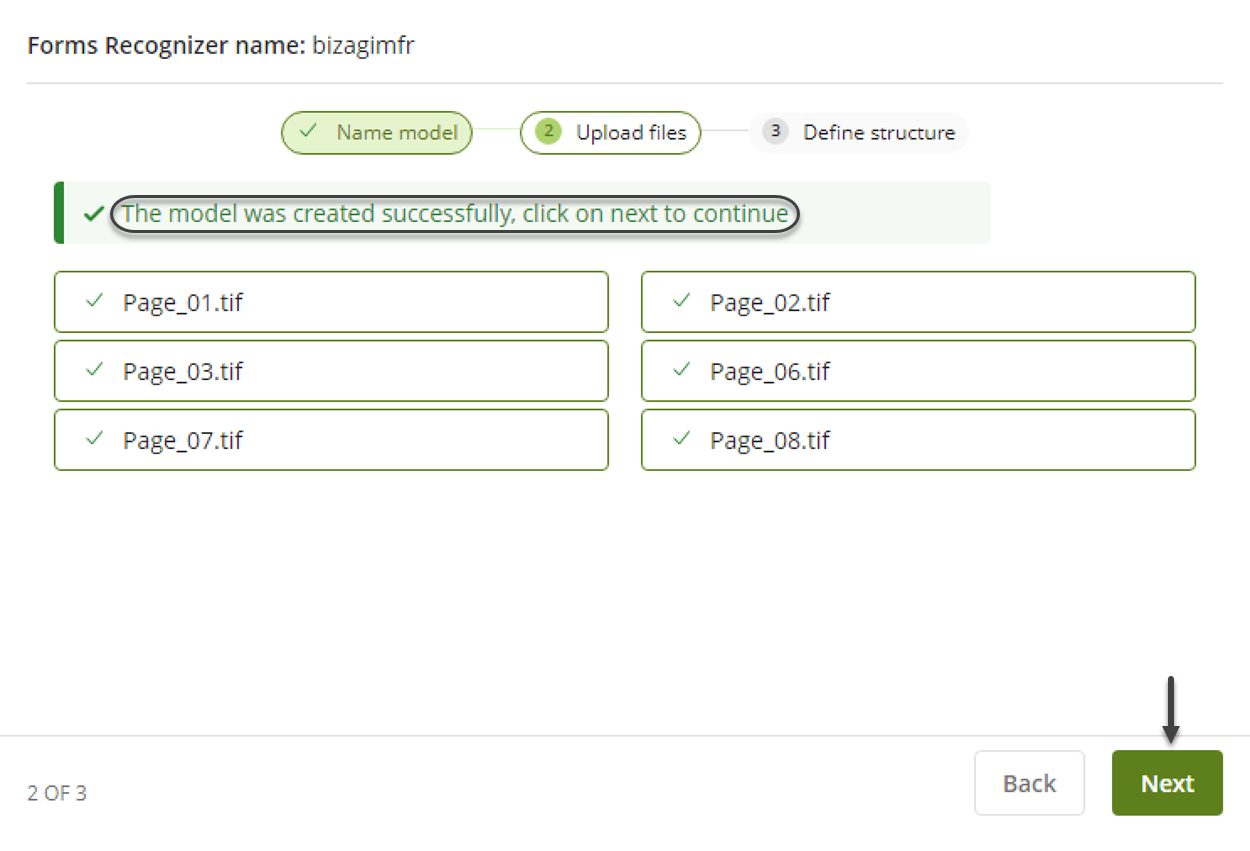
Review and define the data extraction structure
In the third step of the custom model configuration wizard, you must review the data extraction structure generated by your model and define it. Defining means that you have to establish which of the structure's fields are necessary, and map their data type.
For this purpose, Bizagi displays the data extraction structure in four columns: Field, Type, Element and Show/Hide.
•The Field column contains the data fields extracted by your custom model.
|
The data extracted by the custom model and displayed in Bizagi depends on the capabilities of the Form Recognizer service. Therefore, Bizagi is not responsible for form fields that are not recognized by the service. |
•The Type column specifies the data type for each field, and allows you to adjust it by selecting another type from a drop-down list. This list contains the data types Bizagi supports. For a Form Recognizer connector, the supported data types are: String, Boolean, Byte, Date, Decimal, Double and Integer. By default, all the extracted data fields have String as data type.
|
Bear in mind that you will have to map the data extracted by the Form Recognizer connector with the attributes defined in your Bizagi data model. To avoid mapping issues, it is of utmost importance that you choose correctly the data types. For more information on Bizagi's attribute types, refer to Attribute types. |
•The Element column points out the arrangement of the data when it was extracted by your model. Possible values are Single (if the extracted data was found in a single line, for example, a label) and Table (if the extracted data belongs to a table arrangement. For a table element, Bizagi lists the constituting data extracted by your model).
•Finally, the Show/Hide column has an eye icon that allows you to control whether or not you want to consider a field in your data extraction structure. By default, all the extracted data fields are considered in your structure and the eye icon appears as follows ![]() . Click the eye icon to hide a data field, and verify that the eye icon has changed to
. Click the eye icon to hide a data field, and verify that the eye icon has changed to ![]() .
.
To understand better the reviewing process, consider the data extraction structure generated by the model trained in the previous step:
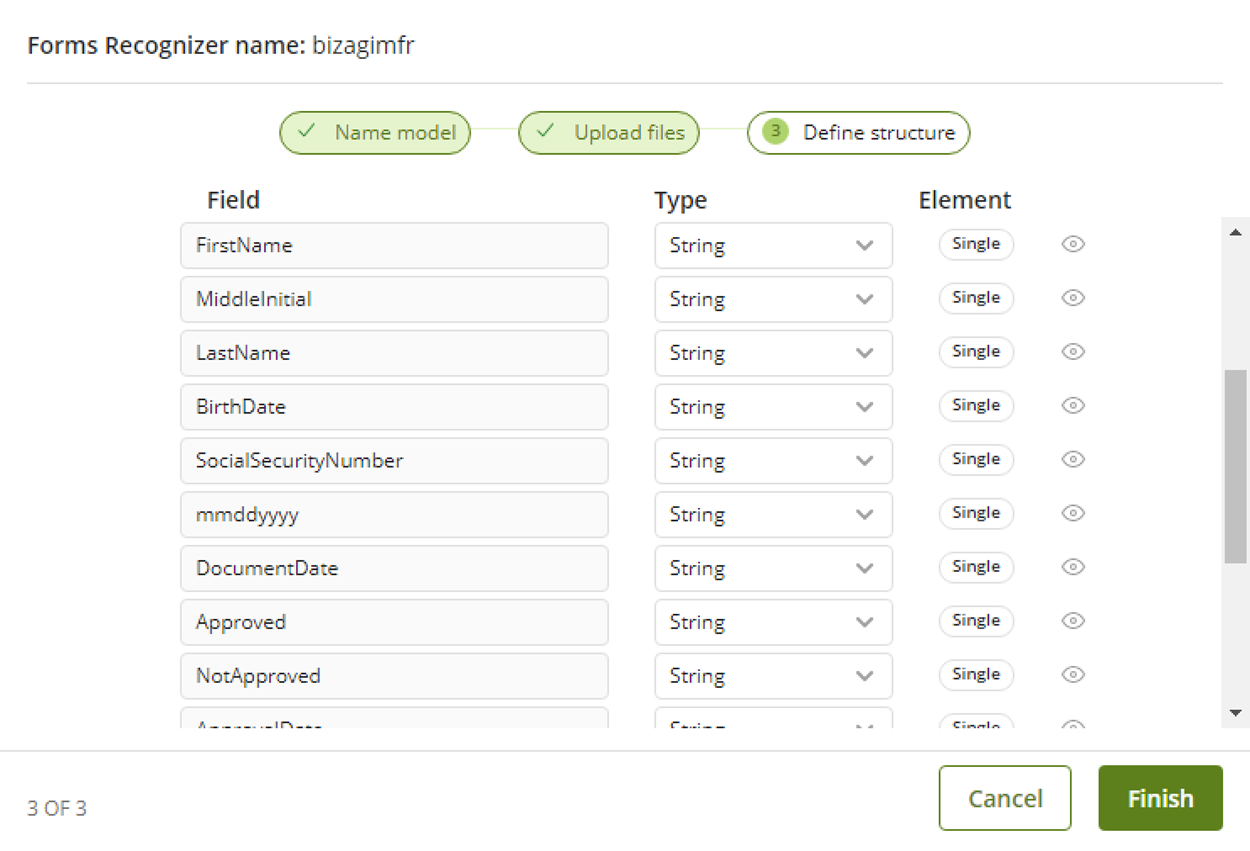
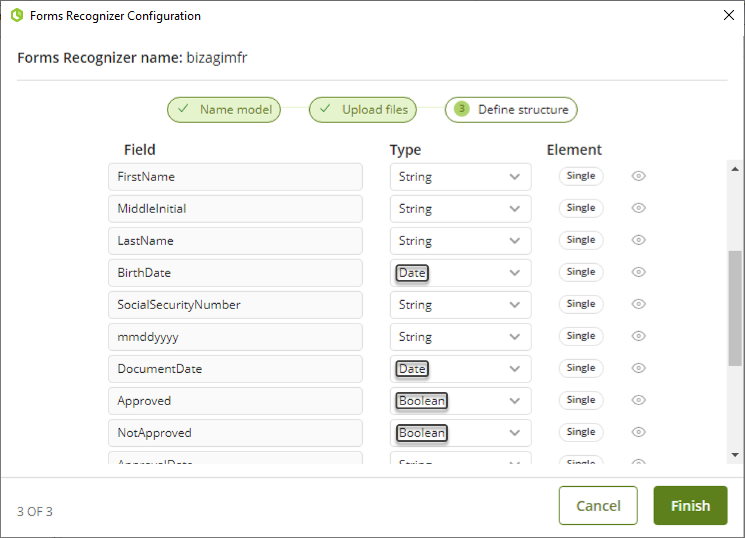
As mentioned before, you can observe that all the extracted data fields have String as data type, and are currently considered in the structure definition. However, assume that:
•You want to change the data type for the BirthDate and DocumentDate fields to Date.
•You want to change the data type for the Approved and NotApproved fields to Boolean.
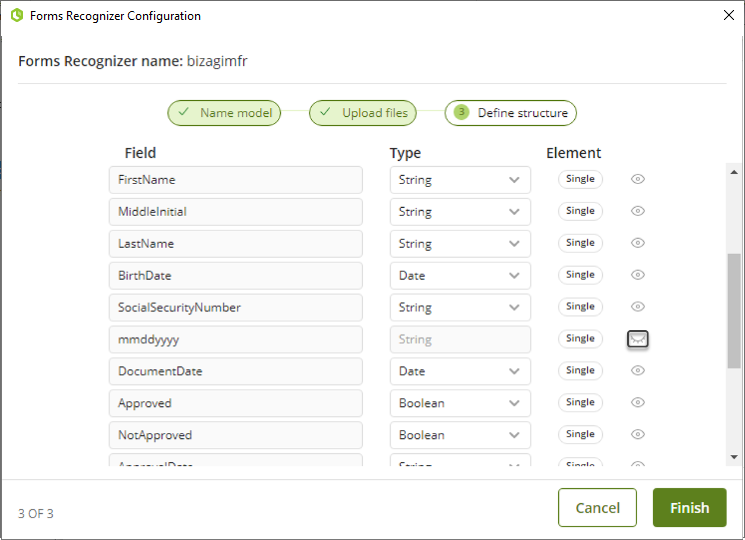
•The mmddyyyy field that was extracted by the model is the text that tells the client the format in which a date field must be filled, instead of a field itself.
Hence, the following changes must be made:
•Click the arrow icon next to the data type name to open the data types drop-down list. Select the appropriate data type for the field by clicking its name. For the example, the data type of the BirthDate field is changed as follows:
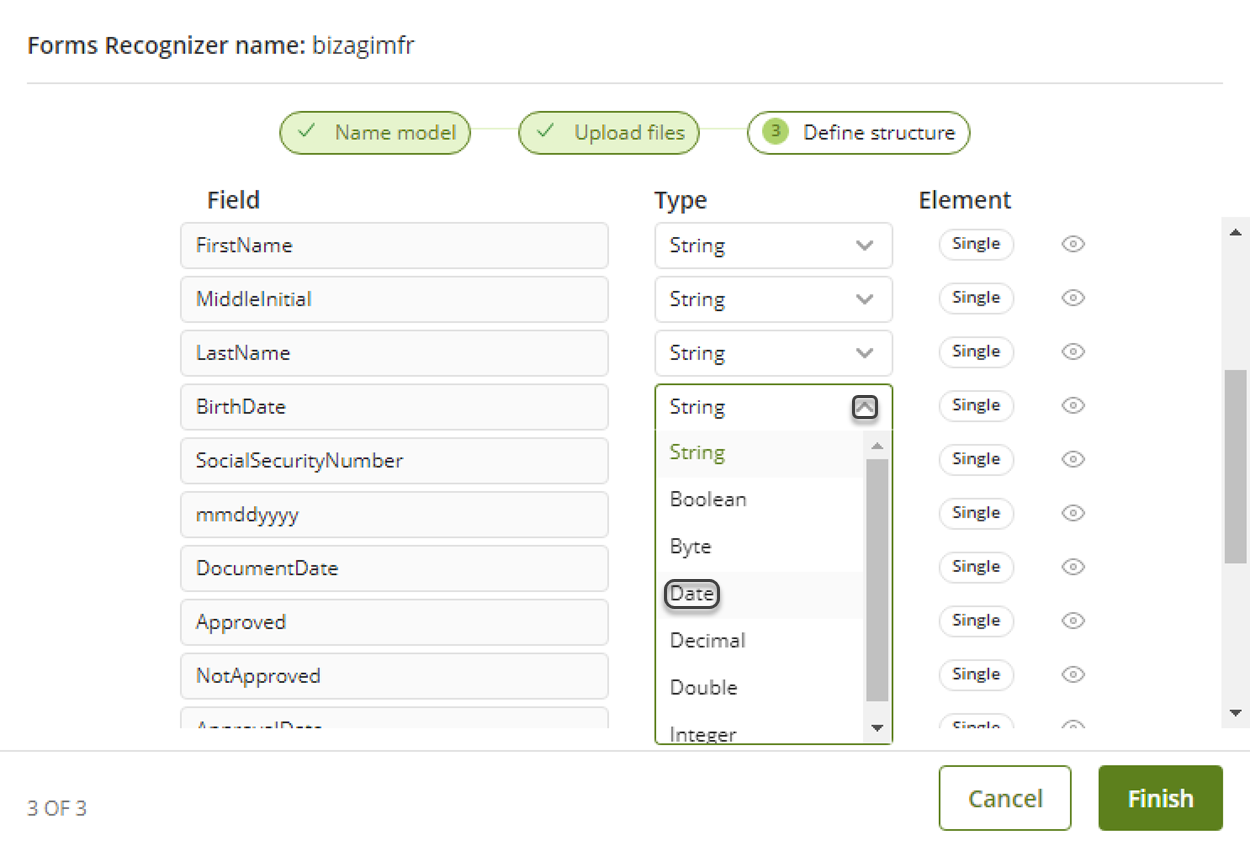
This process is repeated for the DocumentDate, Approved and NotApproved fields, selecting the corresponding data type. After successfully applying the changes, the structure is displayed as follows:
•Click the eye icon of the mmddyyyy field to hide it from your data extraction structure. Verify that the eye icon has changed to ![]() and, to double check, notice that the respective data type has been shaded and is now barely visible.
and, to double check, notice that the respective data type has been shaded and is now barely visible.
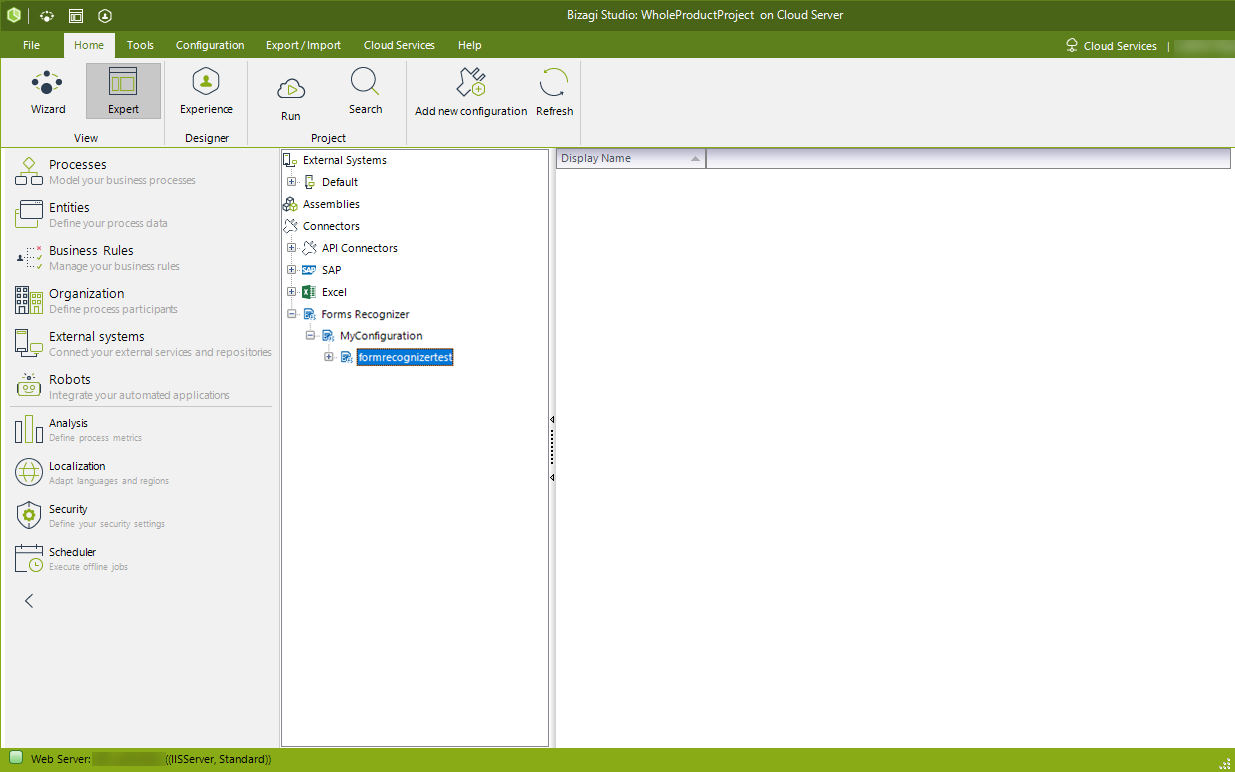
Once you have reviewed and defined your data extraction structure, click the Finish button. The connector appears as a node (with the name you defined for it) inside the connector's configuration node list.
Last Updated 8/21/2024 9:52:51 AM