Overview
This section illustrates a step-by-step example that creates a Custom connector.
The example will post a new message in Twitter from a Bizagi process.
For more information about this feature, refer to Custom connectors.
Before you start
Recall that in order to connect to cloud services such as those provided by Twitter, you usually need a valid application granted with enough rights to access your account. For further information, review the section on creating an application and obtaining authorization credentials in the article Configuring and Using the Twitter Connector.
Creating and Configuring the Process in Bizagi Studio
For this purpose and to illustrate its potential, we will emulate an online newspaper company publishing links to their news in their Twitter account.
We will use the following process:
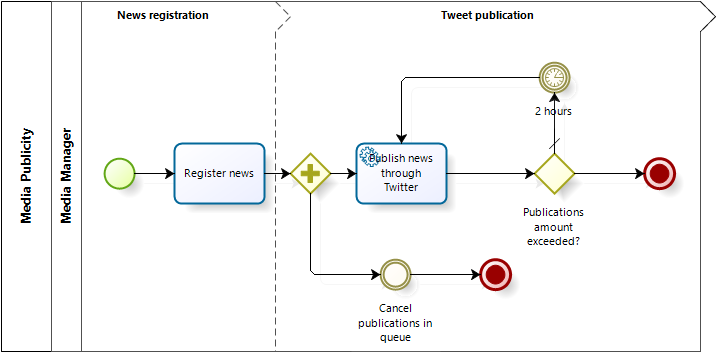
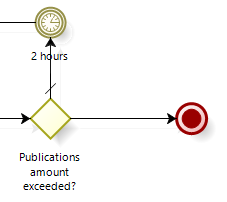
The idea behind this process is that every time a new case is created, the news is published (in an URL) along with setting a predefined number of time for which the news will be announced via Twitter (every 2 hours). And, this case can be canceled at any time.
To configure the connector with this process, we will illustrate how to implement the process, and then how to use the connector in it.
Implementing the process
Based on the BPMN model of the process as shown above, further implementation details will consider the following aspects:
1.Use this data model:
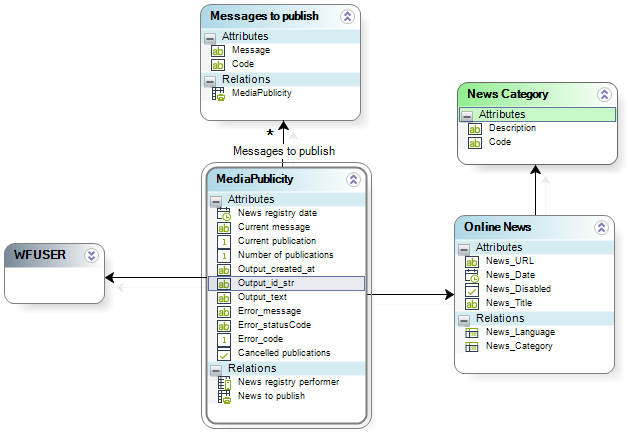
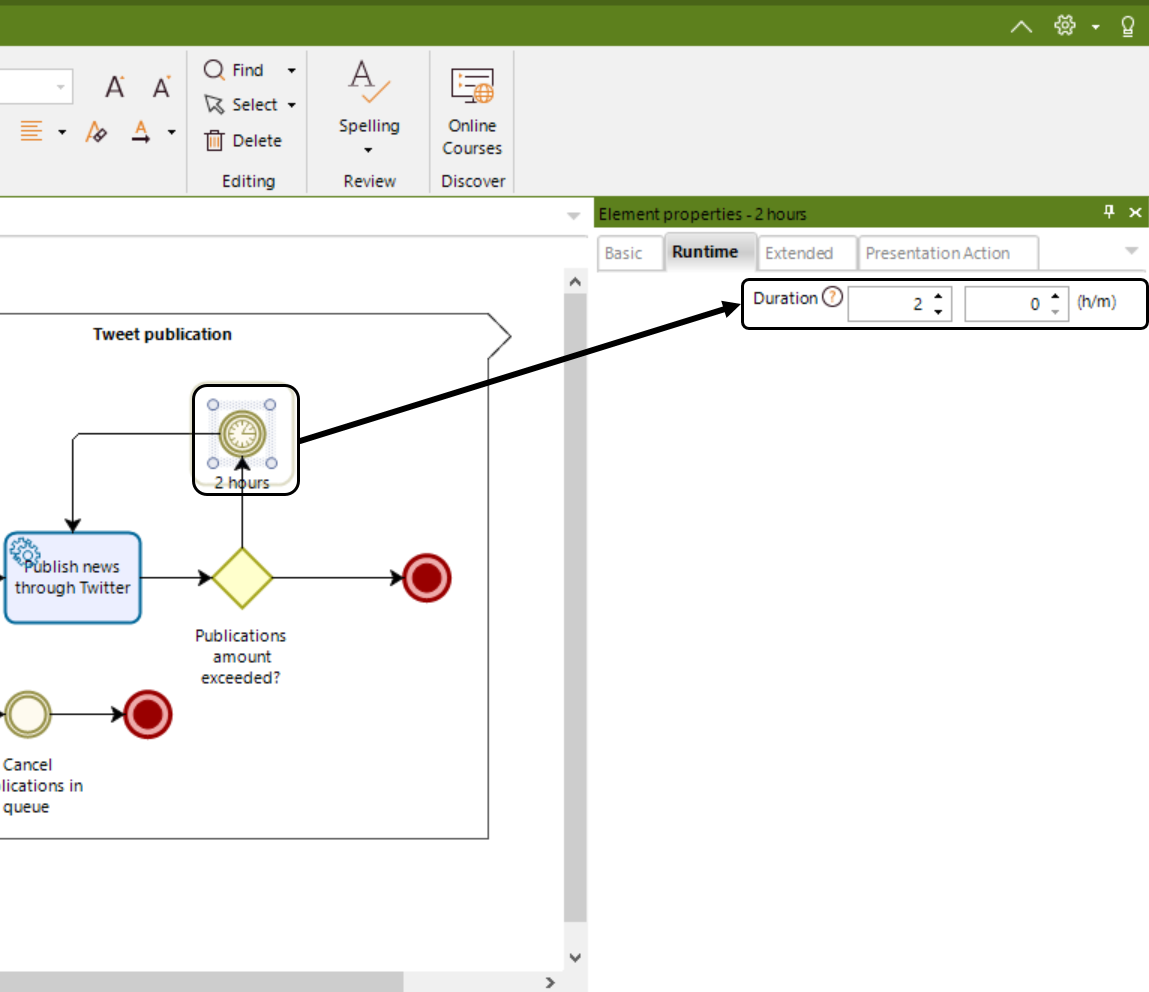
2.Configure the wait time of the timer in the Process Model.
3.Define the form for the Register News task.
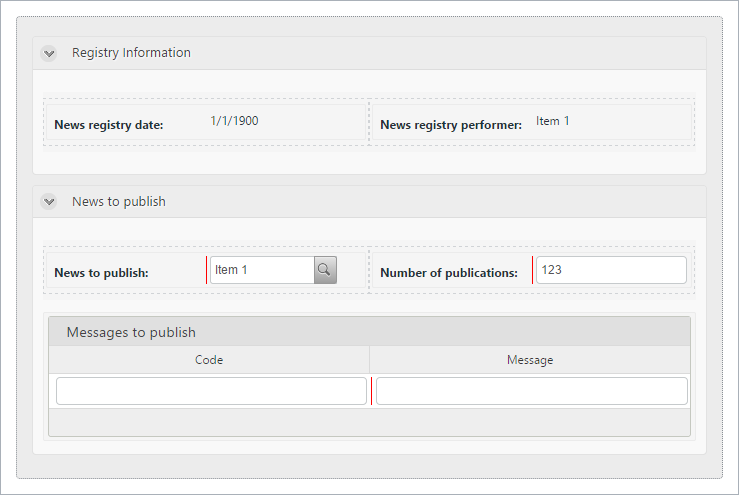
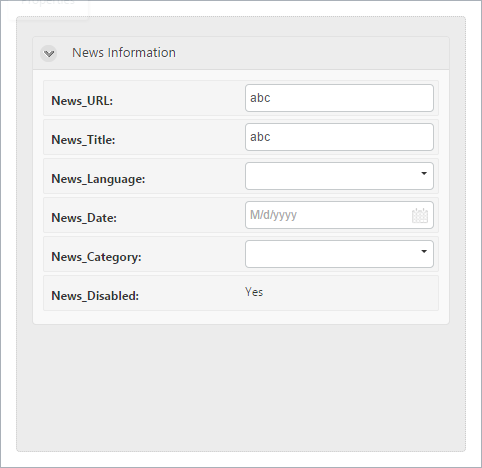
4.Define the form that manages information of the news:
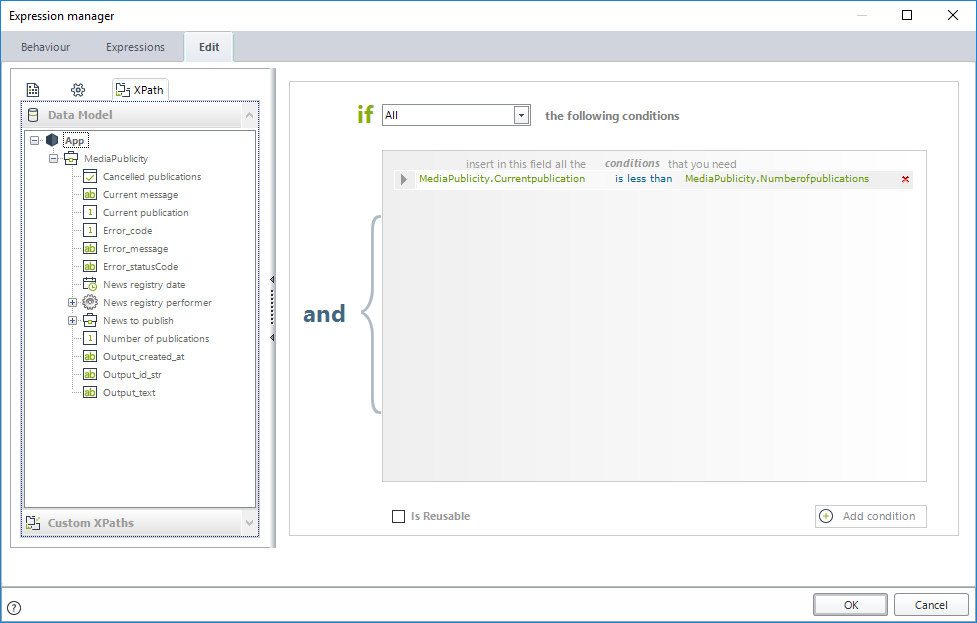
5.Configure logic in the gateway (allowing to publish again only when the total of previous publications has not exceeded that predefined amount):
6.Define a rule to be executed for the Register news task (which assigns the current date and user):
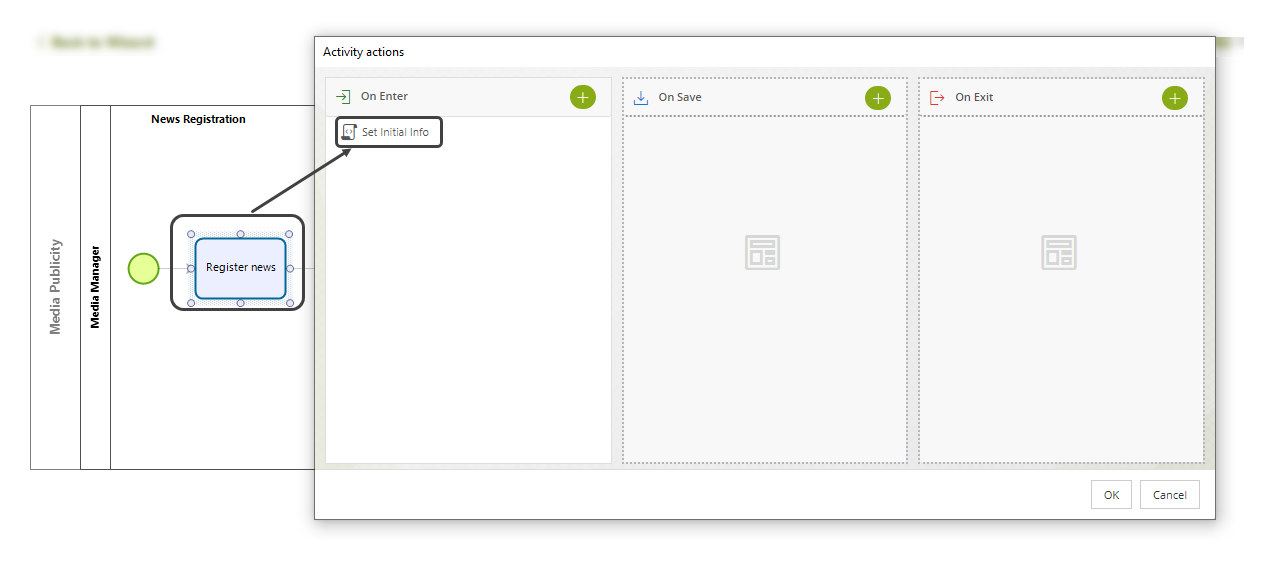
//Case information
<MediaPublicity.Newsregistrydate> = DateTime.Today;
<MediaPublicity.Newsregistryperformer> = Me.Case.WorkingCredential.UserId;
7.Define a rule to be executed for the Publish news through Twitter task.
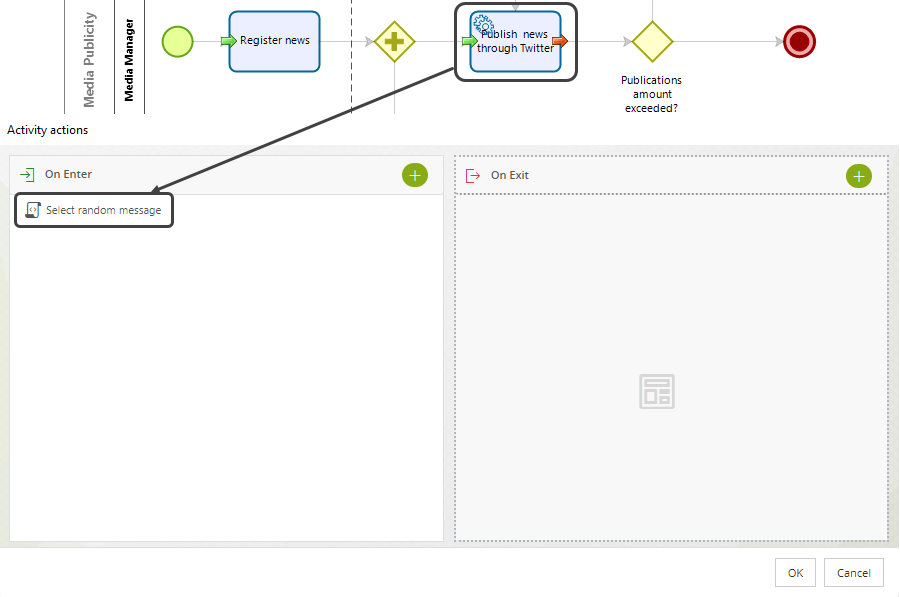
Select a random message to post in Twitter (from a list of predefined ones):
var MessagesEntity = CHelper.GetValueAsCollection(<MediaPublicity.Messagestopublish>);
var MessagesAmount = MessagesEntity.size();
var randNumb = CHelper.Math.Rand(0,MessagesAmount-1);
var MessageToPublish = MessagesEntity.get(randNumb).getXPath("Message");
Me.setXPath("MediaPublicity.Currentmessage",MessageToPublish);
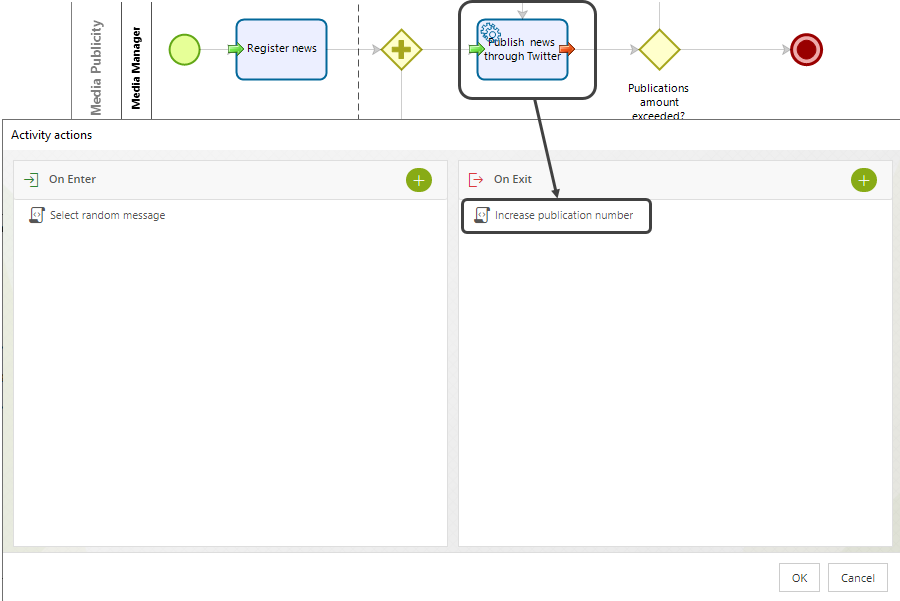
Increase the total of published links:
<MediaPublicity.Currentpublication> = <MediaPublicity.Currentpublication>+1;
Creating the connector
To create a Twitter connector, we illustrate how to first find a library to connect and then how to rely on that library through a new connector.
1. Finding a Node.Js library
Download from https://www.npmjs.com/, a Node.Js library to be used as a connection driver within the connector.
Refer to the documentation of the libraries themselves, or even their code, to pay special attention to how the libraries are used, including the configuration of input and output parameters.
In this example, we will use the twit library (created by ttezel).
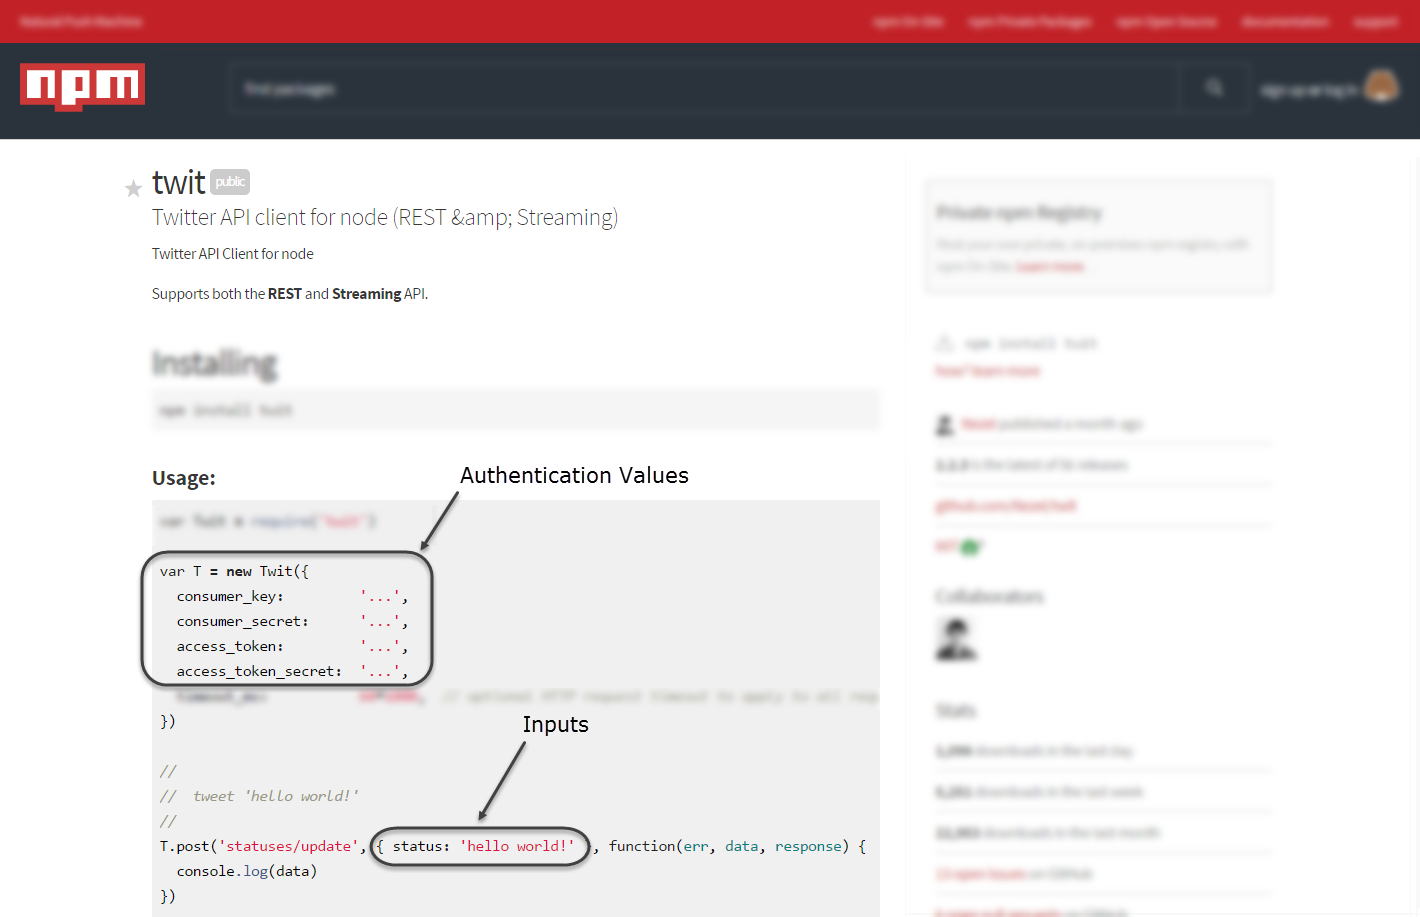
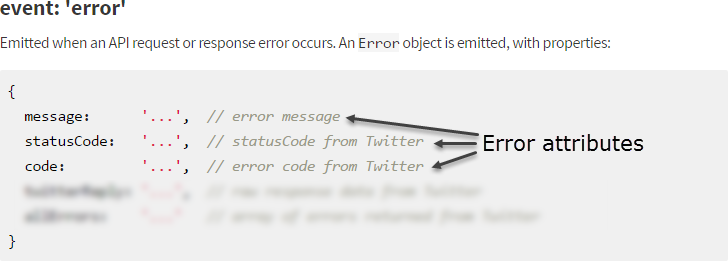
If not enough documentation is presented regarding the output structure and further optional parameters, you may always browse as well the application's API.
For this example you can review:
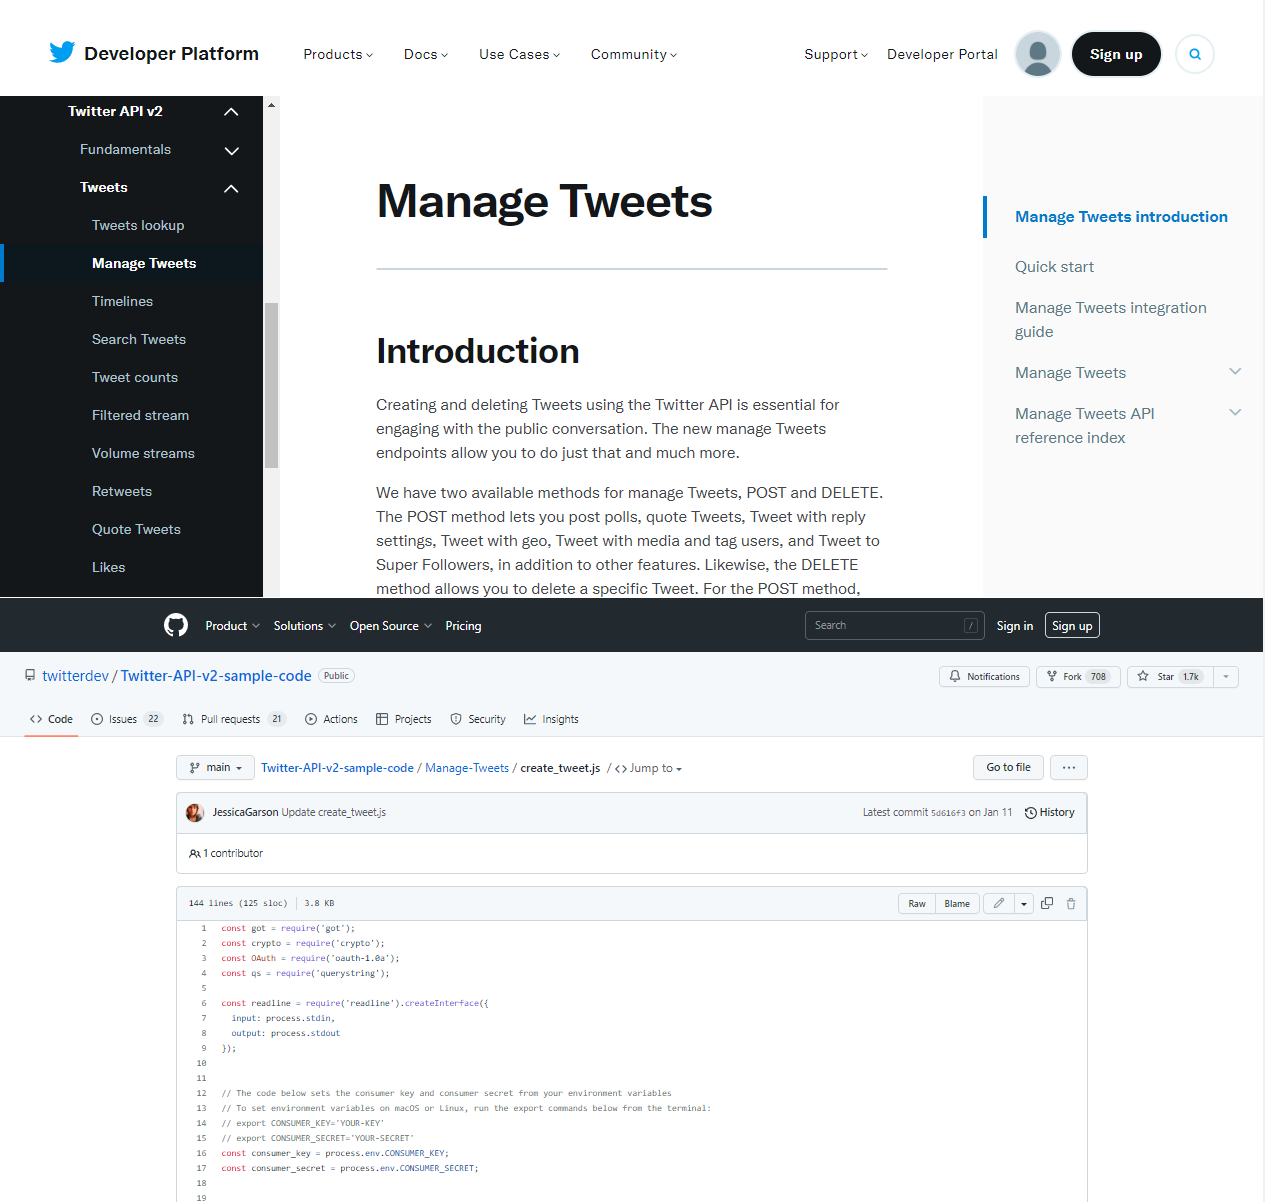
•API Documentation: https://developer.twitter.com/en/docs/twitter-api/tweets/manage-tweets/introduction
•GitHub repository with sample codes: https://github.com/twitterdev/Twitter-API-v2-sample-code
2. Creating a new Custom connector
Access the Integration Hub and create a new custom connector with these steps.
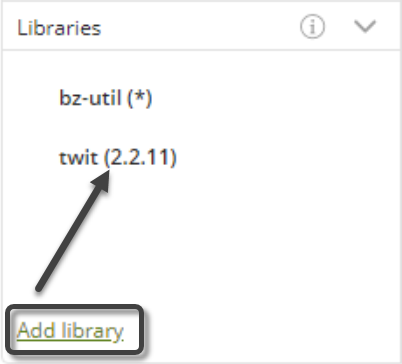
a.Add the downloaded libraries to the connector. For this example, the twit library is added to the connector.
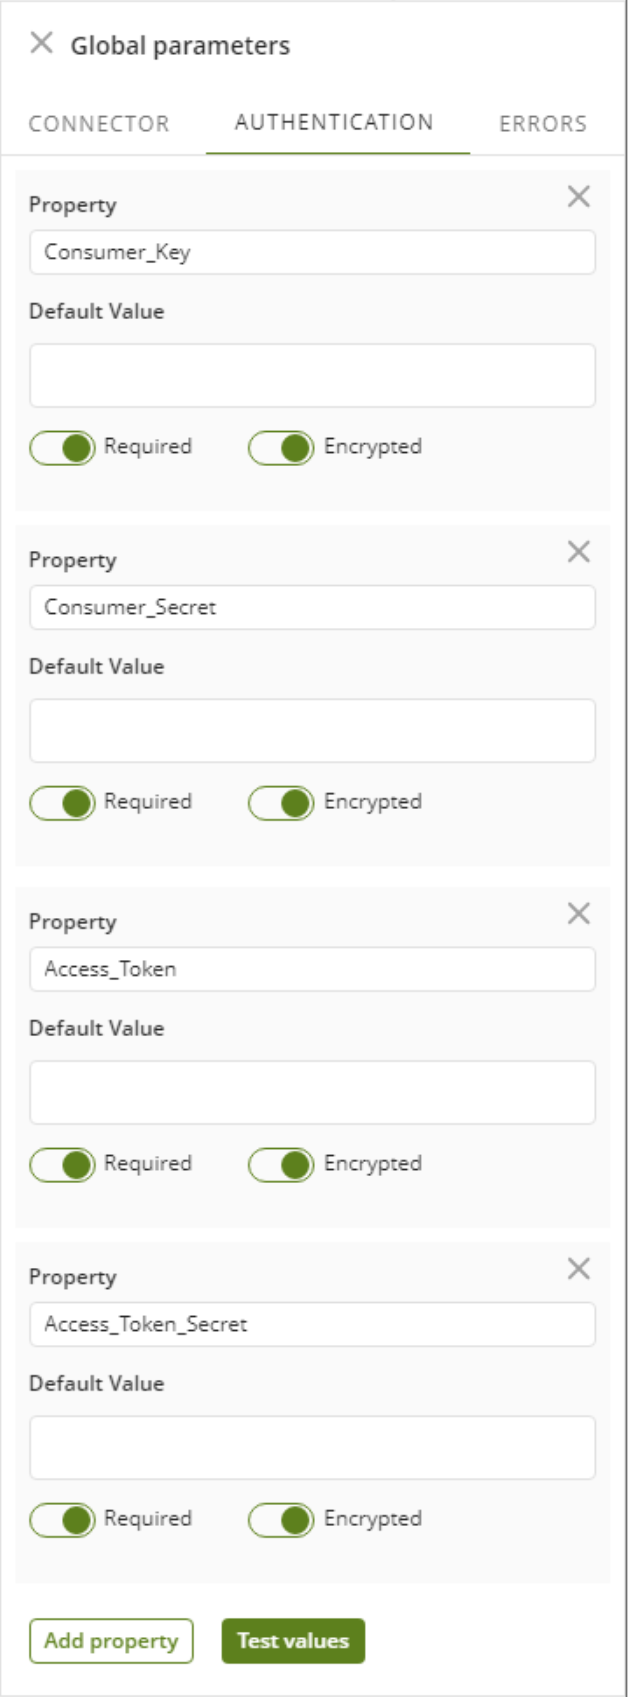
b.Add the authentication parameters.
|
Since these parameter values will hold sensitive information, field encryption should be used. This will change the input of the values in Bizagi Studio from a simple text field to a password field (making it protected when attempting to retrieve the values stored in these parameters). |
c.Add an Action and set its properties. Keep in mind that its Name and Description will be shown when configuring the use of the connector from within processes.
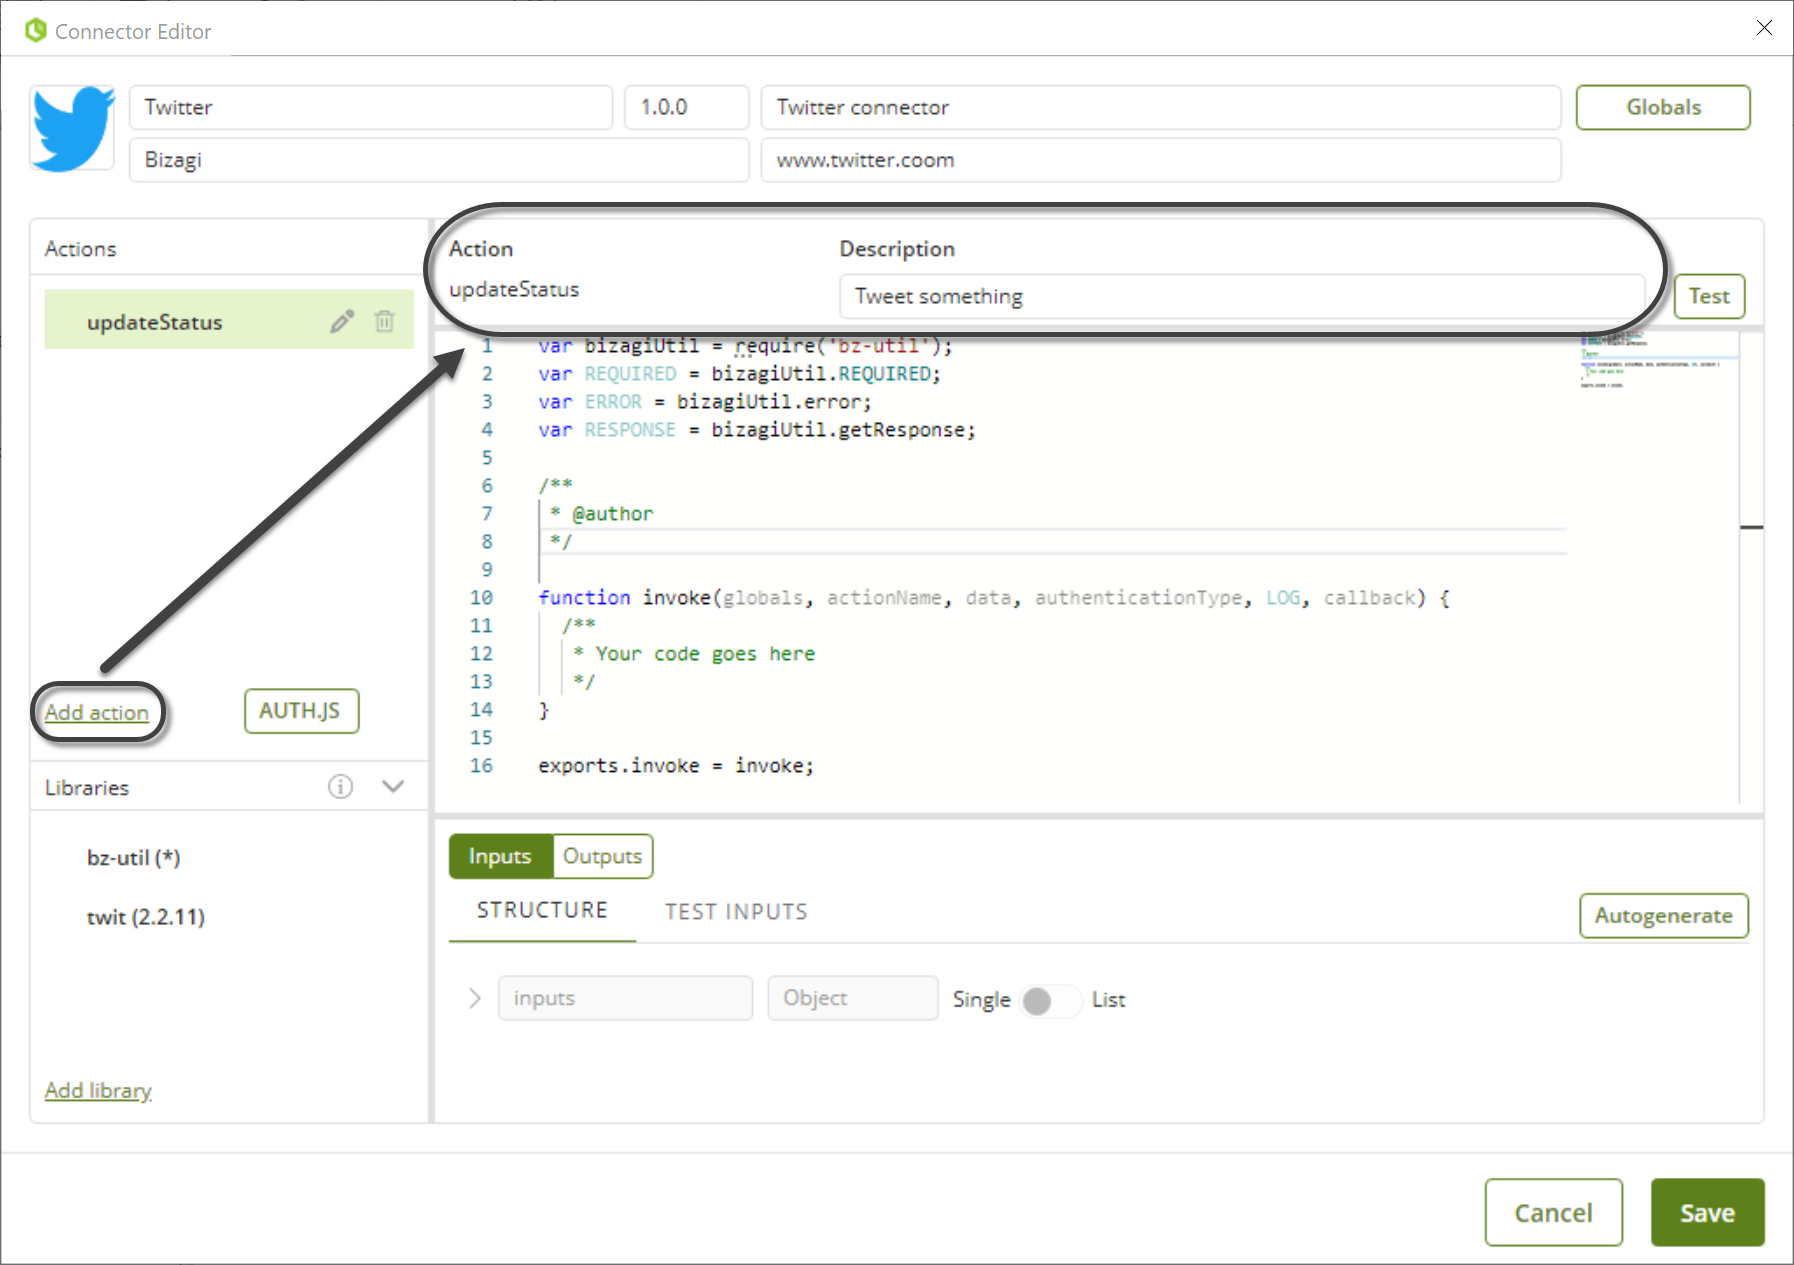
d.Define the Inputs structure (you do not need to include all fields; only those you detect are mandatory and make sense for your connector).
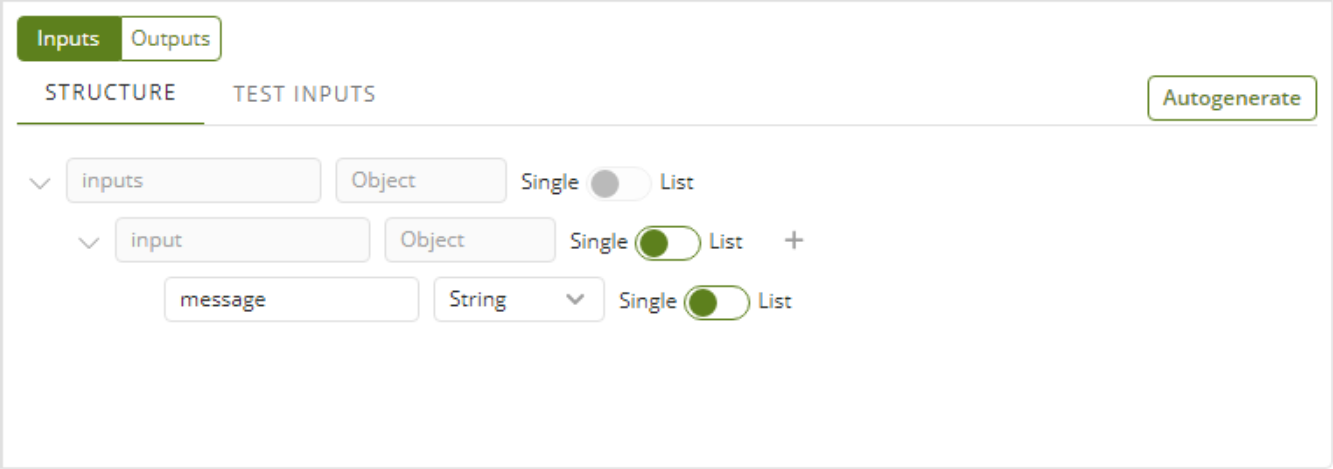
e.Define the Outputs structure (you do not need to include all fields; only those you detect are helpful).
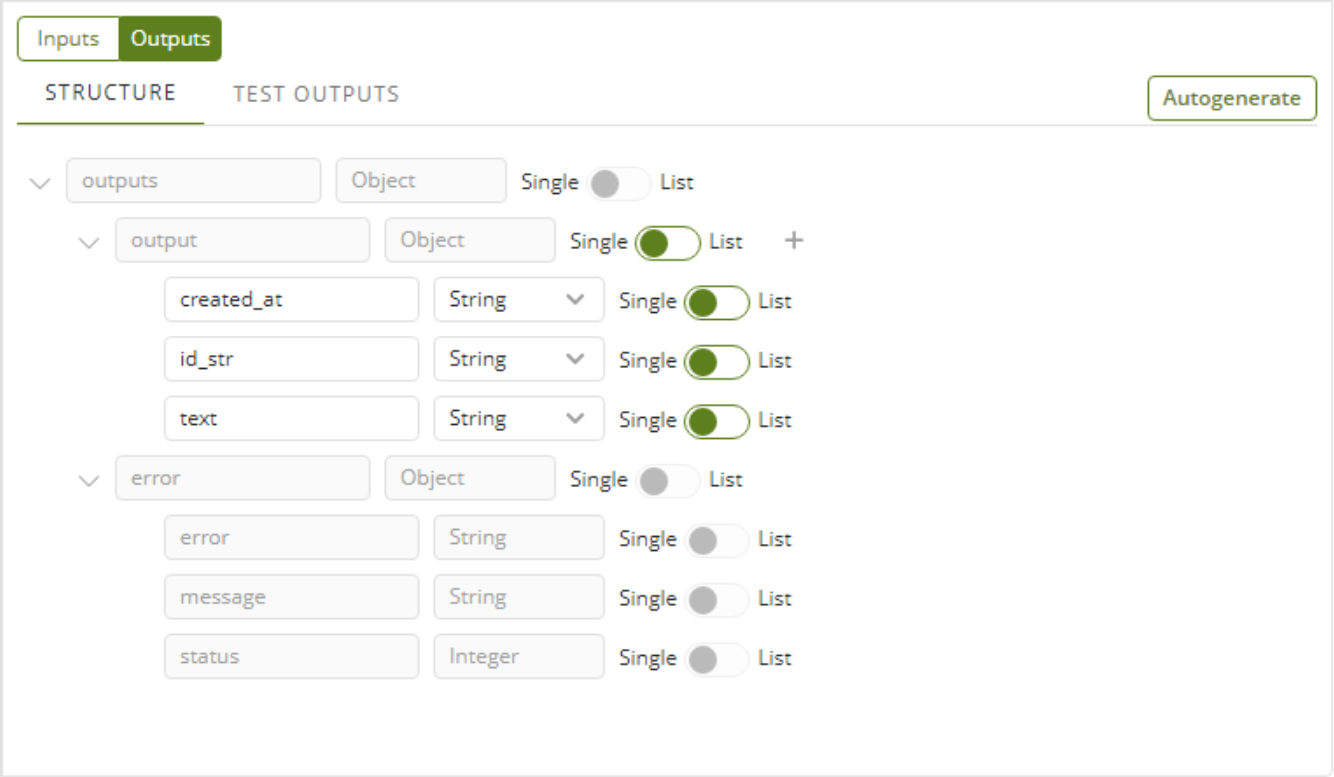
f.Add the code of the action to specify its behavior.
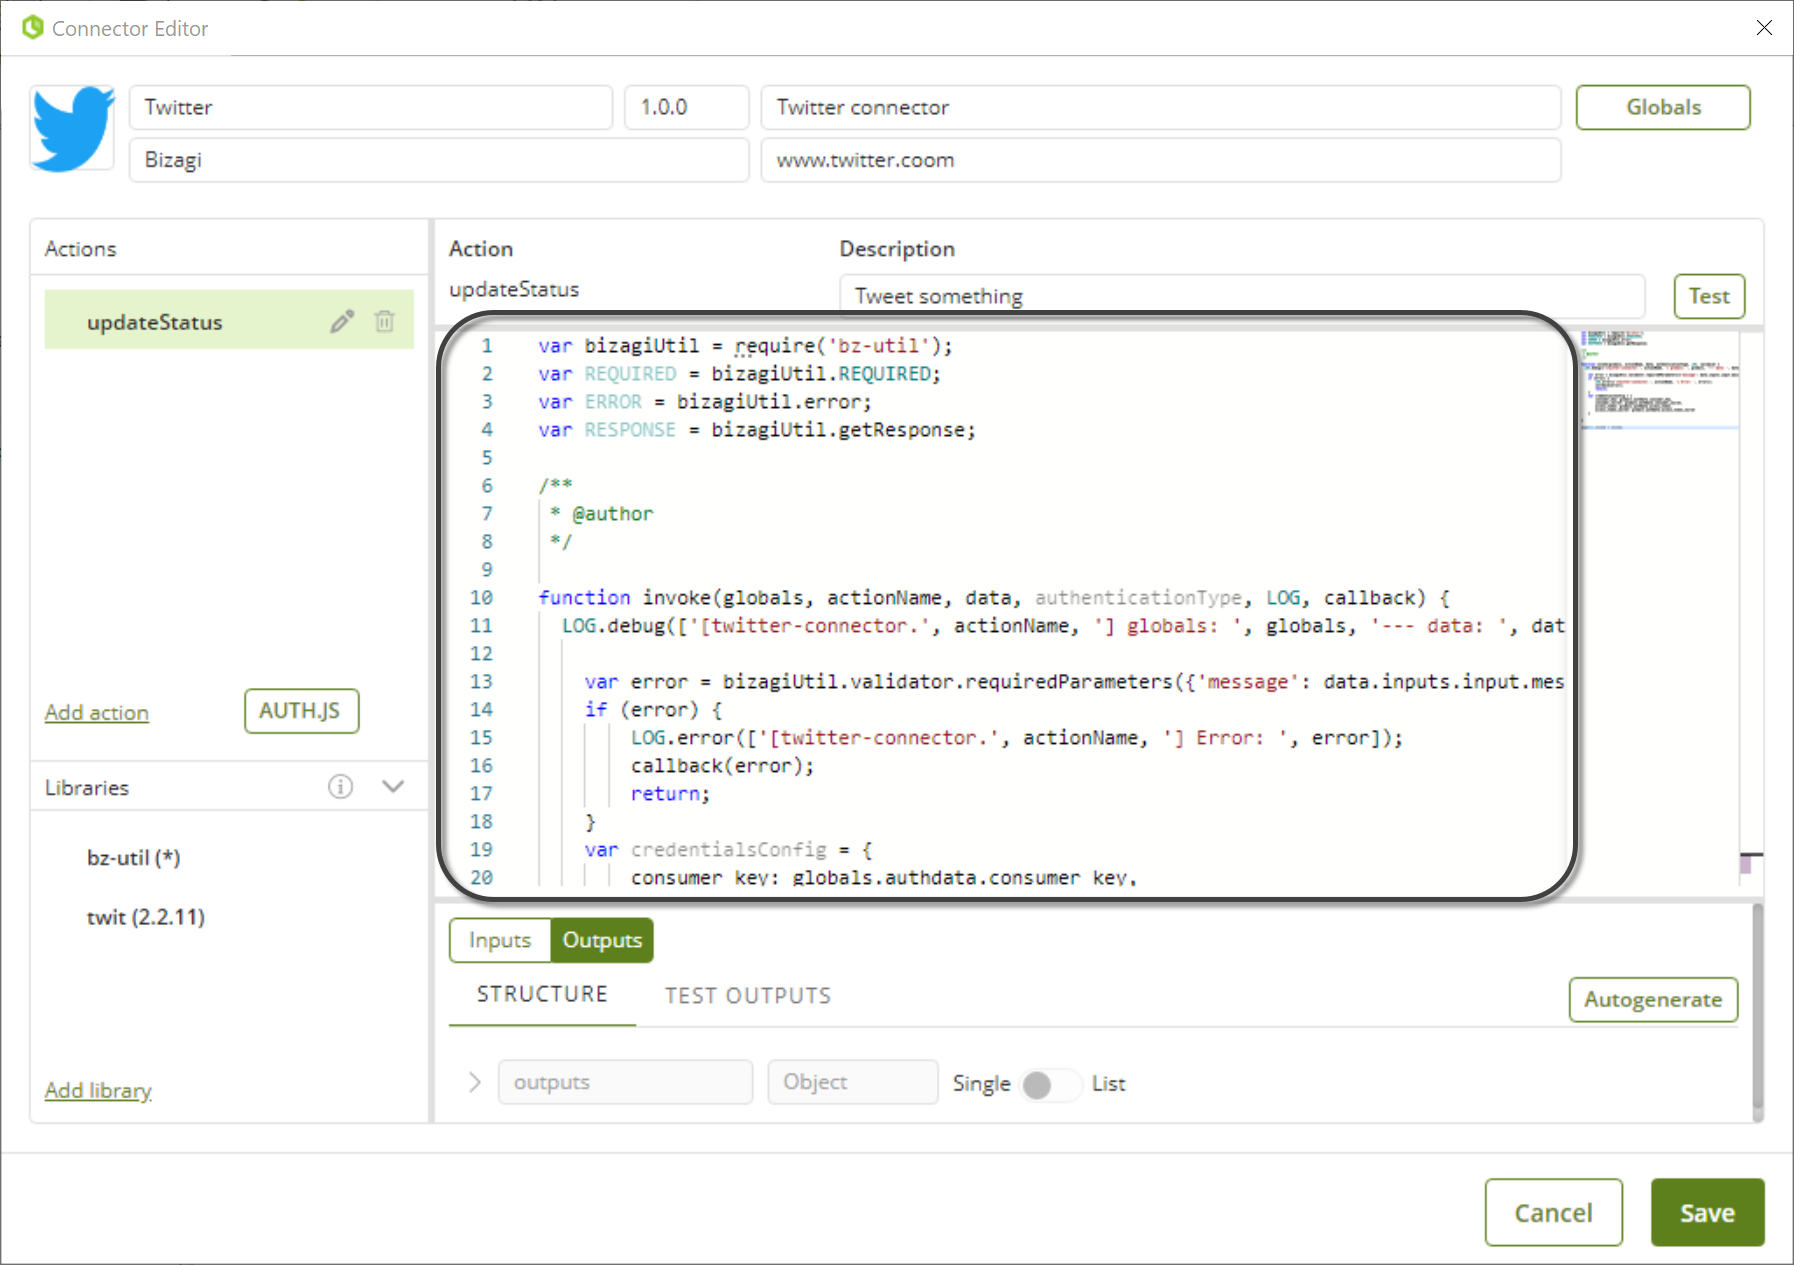
In this example, the following code is used (click to expand and view it):
var bizagiUtil = require('bz-util'); var REQUIRED = bizagiUtil.REQUIRED; var ERROR = bizagiUtil.error; var RESPONSE = bizagiUtil.getResponse; var TwitterService = REQUIRED('twitter-api-v2'); var got = require('got'); var crypto = require('crypto-js'); var OAuth = require('oauth-1.0a'); var qs = require('querystring');
/** * * @author Bizagi * */ function invoke(globals, actionName, data, authenticationType, LOG, callback) { LOG.debug(['[twitter-connector.', actionName, '] globals: ', globals, '--- data: ', data]);
var error = bizagiUtil.validator.requiredParameters({'message': data.inputs.input.message, 'callback': callback}); if (error) { LOG.error(['[twitter-connector.', actionName, '] Error: ', error]); callback(error); return; } var credentialsConfig = { consumer_key: globals.authdata.consumer_key, consumer_secret: globals.authdata.consumer_secret, //access_token_key: globals.authdata.access_token, //access_token_secret: globals.authdata.access_token_secret }
var data = { "text": "Hello world!" }; var endpointURL = `https://api.twitter.com/2/tweets`; var requestTokenURL = 'https://api.twitter.com/oauth/request_token?oauth_callback=oob&x_auth_access_type=write'; var authorizeURL = new URL('https://api.twitter.com/oauth/authorize'); var accessTokenURL = 'https://api.twitter.com/oauth/access_token'; var oauth = OAuth({ consumer: { key: consumer_key, secret: consumer_secret }, signature_method: 'HMAC-SHA1', hash_function: (baseString, key) => crypto.HmacSHA1(baseString, key); });
async function requestToken() { const authHeader = oauth.toHeader(oauth.authorize({ url: requestTokenURL, method: 'POST' }));
const req = await got.post(requestTokenURL, { headers: { Authorization: authHeader["Authorization"] } }); if (req.body) { return qs.parse(req.body); } else { throw new Error('Cannot get an OAuth request token'); } }
async function accessToken({ oauth_token, oauth_token_secret }, verifier) { const authHeader = oauth.toHeader(oauth.authorize({ url: accessTokenURL, method: 'POST' })); const path = `https://api.twitter.com/oauth/access_token?oauth_verifier=${verifier}&oauth_token=${oauth_token}` const req = await got.post(path, { headers: { Authorization: authHeader["Authorization"] } }); if (req.body) { return qs.parse(req.body); } else { throw new Error('Cannot get an OAuth request token'); } }
async function getRequest({ oauth_token, oauth_token_secret }) {
const token = { key: oauth_token, secret: oauth_token_secret };
const authHeader = oauth.toHeader(oauth.authorize({ url: endpointURL, method: 'POST' }, token));
const req = await got.post(endpointURL, { json: data, responseType: 'json', headers: { Authorization: authHeader["Authorization"], 'user-agent': "v2CreateTweetJS", 'content-type': "application/json", 'accept': "application/json" } }); if (req.body) { var reply = RESPONSE(req.body, null, 200); LOG.info(['[twitter-connector.', actionName, '] Response Success for ... statuses/update, {status:', message, '}']); callback(reply); } else { var error = RESPONSE(null, 'error', error.statusCode, ERROR('TWITTER.ERROR', [error.statusCode, error.code, error.message])); LOG.error(['[twitter-connector.', actionName, '] Error: ', error]); callback(error); } }
(async () => { try { // Get request token const oAuthRequestToken = await requestToken(); // Get authorization authorizeURL.searchParams.append('oauth_token', oAuthRequestToken.oauth_token); console.log('Please go here and authorize:', authorizeURL.href); const pin = await input('Paste the PIN here: '); // Get the access token const oAuthAccessToken = await accessToken(oAuthRequestToken, pin.trim()); // Make the request const response = await getRequest(oAuthAccessToken); console.dir(response, { depth: null }); } catch (e) { console.log(e); process.exit(-1); } process.exit(); })(); //var twService = new TwitterService(credentialsConfig); //var message = data.inputs.input.message;
LOG.info(['[twitter-connector.', actionName, '] invoke... statuses/update, {status: ', message, '}']);
} exports.invoke = invoke; |
g.Save the connector.
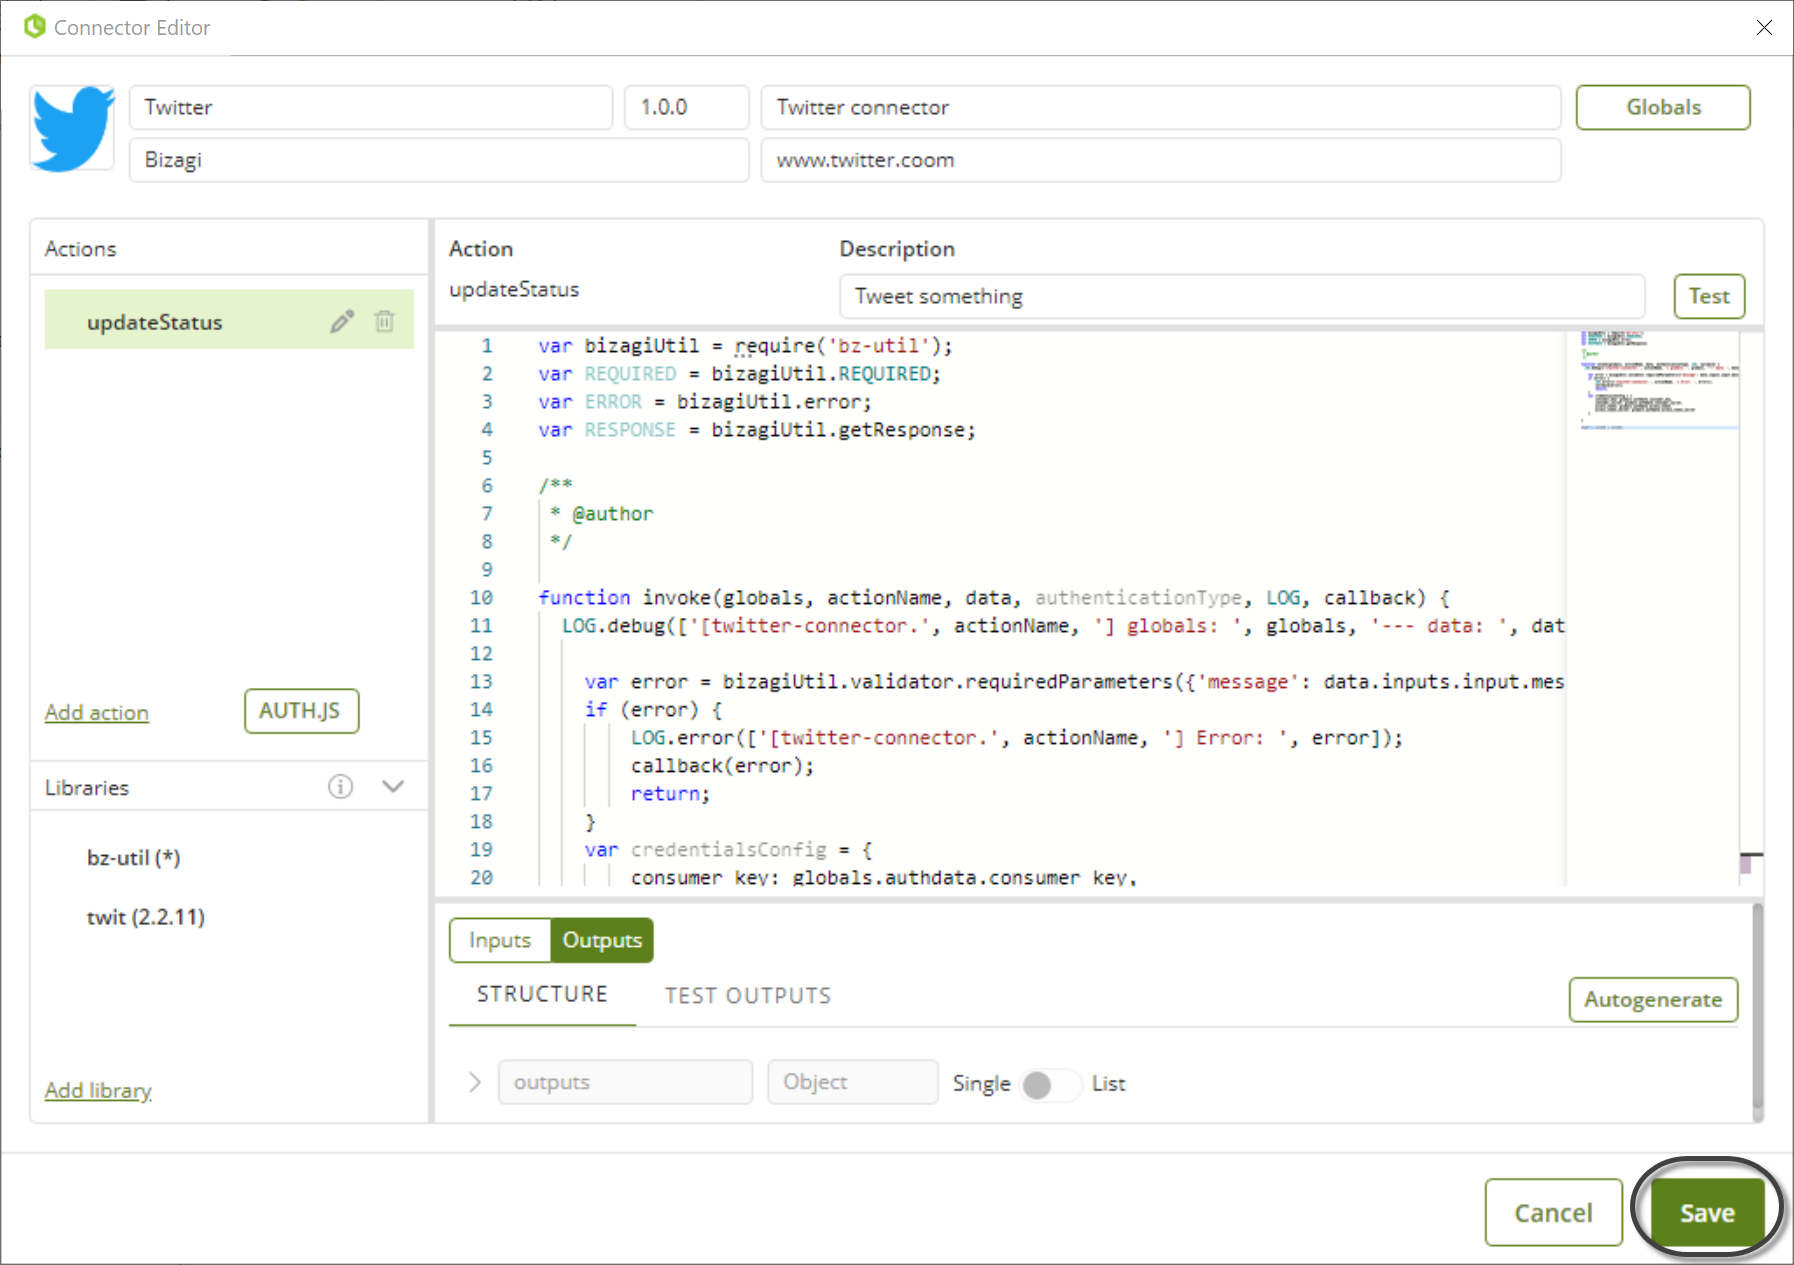
3. Testing the connector
In this part, a series of steps are performed with Bizagi Studio to have a process that uses this connector.
|
In this article, we consider an example process that illustrates the potential of this point connector. For this step, you should know about the use and basic options of Bizagi Studio, and keep in mind that you should not necessarily use this same process to test this connector. |
Configuring the connector
Once you have created your connector, configuring it and using is done with Bizagi Studio.
Now that the process is ready to use the connector, plug the connector into the process through these steps:
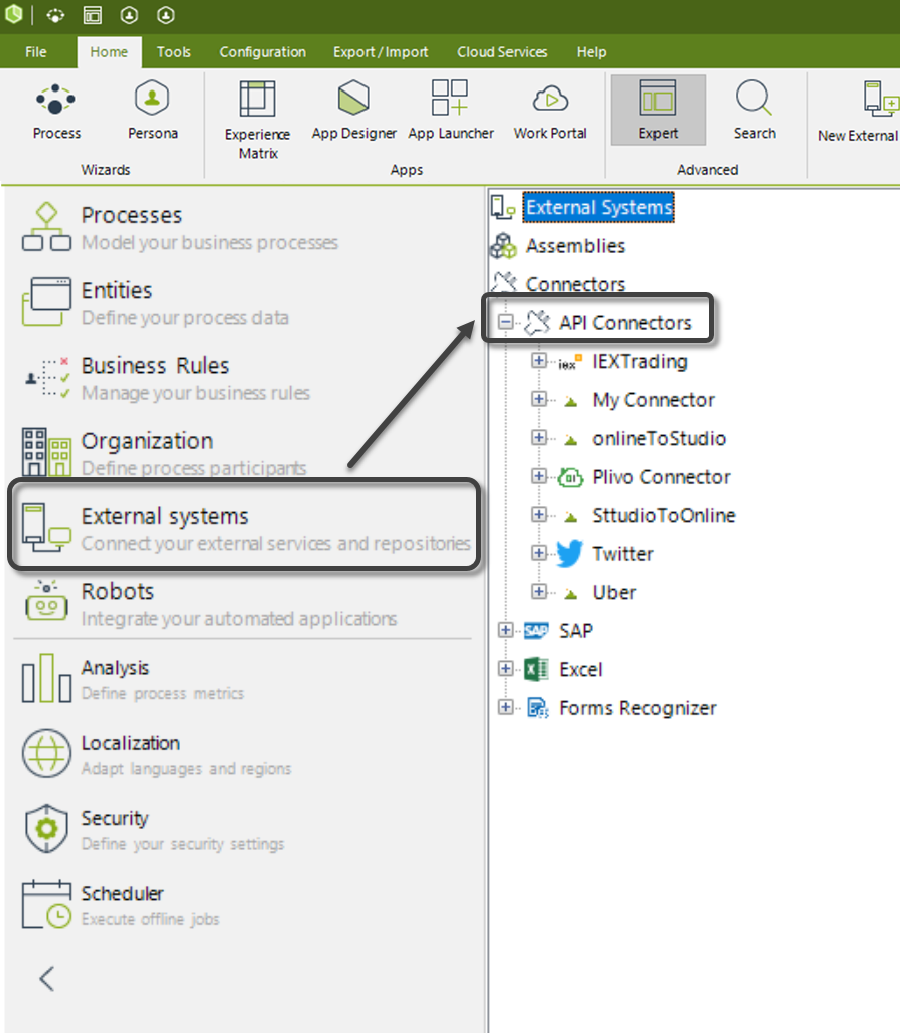
1.Go to the Expert view and into External Systems and open the Connectors API.
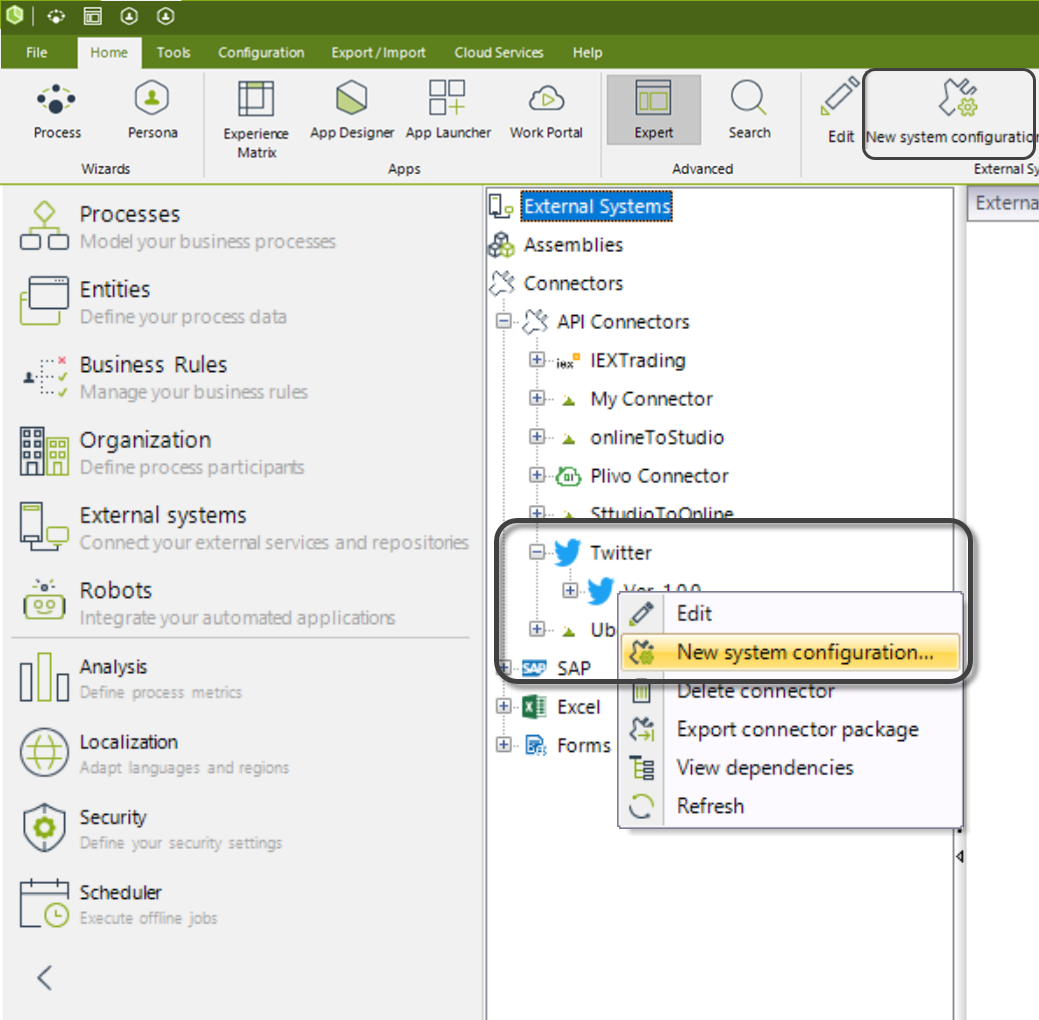
2.Select the new connector shown in the tree menu, and either right click the version to add a New System Configuration, or use the New System Configuration in the ribbon.
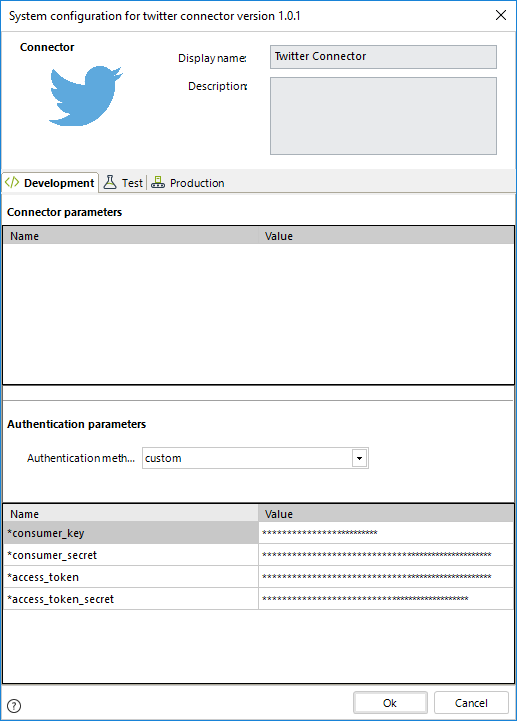
3.Give the new configuration a name and description. Make sure you also select the Authentication method drop down list and click "Custom" to configure it. Enter the API Key, API Secret, Access Token and Access Token Secret, as given by your Twitter account. These credentials will now be used every time an action of the connector is executed.
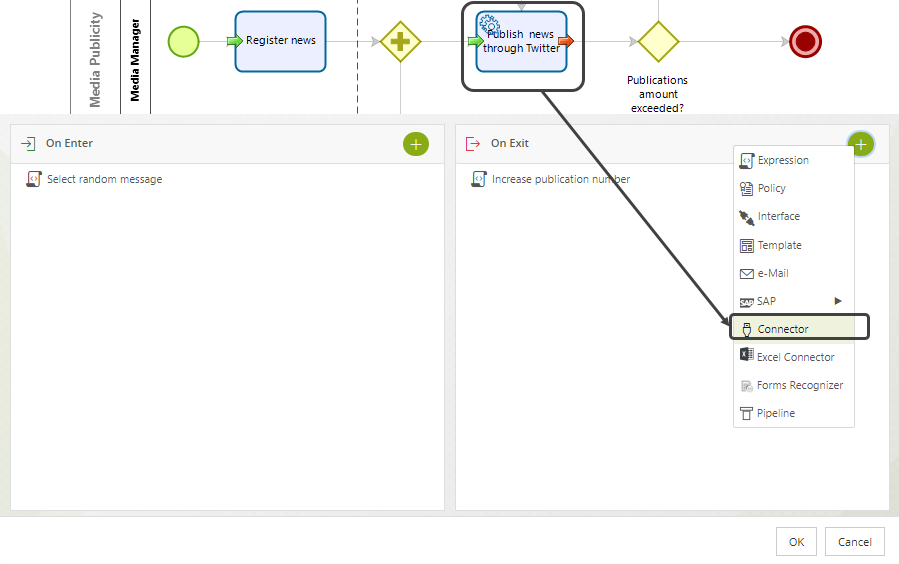
4.Go back to the wizard view and select the forth step (Activity Actions). Add a connector action execution at the exit of the task by selecting the task and choosing the Connector option in the On Exit drop down list.
5.Select the connector and then the action to be executed.
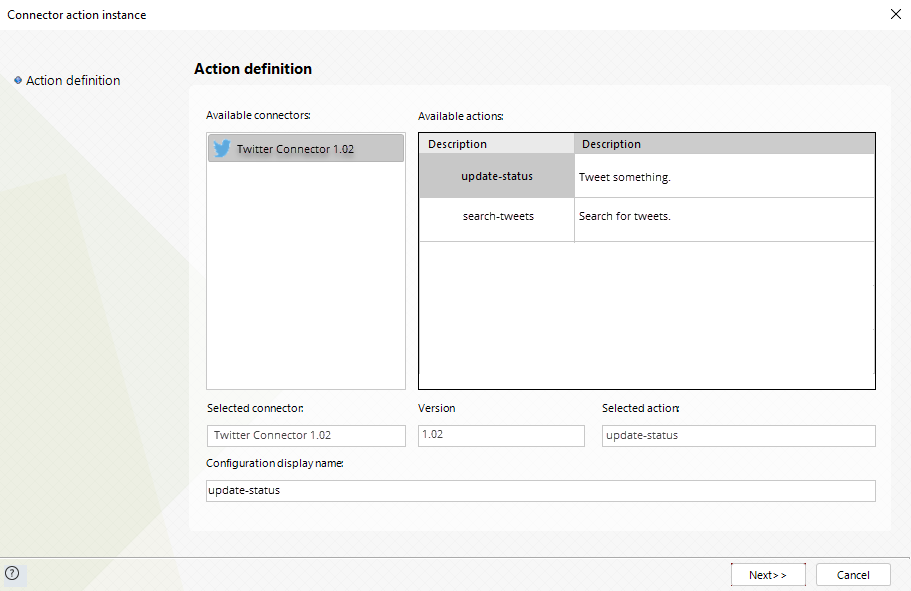
6.Map the inputs.
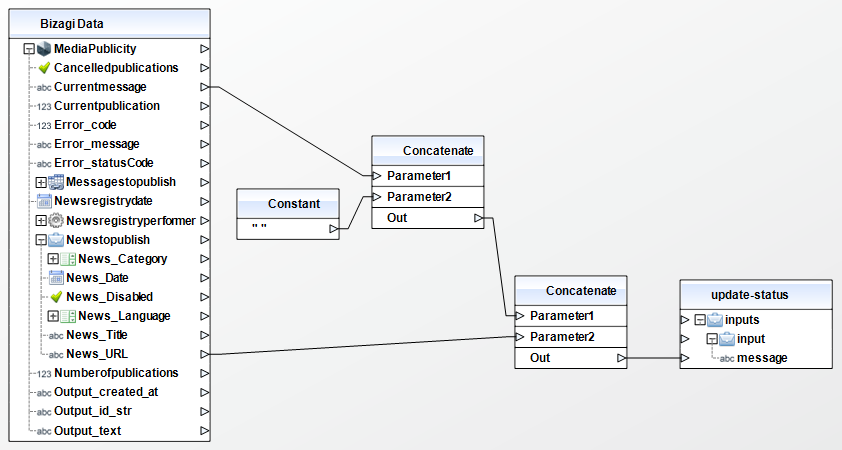
|
Since Currentmessage and URL are separated attributes to go into a single parameter, you need to concatenate them. To better display them, a constant defining a blank space is included between them. |
7.Map the outputs and click Finish.
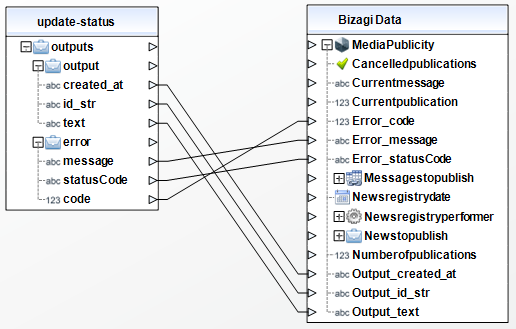
Execution
Launch Bizagi Work portal to execute and test the connector for this process.
Create a new case, and register the news with an URL. Then add some messages to publish the specified news.
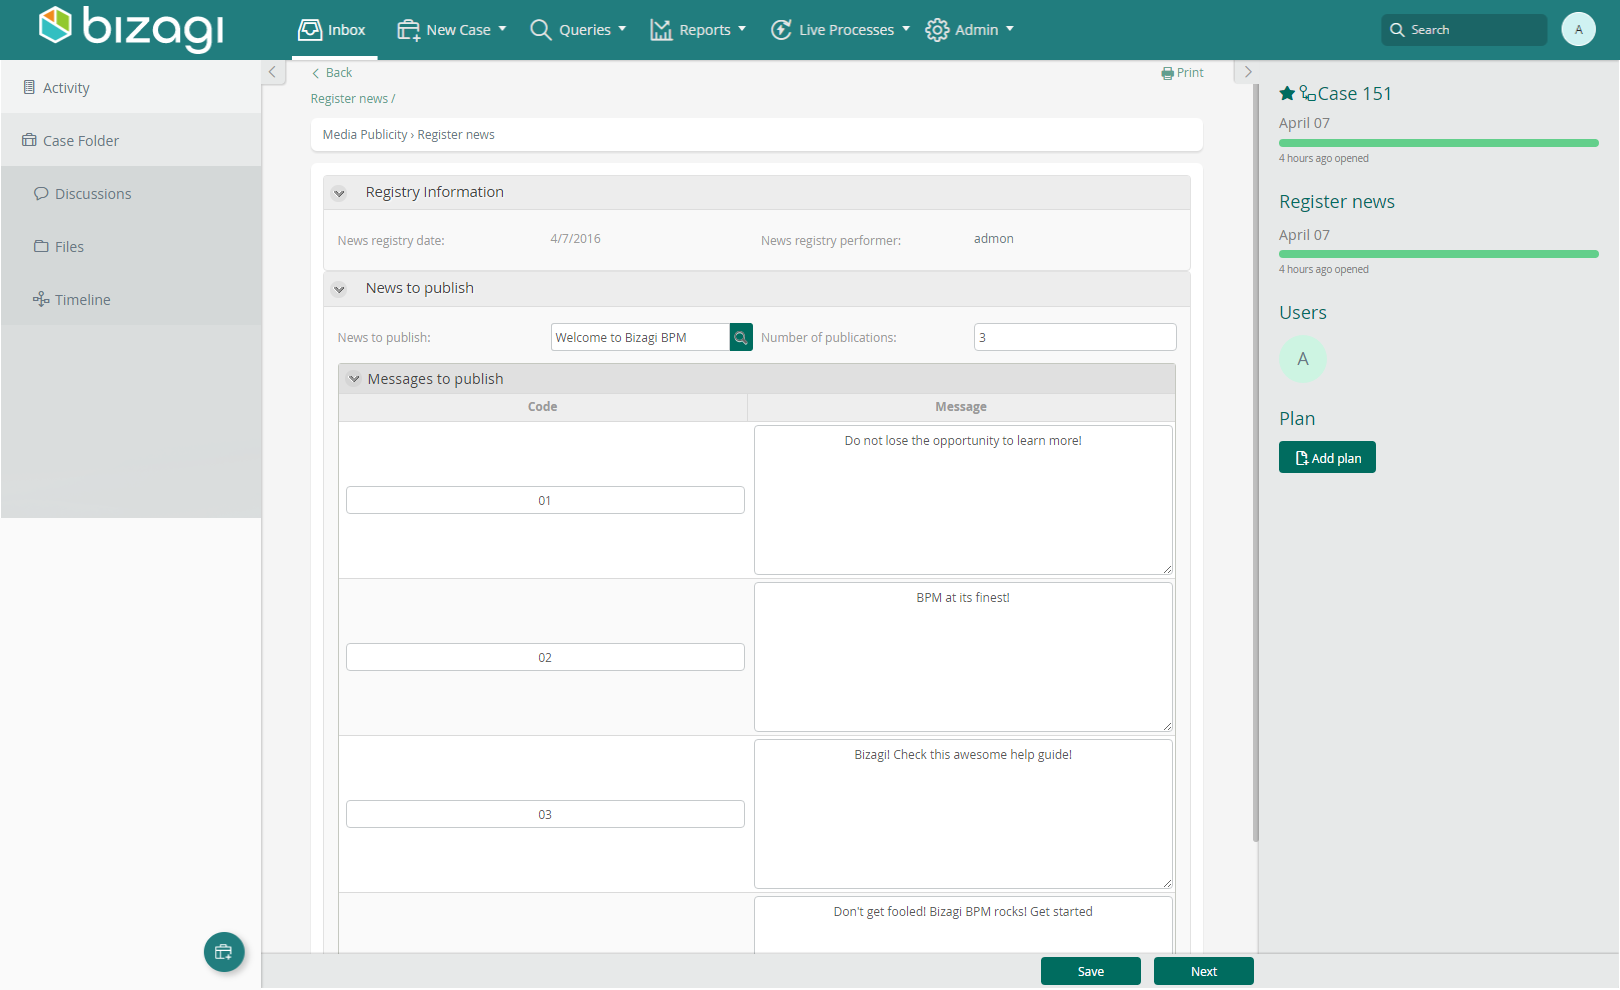
Click Next when done.
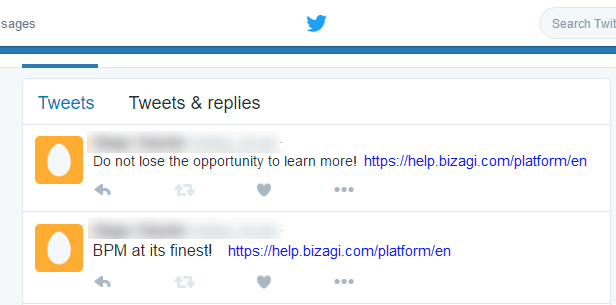
At this point you will notice that a new tweet will be published with the message and the URL of the news.
Last Updated 4/4/2023 3:40:26 PM