Overview
As a Kafka consumer, Bizagi enables processes to respond in real time to events generated by external systems. When a message is published to a Kafka topic, Bizagi automatically consumes it and performs an action, such as starting a case or creating a record.
By integrating with event-driven architectures, Bizagi can transform incoming events into structured business actions, helping ensure that processes react immediately to changes in connected systems.
How consumption works
Before configuring Kafka, it is useful to understand what happens internally when a message arrives.
Bizagi uses an internal service that runs in the Triggers and Actions Azure Function. This service continuously listens for new messages in the configured topics.
The flow is the following:
1.An external system publishes a message to a Kafka topic
2.Bizagi receives the message through the consumer service
3.The message is forwarded to an internal Service Bus queue
4.A processing function reads the message from the queue
5.Bizagi executes the configured action using OData
This architecture ensures reliability. Messages are not processed directly when received, but through an internal queue, allowing retries and avoiding message loss in case of failures.
Configuring Kafka consumption in Bizagi Studio
To define what Bizagi will listen to and how it should react, Kafka must be configured in Bizagi Studio.
This configuration includes:
•The connection to Kafka
•The topics Bizagi will monitor
•The actions executed for each topic
Accessing the configuration
Start by navigating to the Kafka configuration area in Bizagi Studio.
1.In Bizagi Studio, go to the Expert view
2.Open the External Systems module
3.Expand the Event Streaming node
4.Select Kafka
5.Right click Kafka and select New Kafka Configuration. You can also use the same option from the top ribbon
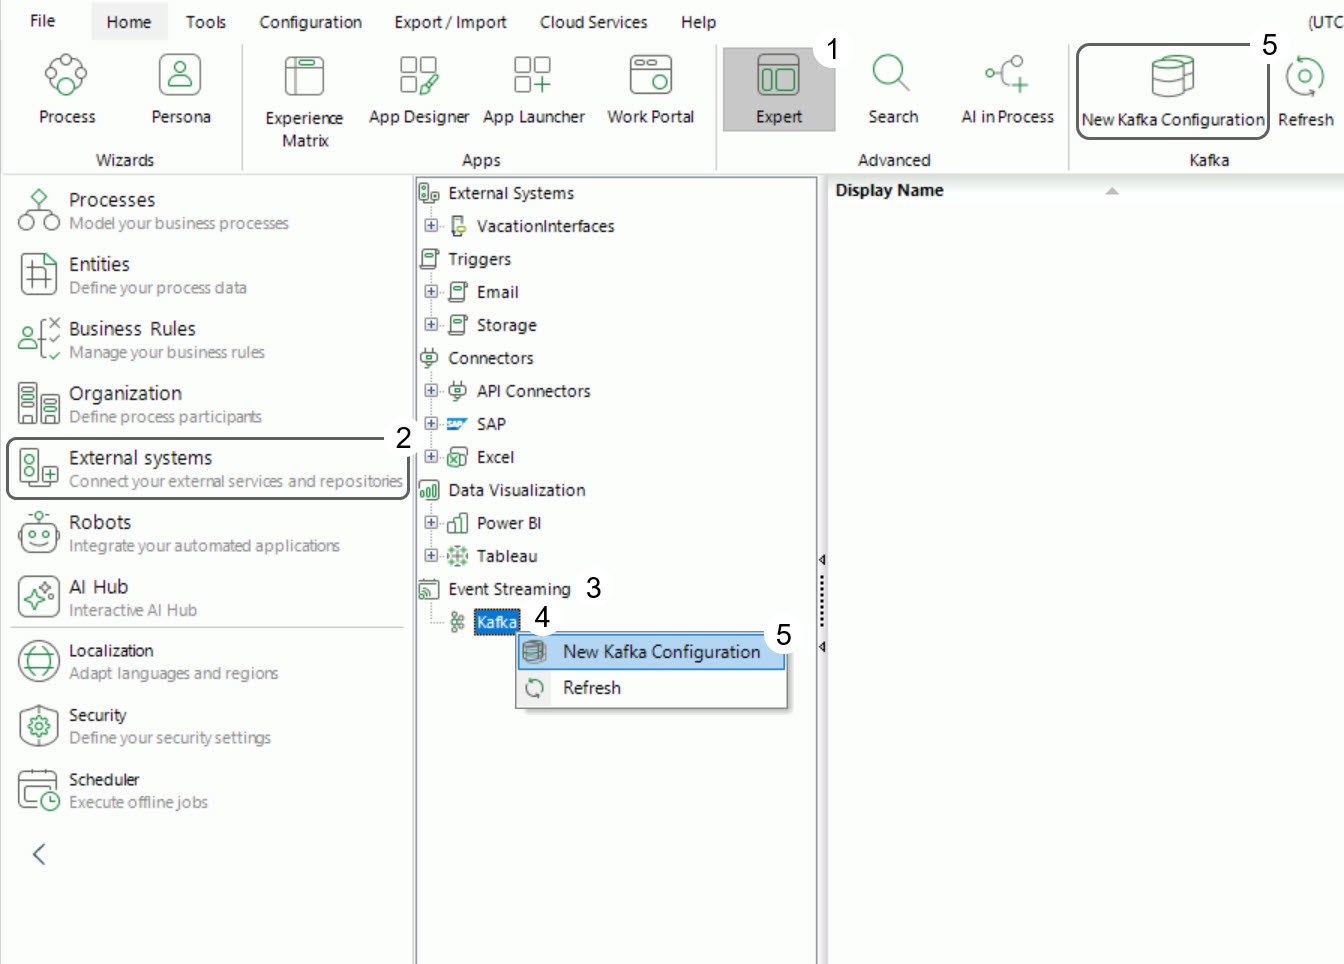
This opens the Apache Kafka Connector window, where you define both the connection and the topics.
Configuring the connection
Before Bizagi can listen to events, it must establish a connection to the Kafka broker.
In the Apache Kafka Connector window, define the following:
•Connection name: A name to identify the configuration
•Description: A brief description of the connection
•Environment: Select where this configuration applies: Development, Test, or Production
Then configure the connection settings:
1.Select the Server (Outbound) option
2.Bootstrap Servers (Broker List): Enter the Kafka broker address. Example: kafka.example.com:9092
3.Security protocol: Select how Bizagi connects to Kafka. Supported options include SASL_PLAINTEXT, SASL_SSL, and PLAINTEXT
4.Provide the required credentials depending on the selected protocol
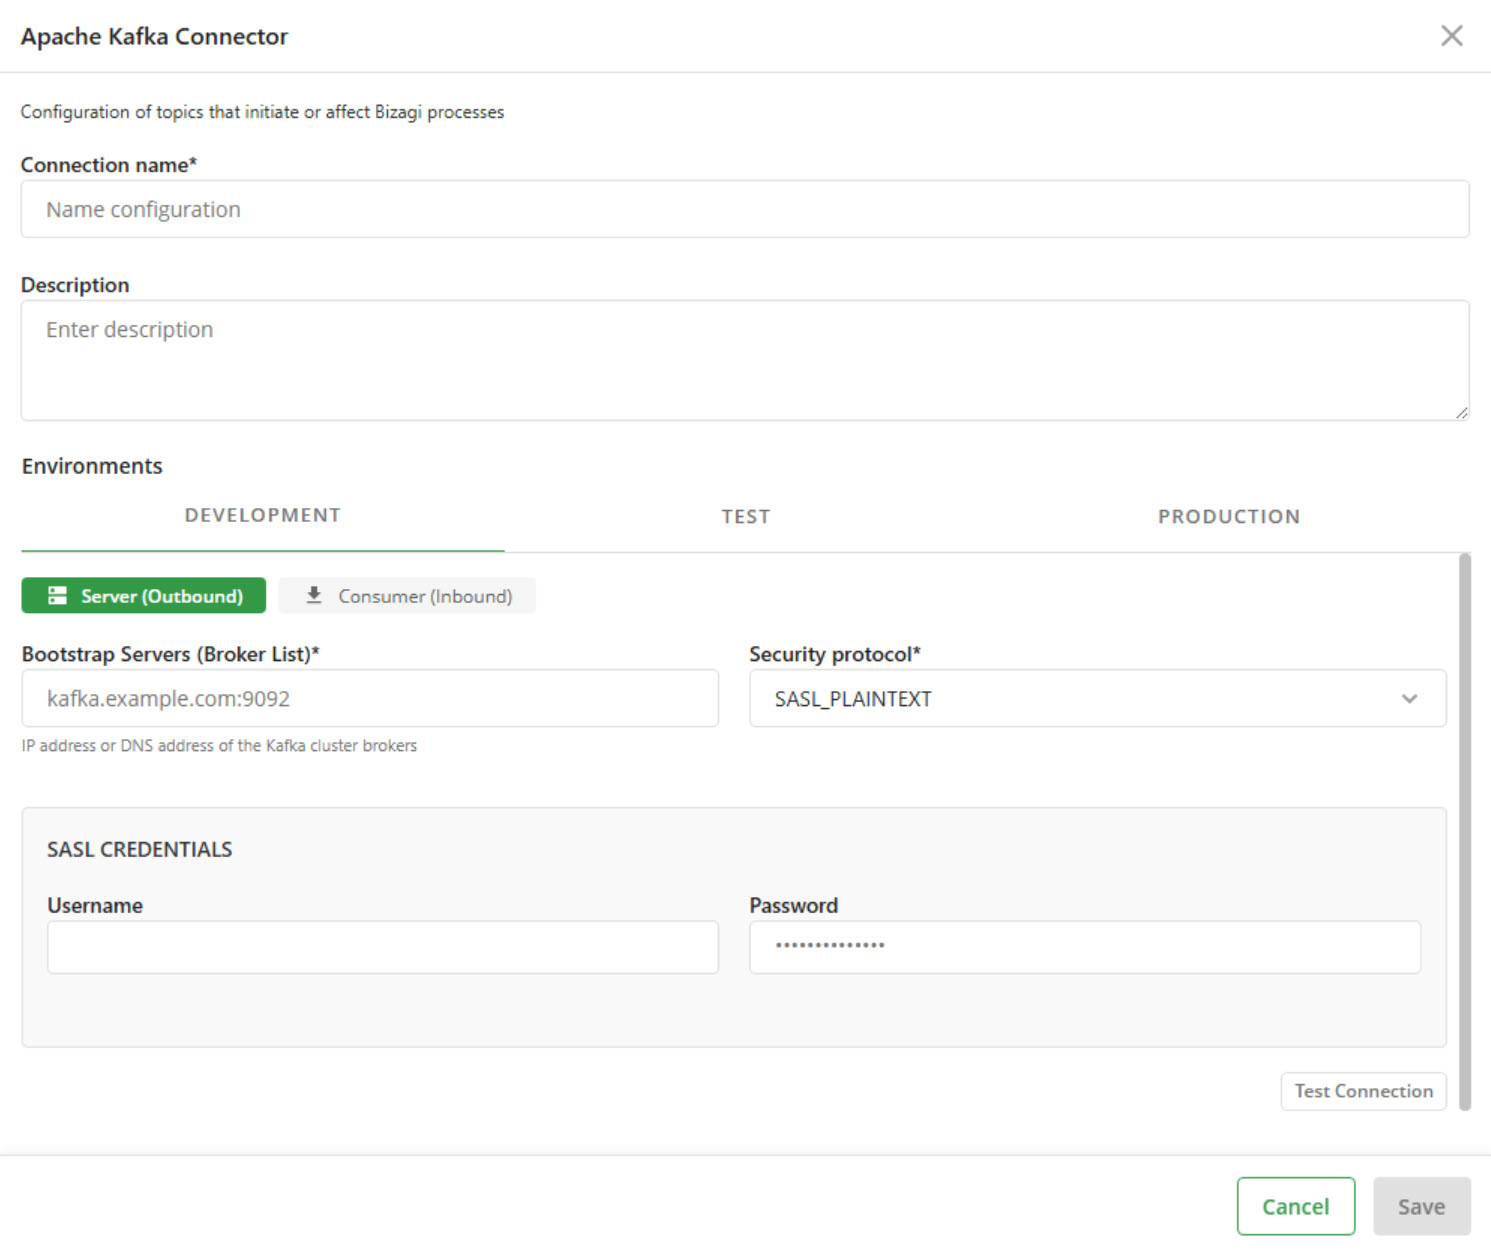
Once configured, click Test connection to verify that Bizagi can successfully connect to Kafka.
Defining topics and actions
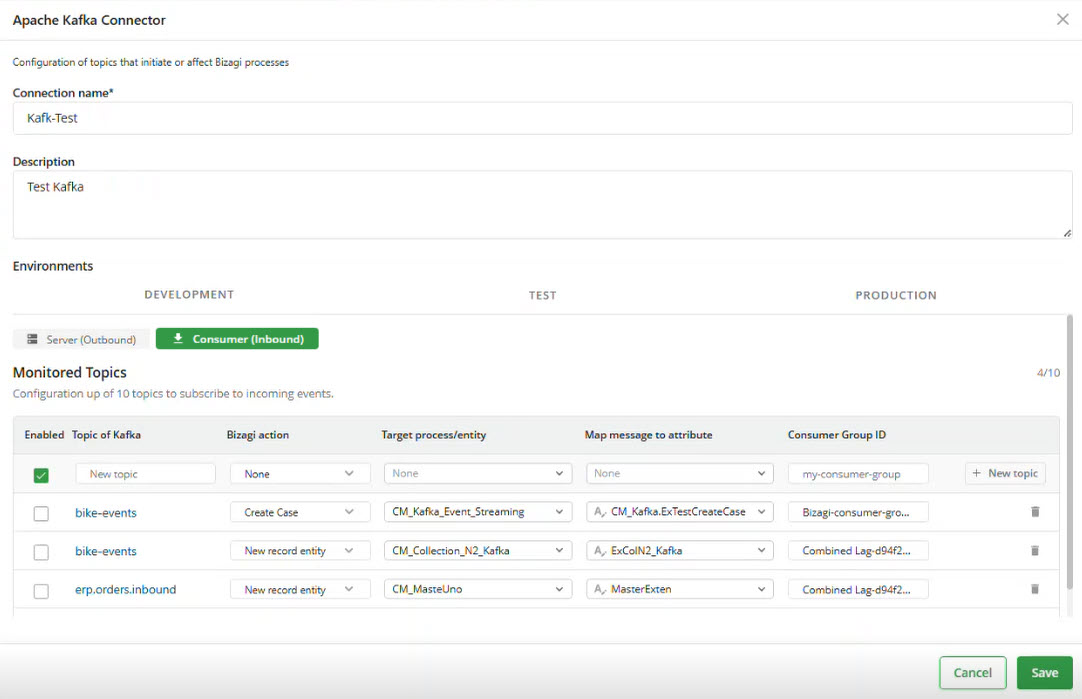
After configuring the connection, switch to the Consumer (Inbound) option. This is where you define the topics Bizagi will monitor and how each message will be handled.
Each row represents a topic subscription. For each one, you must configure all fields to define both the source of the event and the action Bizagi will execute.
•Enabled: Select this checkbox to activate the topic. If disabled, Bizagi will ignore messages from this topic without removing the configuration.
•Topic of Kafka: Enter the exact name of the topic in Kafka. Bizagi does not discover topics automatically. You must know the topic name beforehand and ensure it matches exactly what is defined in Kafka.
•Bizagi action: Select the action that Bizagi will execute when a message is received. The available options are Create Case and New record entity. This selection determines the rest of the configuration.
•Target process or entity: This field depends on the selected action:
oIf you select Create Case, choose the process that will be triggered when a message is received. Bizagi will only allow case creation using attributes that are available in the Start Form. If the required attributes are not present in the Start Form, the case creation will fail when invoked.
oIf you select New record entity, choose the entity where the message will be stored. Only Master entities are available for selection in this scenario.
•Map message to attribute: Select the attribute where the Kafka message will be stored.
oFor Create Case, you must select an attribute that belongs to the target process and is available in the Start Form
oFor New record entity, you must select an attribute from the chosen Master entity
|
In both cases, only attributes of type String or Extended Text are available. This is because the Kafka message is received as a single payload and is stored directly without transformation at this stage. |

•Consumer Group ID: Define the identifier Bizagi will use as a Kafka consumer.
This value allows Kafka to recognize Bizagi as a subscriber. It also enables you to configure the same topic multiple times with different behaviors.
For example, you can use different Consumer Group IDs to:
oTrigger different processes from the same topic
oStore the same message in different entities
|
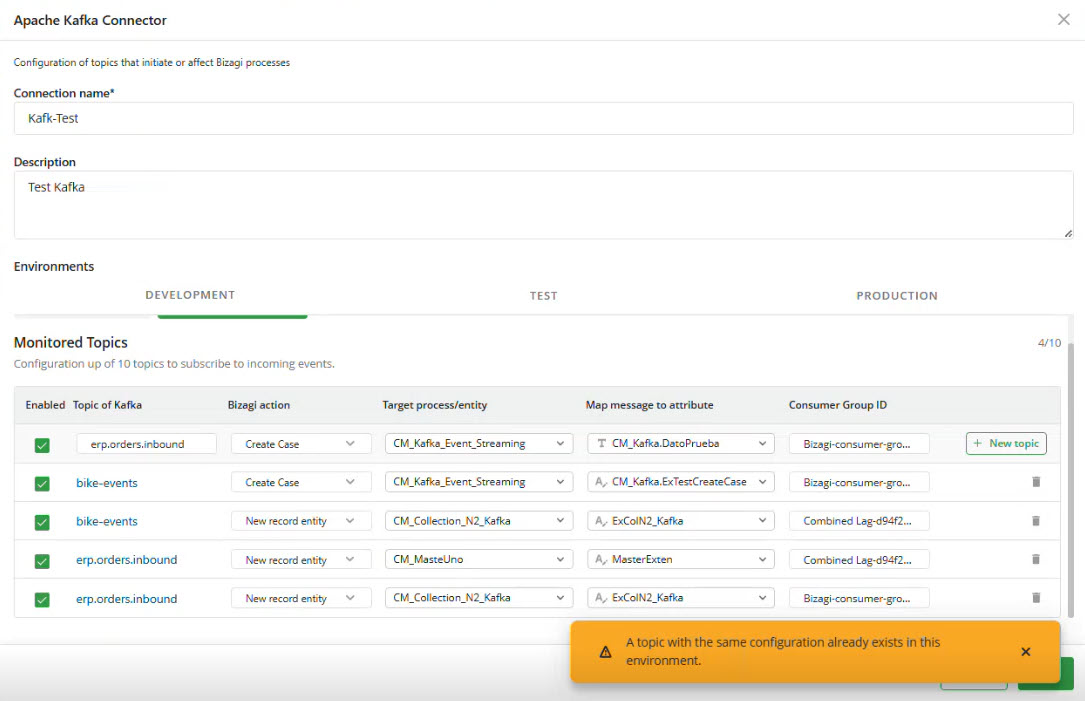
When defining topics, keep in mind that Bizagi validates each configuration to prevent duplicates. If you attempt to create a configuration with the same combination of Topic name, Bizagi action, and Consumer Group ID, Bizagi will display the message: A topic with the same configuration already exists in this environment.
|
Deploying the configuration
Once the configuration is complete, deploy the solution to the target environment.
Deployment includes:
•The Kafka connection
•The defined topics
•The configured actions
Any structural change, such as new topics or modified actions, requires updating the configuration in Studio and deploying again.
Environment behavior
Kafka consumption behaves differently depending on the environment. Understanding this distinction helps you manage configurations correctly as you move from Development to Test and Production.
Development
In Development, all configuration is handled directly in Bizagi Studio.
You define the connection, topics, and actions as part of your model. This environment is focused on designing and validating how Bizagi should respond to incoming events.
There is no Management Console interface available to control Kafka configurations in Development.
Test and Production
In Test and Production, the Management Console provides operational control over the configuration that was deployed from Bizagi Studio.
To review Kafka configurations:
1.Open the Management Console
2.Navigate to Connect
3.Select Event Streaming
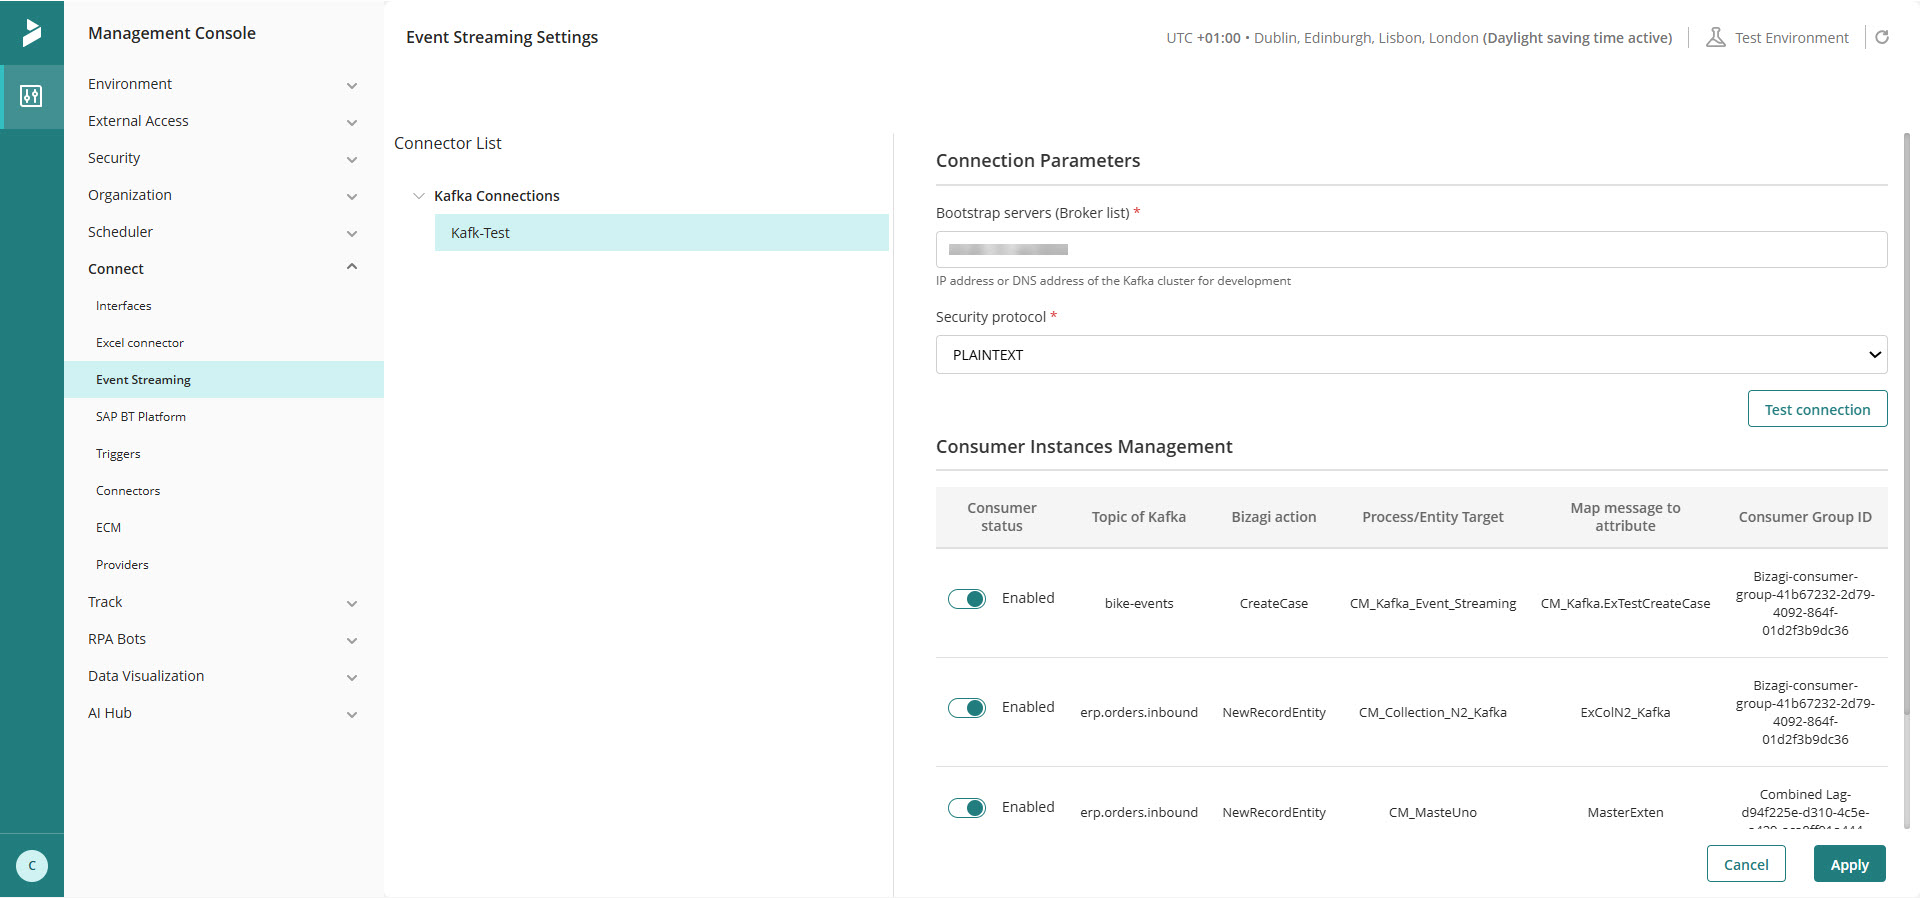
In this section, you can review the deployed configuration and control whether each topic is active.
From here, you can enable or disable topics without requiring a new deployment. This allows you to temporarily stop or resume message consumption as needed.
However, this interface is limited to runtime control and does not allow you to modify how the integration is defined. Any change that would alter the meaning of the configuration (i.e., how a message is interpreted or what action is triggered) must be done in Bizagi Studio and deployed again.
Working with shared Kafka brokers
If multiple environments connect to the same Kafka broker, you need to carefully control which environment is actively consuming messages.
Kafka assigns messages to consumers when they are read. As a result, the first active environment may process a message before others.
To avoid unintended behavior:
•Disable topics in environments that are not currently in use
•Or configure separate Kafka brokers for each environment
This is especially important when promoting configurations across environments.
Runtime behavior
Once the configuration is deployed and a topic is enabled, Bizagi starts listening automatically.
There is no scheduler involved. Messages are processed as soon as they arrive.
Bizagi follows an at least once delivery model, meaning messages may be retried in certain scenarios, but they are not lost.
To ensure this:
•Messages are handled through an internal queue before execution
•Offsets are committed only after successful processing
This guarantees reliability even in the presence of temporary failures.
Retry and monitoring
Kafka integration includes built-in retry mechanisms to handle failures during communication or processing.
If an issue occurs:
•Connection failures trigger automatic reconnection attempts
•Failures when forwarding messages trigger retries with backoff
•Processing failures are retried through the internal queue
Monitoring with traces
To monitor Kafka activity, you can use traces in the Management Console.
To configure traces:
1.Open the Management Console
2.Go to Tracing
3.Open the Configuration tab
4.Locate the Event Streaming category
5.Adjust the trace level as needed
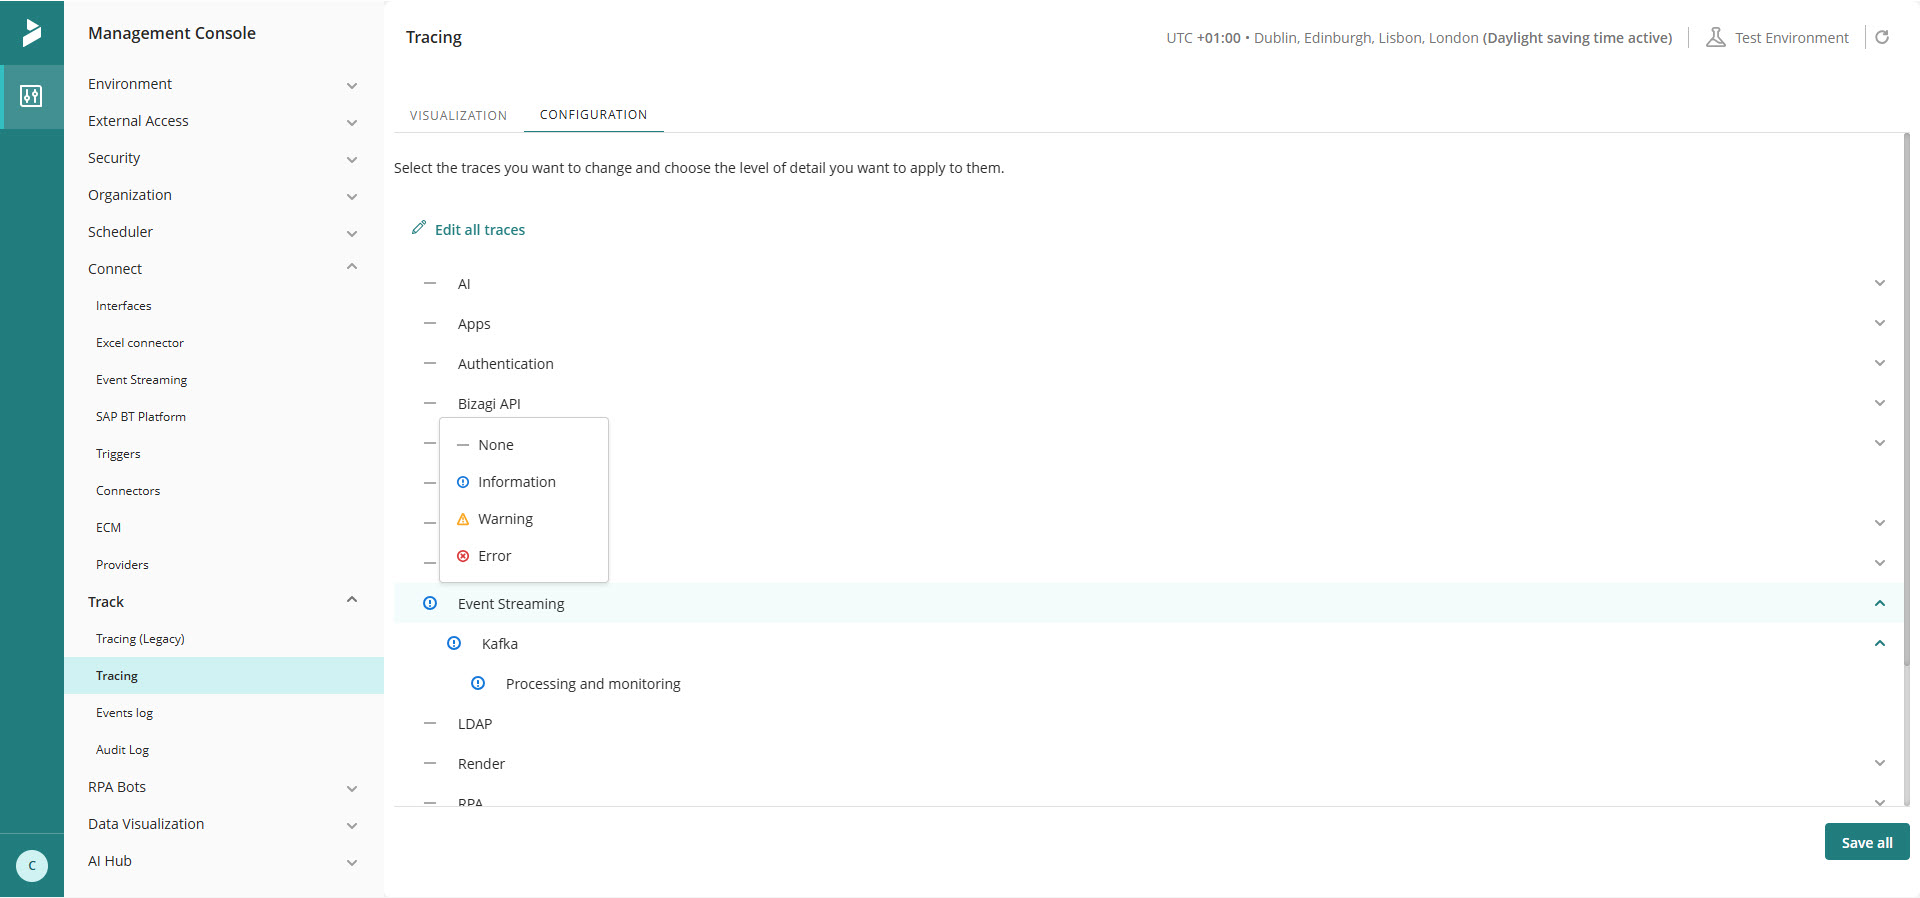
To review traces:
1.Go to Tracing
2.Open the Visualization tab
3.Filter by the Event Streaming category
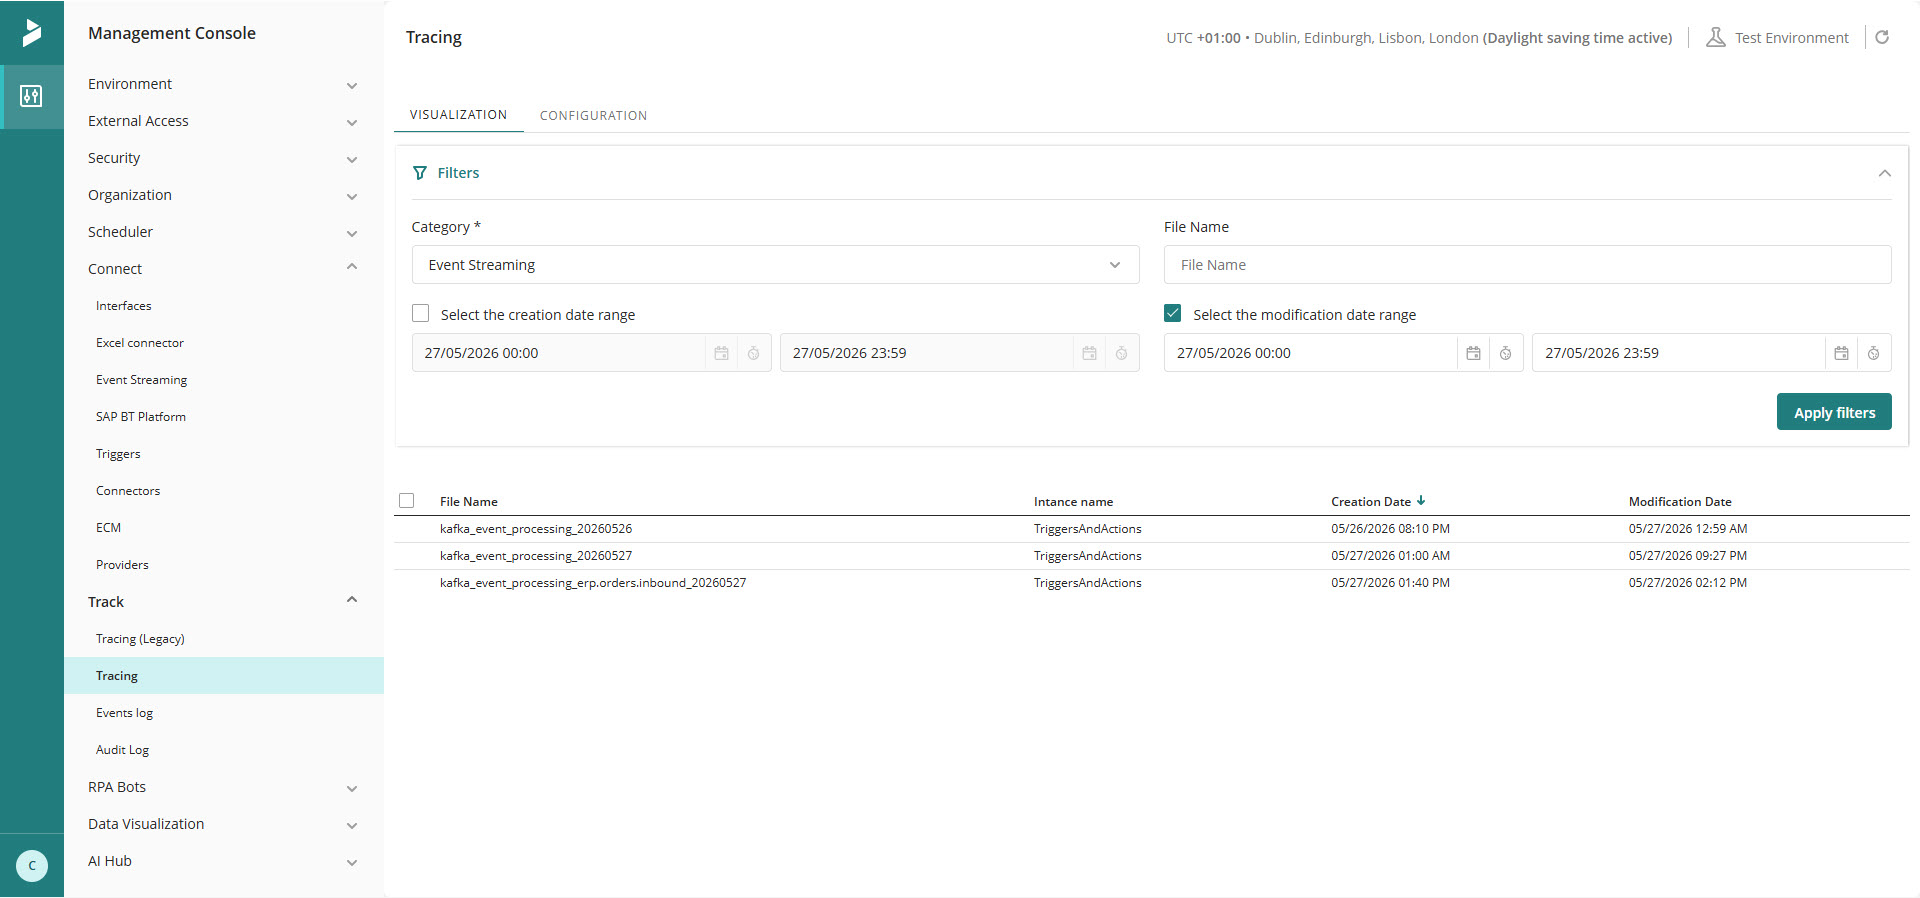
This allows you to track how messages are being processed and identify any issues during execution.
Typical scenarios
Kafka consumption is particularly useful when processes must react immediately to external events.
For example:
•A fraud detection system publishes suspicious transactions, and Bizagi automatically starts investigation cases
•External systems send updates that Bizagi stores and processes
•Devices generate real time signals that trigger workflows
In these scenarios, Bizagi acts as a reactive layer that transforms incoming events into business actions.
Environment configuration
Since actions such as Create Case and New record entity are performed through OData, you must configure an OAuth 2.0 application in the Work Portal.
Open the Work Portal with a user who has access to the Admin menu and the Security section, and then open OAuth 2 Applications.
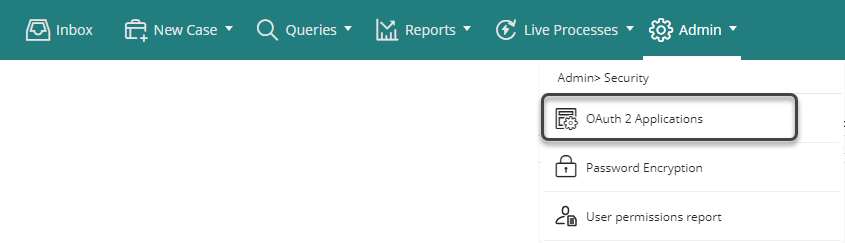
Add a new application with the following characteristics:
•Name: Register the following name:
bz:oauth:2.0:odata:activators:functions
|
|---|
The application name must be configured exactly as shown above. |
•Grant type: Client Credentials.
•Web site: You can either include the URL of the Work Portal or leave it blank.
•Allowed Scope: API.
•User Name: Select a Bizagi user with the minimum permissions required for Kafka operations. This user does not need to be an administrator. For better security, we recommend creating a dedicated service account (e.g., kafka-consumer). This user must have:
oStart access only to the specific processes that will be initiated by Kafka
oPermission to authenticate with the OData API.
The user should not have administrative privileges or global access to all processes.
•Token lifetime: Define the validity period of the access token used by Kafka. For security, configure a short duration, typically 2 to 5 minutes. Each Kafka operation requests and uses a new token, so short lifetimes support secure, single‑use authentication. Avoid using 0 (no expiration), as previously issued tokens would remain valid if credentials were compromised.
•Life cycle type: Absolute.
•Description: Optional description for the application.
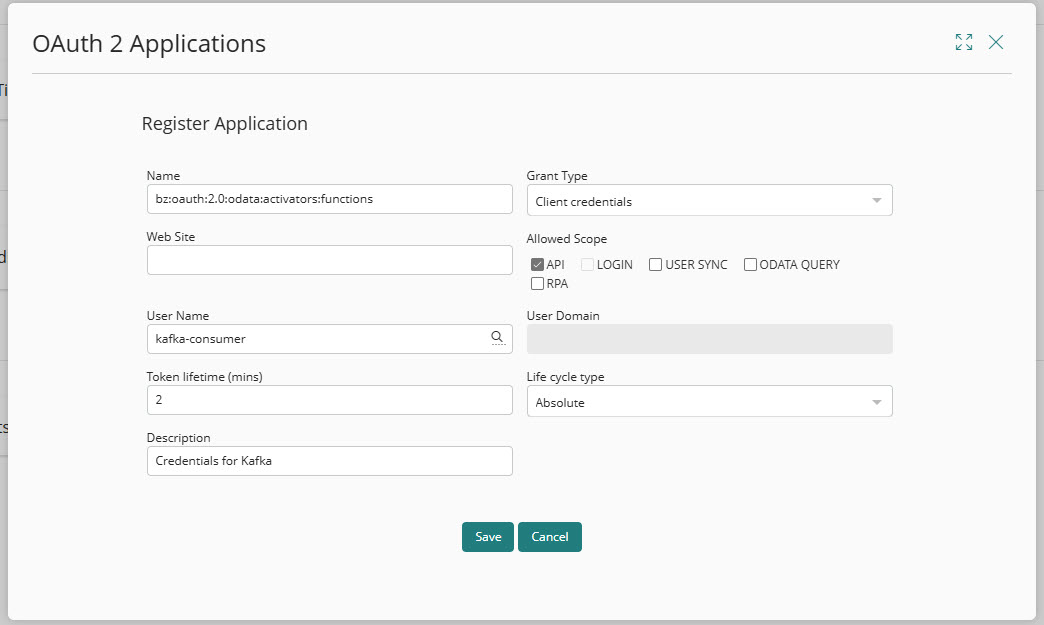
Once the OAuth application is configured, Bizagi can authenticate and execute the actions associated with Kafka messages through OData.
Example workflow
The following example illustrates how Kafka consumption works after the configuration has been deployed.
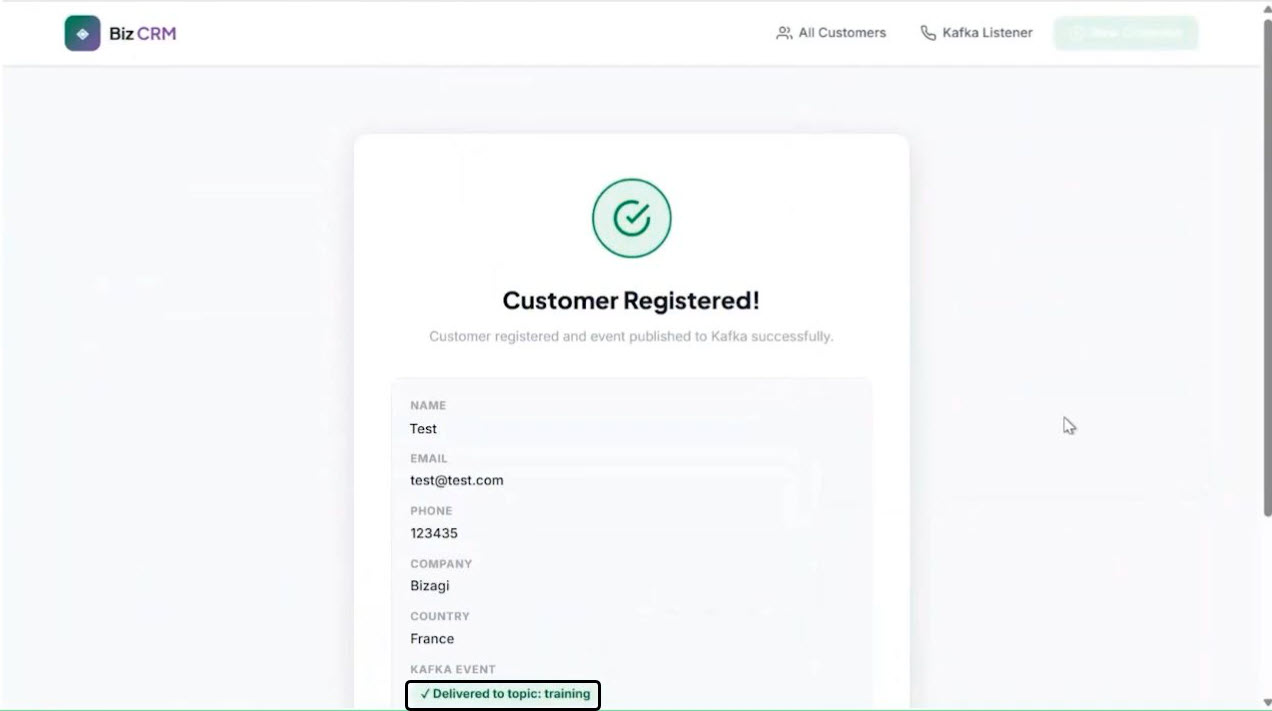
1. External application publishes a message
A customer is registered in an external application. Once the registration is completed, the application publishes an event to the configured Kafka topic.
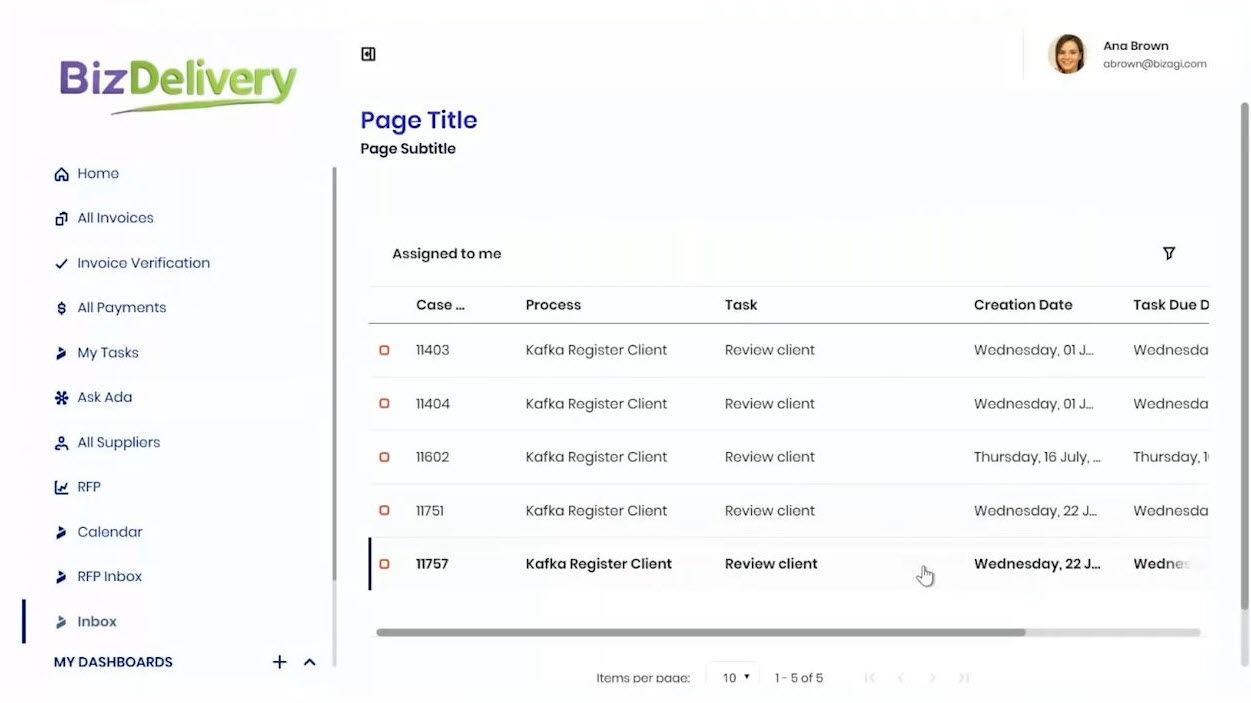
2. Bizagi consumes the message and creates a case
Bizagi consumes the event from Kafka and executes the configured Register Client action. As a result, a new case is created in the target process.
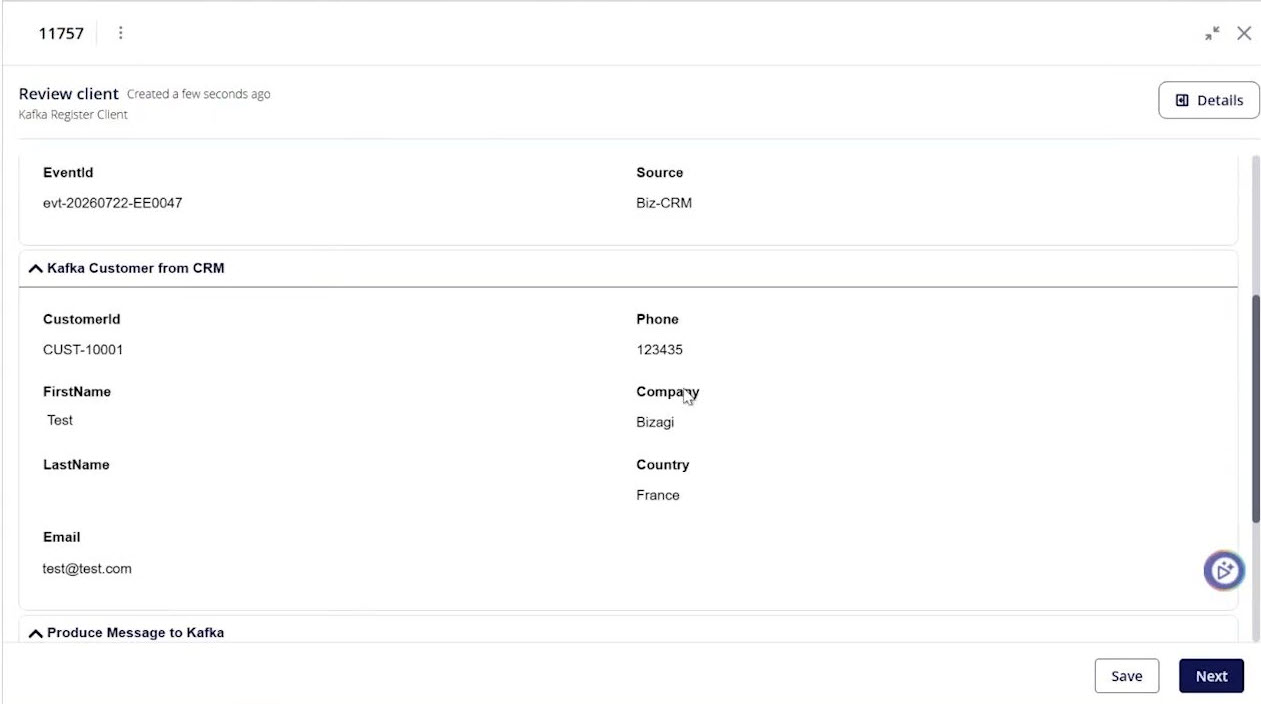
3. Message data is available in the case
The information contained in the Kafka message becomes available within the case and can be used throughout the process.
Last Updated 9/24/2026 8:33:04 PM