Overview
Azure AD B2C is an Identity Access Management system that enables users to use social, enterprise or personal accounts to get SSO access to the application where is configured.
This article provides a step-by-step guide about the configuration needed, both in Azure AD and in Bizagi, to integrate your authentication in Bizagi through Azure AD B2C. Note that these steps are done only once, typically by an admin user of your Customer Portal having access to your Azure AD B2C.

Once you have carried out these steps users sign in to any cloud-based service directly via your Azure AD, as described at Signing in the Bizagi Cloud Portals and Applications.
Before You Start
To configure Azure AD B2C supporting SAML 2.0, you need:
•Have a resource with an Active Directory B2C.
•Create a B2C Tenant inside the Azure AD B2C. To know how to create a B2C Tenant, click here.
|
The Forgot Your Password flow is not supported. |

Associate the SAML 2.0 protocol with the B2C.
Configure the necessary policies to support SAML 2.0
To do so, go to your tenant configuration and go into the Identity Experience Framework.

|
Bear in mind that you need to be in the subscription and in the active directory where the B2C tenant was created. |
Create the Policy Keys needed to establish trust with the services that you are going to integrate with. For this, click Policy Keys and then click Add.


Register a SAML application in Azure AD B2C. For more information about registering a SAML application in your Azure AD B2C, click here.

To know more about custom policy keys, click here.
To have already users into the Customer Portal
When integrating any Identity Manager, you need to synchronize authorized accounts so they can access Bizagi 's cloud-based portals.
Synchronizing means importing or updating the account's primary identifiers. The Bizagi's account email must match with the attribute NameID of the SAML assertion. Usually the email is the most common parameter. See Create company users.
Bizagi does not store passwords when integrating an Identity Manager.
|
You cannot have two or more users with the same email, because it is considered as part of the primary identifier. |
Once you have verified in the Customer Portal that there has been at least an initial import of your users into Bizagi, you may proceed.
1. Generate certificates to sign assertions (mandatory)
This step is not bound to Bizagi nor restricted by any special requirement of Bizagi (you normally do it yourself).
If you need some guidance or an example on this step, refer to Certificates for SAML 2.0 authentication.
To proceed with these guided steps, you need to have:
•One certificate to sign assertions (mandatory) in .P12 or .PFX file format. You need The password for the certificate file, as defined by you when you exported the public and private keys.
•One certificate to encrypt messages (optional) in .P12 or .PFX file format. You need The password for the certificate file, as defined by you when you exported the public and private keys.
|
You will need to be in charge of managing your installed certificates (keep track of its expiration date and other relevant maintenance aspects such as changes in your Identity Provider's endpoints). |
2.1 Log in to your Azure services with a user account with admin rights.
Access your Azure subscription with the Azure AD service.
You will need to sign into Azure's portal at https://portal.azure.com.

Make sure that you need to be in the subscription and in the active directory where the B2C tenant was created.

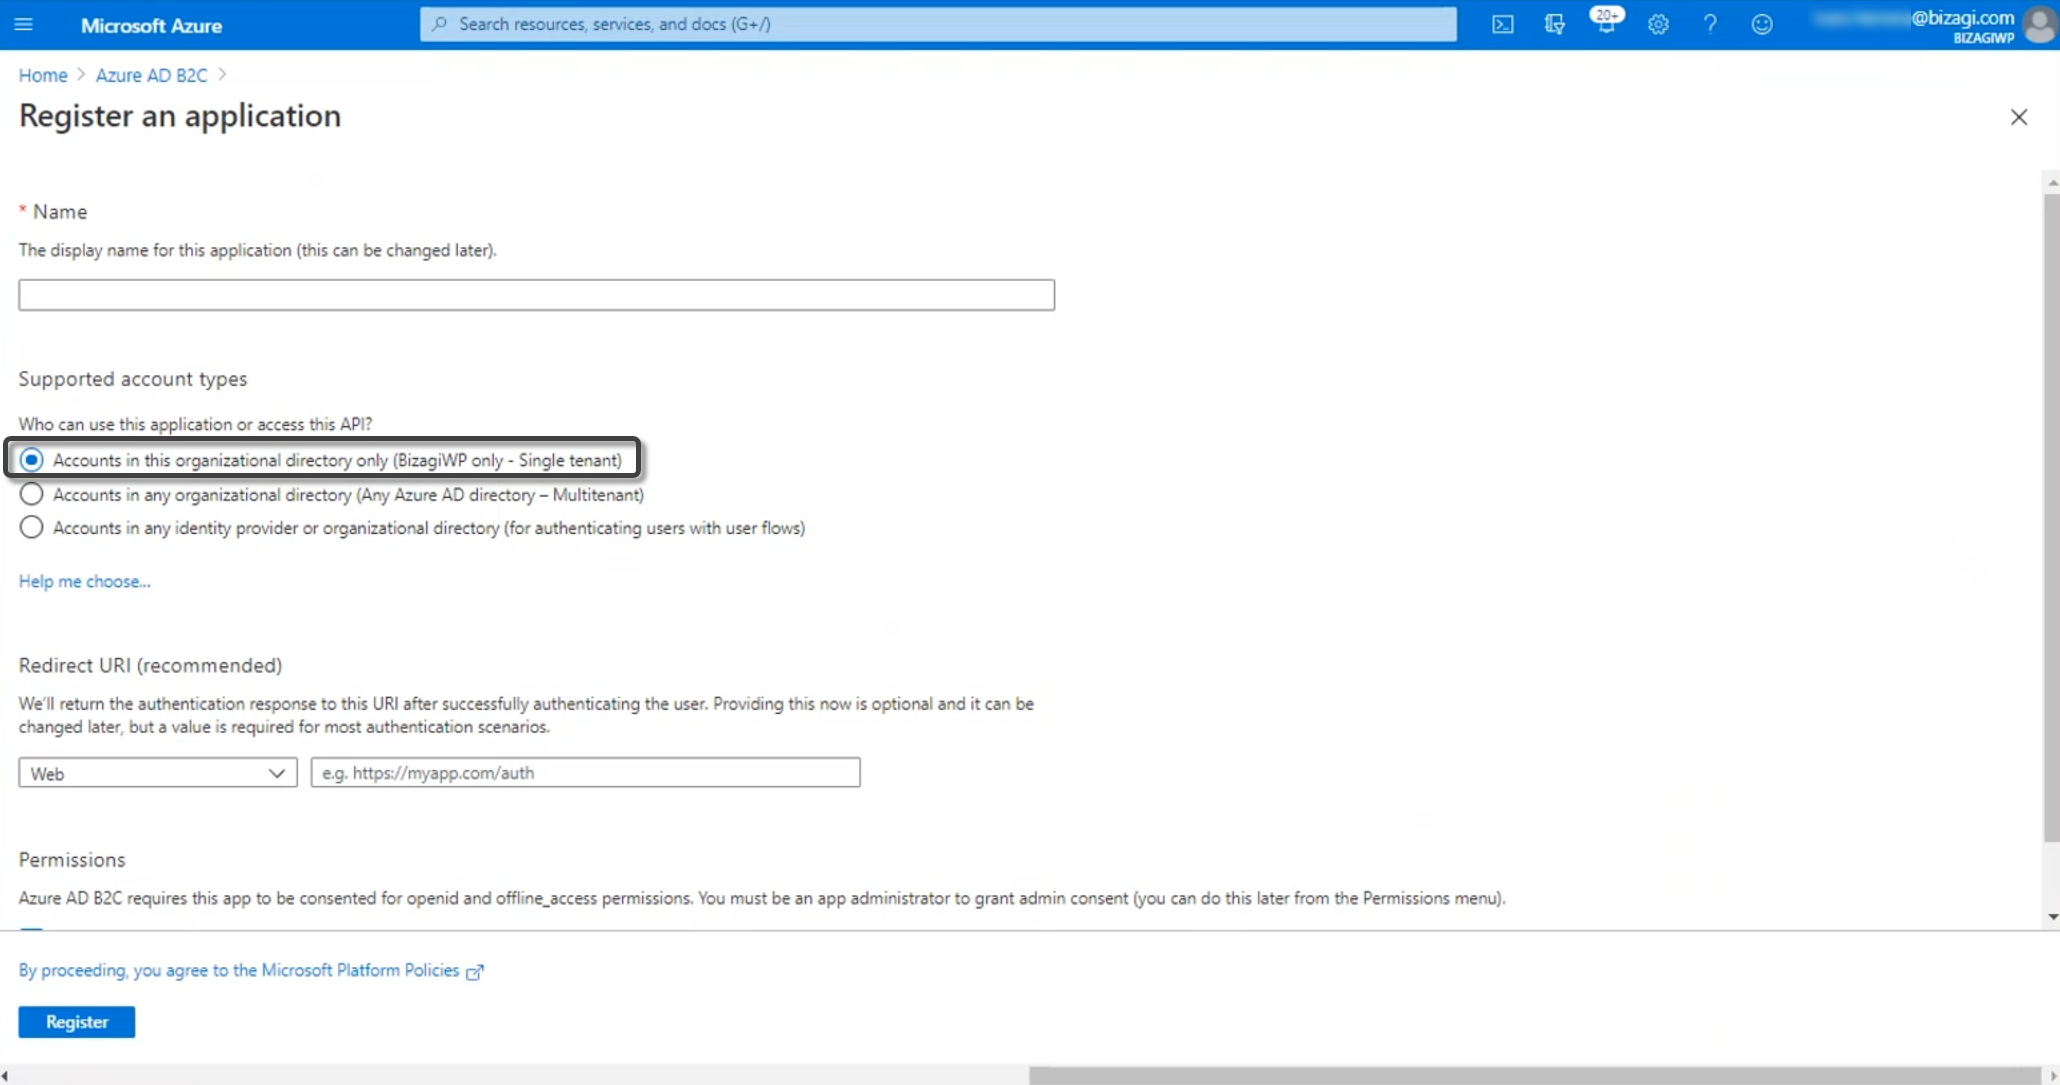
2.2 Register the Application
Open the Azure AD, and select the App registrations menu. Click New registration:

Give a name to your application. Then, select the supported account types. Make sure that you select the tenant associated to the B2C. Finally, type your project's URL.
2.3 Change the application manifest
Once your application is registered, you will be able to see it in the App registrations menu. Go to the application.

Open the manifest.

Change the following parameters with the values below:
Endpoints
•identifiersURI: It is the Bizagi 's URL used for authentication, with the following format https://accounts-<companyname>.bizagi.com
•replyURL: This is the destination in the SAML response https://accounts-<companyname>.bizagi.com/saml2/assertionConsumer
•signInURL: It is the Bizagi 's URL used for authentication, with the following format, https://accounts-<companyname>.bizagi.com
•logoutURl: It is the Bizagi's cloud logut URL https://accounts-<companyname>.bizagi.com/saml2/logout
•samlMetadataURL: You can review this metadata file by browsing it at:
https://accounts-[company].bizagi.com/saml2/metadata
Additional Keys
You must add the following key accessTokenAcceptedVersion and must have the value 2:
"accessTokenAcceptedVersion" : 2
Go to the Identity Experience Framework and open the TrustFrameWorkBase file.

Look for the TechnicalProfile node associated to the SAML protocol. Inside, copy the IssuerUri, which is the metadata URL associated to the SAML assertions generator.

Finally, add the following suffix to the URL copied: Samlp/metadata
|
The metadata URL must have the following format:
https://<B2Ctenant>.b2clogin.com/<B2Ctenant>.onmicrosoft.com/B2C_1A_signup_signin_saml/Samlp/metadata
where <B2Ctenant> is the name of the B2C tenant created in the Azure AD B2C. |
3. Configure your IdP in the Customer Portal
After you configure the application in Azure AD, now you must access the Bizagi Customer Portal and register the Identity Provider. Follow the steps in Configure a SAML 2.0 IdP in the Customer Portal.
Now you can test your single sign-on. To test your configuration we recommend that all users log out and opening a new tab using incognito mode, or use a different browser. If the configuration with a new IdP fails, you can Restore the authentication protocol.
Troubleshooting
In case the authenticator fails, you can review: