How Azure AD integration works
OpenId is an authentication protocol, built on top of OAuth2.0 to extend the authorization specification. It can be used to securely sign users into web applications (in this case, the Work Portal). By using this feature, you can outsource sign-up, sign-in, and other identity management experiences in your web applications to Azure AD. This allows you to provide Single Sign-On capabilities at the browser level.
This authentication mechanism introduces the concept of an id_token, which is a security token that allows for due verification of the identity of the user while obtaining some of his/her basic profile information.
Because OpenId extends OAuth 2.0 it also enables applications to securely acquire access_tokens. The Access_tokens allow users to access resources that are secured by an authorization server.
|
This implementation does not work for Trial versions since they are multitenant environments. For this, an enterprise and on-premise environment must be used.
Currently supported standards in this mechanism are: OpenId v1.0, relying on the OAuth 2.0 authorization flow.
Though OAuth2.0 considers authorization aspects, these definitions apply to resources. This means, that for access rights definitions in the Bizagi Work Portal (i.e. which profiles can see, work or use certain Bizagi options), you will still need to input authorization definitions in Bizagi. |

What you need to do
To configure Bizagi to sign in with Azure AD, please follow these steps:
1. Register your Bizagi Work Portal as an authorized app in your Azure AD.
2. Configure the authentication type with the Management Console.
3. Synchronize the users into Bizagi.
|
The steps oriented toward configuring integration with Azure AD, will require specific technical details (e.g, endpoints, authorized credentials) which are usually managed by an IT admin.Therefore, these steps will require a profile having expertise on this matter, and having access to the information mentioned above. |
1. Register your Bizagi Work Portal as an authorized app in your azure AD
The first step is to set up the configuration needed to Register Bizagi Work Portal (its URL) in Azure AD.
This includes inputting Bizagi endpoints to get access keys for an entitled connection.
1.1 Log in to your Azure services
Access your AzureAD subscription. To do so, you will need to sign in to Azure's portal at https://portal.azure.com.

1.2. Go into your Active Directory
Click the Active Directory option at the left panel and then click the App registrations to add a new application to it (by clicking New registration).

1.3. Input the app's basic properties
Give this app a name, and select Web App / API for its type.
For its Sign-on URL note that you need to input the base URL where your end-users access Bizagi Work Portal.
Consider:
•For Automation Service (cloud projects), this URL is specified as:
https://[project_environment]-[your_project]-[your_company].bizagi.com/oauth2/client/callback
Replace [your_company] and [your_project] for your subscription's values accordingly.
Similarly, replace [project_environment] with test for a Testing environment, or with nothing at all for a Production environment.
•For on-premises Bizagi projects, this URL is specified as:
https://[your_server]/[your_project]/oauth2/client/callback
Replace [your_server] and [your_project] depending on how you set up your environment.

Click Create when done.
1.4 Create a new Application ID
Once the app is created, you need to create an application ID and the Scope related to it.

Edit the Scope, select the Admins and users options in the Who can consent field:

|
Generally, the appropriate authorization settings are configured correctly by default, which means you should not need to configure them. By default the new applications and their keys are granted with Sign in and read user profile, which is what Bizagi requires. Note that it is expected that this setting does NOT require Admin:
|

1.5 Create a valid access key for the app
Go to the Certificates & Secrets and then click New client secret.

At the next screen, make sure you add a long descriptive secret for your key. Input such number within Description. Make sure you set the expiration for such key, and then click Add so that the key is generated and shown to you.

|
Note that the above access keys must have an expiration date, and you are therefore, in charge of managing and looking after its validity. |
At this point, you should copy the key's value.

Make sure you paste it into someplace you control having adequate measures for safekeeping and acknowledge that this value will be your Key.
1.6 Fill out additional URL details
You can register additional Branding details like the name or the Home page URL. In the Home page URL you can set the Bizagi Work Portals URL.

1.7 Configure Bizagi endpoints in Azure AD
Open the Authentication module. In there, make sure that the redirect URI (also referred as reply URL) Sign-on URL, has in its end the following suffix:
/oauth2/client/callback
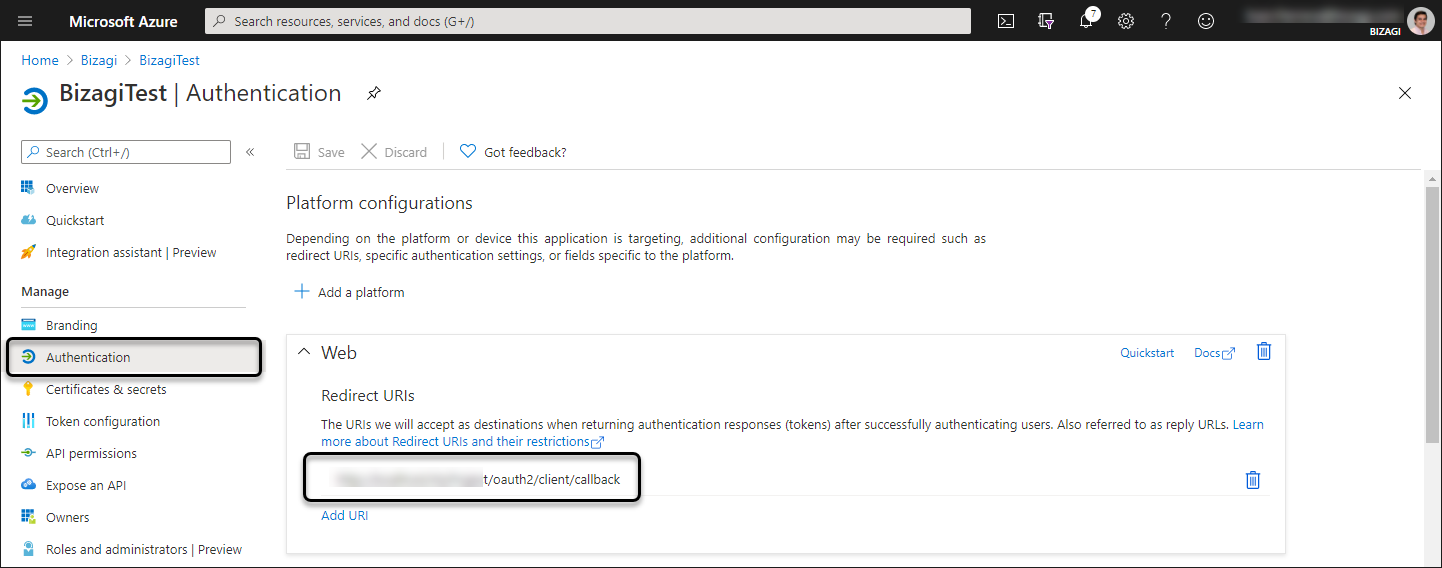
Click Save when done.
1.8 Look up your AD endpoints
Go back to Overview and look up the Endpoints to gather these URLs that you will need to configure later on in Bizagi.

Make sure you copy down the endpoints for the following:
•OAuth 2.0 Token Endpoint V1
•OAuth 2.0 Authorization Endpoint V1
|
OAuth 2.0 V2 enpoints are not supported. |
At this point, configuration directly in Azure AD is set and you may now go to Bizagi to complete the procedure.
2. Configure the authentication type in Bizagi with the Management Console
At this point, after having verified access in Azure AD works, you need to input the Azure AD details into Bizagi.
Do this by using Bizagi Management Console targeting the environment you want this configuration to apply to (e.g, Development environment, Testing environment, Production environment).
2.1 Open your project with the Management Console.
Open the Bizagi Management Console and load your project.

2.2 Go to the security settings
Select the Security module.

2.3 Select Azure authentication.
To do this, click the Authentication option in the middle panel, and use the following settings for the parameters in the rightmost panel:
•Type: OAuth2.
•Client: Azure AD.
Click Update.

Once OAuth2 and AzureAD are chosen, you will notice that new parameters for such Authentication are displayed.
2.4. Configure the authentication parameters and endpoints
To do so, consider the detail as described below:
PROPERTY |
VALUE |
|---|---|
Client ID |
Should match the Application Id as registered in Azure AD. |
Client Secret's value |
Should match the VALUE of the generated Key for that App set in Azure AD. |
Redirect Uri |
Should match the Response URI as registered in Azure AD, which should correspond to the Reply URL (that one ending in /oauth2/client/callback). |
OAuth2 Authorization Endpoint |
Should match the OAuth 2.0 Authorization endpoint as per your Azure AD. Use the following URL: https://login.microsoftonline.com/[tenant]/oauth2/authorize
Consider: •[tenant]: Should specify your Tenant id (based on your Azure's subscription). |
Token Endpoint |
Should match the OAuth 2.0 Token endpoint as per your Azure AD. Use the following URL: https://login.microsoftonline.com/[tenant]/oauth2/token
Consider: •[tenant]: Should specify your Tenant id (based on your Azure's subscription). |
Logout Endpoint |
Should refer to a Logout endpoint as handled by Azure AD, usually having the following URL: https://login.microsoftonline.com/[tenant]/oauth2/logout?post_logout_redirect_uri=[homeRedirect]
Consider: •[tenant]: Should specify your Tenant id (based on your Azure's subscription). •[homeRedirect]: Should specify the URL used to direct after a log-out. Usually, you use the same login URL, which is the one directing to Bizagi Work Portal. |
Bizagi Server URL |
Enter the complete URL which it was published and is accessed the Bizagi server. |
Cookie type |
•Persistent cookies: These remain on your hard drive until you erase them (log off) or they expire. How long a cookie remains on your browser depends on how long the Idle session time has been programmed.
•Session cookies: These are temporary and are erased when you close your browser at the end of your session. The next time you visit the Bizagi Work Portal it will not save your previous session as if you were accessing the first time. |
Enable authentication logging in database |
Defines if the web application must log every authentication event to the database. |
Idle sessions time-out |
Determines the amount of minutes for a session before it expires. Default Value: 20 |
Redirect to a logoff page after logoff process |
By default, when you log off, Bizagi automatically redirects you to the login page. If you want to change this behavior and redirect to a static logout page, enable this option. |
Show detailed authentication error messages |
For security reasons, the causes of authentication error are not shown in the Bizagi Work Portal, instead, a generic message is shown without details of the cause of the error. If you want to show the causes of the authentication errors, enable this option. |
|
If you applied this change into an environment other than development, make sure such same changes are applied in your Development environment.. To do this, follow the same procedure mentioned above while using Bizagi Studio. |
3. Synchronize the users from your Azure AD into Bizagi
At this point, the configuration is complete.
However, before using or testing the integrated authentication in runtime, you will need to explicitly import users from in Bizagi (as you are in charge of managing users). See how to synchronize users.
|
If you will not synchronize users yet, then you may test the authentication works as expected by simply creating one user manually in the Bizagi Work Portal for validation purposes. To create such user, consider: 1. You may need to temporarily switch back to using Bizagi authentication so that you can log in. 2. Make sure your created user is set with the exact domain\username combination matching your users in Azure AD. |
Authentication in runtime
Once these steps are carried out, authentication will be set for your end users in runtime.
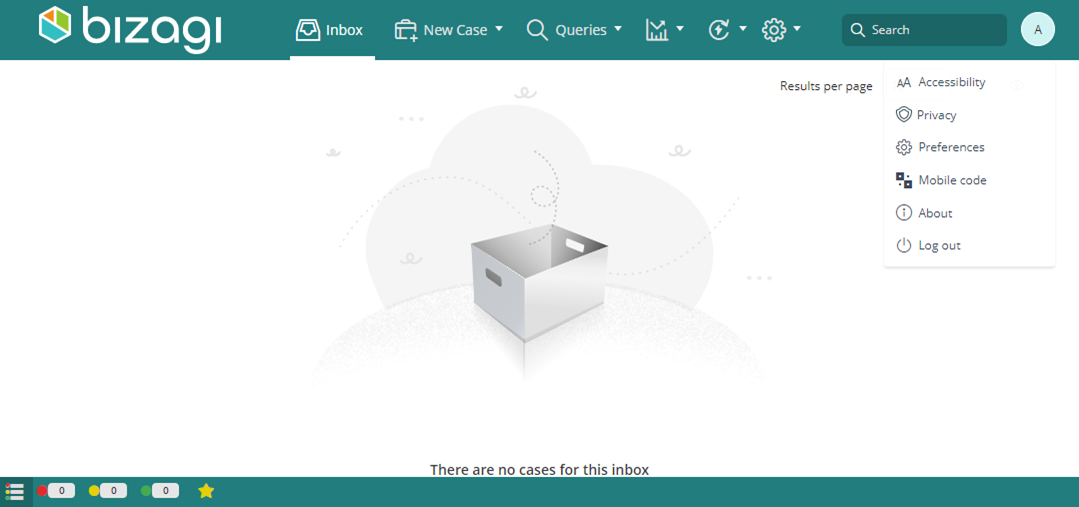
End users will be able to sign-in, and you can verify them by using a browser to access Bizagi Work Portal.
The following image exemplifies access to the Testing environment's Work Portal for Automation Service (using https://[project_environment]-[your_project]-[your_company].bizagi.com):

When the Bizagi Work Portal loads, it redirects you to your Azure AD login page:
After you sign in successfully to Azure AD, you are redirected back to the Work Portal with a valid session:
|
If you are already logged in with a valid session, you will not need to input any credentials. The SSO capabilities are kept at the browser's level meanwhile having an authenticated valid session. Other properties like the idle session, depend on the configuration in Bizagi, and are not inherited from the IdP |