Overview
Once you have your ECM with the folder repositories and its content-types configured for Bizagi, you may carry out the ECM configuration in Bizagi.
For more information about this prerequisite, refer to Configuring the ECM.
Before you start
Bizagi has a Proxy configuration option available to connect with external services such as ECM.
Configuration
To set the ECM to be used as the central repository of Bizagi Processes (to store uploaded documents), these are the main steps involved:
1. Registering the ECM in Bizagi
This means specifying its URL location and specific repository (folder), and any additional information to connect to the ECM.
2. Defining the File attributes which are to be stored in the ECM
Within this definition, you will set the specific folder to which the uploaded documents will be stored.
3. Using the appropriate control and configuration in your forms
At this point, you may also define how the metadata will be associated with that ECM repository.
1. Registering the ECM in Bizagi
The first step is to define and register the detail of your ECM system.
To do this, go to the Expert View and select External Systems.
You may create a new external system, or use an existing one which has no ECM configuration yet.
To create the ECM, right-click the External systems item and click New external system...:
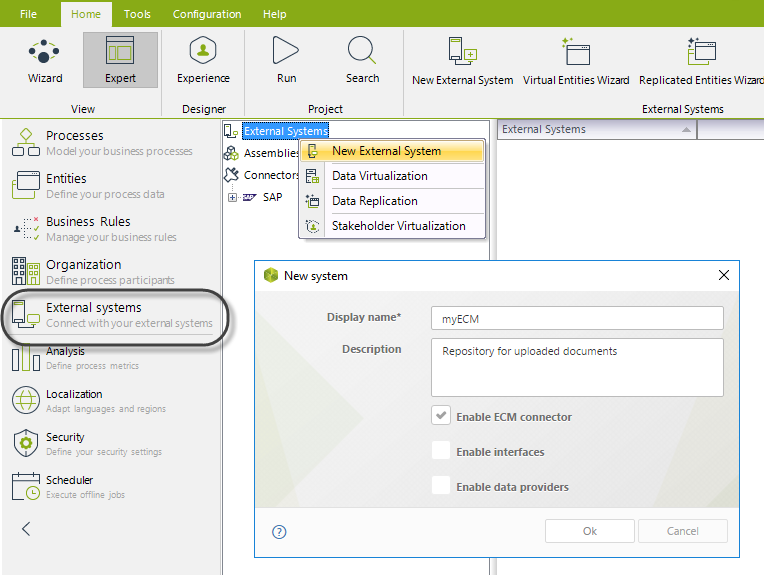
Enter its Name, Display Name and a meaningful Description.
Click OK.
Right-click the newly created system, and select New repository:
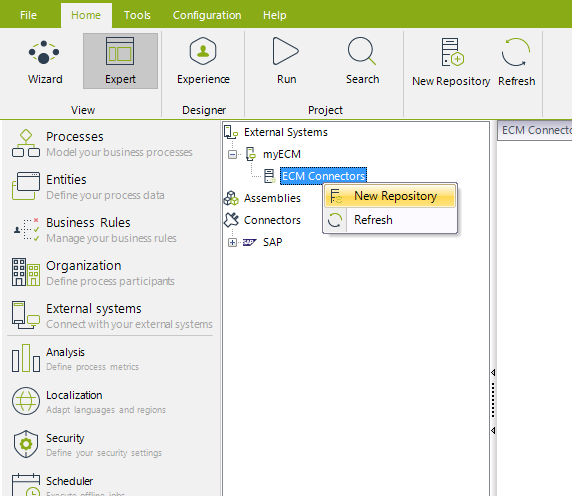
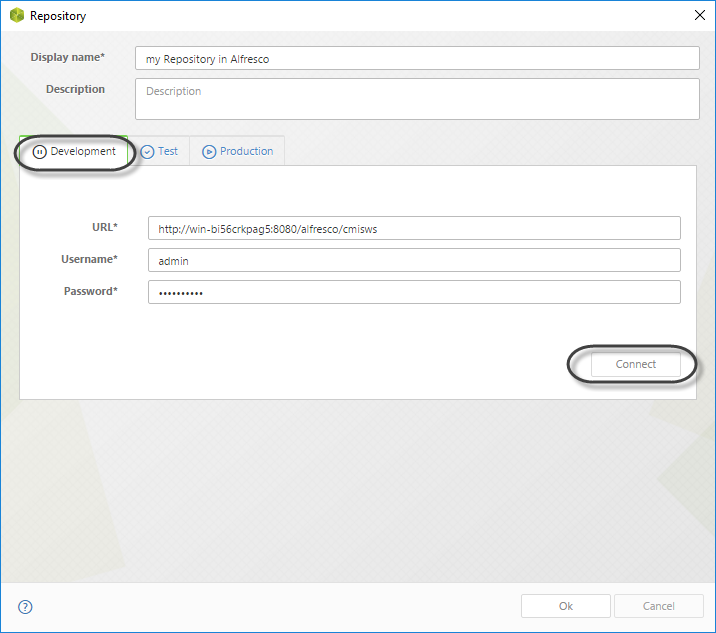
Enter a Name (Connector Name), Display Name and meaningful Description to register this repository.
For its Connection parameters, make sure you specify:
•URL: The URL location of your ECMs CMIS-compliant Web services root.
|
•For SharePoint, the URL corresponds to: http://[your_server]:[port_number]/[sites]/[your_site]/_vti_bin/cmis/soap •For Alfresco, the URL corresponds to the below possibilities: http://[your_server]:[port_number]/alfresco/cmis In newer versions of Alfresco, those having support for CMIS 1.1, CMIS 1.0 services are published by default at: http://[your_server]:[port_number]/alfresco/cmisws •For Documentum, the URL corresponds to: http://[your_server]:[port_number]/emc-cmis-ea/services •For FileNet, the URL corresponds to: http://[your_server]:[port_number]/fncmis/resources/[object_store_name] |
Notice that the URL does not include the full path to CMIS web services, as Bizagi will add the necessary suffixes to use more than 1 web service starting from that common path.
•User name: An authorized service account for the ECM connection in the form of domain\user.
This account will need to have access (writing permission) to the folder of your repository. This user will be displayed as the editor/creator of the files uploaded to your ECM.
•Password: The password for the authorized ECM user.
•Connect: Click on this button to test the connection to your ECM.
•Retries: Specifies the number of retry attempts to be made if the connection fails. This field will only be available when Is an asynchronous connection property is checked.
Select the repository.
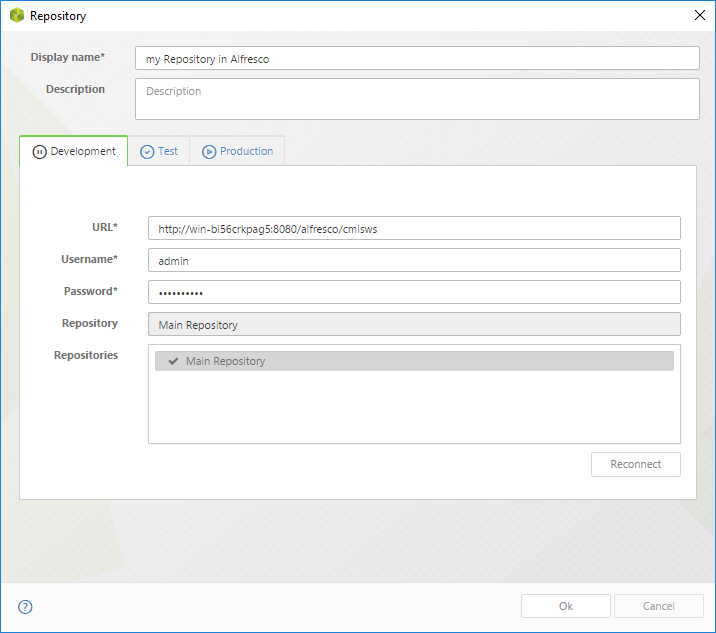
Notice you may also specify the different Connection parameters involved in your different project environments (Development, Test and Production).
By default, you will fill out the Development Connection parameters, and if no explicit definitions are entered for the Test and Production environments, these will take the configuration set for Development.
Once you have set your ECM and repository, proceed to define which folder you want to use.
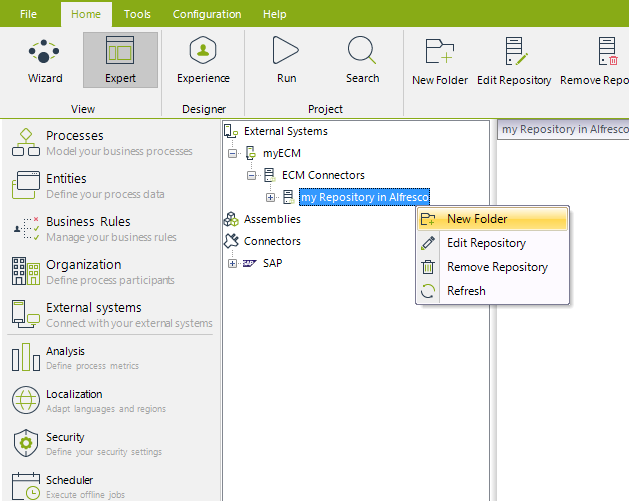
To do this, locate the newly created repository, and right-click it to select New folder:
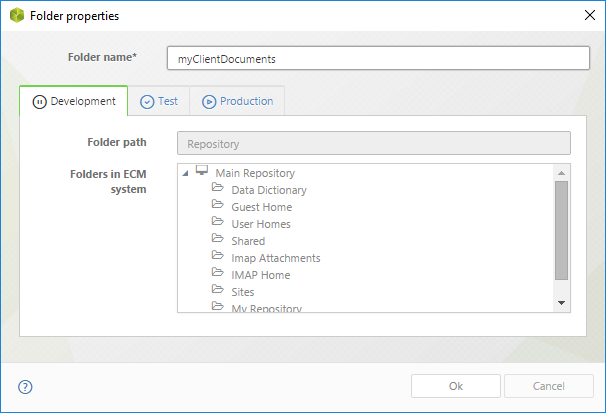
Give a Name to your folder, and select the ECM folder:
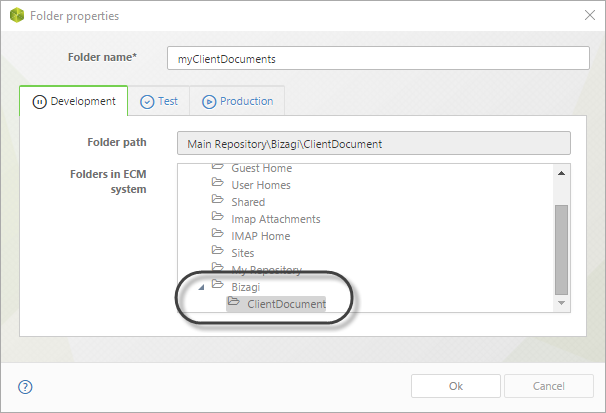
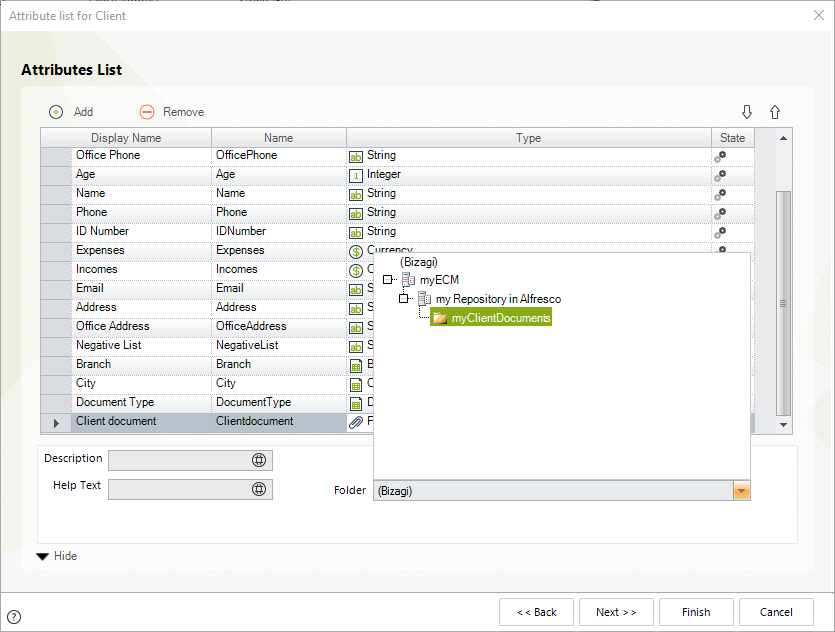
In this example, we select a ClientDocument folder inside a Bizagi folder of Alfresco's Main Repository. To expand a folder, double-click it:
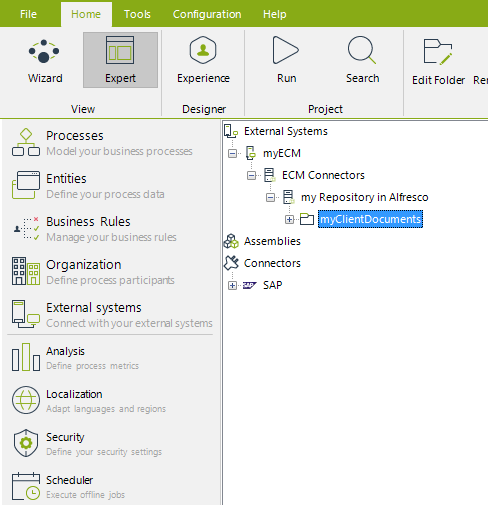
The final configuration should look similarly to the image below:
2. Defining the File attributes which are to be stored in the ECM
Once you have registered and defined the ECM system in Bizagi, you may specify the documents that will be stored into the ECM.
You may specify this for each File type attribute in your Data model.
To do this, locate the specific entities which have File type attributes having documents you want to store directly at the ECM.
Go to the Entities module, and edit the attributes of these entities:
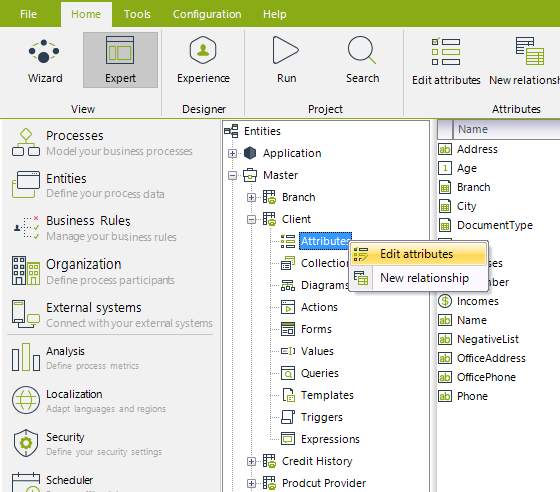
In our example, we will create a new File type attribute in the Client entity:
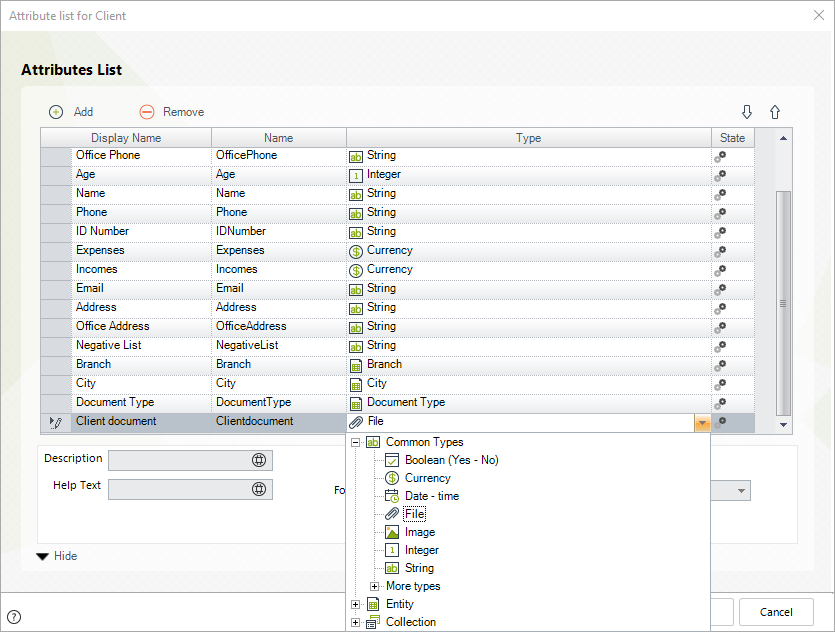
Notice that once you define that an attribute is of type File, you may select the Folder in which documents of this attribute will be stored.
By default, (Bizagi) is selected in this property, which means that no ECM is used.
Click on the drop-down list to locate your registered ECM and repository, and select the specific folder:
Once the folder is specified, make sure you select a valid content type for your documents.
To do this, click the ECM Type's drop-down list. You may also click View Metadata to review this content's expected information.
|
When working with the different ECMs, consider: •SharePoint will list those content types registered in the repository. •Alfresco will list all content types, even those which may not be valid for the given documents. It is recommended to select the Custom content types created in Alfresco. •In Documentum, it is strongly recommended to review the metadata to make sure you select the proper content type. |
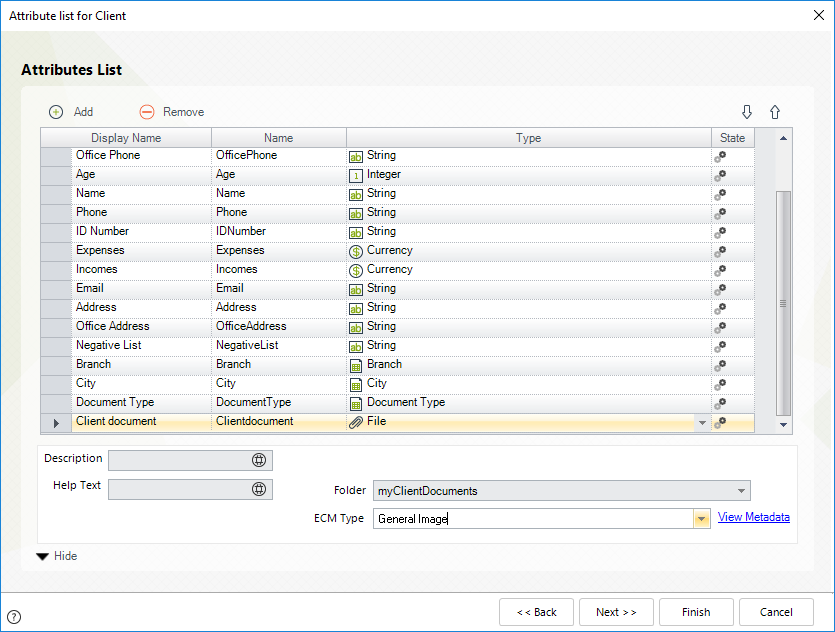
Click Finish to save changes.
The Client document attribute has been configured to store its information at the ECM.
3. Using the appropriate control and configuration in your forms
Once you have defined which File attributes should have the documents stored directly at the ECM, the remaining step is to define and configure your forms so that these File attributes are included and use the ECM control.
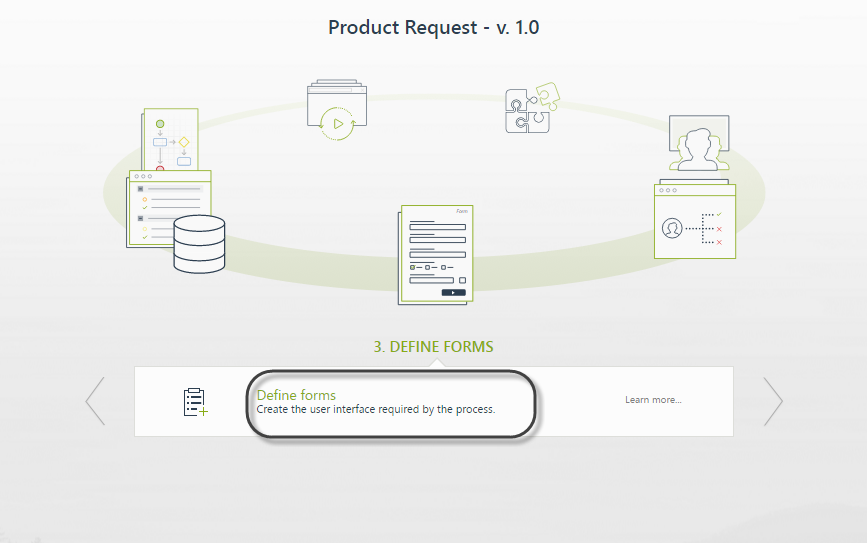
To do this, go to the Process wizard step 3 (Define forms), and edit the form for the Activity in which documents will be uploaded by end users.
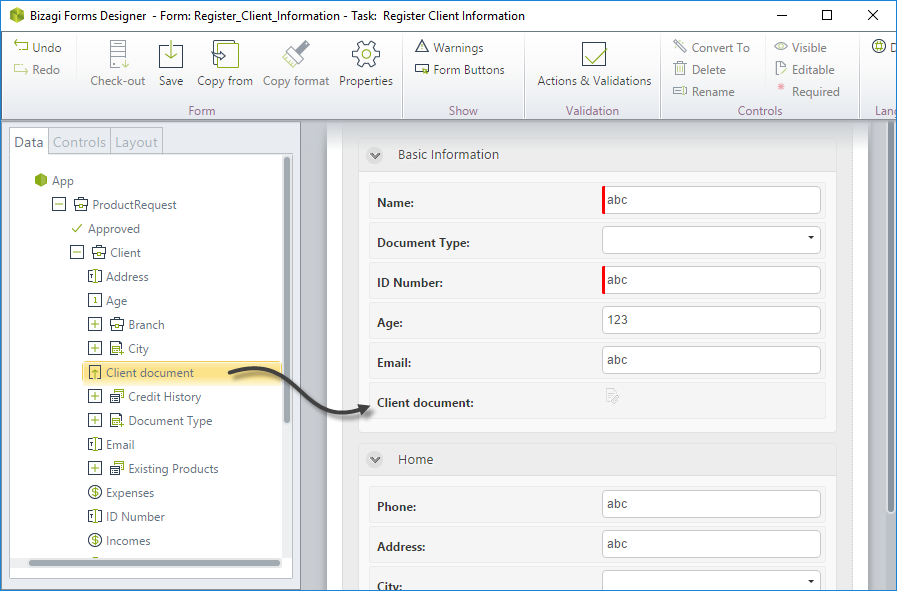
In our example, our edited form will now include the Client document attribute, which is automatically configured with the corresponding control by Bizagi:
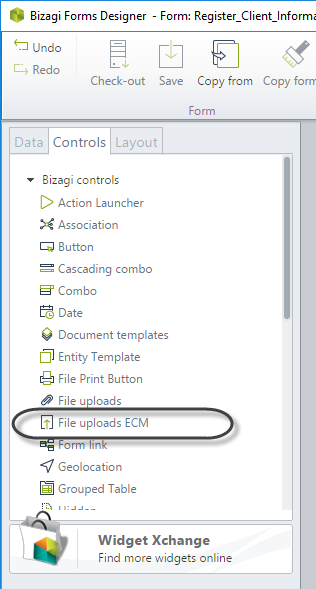
Notice this attribute uses the File Uploads ECM control:
At this point, configuration is finished.
Clicking on the attribute will display further optional configuration (such as specifying the maximum number of files -documents- which can be uploaded in this attribute, specifying valid extensions for them, or enabling the "send as attachment" icon, to name a few).
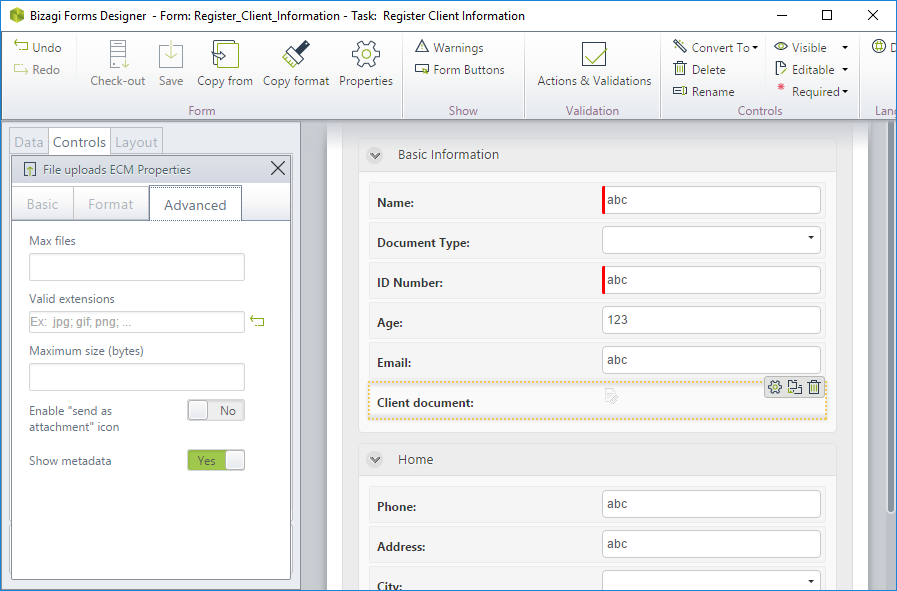
|
It is important and strongly recommended for Automation Service, to set the use of ECM integration with an asynchronous treatment for best performance. |
Execution
By default, the metadata involved in the ECM repository's folder will be shown to end users so that they can edit this information for each of their uploads.
If you wish to fill out the metadata in an automatic manner, you may create a business rule to map information of the Process instance into the metadata.
For more information about this option, refer to Set file metadata through a rule.
In our example, our Activity's form will allow end users to upload documents which will be stored directly at the ECM.
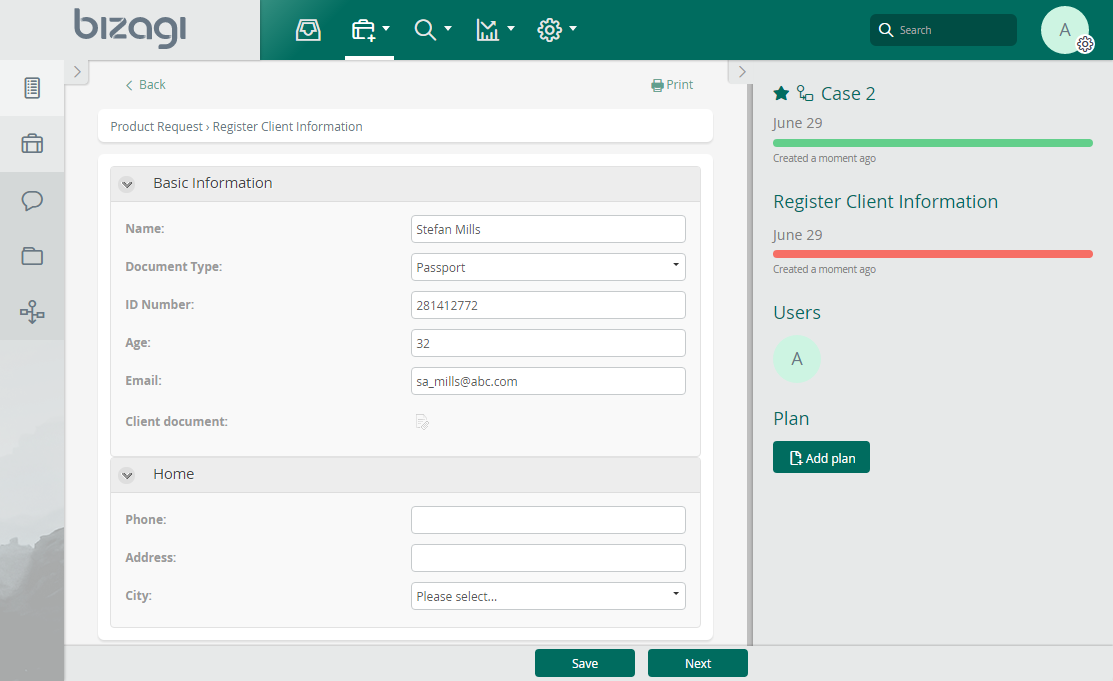
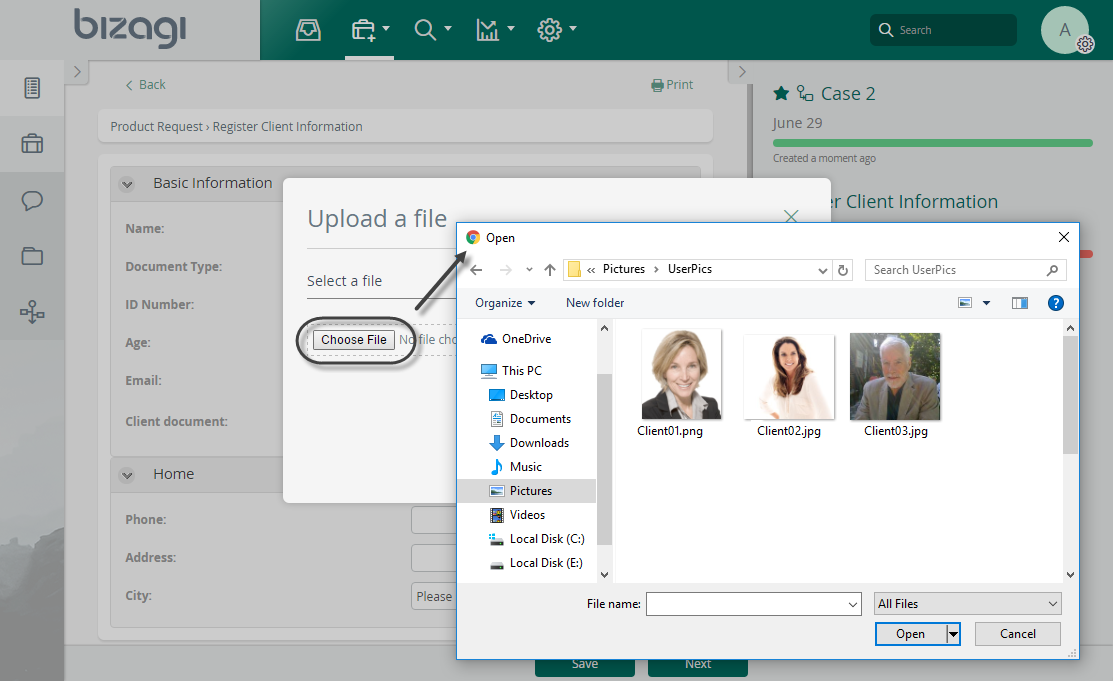
Clicking on the upload icon ( ![]() ) will allow you to include your attached document.
) will allow you to include your attached document.
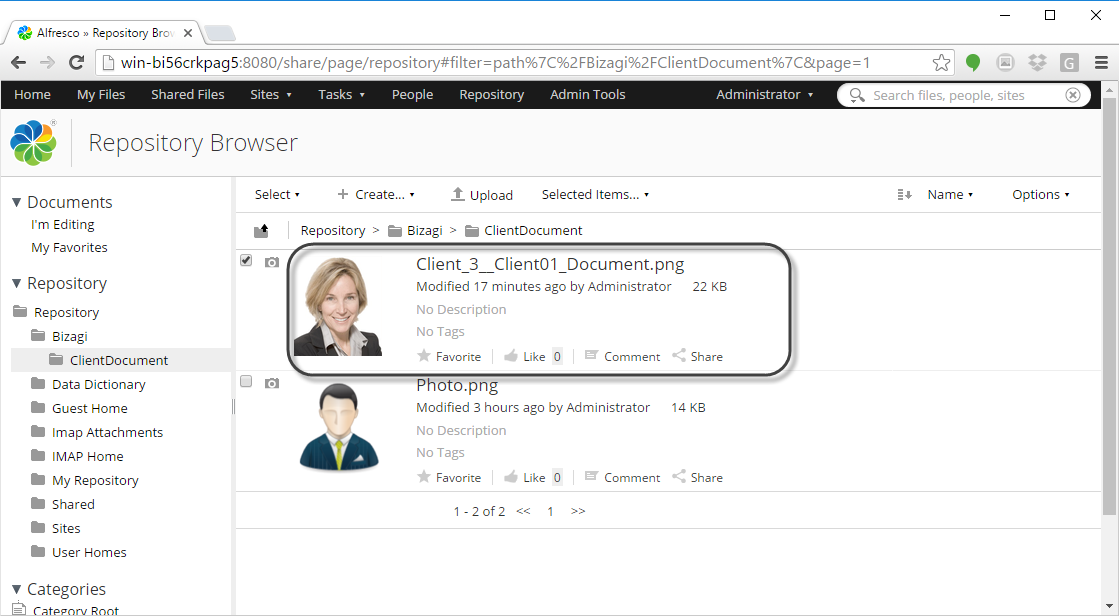
Notice that once uploaded, the file will not be sent to the ECM right away.
When clicking on the Next button (finishing the Task) Bizagi will commit the transaction and store the document at the ECM.
Additional options
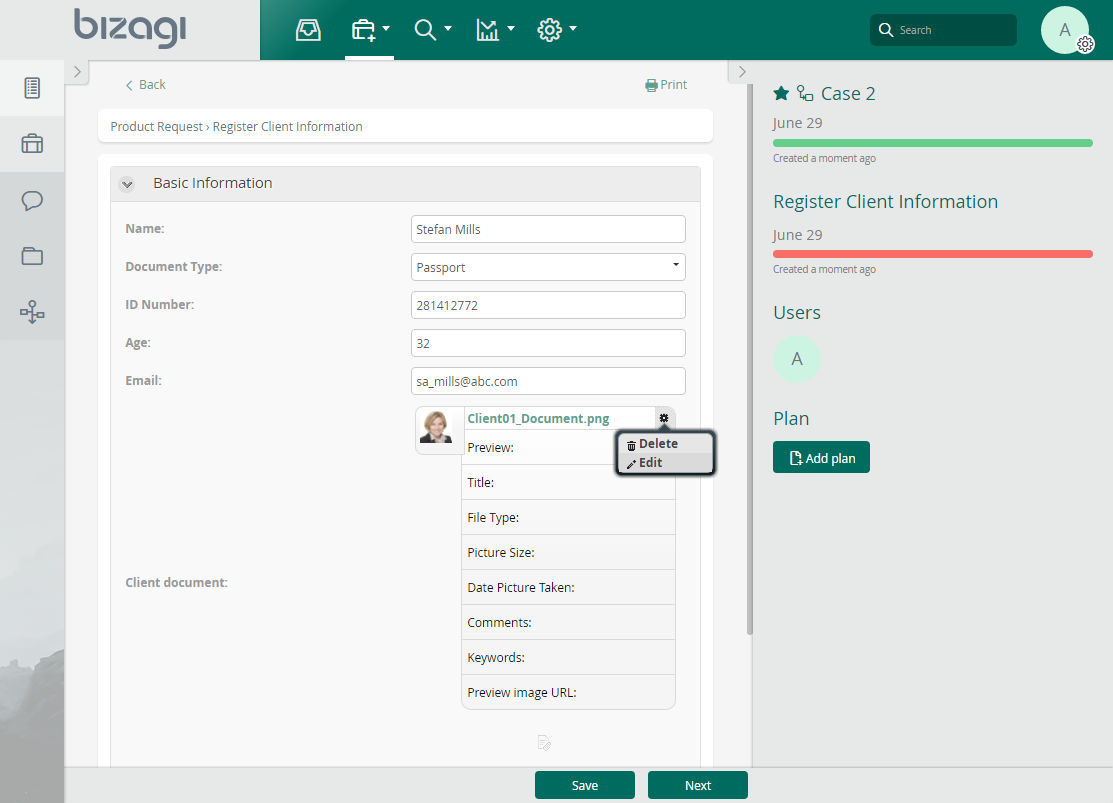
In this same Activity, you will see there are additional options for the document such as: Viewing the document, deleting the document, or updating its metadata.
Bizagi will load a thumbnail preview (when uploading an image file) or an icon representing the document type, as shown below:
•Viewing the document
Click on the file's name to visualize the document (you may also save it as a local copy, according to the file type).
With this option if the document is modified, changes will only be saved locally (and not in the ECM).
•Deleting the document
Click on the icon to the right of the document, and click Delete (to delete it).
You will be prompted for confirmation.
Click on the icon to the right of the file, and click Edit to enter or modify this document's metadata.
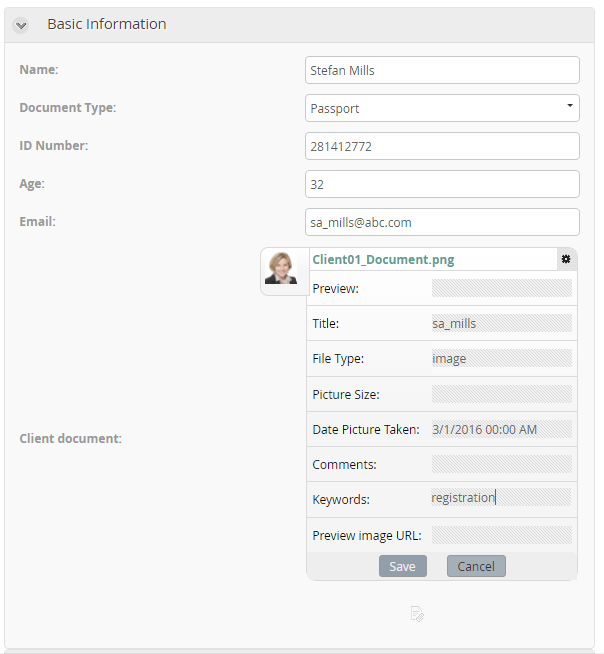
Keep in mind this is a manual edition, which can be also complemented by setting file metadata through a rule.
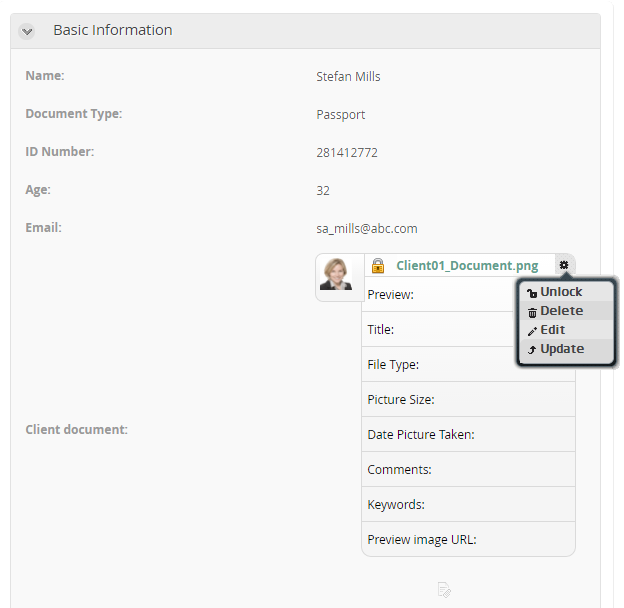
Once the document has been committed into the ECM, having the document shown in Activity forms will present additional possibilities (that is, if the ECM document is set as editable), such as: Update the document, Lock it (a check out) or unlock it.
If the document is set as non-editable, then the only option will be to view it.
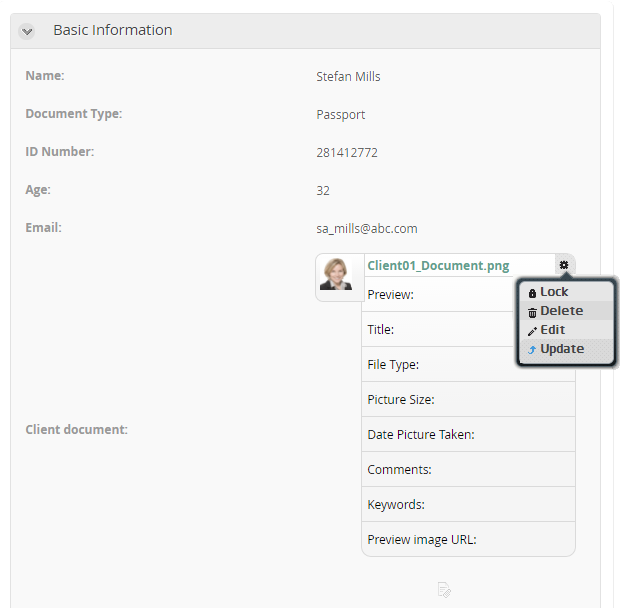
•Updating the document
Click on Update to upload a replacement for this document (similarly as when initially attaching the document).
•Locking / Unlocking the document
Click on Lock to check out the document so that no modifications can be done to it directly in the ECM by any other user or Activity.
Click on Unlock to release a document which was locked.
ECMs in Production
When creating a New Repository, you may set and define its properties' values for each environment (this includes the folders for the repository).
Once that ECM configuration has already been taken to the Production environment, the values for that environment may no longer be edited directly in the Development environment (similarly, Bizagi will not allow deleting an ECM in the Development environment which is already working in Production).
For the Test environment, values can be redefined in the Development environment (through Bizagi Studio), so that a new deployment overwrites those values.
Summarizing, for ECM system-configuration which are already deployed to Production, any edition to their property values needs to be done directly in that environment.
This same concept applies to the folders definition in the ECM integration.
Last Updated 7/8/2025 3:09:19 PM