Overview
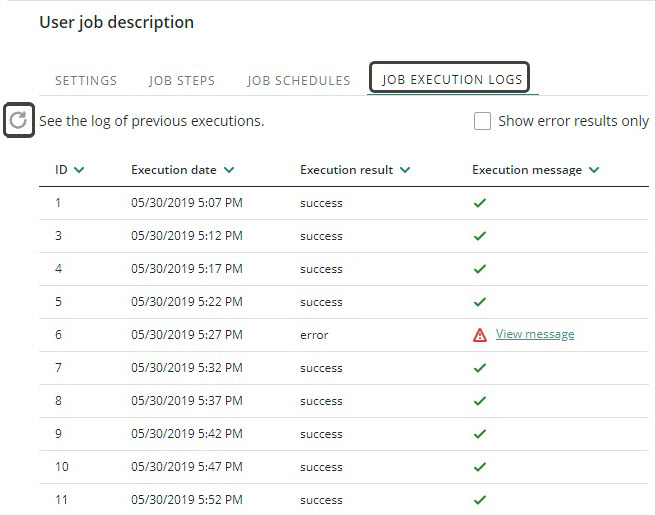
Sets of steps that can be run according to a schedule: run once by specifying a specific date, or run periodically during a given period of time. From this tab, you can edit the steps and schedules of User Jobs (also known as Custom Jobs) directly in the Management Console (MC) in Test and Production environments. Jobs and schedules are listed alphabetically, and the Jobs log displays the most recent execution at the top. A refresh button is available in the Job Execution Logs subsection to instantly update the log with recent data, without needing to reload the page or navigate away.
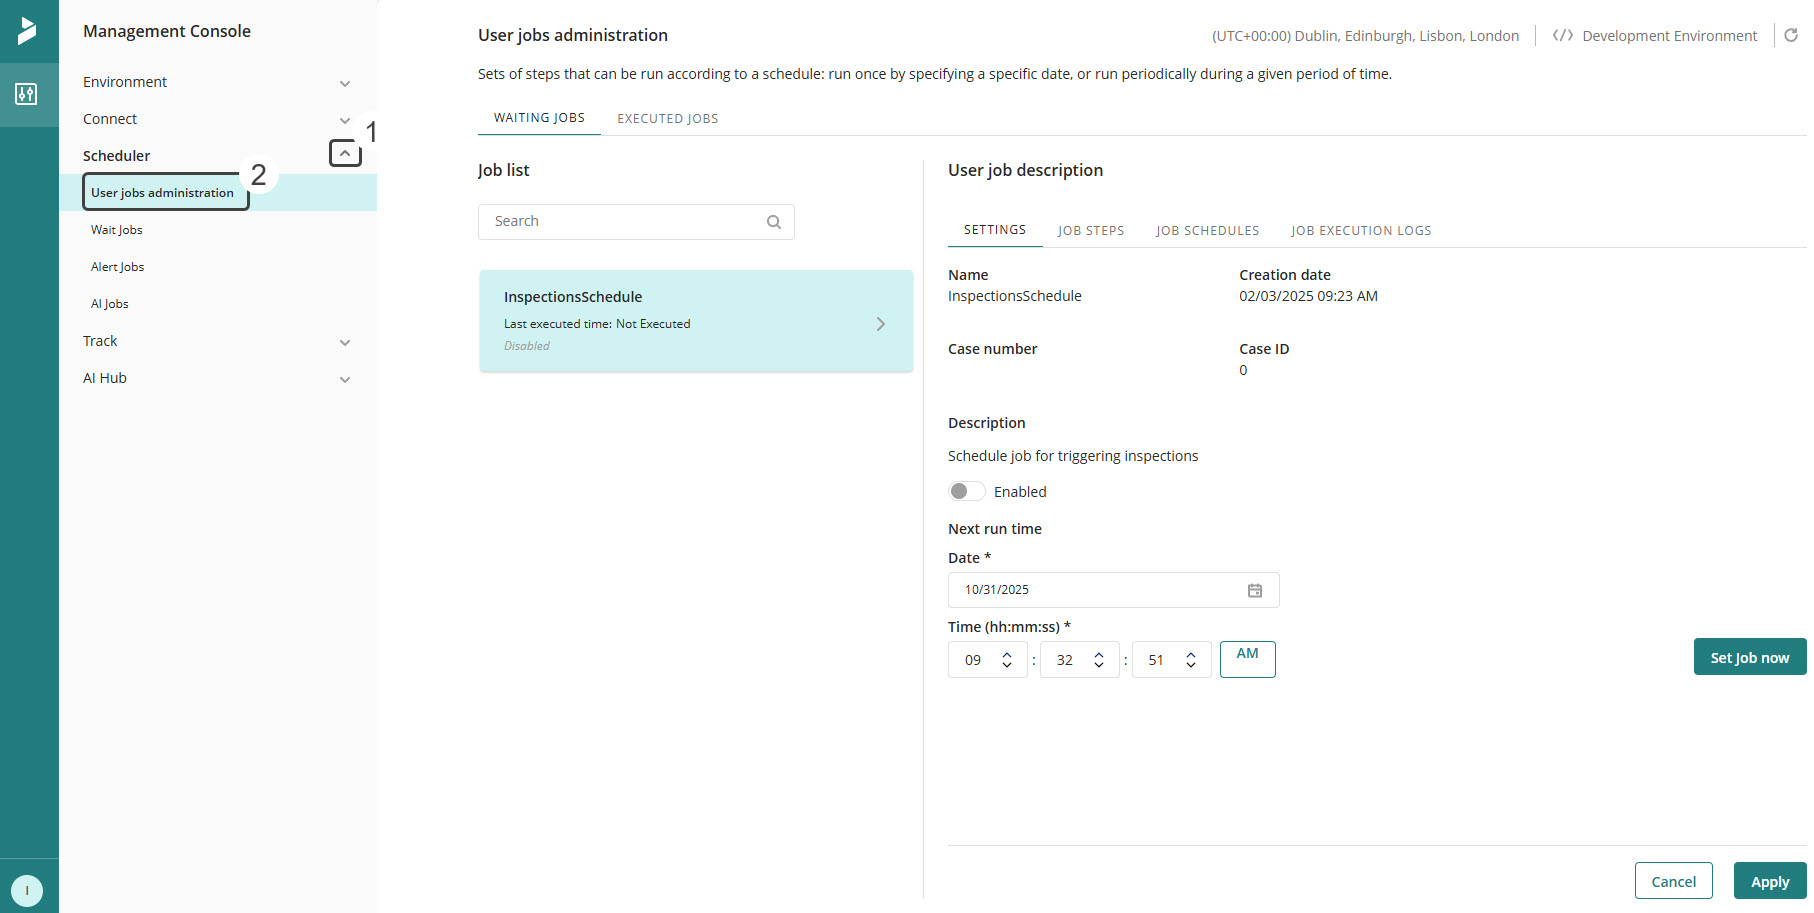
The User jobs administration module has two tabs for you to choose a Job fom:
•Waiting jobs: Lists unexecuted or recurring Jobs.
•Executed jobs: Lists non-recurring Jobs already executed.
Both tabs show the same panels: Job list and User job description.
|
•User Jobs are read-only in the Development environment in the Management Console. However, from the Development environment you can enable or disable a Job and select a run time from the Settings tab. The Job Steps, Job Schedules and Job Execution Logs tabs are read-only. •To access editing options for the steps and schedules of User Jobs, use Test or Production environments in the Management Console. |
Job List
This list shows the Jobs in the project. Each element of the list presents the following information:

# |
DESCRIPTION |
|---|---|
1 |
Job name defined in Bizagi Studio |
2 |
The label and value of this date changes according to the Job status: •If the Job has not been executed before, shows 01/01/0001 12:00 AM as the Last executed time. •If the Job is recurrent and failed, shows the Last executed time. •If the Job is recurrent and was successfully executed, shows the Next run time. •If the Job is not recurrent and was executed. Shows 31/12/9999 11:59 PM as the Next run time. |
3 |
Job status which can be switched in the User job description panel |
User job description
This panel shows further information about the selected job in the list, grouped into four tabs: Settings, Job Steps, Job Schedules, and Job Execution Logs.
Settings
Shows the general properties of the Job. This tab shows the following information:
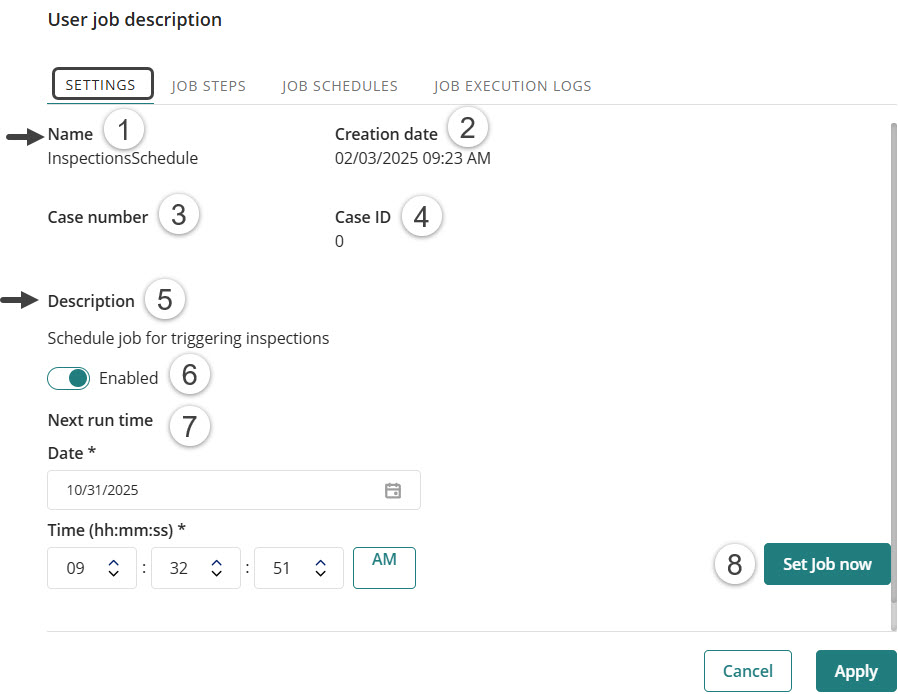
You can edit the name and description of a Custom Job from the Settings tab in Test and Production environments. You can also enable or disable a job and select a run time in this tab.
# |
OPTION |
DESCRIPTION |
|---|---|---|
1 |
Name |
The name of the Job. |
2 |
Creation date |
The date when the Job was created. |
3 |
Case number |
The case number of the selected Job. |
4 |
Case ID |
The case ID of the selected Job. |
5 |
Description |
A brief description of what the Job does. |
6 |
Enabled |
Enable or disable the execution of the Job. Click Apply to save changes. |
7 |
Next run time |
The date and time when the Job will run. •This date is rescheduled each time the Job runs depending on the periodicity indicated for the Job. •Click Apply to save changes. |
8 |
Set Job now |
Click this button to automatically enable a waiting job and set it for immediate execution. |
|
Text entered in the fields must not contain spaces or special characters, and must be no longer than 24 characters. If these requirements are not met, the Apply button is disabled. |
Job Steps
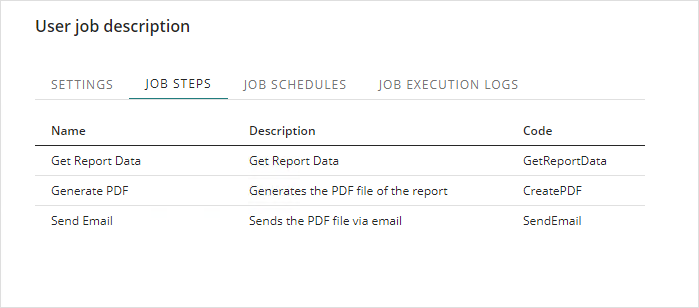
Shows the sequence of steps of the Job, you can edit the name and description fields of a User Job in the Job Steps tab from the Test and Production environments. This tab shows a table with the following information:
NAME |
DESCRIPTION |
|---|---|
Name |
Name of the step. This field is editable from this tab. |
Description |
A brief description of what the step does. This field is editable from this tab. |
Code |
The rule executed by the step. |
Job Schedules
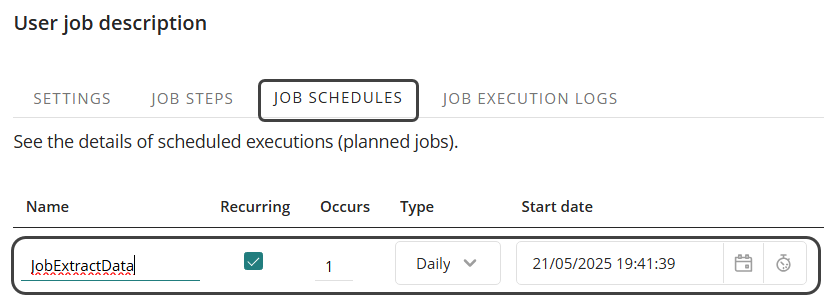
Shows the details of the scheduled executions. In Test and Production environments, the fields for name, recurrence, frequency, type and start date are enabled for editing. This tab shows a table with the following information:
NAME |
DESCRIPTION |
|---|---|
Name |
The name of the schedule. |
Recurring |
Indicates whether the job is executed recurrently |
Occurs |
Indicates how many times the job will take place according to the frequency indicated in Type. |
Type |
The frequency (Example: Every N weeks). |
Start date |
Date on which the Job will begin to run. |
Job Execution Logs
Shows the log of all the executions of the selected Job. This section displays the most recent execution first.
Use the Show error results only option to filter the list to show only unsuccessful executions. A refresh button is available to instantly update the log with recent data, without needing to reload the page or navigate away.
This tab shows a table with the following information:
NAME |
DESCRIPTION |
|---|---|
ID |
Identifier of the execution. |
Execution date |
Date of the execution |
Execution result |
Indicates if the execution result was success or error. |
Execution message |
•Shows a check mark if the execution result is success. •Shows a red warning and a link with the message thrown when the execution result was error. |
Last Updated 11/19/2025 1:24:25 PM