Overview
Often, there are situations where you need to apply a minor change into a specific part of a project without affecting the majority of it.
Given that in such situations, you still need to deploy changes, as minor as they can be, you need to make sure that such deployment doesn't include objects which may alter other parts of your project.
Some examples of those situations are: the need to change some specific texts or labels on forms, change only one query form, or change one business rule. For such situations, Bizagi introduces the Microdeployment feature.
Considerations with Bizagi versions
A microdeployment considers the same restrictions as a normal deployment. When you are microdeploying you have to make sure that the version of your target environment, test or production, has the same version or superior from your development environment. For example, you can deploy from 11.2.2 to 11.2.4, or from 11.2.4 to 11.2.4. You cannot apply a microdeployment for lower versions, for example, from 11.2.4 to 11.2.2 is not possible.
Before you start
There are some important aspects to consider before starting a Microdeployment:
•A Microdeployment, as a procedure, does NOT undergo the same configuration steps of a traditional deployment. You may consider the Microdeployment as a shorter and faster procedure when compared to other deployments.
As such, a thorough Dependency Analysis is NOT performed when exporting a package to an environment.
This means that any metadata included in the exported .bex file, must already exist in the environment where that .bex will be imported into (e.g. testing or production environment).
In other words, when performing a Microdeployment there is one aspect that you can consider so that it results in a successful deployment: object references. The following table summarizes the possible outcomes.
Situation |
Outcome |
|---|---|
Objects being deployed only refer to other objects that are already present in the target environment's metadata |
The Microdeployment succeeds |
Objects being deployed refer to other objects that are not present in the target environment's metadata |
The Microdeployment fails |
•To use a Microdeployment, some basic environment rules (as those enforced by a traditional deployment) are applicable, such as making sure that there is only one valid production environment set for one Bizagi project.
A Microdeployment is applicable to both on-premises and cloud projects.
What can you include in a Microdeployment?
Not all objects can be included in a Microdeployment due to some of them having complex references.
The following list considers objects which are eligible for a Microdeployment:
•Rules
•Mappings
•Message Templates
•Forms
•Document Templates
•Queries
•Start forms
•Search forms
•Custom columns
Any other type of objects are not available, and so, these are not shown in the Microdeployment wizard.
What you need to do
The following steps provide a high level outline of the actions that you need to follow to successfully carry out a Microdeployment.
1.Generate a deployment package including only those specific objects you wish to deploy.
2.Import the package in the target environment.
Example
Consider as an example, that an environment has been already set up having the Vehicle Insurance Policy Underwriting process , which is operational in a production environment.
For this example, the Microdeployment targets a cloud environment.

Description
The initial state of this scenario is:
•The Vehicle Insurance Policy Underwriting process' has a first activity called Register Client and Vehicle Data.
•The form (UI) for that Register Client and Vehicle Data looks as shown below.

•Your manager pointed out that the Case information group shown in the form is no longer desired.
In other words, you will need to delete this Case information group from the form.
•Assuming you and your team colleagues are currently working in the development environment, while implementing other unfinished changes, then it becomes clear that you need to perform a Microdeployment, so that those other changes do not affect operations of your process.
Performing the changes in the development environment
The first thing is actually making the minor changes to the process (as pointed out by your manager).
In the following image you can see how the group is not present anymore and the Policy Owner Information is now the uppermost element of the IP_CustomerVehicleBasicData form:

First step (Generate a deployment package including only those specific objects you wish to deploy).
Once changes are implemented, you proceed to generate a .bex file by only considering the form in question.
To do so, go to the seventh step of the wizard and select the Microdeployment option. This option is also available in the Export/Import tab.

The Microdeployment wizard appears.

The first step of the wizard lets you filter the elements you want to deploy. Select the element types in the left panel of the wizard and the element's process. Filter the objects you want to export. You can use the Filter field to find the process.
Click Next.
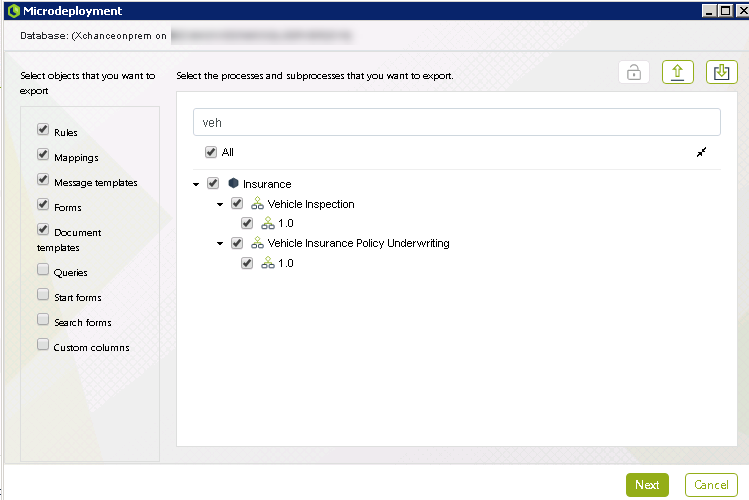
According to your selection, a panel is displayed where all the objects that can be considered in a Microdeployment are available.
Use the Filter field or navigate the panel to find the modified element and check it to indicate that it is included in the Microdeployment.

Click the Export button and select a directory in your machine where you want the deployment package (.bex file) to be saved.

Second step (import the package in the target environment).
Head to the management options of your target environment to import the .bex file. You can do this either from the Management Console Web for cloud environments, or by using the CreateImport.exe tool for on-premises projects.
To do so, click the Import option or Upload package option in Managment Console Web, select the recently created .bex file, confirm that you want to upload it into your environment and wait for the process to be finished.

You can make sure that the Microdeployment was successful by checking the form of the first task, making sure that the Case information group is no longer present. Since the Import did not result in an error you can assume that no new metadata was introduced by the import within your target environment.
Thus you can rest assured that unfinished/undesired changes were not mistakenly included.

At this point you have successfully carried out a Microdeployment, and your manager's suggestion is now fulfilled!
Important considerations
Consider the following when using a Microdeployment:
•The Microdeployment is only available when using the Advanced Deployment.
The Microdeployment is NOT available for the One-click deployment feature.
•Any object referenced by those ones being deployed must already exist in the metadata of the target environment, otherwise the Microdeployment procedure will fail.
Those referenced objects are NOT automatically included (because a thorough Dependency Analysis is not performed).
For this reason, a Microdeployment is eligible for specific objects of a process, only when such process has already been deployed to that same target environment.
•If you are microdeploying Customize Columns, make sure that the variables or vocabularies, are previously deployed so its metadata exists in the target environment.
•In Automation service, a maintenance window can be triggered automatically, if the microdeployment package contains an element that requires resetting the cloud-based environment. Refer to the Bizagi cloud maintenance window.