Overview
Automation Service supports integrating with on-premises Identity managers such as LDAP Servers (i.e. Microsoft Active Directory), via a VPN configuration.
For introductory information about authentication options in Bizagi, refer to Identity and Access Management.
When using LDAP Authentication in Bizagi, credentials entered in the login page (username, password and domain) are sent to an LDAP Server for verification.
Once the server verifies the user account (which must already have been created in Bizagi) and grants access, login is successful.

With this authentication type, passwords are never stored in Bizagi and you are autonomous to rely on your LDAP Server for adequate account configuration and password policies.
Before you start
You need to set up a VPN for this type of authentication.
For details and requirements about this first step, refer to VPN setup.
What you need to do
Once a VPN is set up, follow these steps to configure LDAP authentication:
1. Configure the authentication type in the Management Console (recommended) or in Bizagi Studio.
2. Synchronize the users from your LDAP into your Automation Service service via Management Console or Studio.
Configuration procedure using Management Console
By default, all projects use Bizagi Authentication, so the first step is changing this setting.
1. Configure the authentication type
You will need technical details from your LDAP system.
1.1 Open the project's Management Console and go to the security settings.
To perform changes in the authentication options, it is necessary to enable the maintenance window. To do so, click Go to maintenance window button.
Move to the Authentication tab and make sure that the drop-down list shows LDAP as the security option. Click Save to refresh the list:

Once you choose LDAP, sub-items for Authentication display.
Configure these parameters to finish the details and connection settings.

•Cookie type: Defines whether Bizagi uses Persistent o Session cookies. The idle session time-out defines the expiration time for cookies.
•Enable Forms Authentication: enables the extension feature to Bizagi with the ASP.net Forms authentication protocol, based on using forms to authenticate users. For more information visit Forms Authentication.
•Enable authentication logging: Establishes if an audit log is recorded with all authentication events. If enabled look for the table AUTHOLOG in the database.
•Forms Authentication Cookie Domain: type the domain of the Cookie in the available field.
•Forms Authentication Cookie name: type the name of the Cookie used.
•Forms Authentication Login page: set the URL of the login page that Bizagi redirects in case the session expires or the authentication fails (e.g. using the wrong password).
•Idle session time-out: Defines the time in minutes in which an idle session expires; in which case it would be required to authenticate again. This setting defines the expiration time for cookies.
In case you wish to increment this time-out to more than 60 minutes (not recommended), bear in mind that you will need to edit the default settings at your web server (e.g, doing so directly at the IIS).
•LDAP URL: Corresponds to the path used to access the LDAP Server (using the LDAP URI format).
Input LDAP://myldap:389/OU=users,DC=domain,DC=com
With the LDAP prefix in capital letters.
|
LDAP using SSL/TLS (LDAPS) protocol is NOT supported. |

•Show detailed authentication error messages: Defines if authentication errors are shown in a detailed way when they occur.
•Use settings in LDAP synchronization: This applies if you have configured Bizagi to synchronize your Active Directory users into Bizagi (as described in the following step).
oTurn this option on, to use the same LDAP URL and settings from the LDAP synchronization settings.
oWhen this option is on, the value of the former option will be ignored.
Configuration procedure using Bizagi Studio
By default, Bizagi Studio projects use Bizagi Authentication, so the first step is changing this setting.
1. Configure the authentication type in Bizagi Studio.
You will need technical details from your LDAP system.
1.1 Open your Bizagi Studio project
Open Bizagi Studio and load your project (Development environment).

1.2 Go to the security settings.
Click the Expert view and select the Security module.

Click Authentication in the middle panel, and make sure that the drop-down list at the rightmost panel shows LDAP as a security option. Click Update to refresh the list:

Once you choose LDAP, sub-items for Authentication display.
Configure these parameters to finish the details and connection settings.
•Cookie type: Defines whether Bizagi uses Persistent o Session cookies. The idle session time-out defines the expiration time for cookies.
•Enable authentication logging: Establishes if an audit log is recorded with all authentication events. If enabled look for the table AUTHOLOG in the database.
•Enable Forms Authentication: enables the extension feature to Bizagi with the ASP.net Forms authentication protocol, based on using forms to authenticate users. For more information visit Forms Authentication.
•Forms Authentication Cookie Domain: type the domain of the Cookie in the available field.
•Forms Authentication Cookie name: type the name of the Cookie used.
•Forms Authentication Login page: set the URL of the login page that Bizagi redirects in case the session expires or the authentication fails (e.g. using the wrong password).
•Idle session time-out: Defines the time in minutes in which an idle session expires; in which case it would be required to authenticate again. This setting defines the expiration time for cookies.
In case you wish to increment this time-out to more than 60 minutes (not recommended), bear in mind that you will need to edit the default settings at your web server (e.g, doing so directly at the IIS).
•LDAP URL: Corresponds to the path to access the LDAP Server (using the LDAP URL format).
It is mandatory that you input LDAP://.. with the starting LDAP prefix in uppercase, capital letters.

•Show detailed authentication error messages: Defines if authentication errors are shown in a detailed way when they occur.
•Use settings in LDAP synchronization: This applies if you have configured Bizagi to synchronize your Active Directory users into Bizagi (as described in the following step).
oTurn this option on, to use the same LDAP URL and settings from the LDAP synchronization settings.
oWhen this option is on, the value of the former option will be ignored.

2. Synchronize the users from your LDAP into your Automation Service service.
It is your responsibility to manage users, and therefore you also need to synchronize users from your LDAP into Automation Service.
To both set up and test the LDAP synchronization in your project, follow these steps:
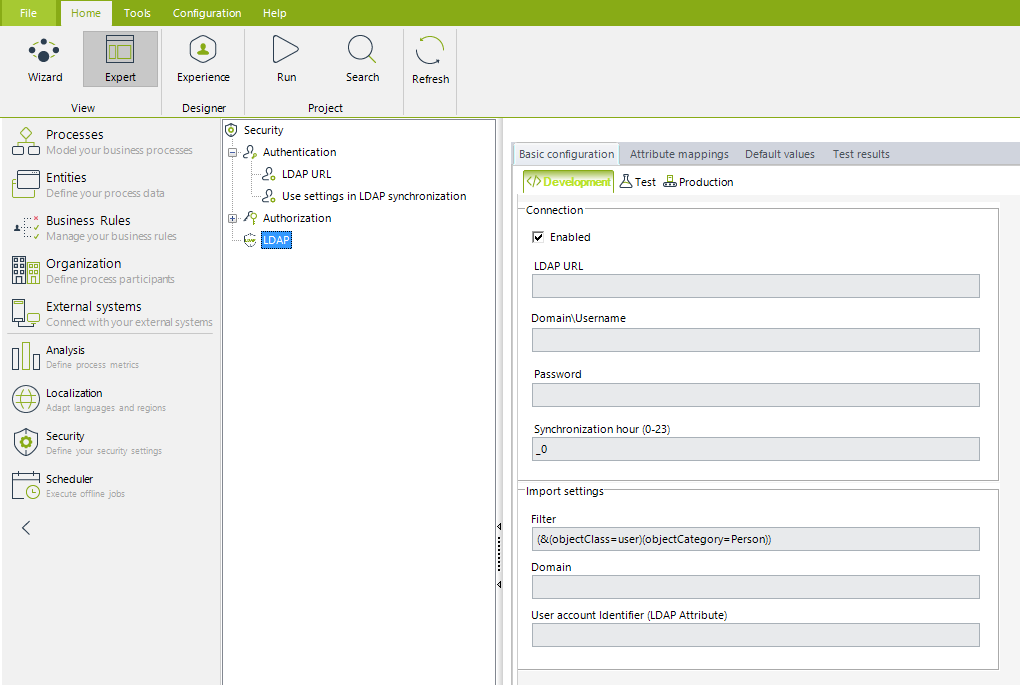
2.1. Enter the connection and import settings.
This initial configuration is done on the Basic configuration tab.
To do this, first enable the LDAP synchronization by marking the Enabled checkbox.
Then, make sure you fill out both the connection and import settings as described below:
SETTING |
DESCRIPTION |
|
Connection |
LDAP URL |
Specify the URL path to access the LDAP server (LDAP URL format). |
Domain/username |
Specify a username and its domain, to be used as the authenticated user performing the synchronization. The user needs read access to these definitions. |
|
Password |
Specify the password for the domain's username used as the authenticated user performing the synchronization. |
|
Synchronization hour |
Define an hour of the day that the Scheduler will perform LDAP synchronization. Allowed values for this field are 0 to 23. |
|
Import settings |
Filter |
Provide a filter to import only the proper accounts into your project (according to an LDAP attribute criteria). We strongly recommend using and setting a filtering condition to import the proper set of users (especially when testing the configuration). |
Domain |
Specify the domain name to which the users will be registered in Bizagi's user entity (WFUser). |
|
User account identifier |
Choose the LDAP attribute that identifies in a UNIQUE manner each account. For example, sAMAccountName is the common LDAP attribute corresponding to a user's account name. |
|
From the Management Console

From Bizagi Studio

|
You can define the connection and all relevant LDAP import settings separately for each of your environments (Development, Test and Production).
An initial deployment will publish this configuration to each environment. From then on, changes to the LDAP import settings need to be managed separately for each environment. |
2.2. Specifying attribute mappings.
On the next tab, Attribute mappings, add the necessary mappings for your WFUser attributes (the name of the table storing user's identifiers in Bizagi).
Click the Add Mapping button. Select attributes from the WFUser Entity and match them to an LDAP attribute. LDAP attributes have the following incoming information:
From the Management Console

From Bizagi Studio

This example shows mapping the mail and name attributes, as these two are explicitly required in Bizagi (contactEmail and fullName).
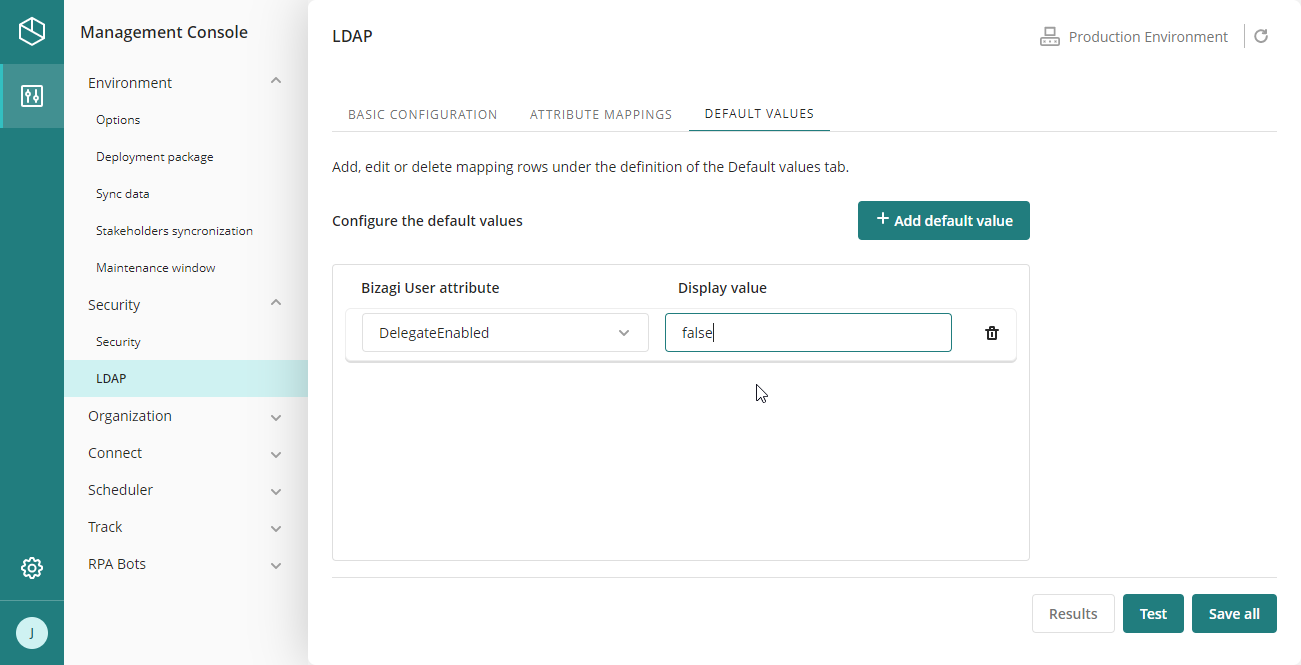
2.3. Define default values (if any).
On the next tab, Default values, add any necessary default values for your WFUser attributes.
Click the Add Default value button, and then, select attributes from the WFUser Entity and assign values to them.
From Management Console

From Bizagi Studio

|
Do not set the enabled attribute to true for all users before confirming that is the correct set of users to import and synchronize. |
2.4. Test and save your configuration.
Once you have finished your configuration, click the Test button to see your synchronization results.
Note that this can take a while if you have a large number of users and it is, therefore, recommended that you use the filter setting mentioned in step 2.1.
The synchronization results appear in the Test results tab.

|
Testing the configuration does not imply that an immediate synchronization is made into Bizagi. This is only for testing purposes. The list of users displayed is not automatically updated (this happens as scheduled task later on). |
Finally, save your configuration.

|
When synchronizing your users, if a user is no longer found on the LDAP server, Bizagi will disable (but not delete) that user in its import. |
